Avast Cleanup Premium is an optimization tool that includes a range of scans and 1‑click maintenance features designed to detect unnecessary items and performance issues. These scans help free up disk space and improve your system's speed.
Scan your Windows device
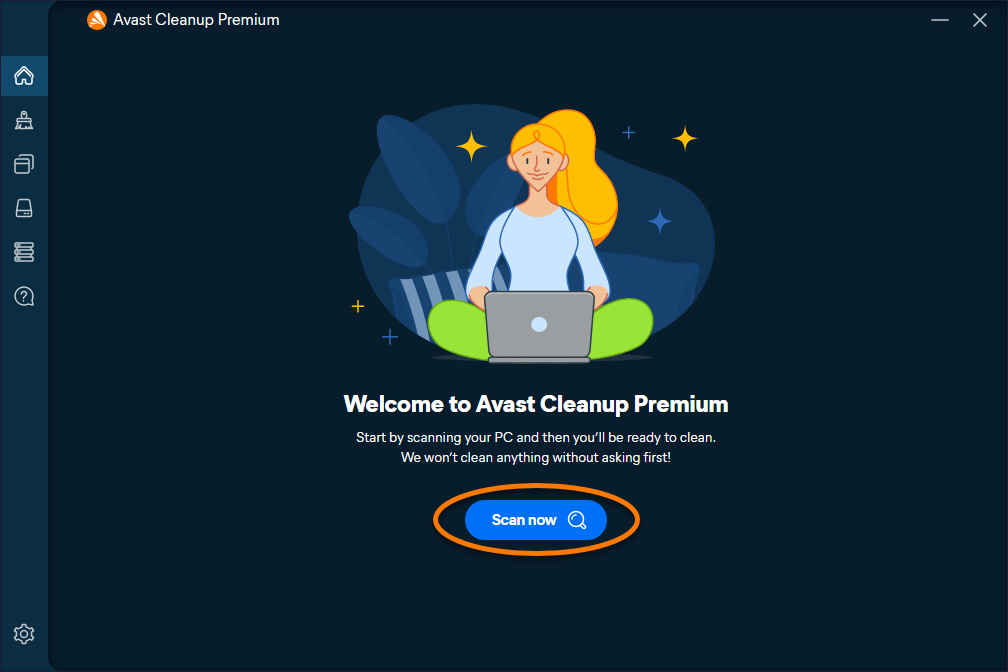
If you are using Avast Cleanup Premium for the first time, the application opens automatically after installation. Click Scan now to run a general scan.
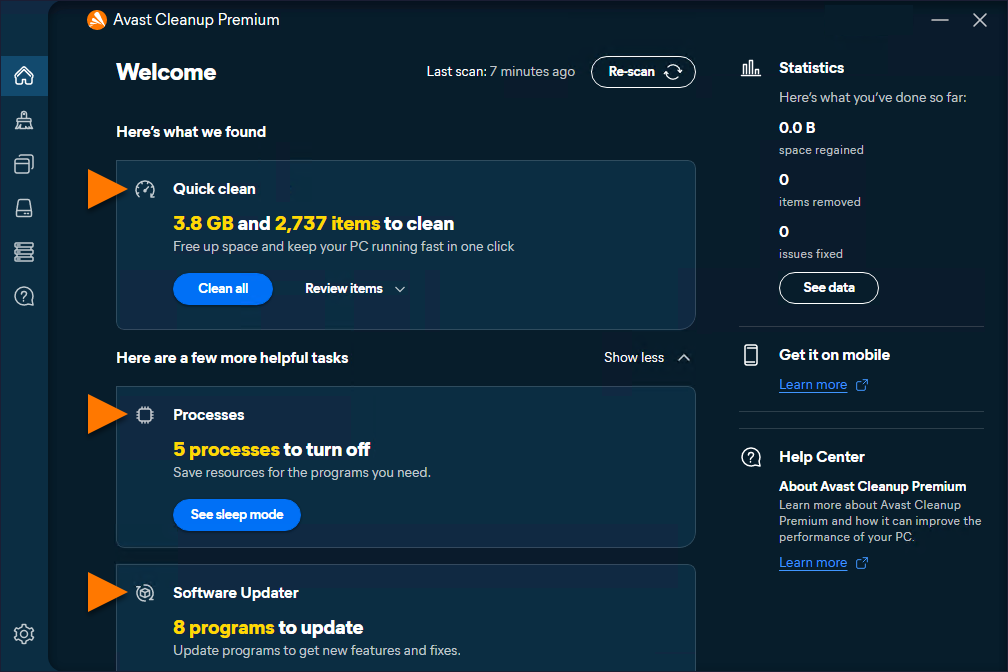
The scan results appear on the main dashboard. When the scan is complete, follow the instructions for each found issue.
- The Quick Clean card groups key maintenance features (cleaning system junk, browser data, broken registry keys, and broken shortcuts), allowing you to remove the most common junk items in one click.
- Additional optimization options are also available (such as app management and disk optimization).
Free up disk space
Avast Cleanup Premium scans your Windows device for unnecessary data, such as browser data and system junk, and safely deletes it to free up disk space. Use the tools below to clean different types of data and optimize your device.
Disk Cleaner
To remove unnecessary files:
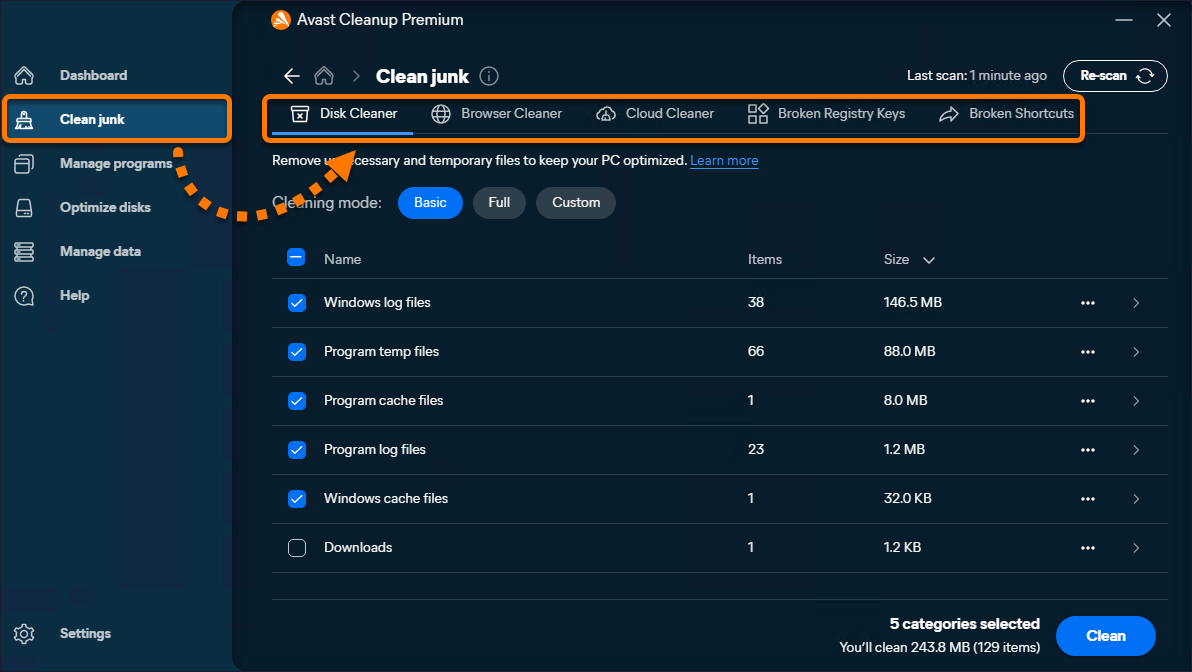
- Open Avast Cleanup, hover your cursor over the side menu, and select Clean Junk ▸ Disk Cleaner.
- Choose a cleaning mode (Basic, Full, or Custom), or manually select the items you want to remove.
Full mode deletes the contents of your Downloads folder, as well as logs, caches, backups, and recycle bin contents. You should always review the contents before using full mode.
- Optionally, for each item on the list, click
•••(three dots) ▸ Ignore to move it to the Ignored list or click the arrow to view more details. - Click Clean to remove the selected files.

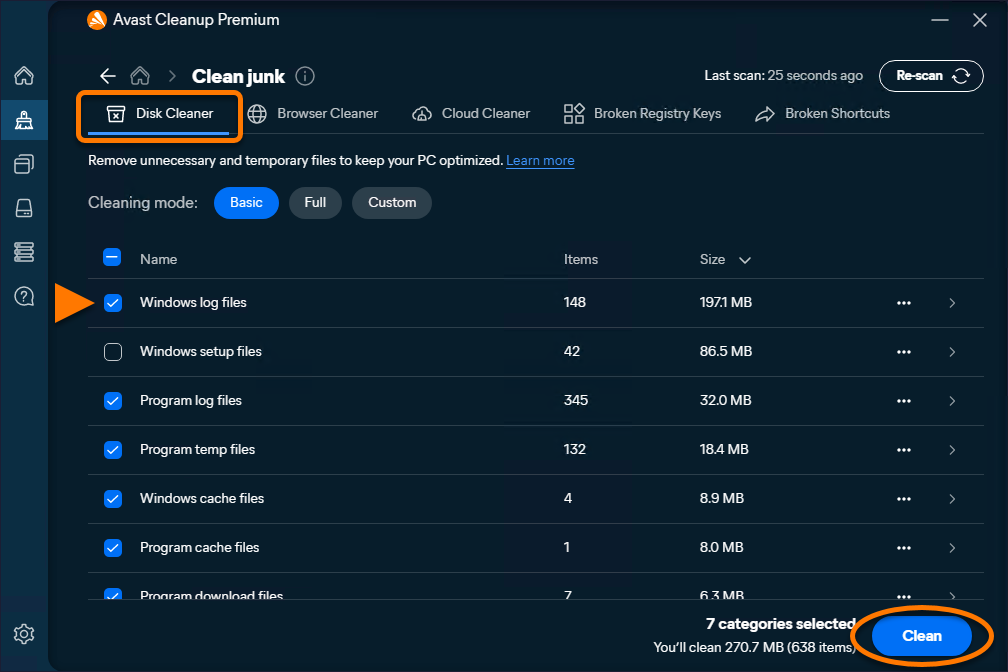
The selected files are removed, freeing up disk space on your device.
Browser Cleaner
To clean your browsers:
- Open Avast Cleanup, hover your cursor over the side menu, and select Clean Junk ▸ Browser Cleaner.
- Choose a cleaning mode (Basic, Full, or Custom) or manually select the browsers you want to clean.
Full mode deletes autofill data saved in your selected browsers.
- Optionally, for each browser on the list, click
•••(three dots) ▸ Ignore to move it to the Ignored list or click the down arrow to choose which items to clean (browsing history, cache, cookies, and so on). - Click Clean to remove the selected data.
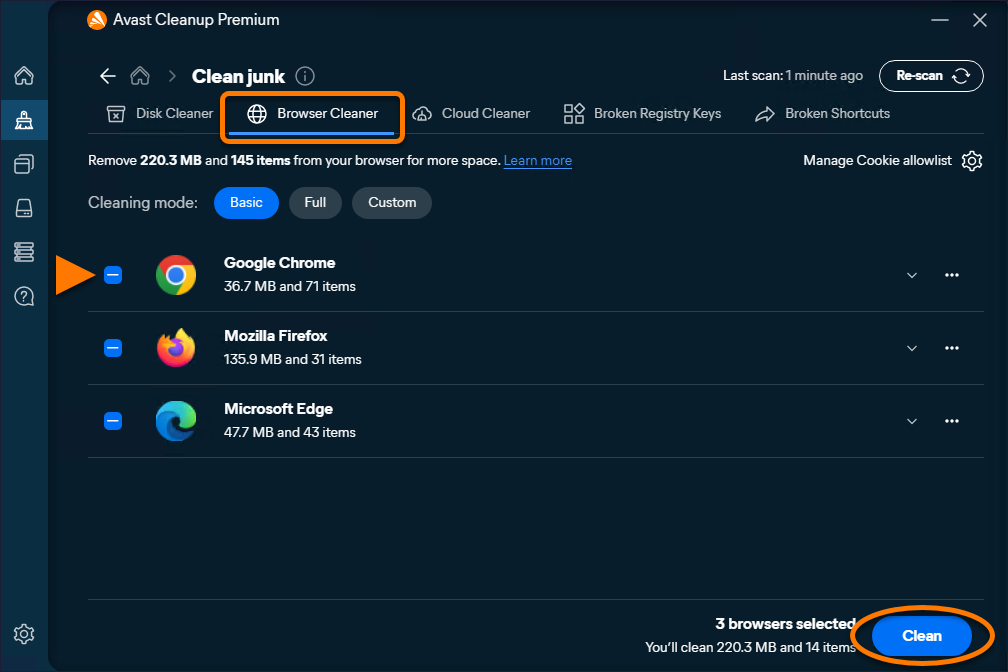
Selected browser data is removed, helping free up space and improve privacy.
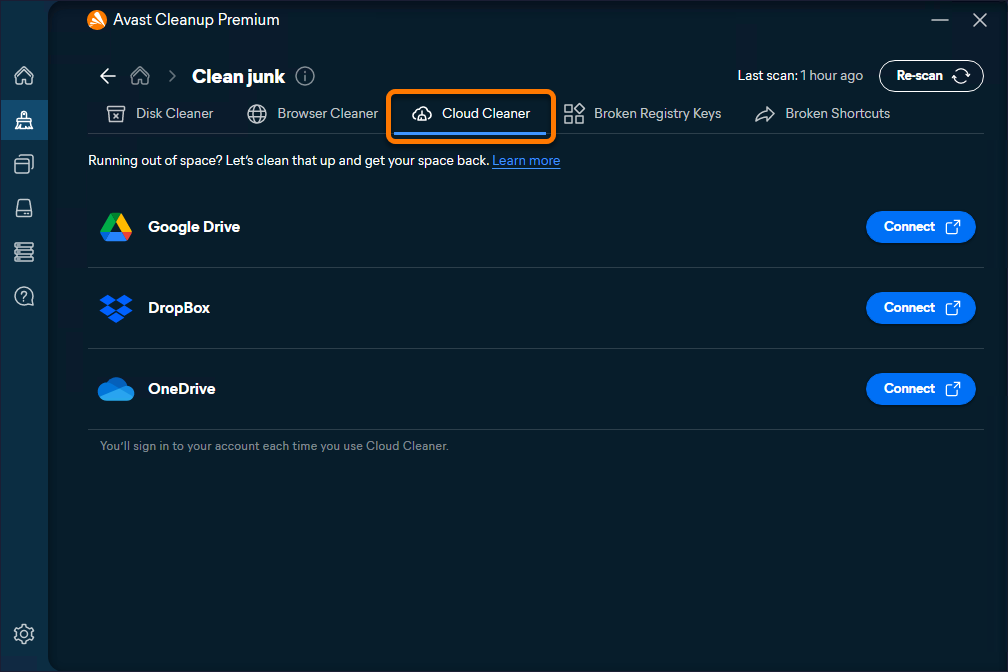
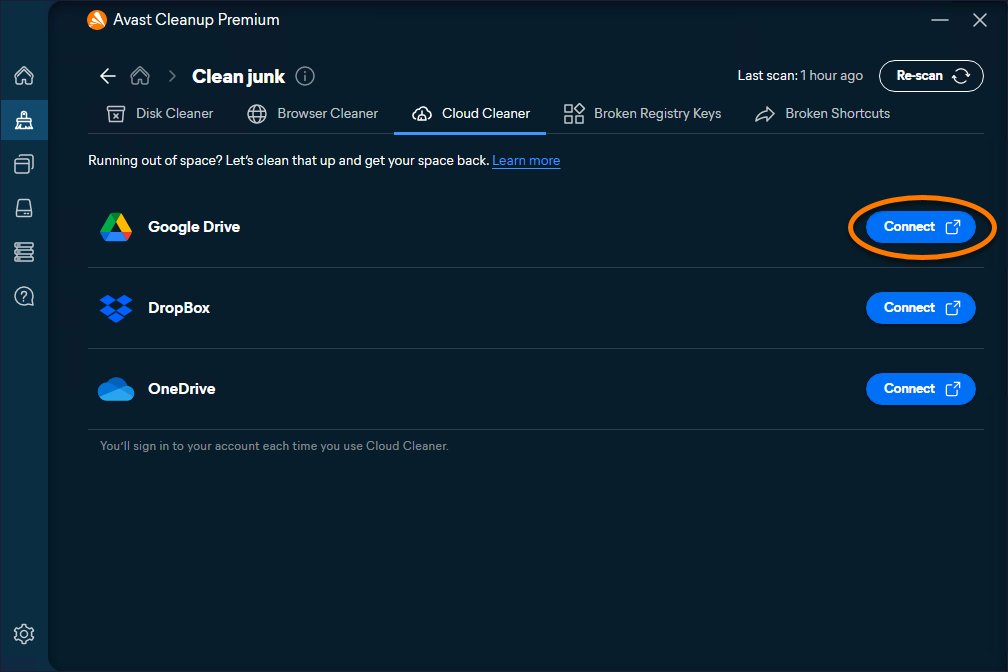
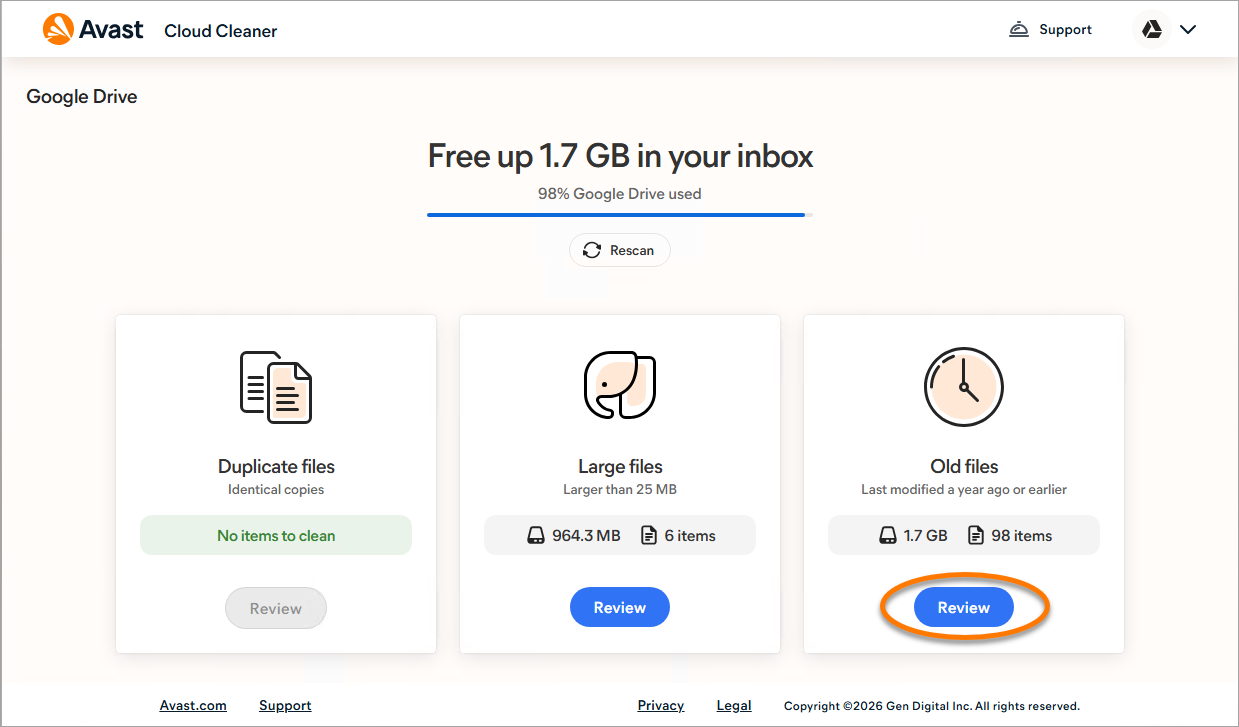
Free up space in Cloud Storage
Cloud Cleaner helps free up space in your online storage by identifying and removing duplicate, large, and old files.
- Open Avast Cleanup, hover your cursor over the side menu and select Cleanup Premium ▸ Cloud Cleaner.
- Click Connect next to the relevant cloud storage service, then follow the on-screen instructions to sign in to the selected account.
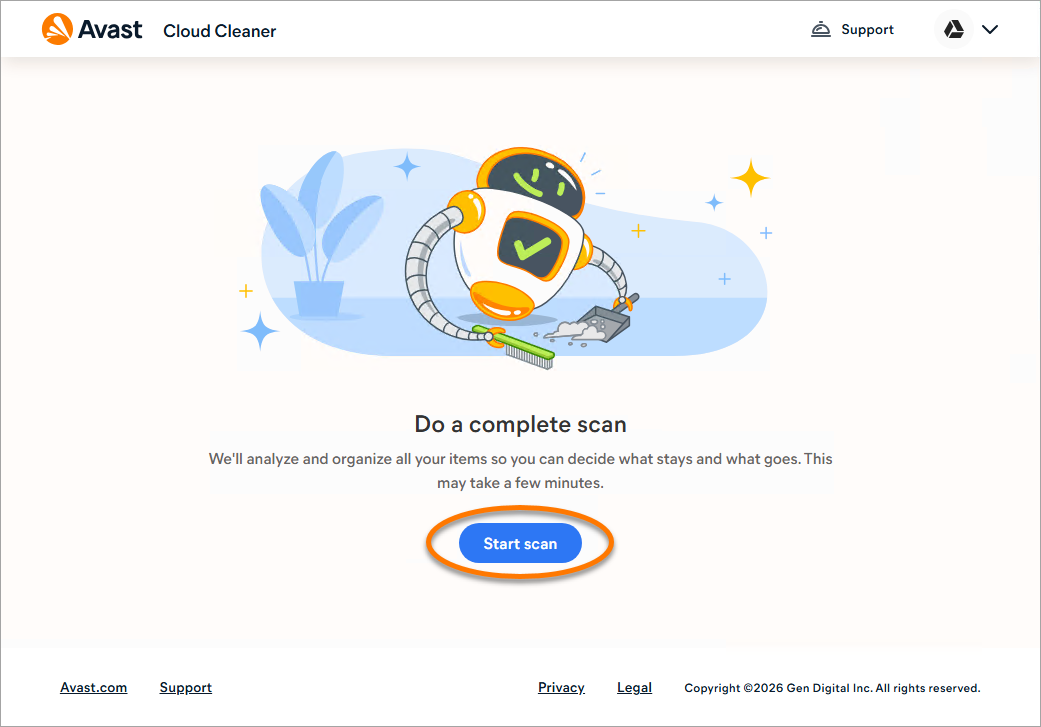
- Once you are signed in, click Start scan to analyze your cloud storage.
- Click Review under the chosen category.
- Select the items you wish to delete, then click Remove.
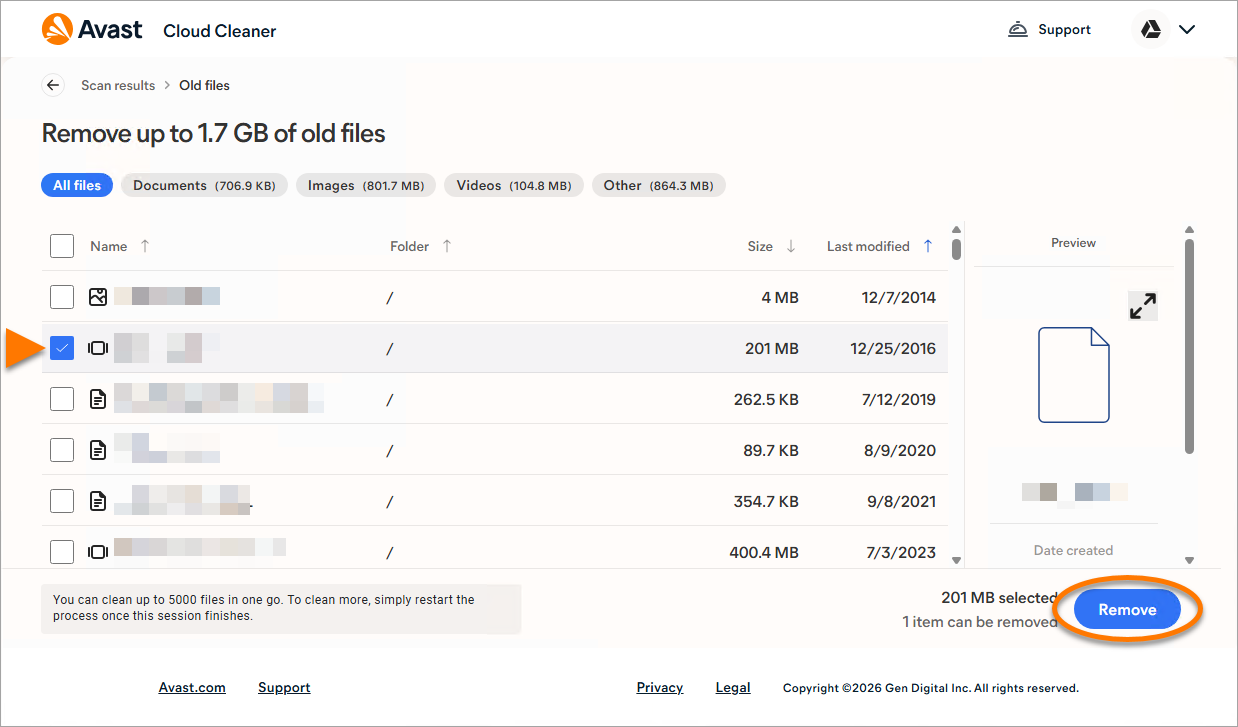
The selected files are removed from your cloud storage.
Broken Registry Keys
To clean the Windows registry:
- Open Avast Cleanup, hover your cursor over the side menu, and select Clean Junk ▸ Broken Registry Keys.
- Choose a cleaning mode (Basic, Full, or Custom) or manually select the entries you want to fix.
- Optionally, for each item on the list, click
•••(three dots) ▸ Ignore to move it to the Ignored list or click the arrow to view more details. - Click Clean to remove the selected registry entries.
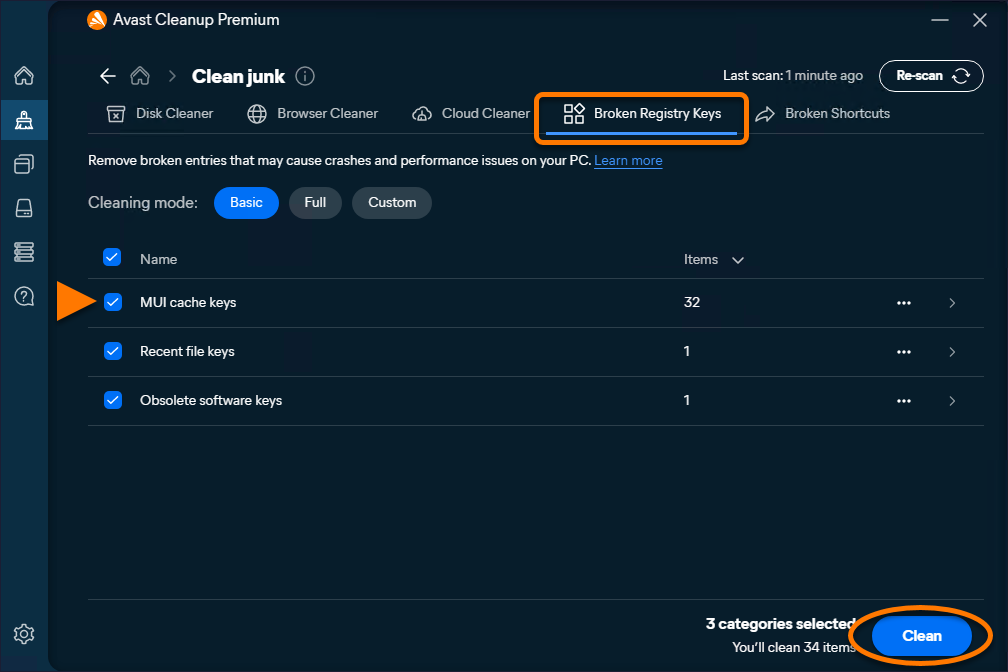
The selected registry issues are removed, which may help improve system stability.
Broken Shortcuts
To remove broken shortcuts:
- Open Avast Cleanup, hover your cursor over the side menu, and select Clean Junk ▸ Broken Shortcuts.
- Choose a cleaning mode (Basic, Full, or Custom) or manually select the shortcuts you want to remove.
- Optionally, for each item on the list, click the arrow to view its full path.
- Click Clean to remove the selected shortcuts.
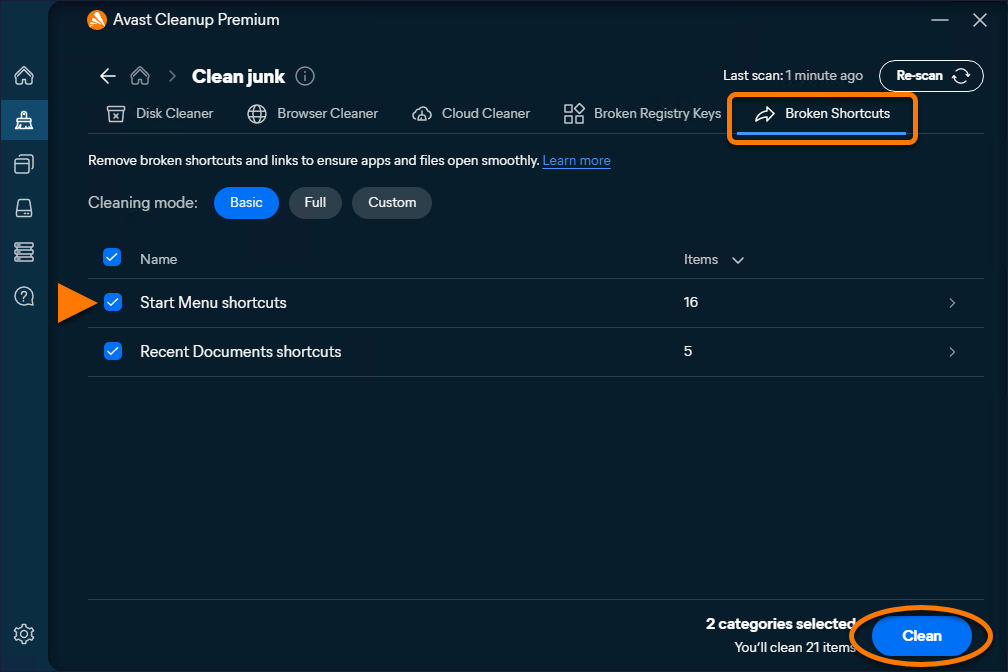
The selected broken shortcuts are removed from your system.
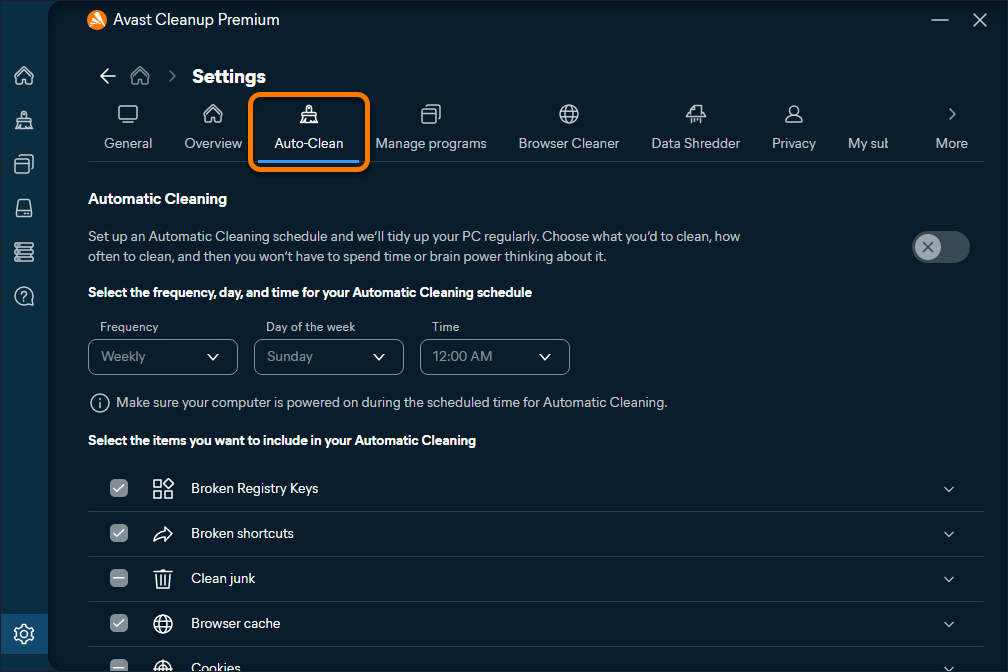
Enable Auto-Clean
Auto-Clean runs silently in the background with no actions required from you and frees up space on your Windows device by removing dispensable items, such as broken shortcuts and registry items.
To enable Auto-Clean:
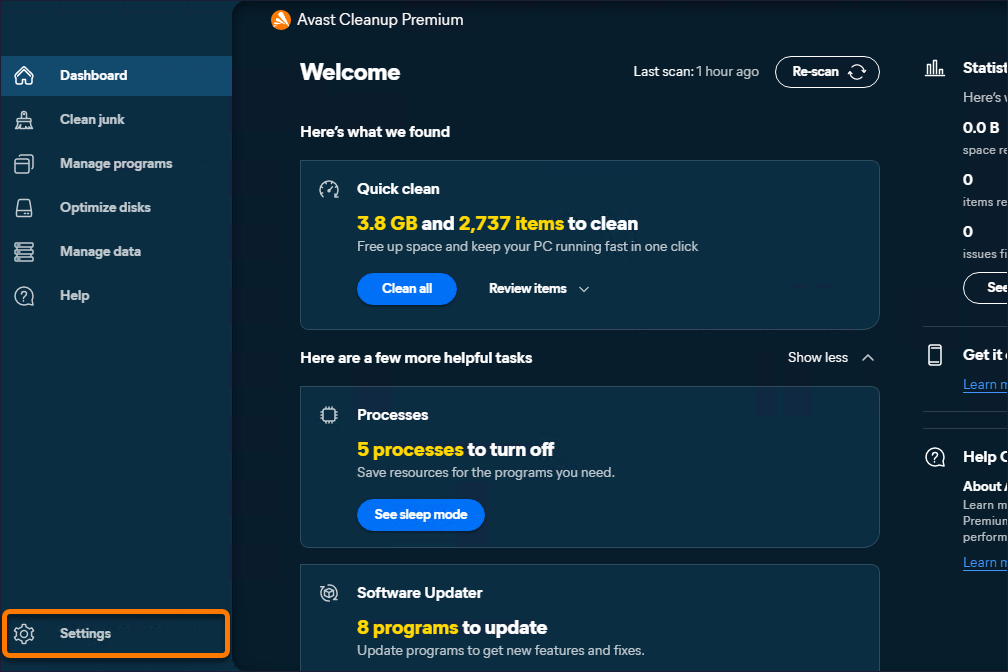
- Open Avast Cleanup Premium, hover your cursor over the side menu, and click Settings.
- Select the Auto-Clean tab.
- Click the gray (OFF) slider so that it changes to green (ON).
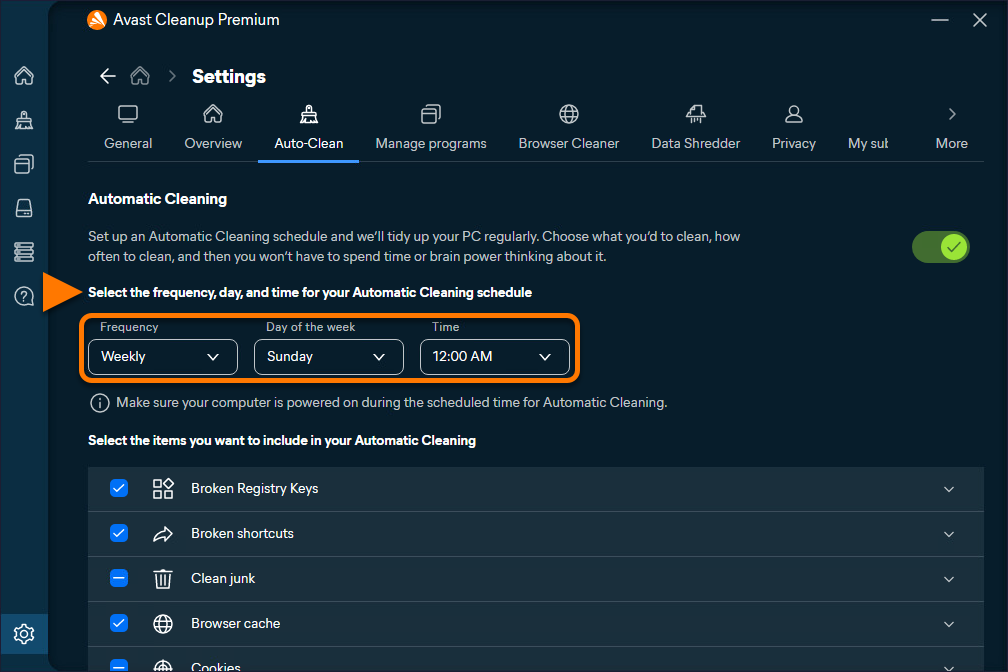
- Optionally, use the menu to specify the frequency of scans.
- Optionally, select the file types you want Avast Cleanup Premium to remove during automatic cleaning. The file types that Avast ticks automatically are safe to clean without losing crucial data.
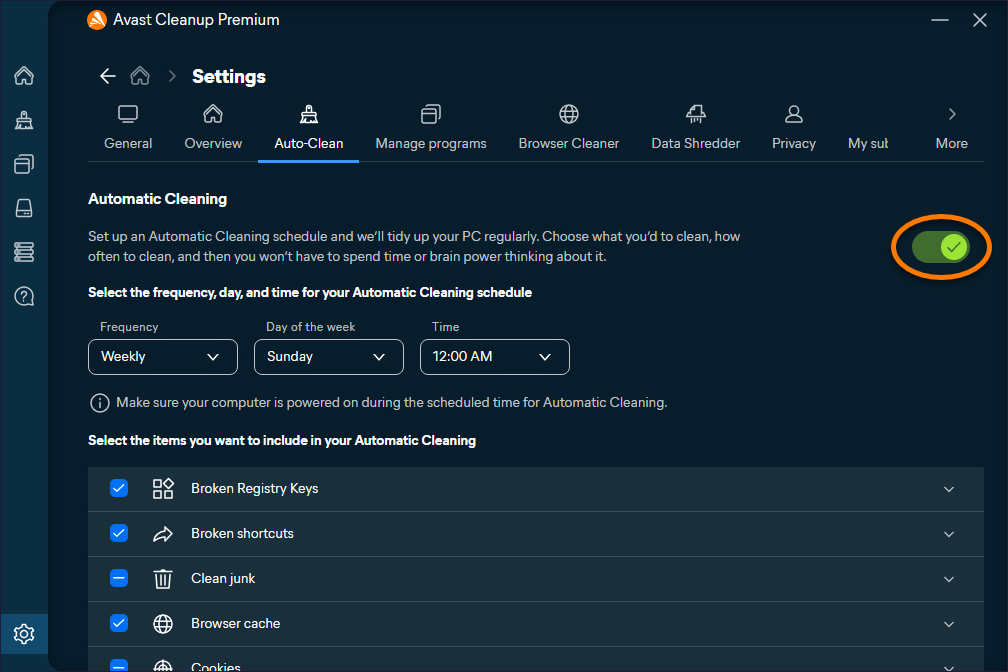
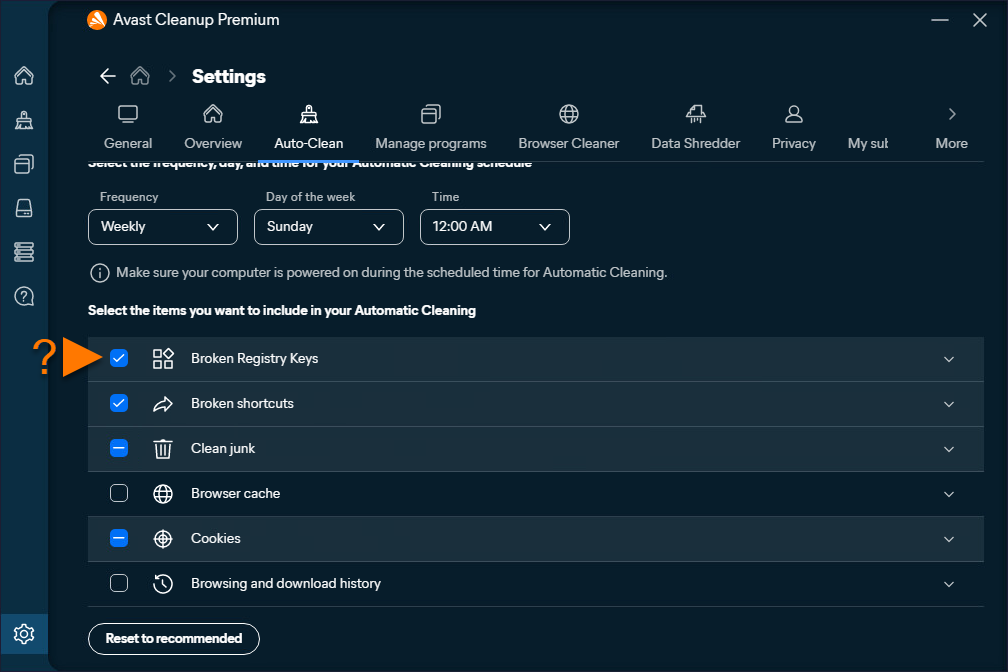
Auto-Clean is now enabled.
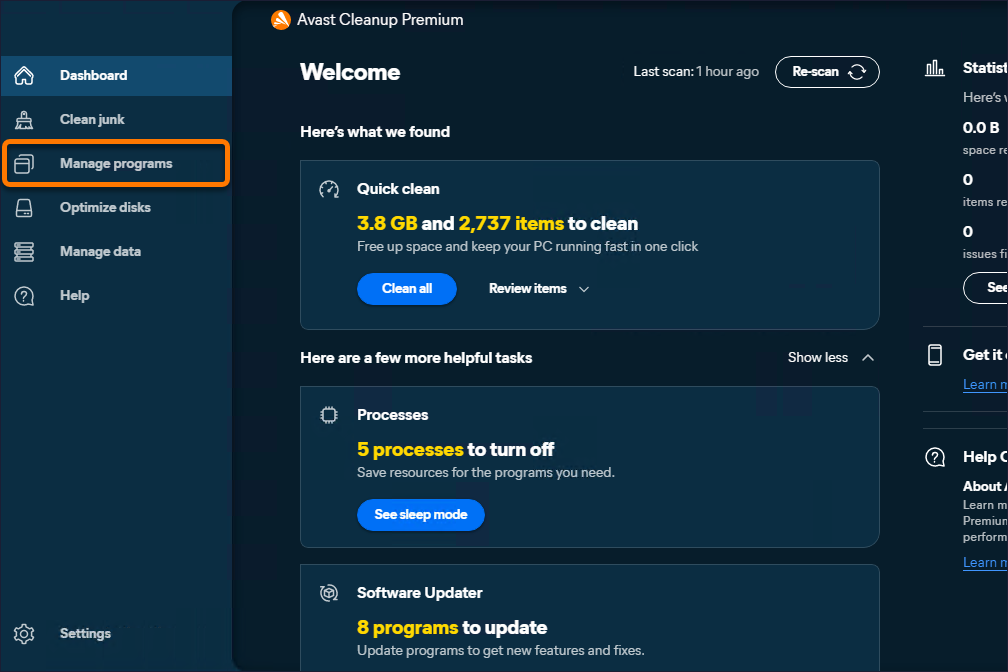
Manage applications
Avast Cleanup Premium scans your Windows device for outdated or unused applications, then allows you to easily update, sleep, or uninstall them. This helps ensure that your applications are running optimally and frees up resources on your Windows device.
Update applications
- Open Avast Cleanup Premium, hover your cursor over the side menu, and click Manage programs.
- In the Software Updater tab, find the application you want to update, and click Update.
If you have not run a scan before, you cannot choose the updater tab. In the top-right corner, click Scan programs to run your first scan.

The application is now updated.
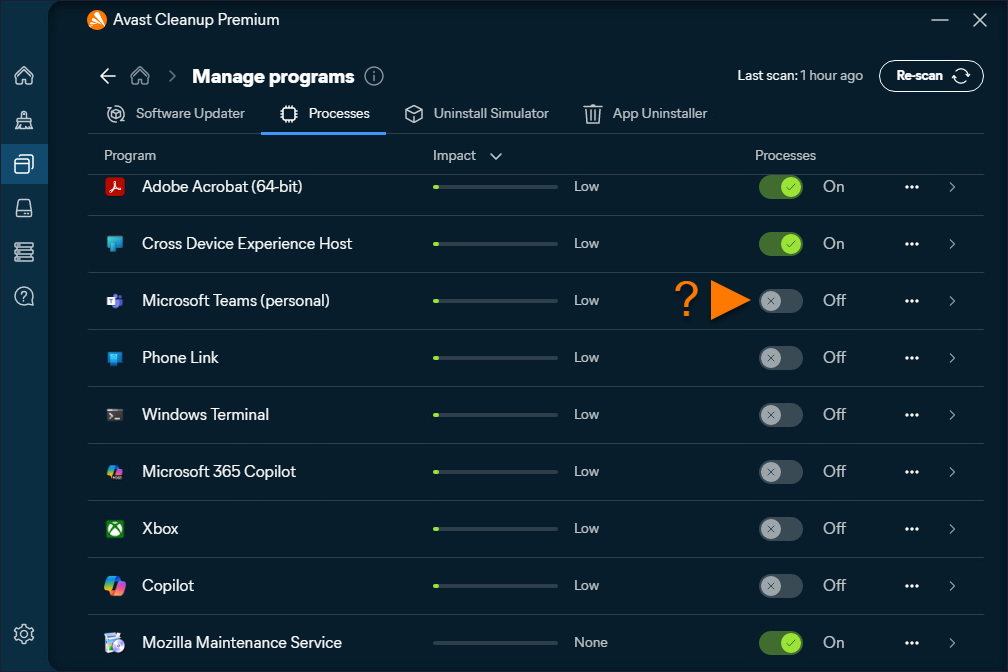
Put applications to sleep
Certain applications slow down your system by running silently in the background. Avast Cleanup Premium scans for these applications, then allows you to safely put them to sleep and boost performance.
- Open Avast Cleanup Premium, hover your cursor over the side menu, and click Manage programs.
- Select the Processes tab. The Processes screen shows applications that are running unnecessarily in the background and slowing down your Windows device. To put an application to sleep, click the green (ON) slider next to an application, so that it changes to gray (OFF).
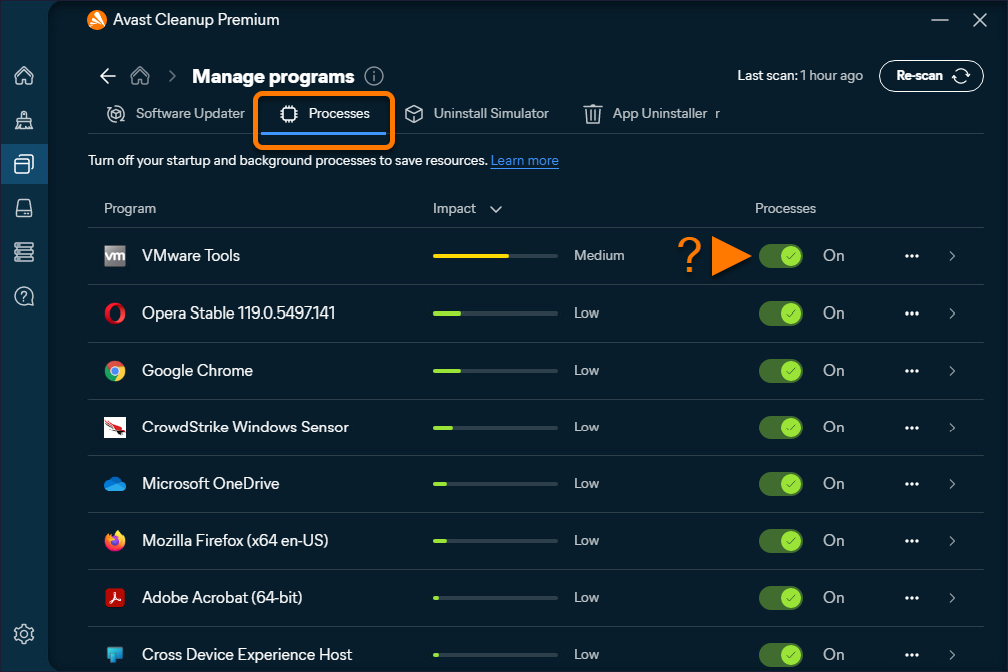
The selected applications are now sleeping. You can open and use sleeping applications as normal. After you close the application, Avast Cleanup Premium automatically returns its status to sleeping.
To turn on a sleeping application, click the gray (OFF) slider next to an application so that it changes to green (ON).
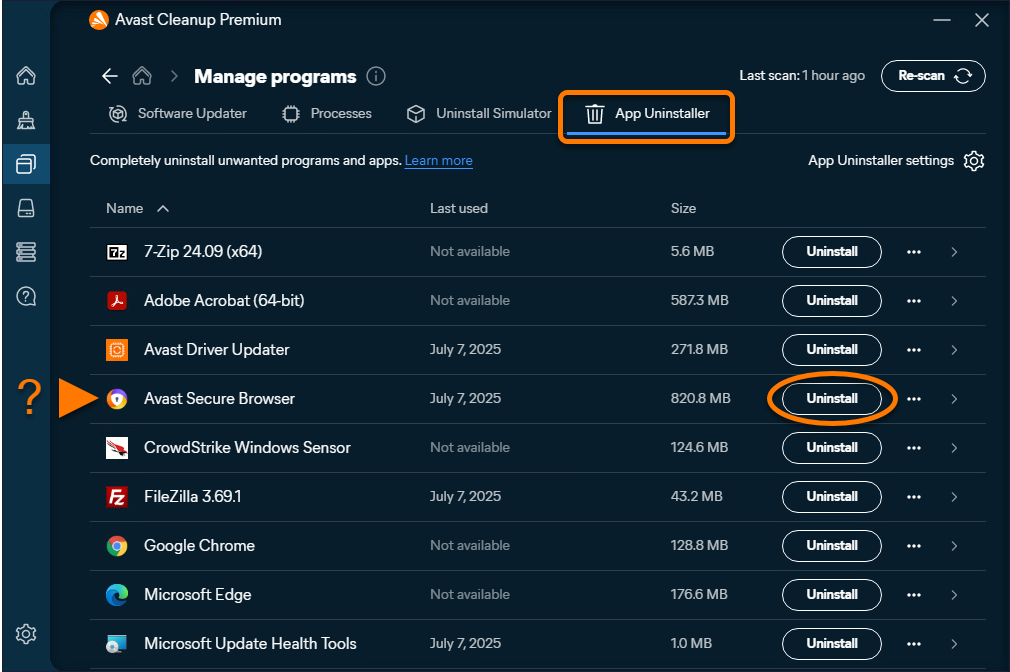
Uninstall unused applications
- Open Avast Cleanup Premium, hover your cursor over the side menu, and click Manage programs.
- In the App Uninstaller tab, find the application you want to uninstall, and click Uninstall.
- Select Uninstall to confirm the unistallation of the application.
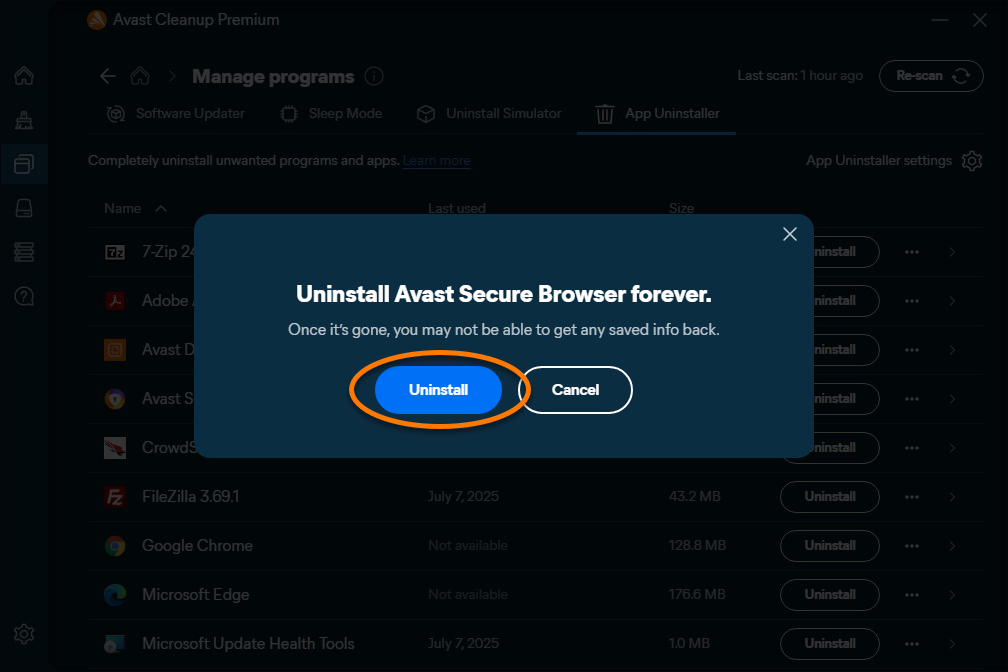
The application is now uninstalled.
Analyze your Windows device
Open Avast Cleanup Premium, hover your cursor over the side menu, and click Optimize disks, to check for a variety of problems that may impact the performance and security of your Windows device. Follow the instructions on the Optimize disks screen, to resolve the problems.
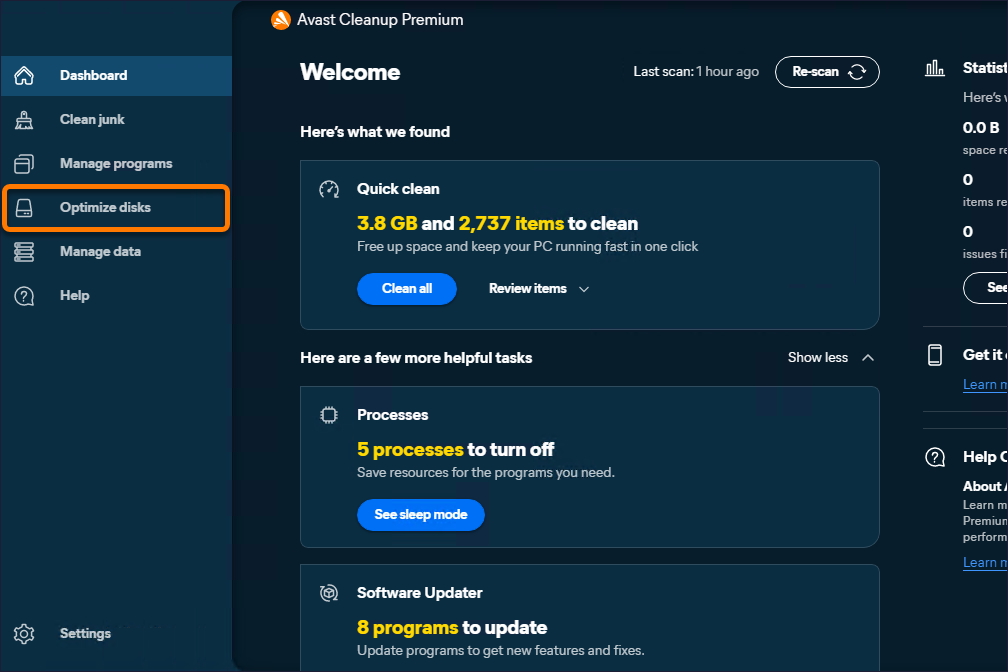
For more information about the issues that Avast Cleanup Premium may detect during an Optimize disks scan, refer to the following article:
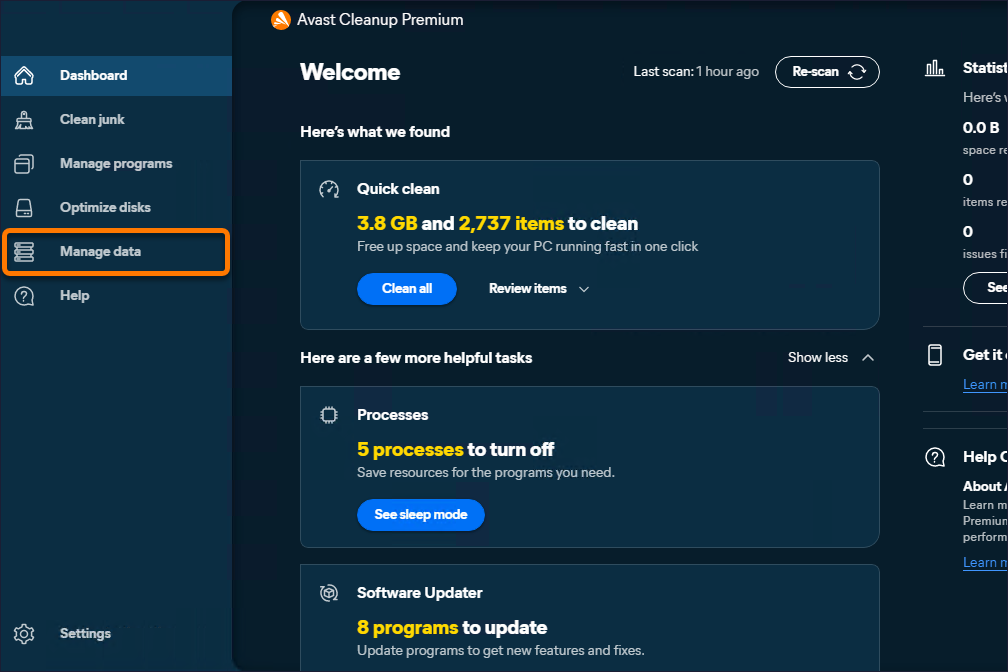
Manage your data
Avast Cleanup allows you to easily shred sensitive data, or recover data that is lost. This helps ensure your data is secure.
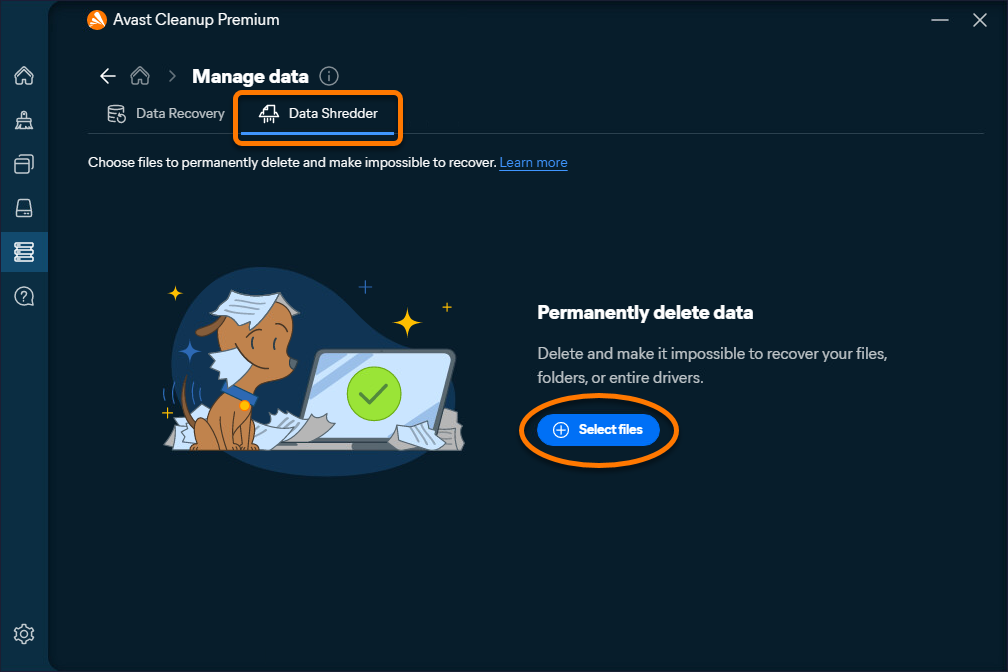
Shred your data
Data Shredder permanently deletes your files to free up space and increase security on your device. To shred your data:
- Open Avast Cleanup Premium, hover your cursor over the side menu, and click Manage data.
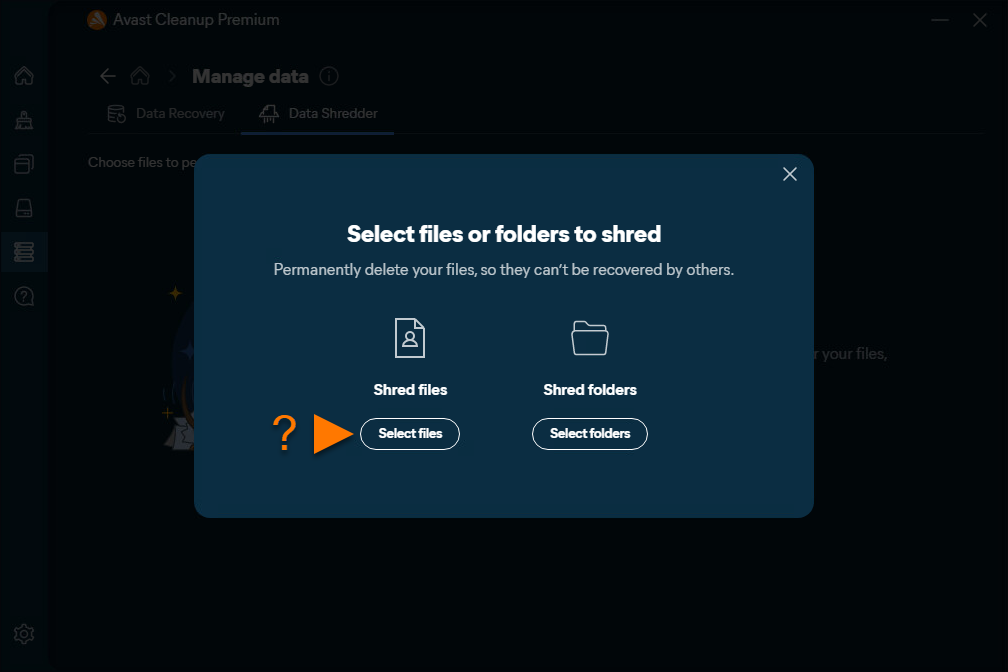
- In the Data Shredder tab, click Select files.
- Click Select files or Select folders, depending on what you want to shred.
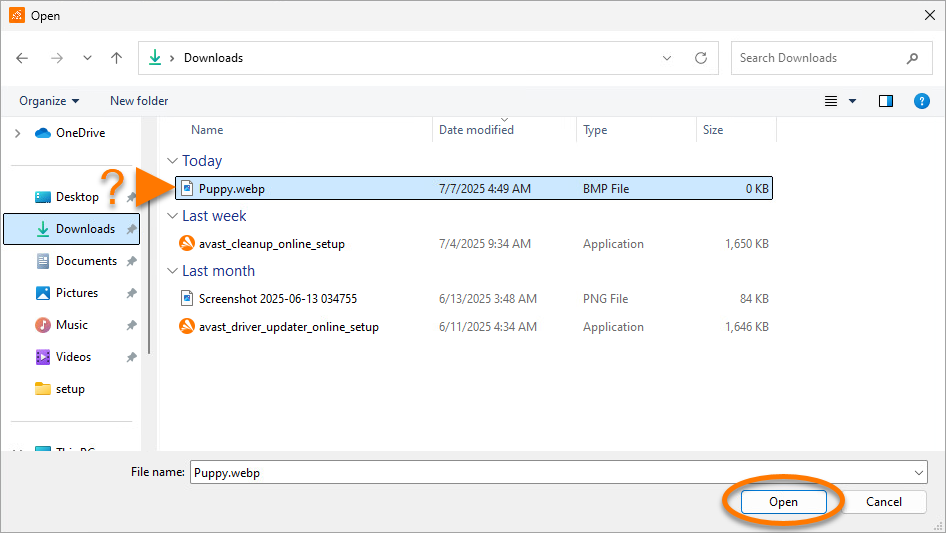
- Navigate to the file or folder you want to shred, select it, then click Open.
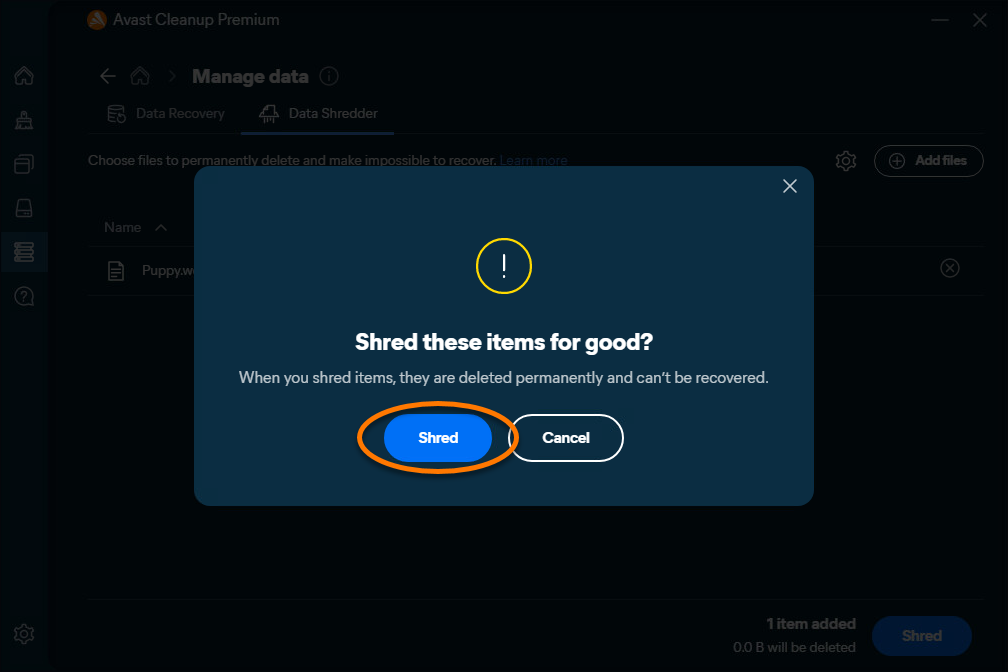
- In the relevant panel, click Shred to start shredding the file or folder.
- In the Shred these items for good? confirmation pop-up windows, click Shred.
To stop shredding the file or folder, in the relevant panel, click the
Xicon ▸ Cancel shredding.
- When the files are shredded, click Back to Dashboard or Shred more.


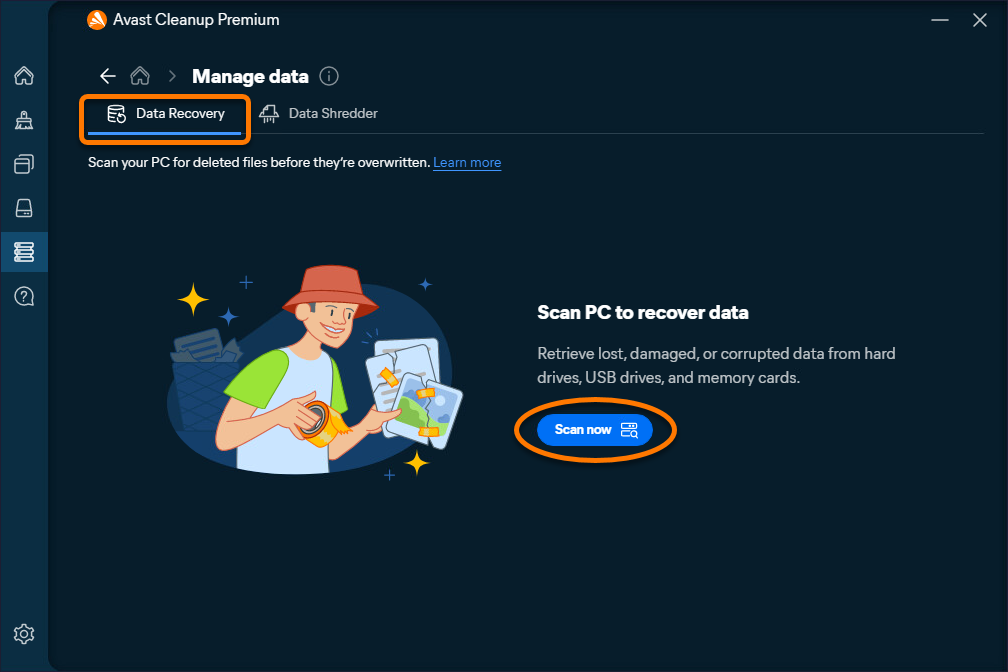
Recover your data
Data Recovery helps you to recover deleted files from hard drives and other storage devices. To recover files:
- Open Avast Cleanup Premium, hover your cursor over the side menu, and click Manage data.
- In the Data recovery tab, click Scan now.
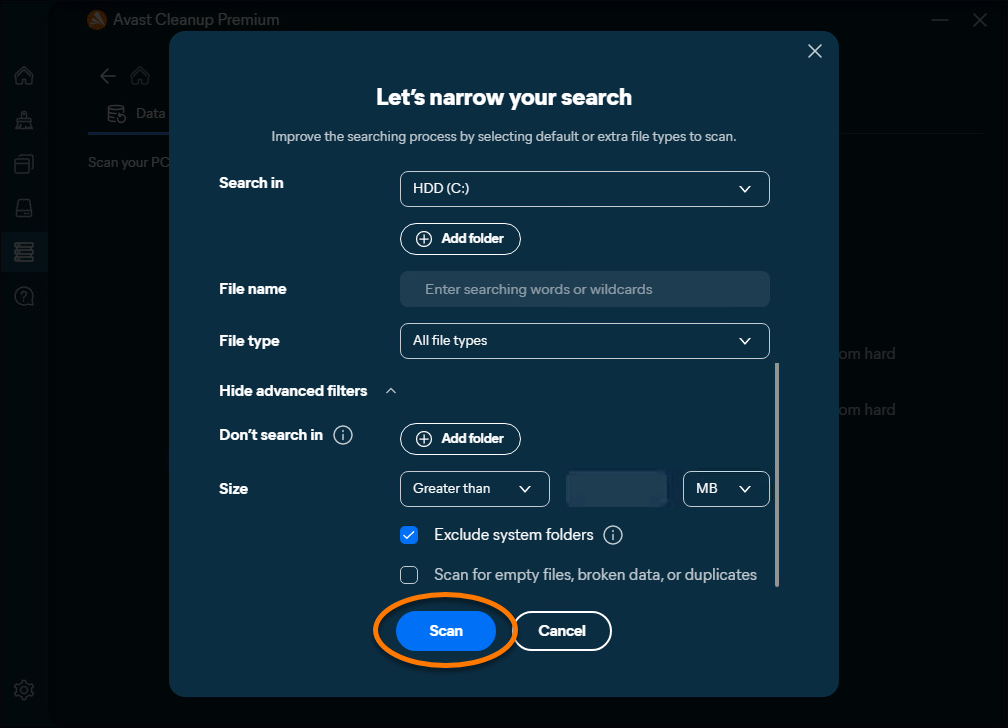
- Select the relevant options in each category to narrow down your search. Click the drop-down arrow beside Show advanced filters to add extra filters on your search.
Adding detailed filters can help you to find the desired items that you are looking for and help reduce the scan time.
- Click Scan.
The scan may take several minutes to complete.
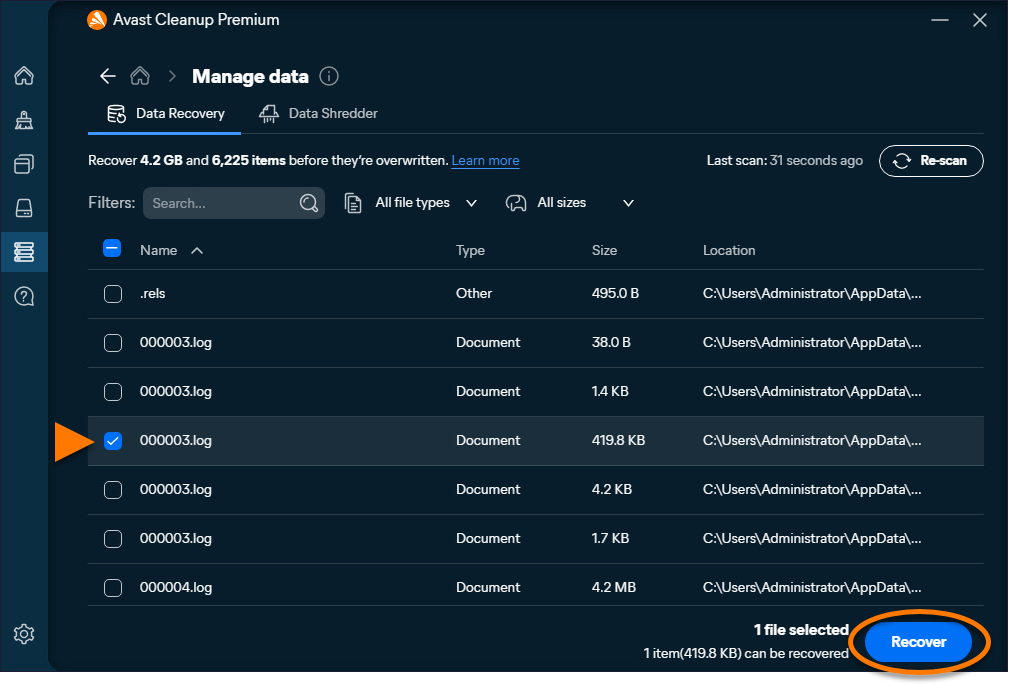
- Tick the boxes beside the files you want to recover, then click Recover.
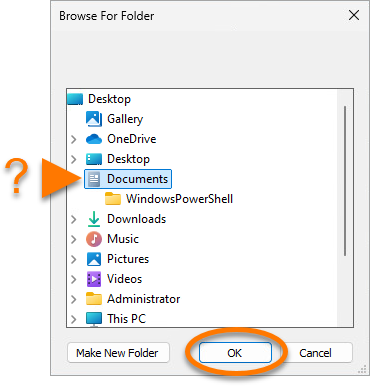
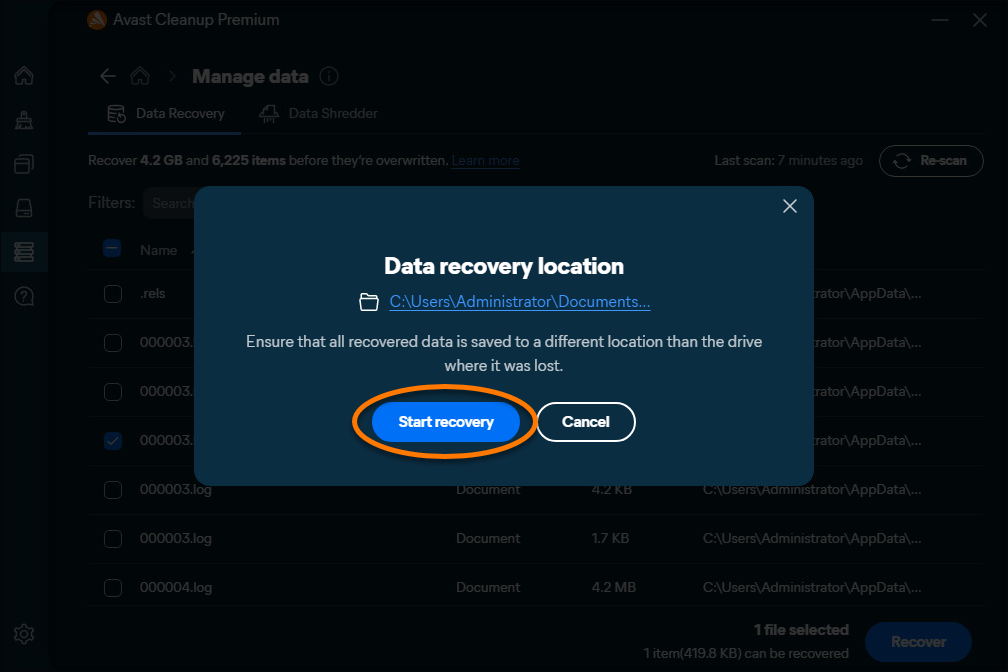
- Select a folder you want the files to be recovered to, and click OK.
We recommend choosing a different drive to increase your chances of successful data recovery. Data recovery to the same drive may end in the overwriting of recovered files and lead to the failure of the operation.
- Click Start recovery.
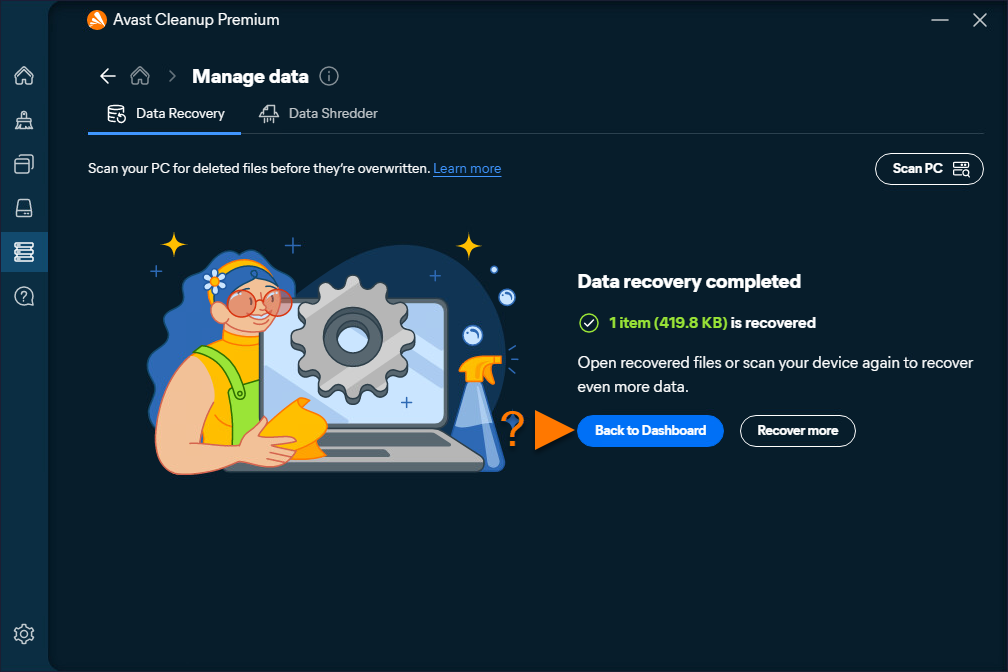
- When the files are recovered, click Back to Dashboard or Recover more.

Undo changes
Undo Center helps you to review and undo recent changes made by Avast Cleanup Premium:
- Open Avast Cleanup Premium, hover your cursor over the side menu and select Help.
- Select Undo Center, then click the drop-down arrow beside the date a backup was made.
- Click Undo next to changes you wish to reverse.
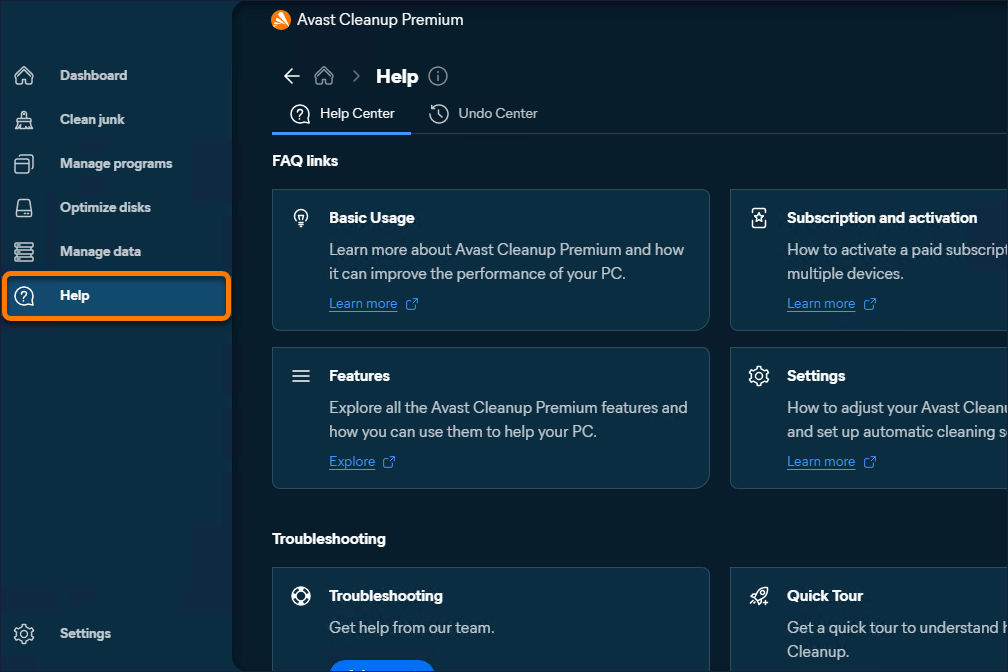

The changes are now reversed.
Further recommendations
To learn more about Avast Cleanup Premium, refer to the following article:
Avast Cleanup Premium is an optimization tool that includes a range of scans designed to detect unnecessary items and performance issues. These scans help free up disk space and improve your system's speed.
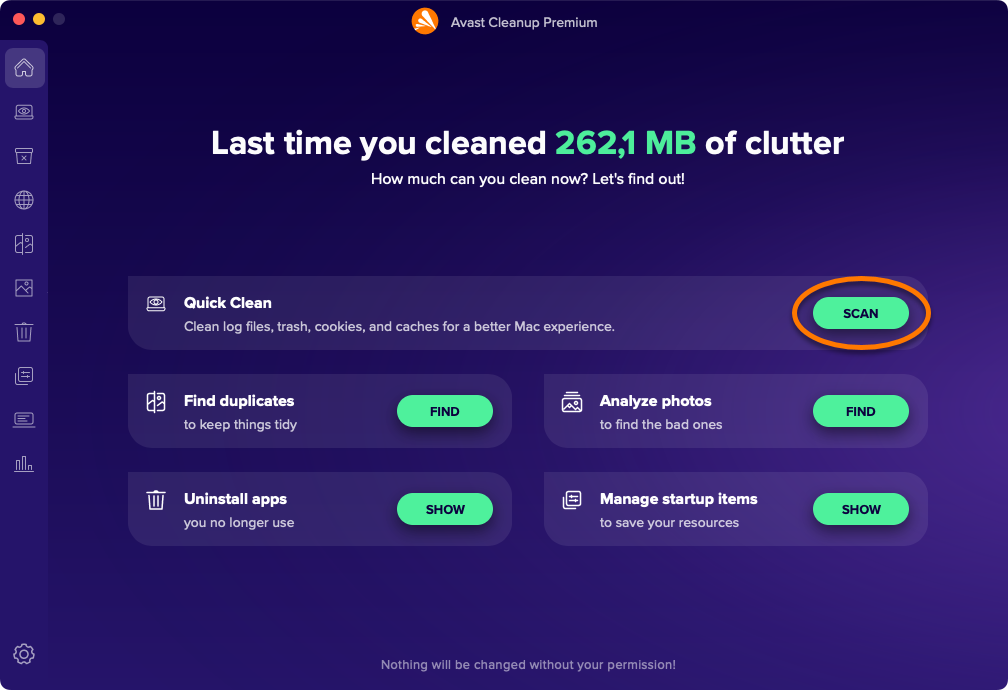
Run Quick Clean
Quick Clean scans your Mac for unnecessary files and allows you to select which files are deleted to clear disk space. Quick Clean also allows you to easily remove cookies and other browsing data from your web browsers.
To run a scan:
- Open Avast Cleanup Premium and click Scan in the Quick Clean panel.
- Tick the boxes next to the types of files you want to clean. Optionally, click the
varrow to expand a section and select the specific files you want to clean.
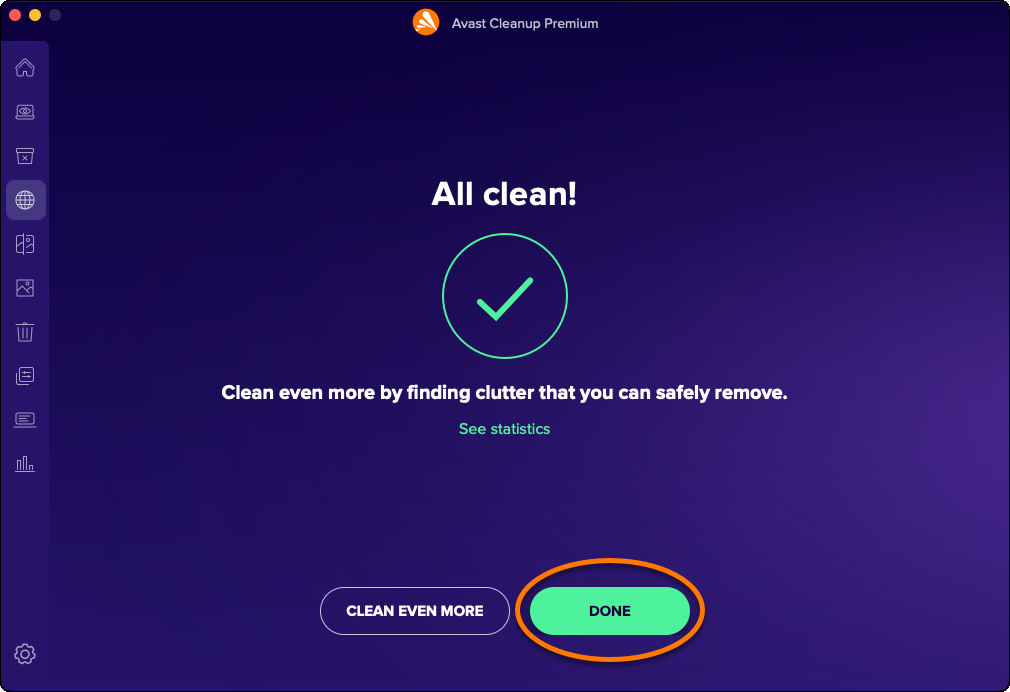
- Click Clean ▸ Done.
Clear disk space
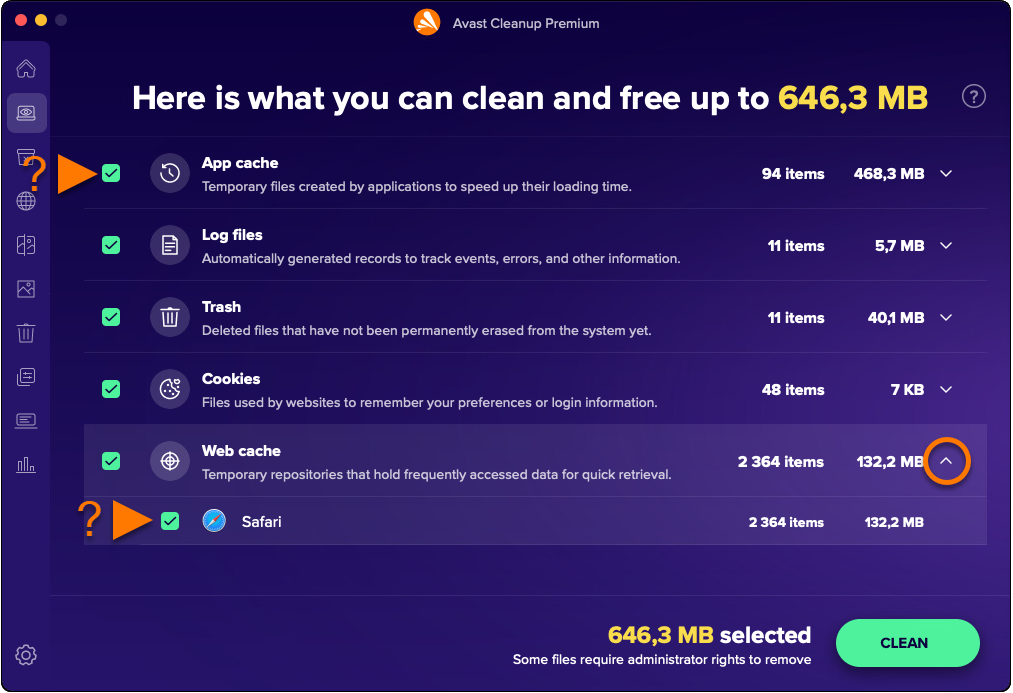
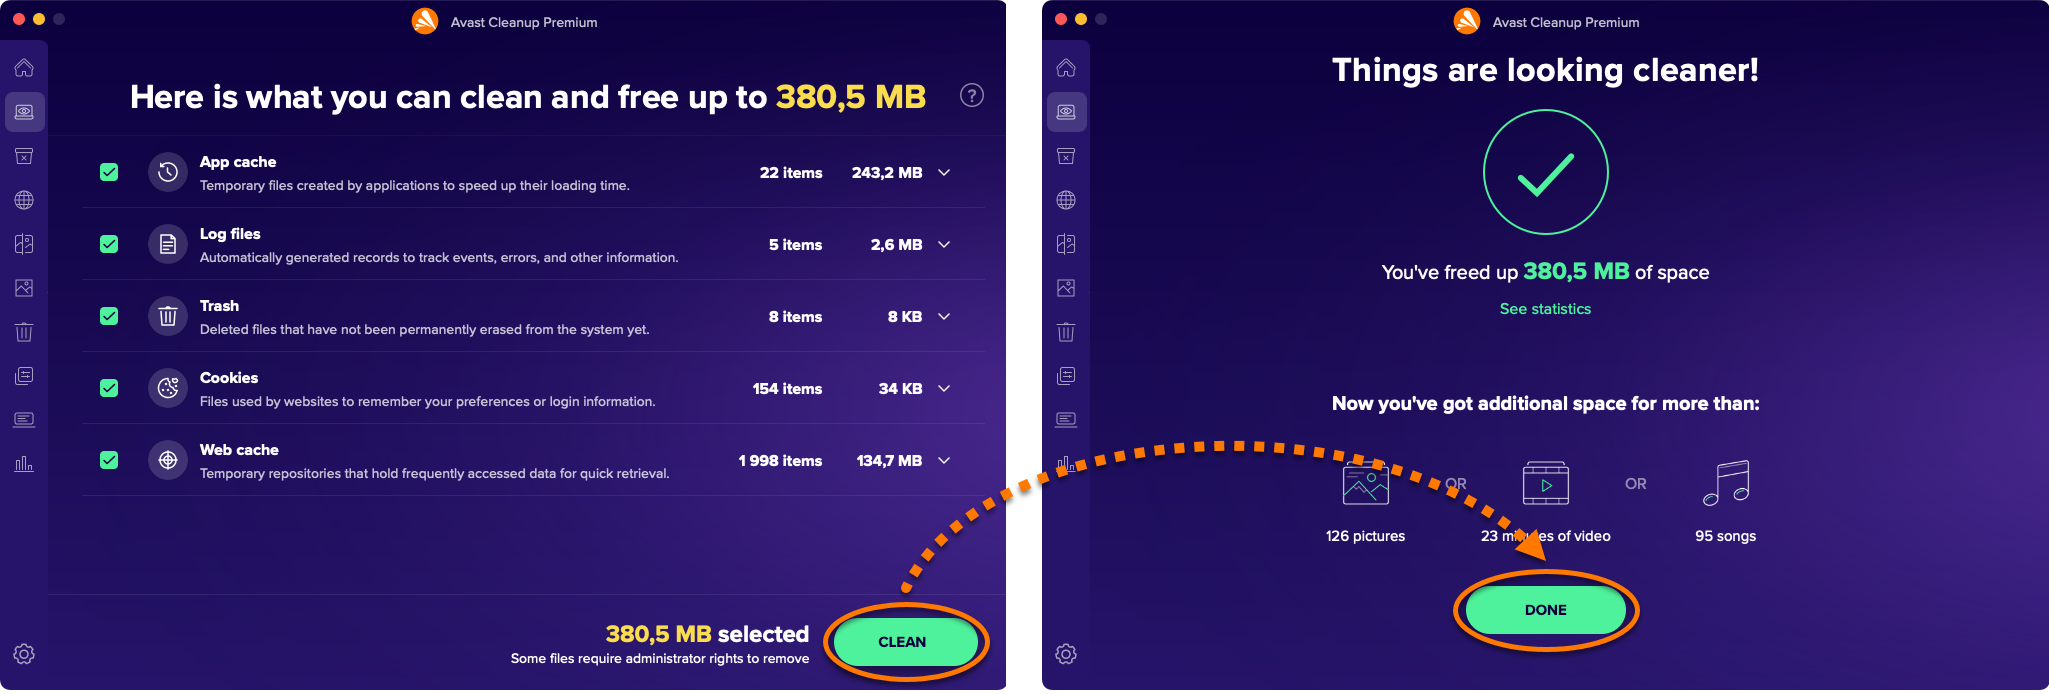
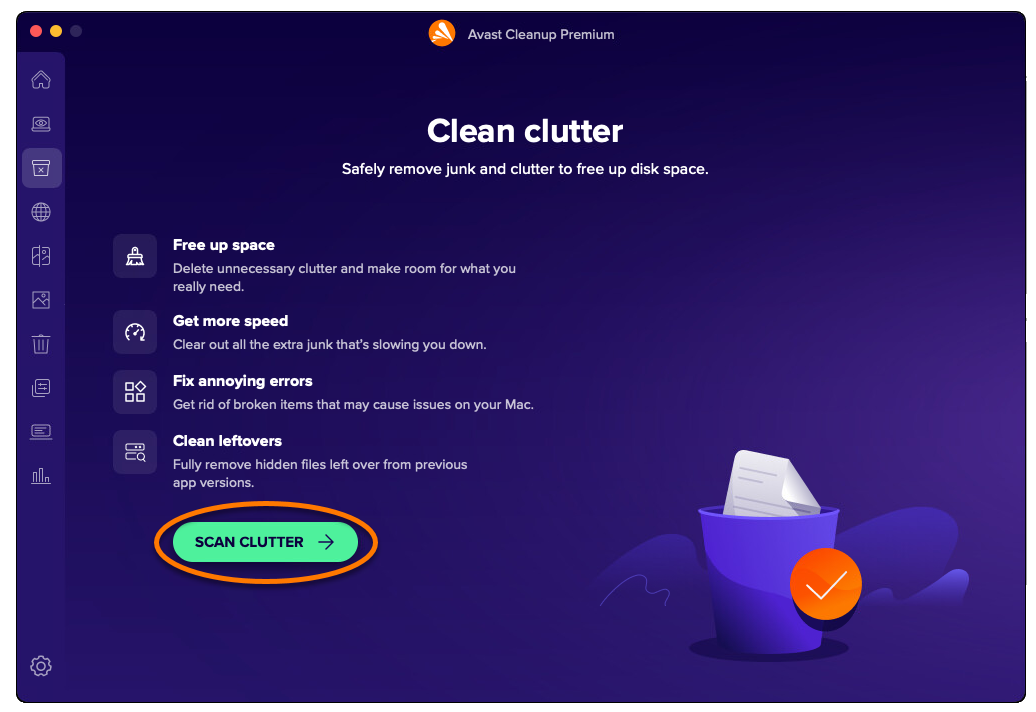
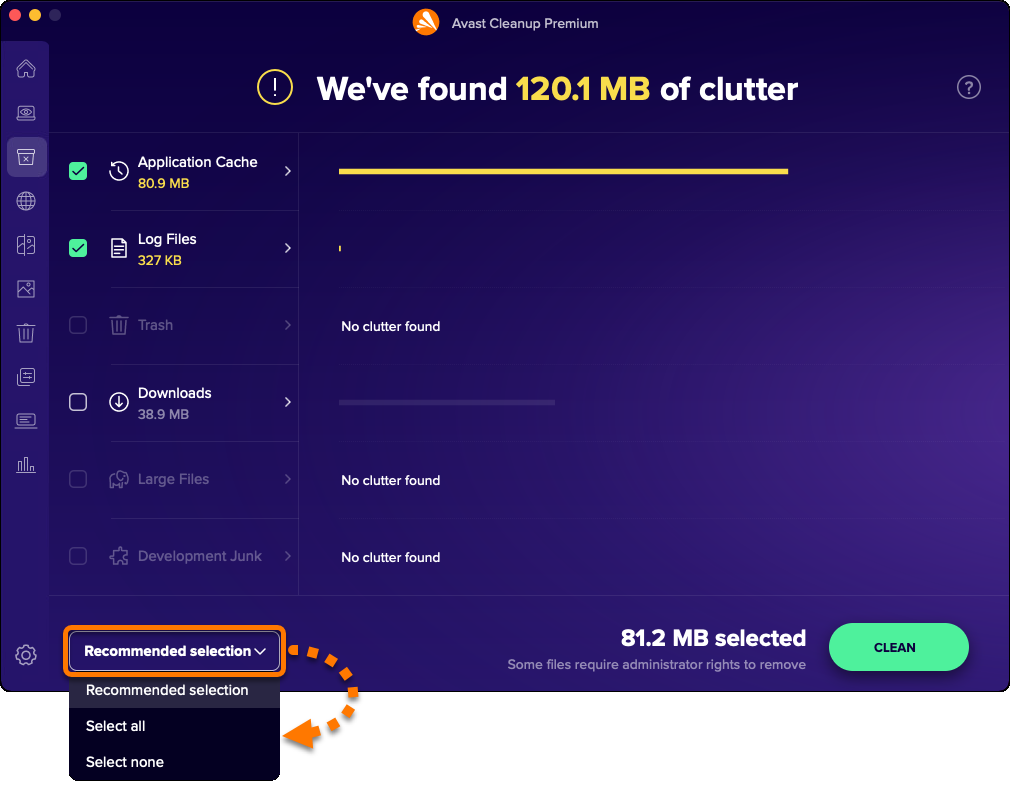
The Clean clutter option scans your Mac for unnecessary files and allows you to select which files are deleted to clear disk space. To run a scan and remove files:
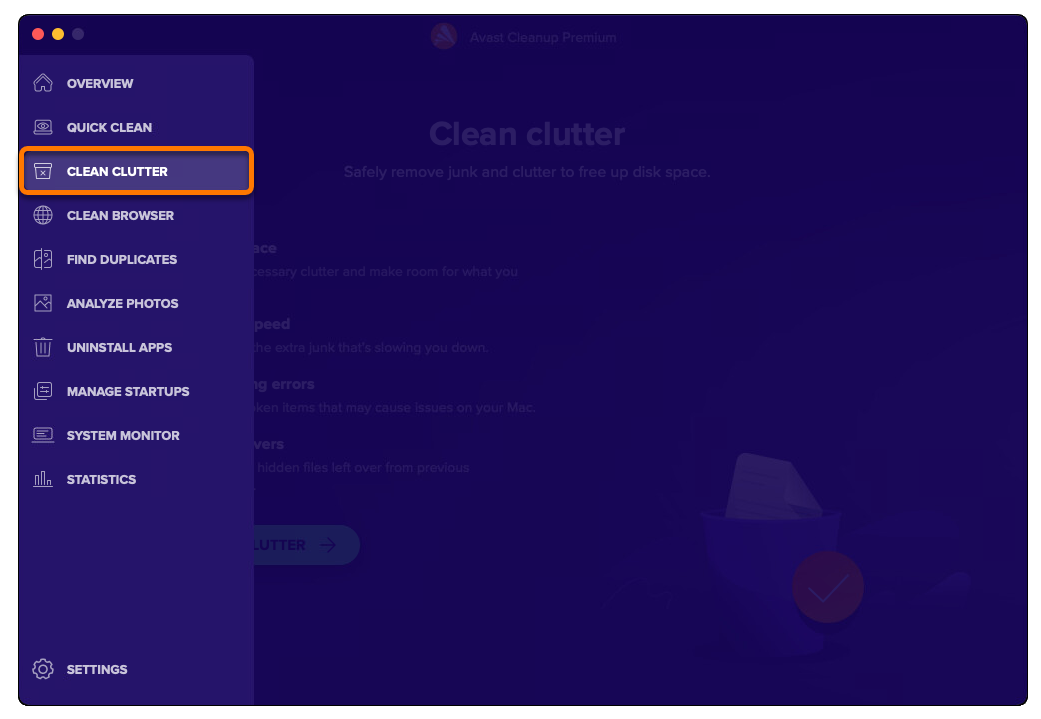
- Open Avast Cleanup Premium, hover your cursor over the side menu, and select Clean clutter.
- Click Scan clutter.
- Use the drop-down menu in the bottom-left corner to select file categories for removal. The following options are available:
- Recommended selection: Selects only file categories that you can safely clean without losing crucial data.
- Select all: Selects all listed file categories. You can then manually deselect any file categories you do not want to clean.
- Select none: Deselects all listed file categories. You can then manually select the file categories you want to clean.
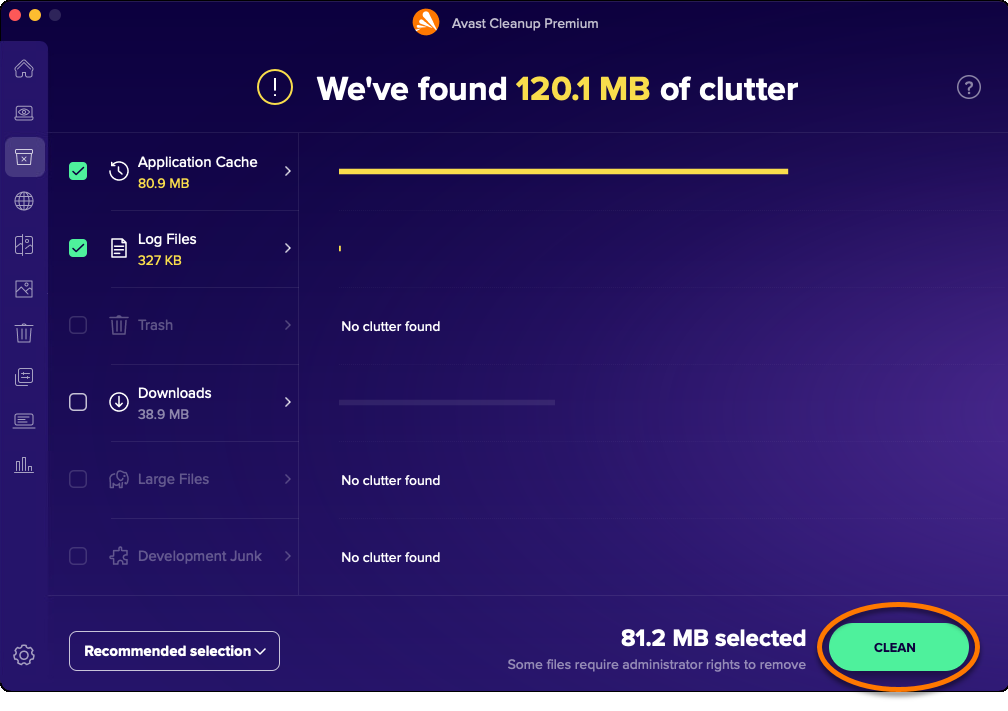
- After selecting the files you want to remove, click Clean.
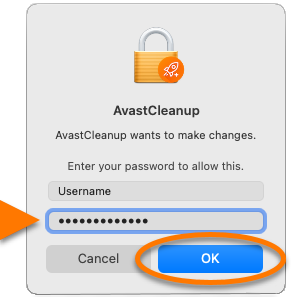
- If prompted, enter the password that you use when you start your Mac, and click OK.
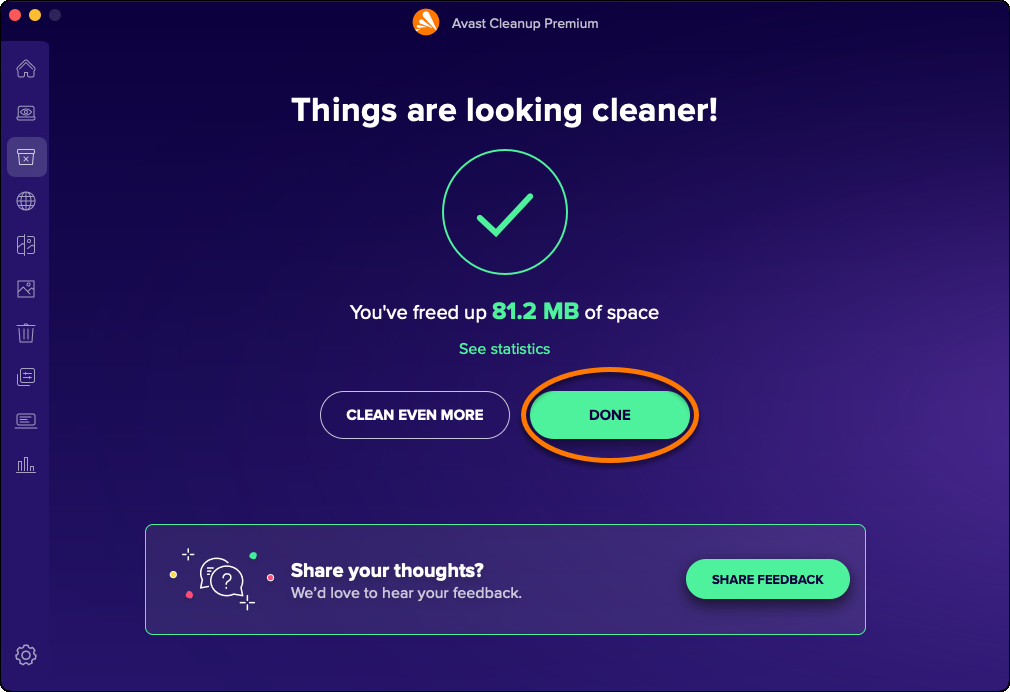
- Click Done to return to the main Avast Cleanup Premium screen.
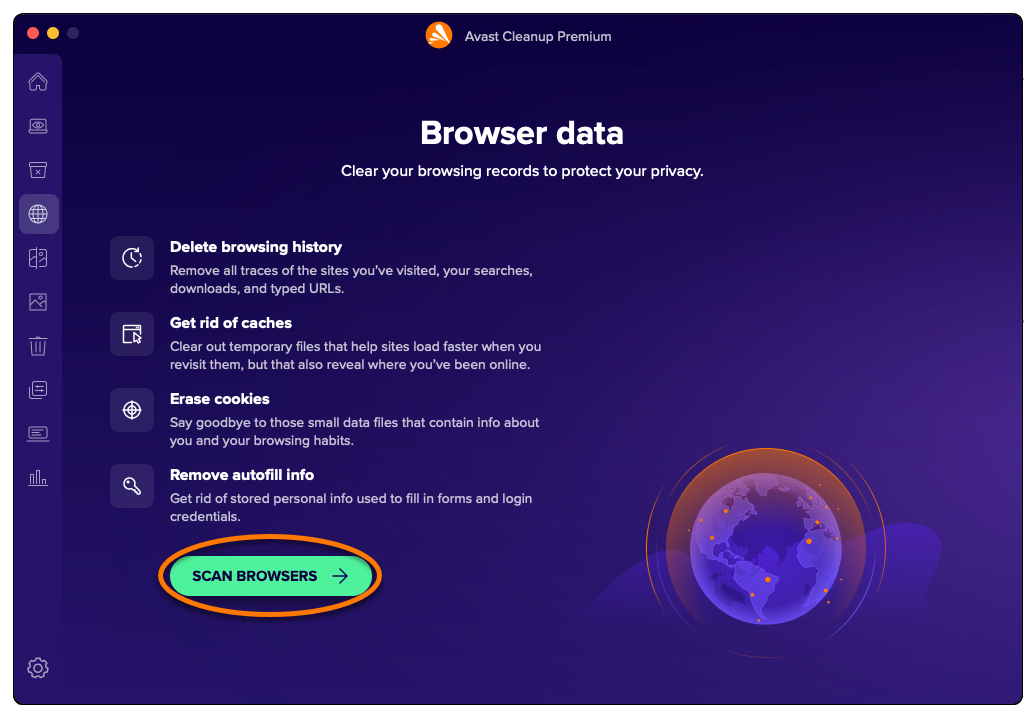
Clean your browsers
The Clean browser option allows you to easily remove cookies and other browsing data from your web browsers. The following options are available:
- Run a manual scan and specify which data you want to remove.
- Choose the type of Browser History you want Avast Cleanup Premium to delete.
- Configure Avast Cleanup Premium to run automatic scans.
- Add allowed websites that are always exempt when Avast Cleanup Premium clears cookies and other browsing data.
Run a manual scan
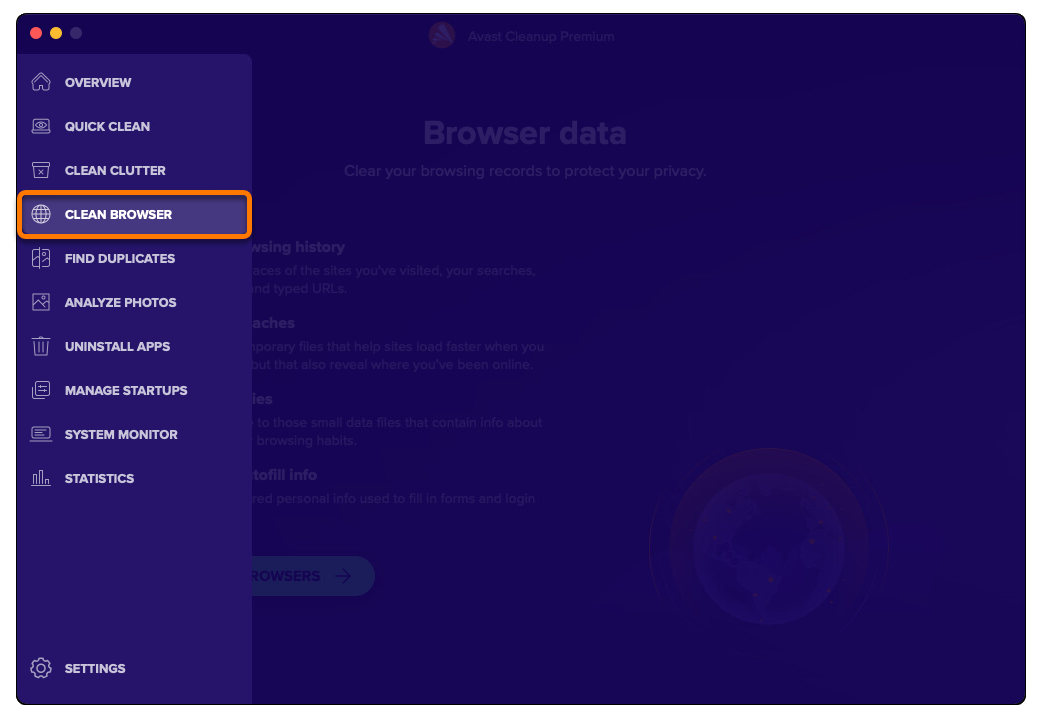
- Open Avast Cleanup Premium, hover your cursor over the side menu, and select Clean browser.
- Click Scan browsers.
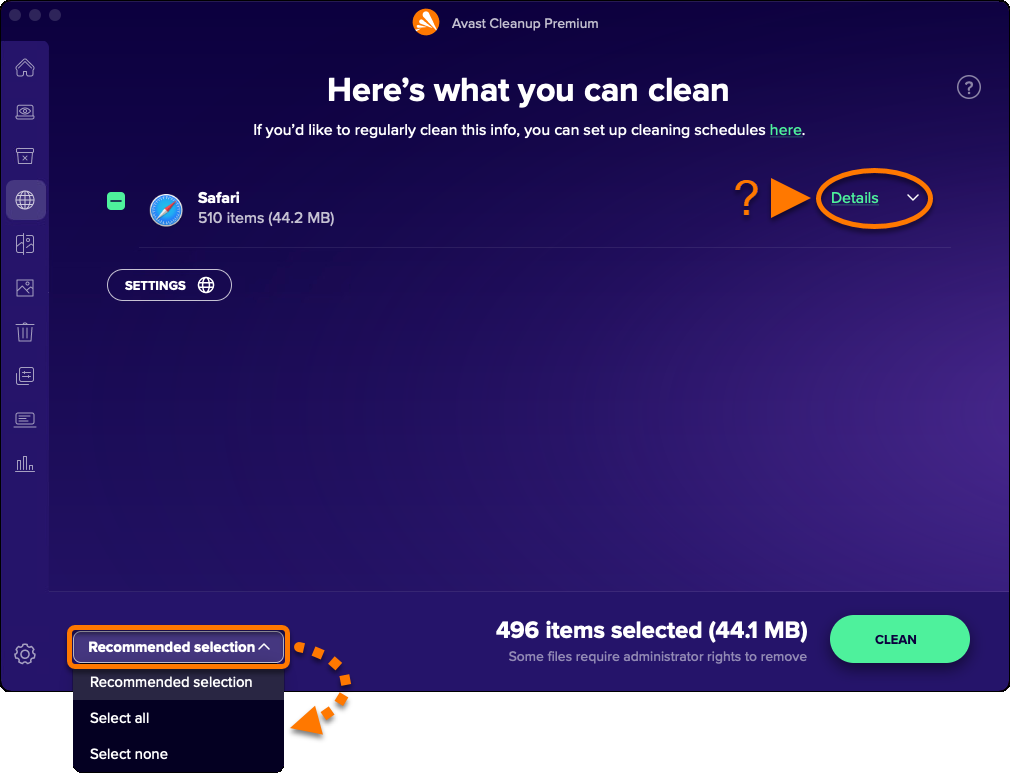
- Use the drop-down menu in the bottom-left corner to select the items you want to remove. The following options are available:
- Recommended selection: Selects only the items that you can safely clean without losing potentially valuable data. You can check the items that are selected for cleaning by clicking Details next to a browser.
- Select all: Selects all listed items. You can then click Details next to a browser to manually deselect any items you do not want to clean.
- Select none: Deselects all listed items. You can then click Details next to a browser to manually select the items you want to clean.
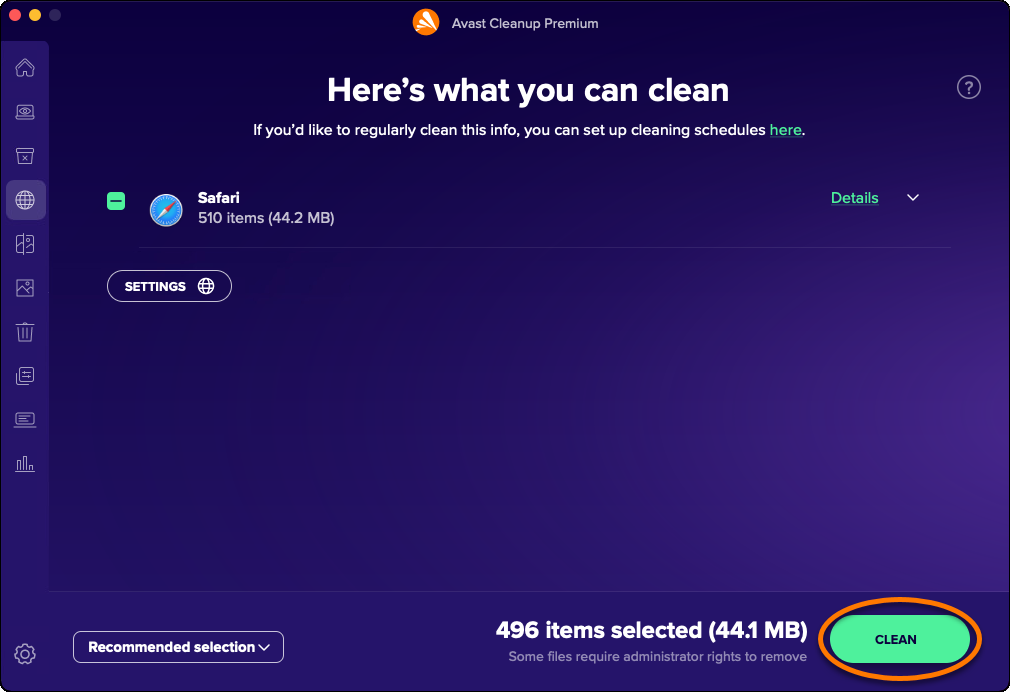
- Click Clean to remove the selected data.
- Click Done to return to the main Avast Cleanup Premium screen.
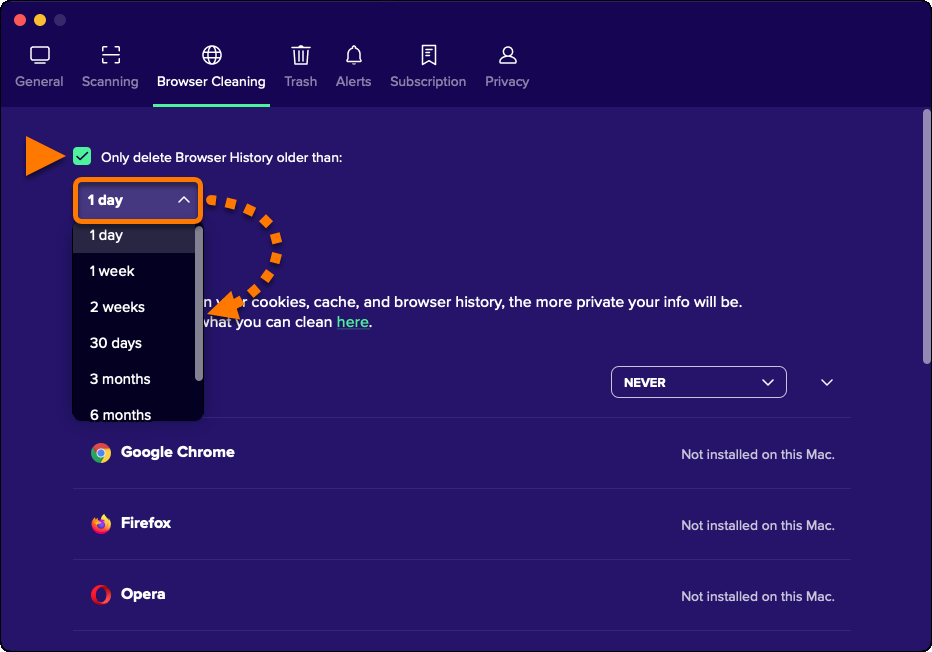
Choose Browser History
- Open Avast Cleanup Premium, hover your cursor over the side menu, and select Clean browser.
- Click Scan browsers.
- Click Settings.
- Tick the box beside Only delete Browser History older than: and choose the frequency according to your preferences.

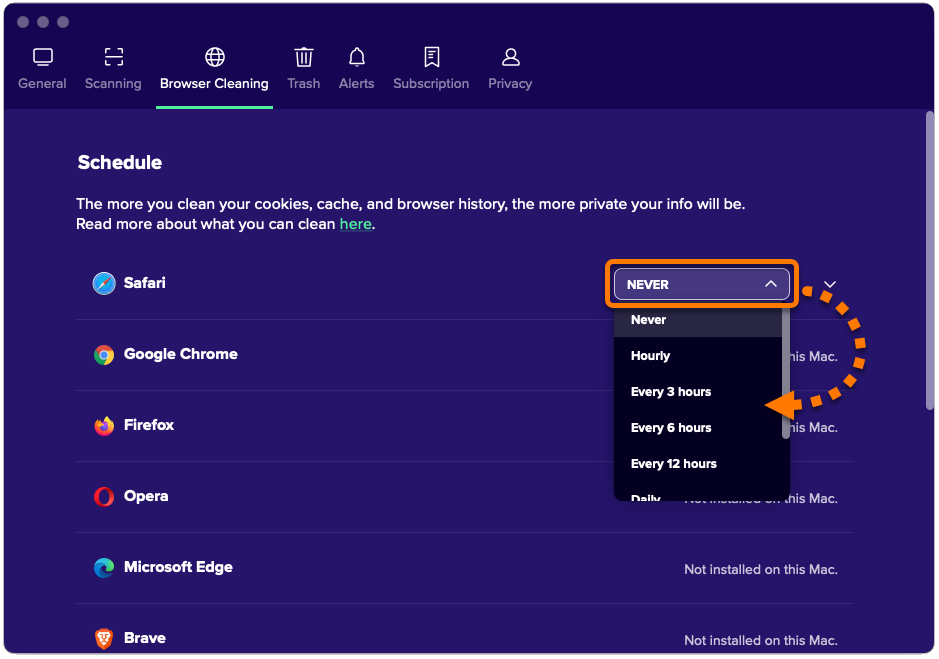
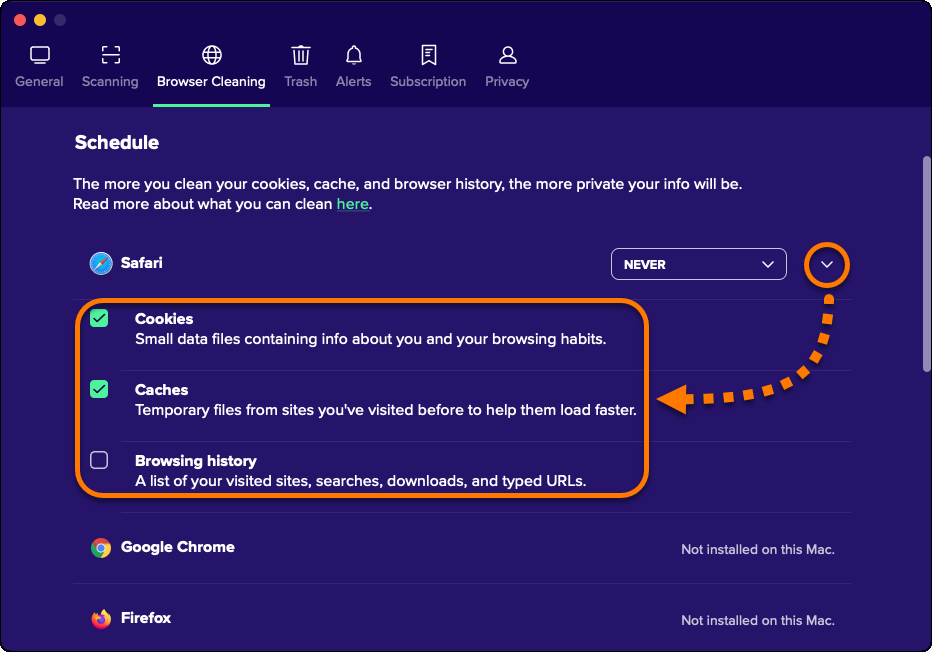
Schedule automatic scans
- Open Avast Cleanup Premium, hover your cursor over the side menu, and select Clean browser.
- Click Scan browsers.
- Click Settings.
- Use the drop-down menu next to a browser to specify how regularly you want Avast Cleanup Premium to scan the browser for cookies and browsing data.
- Select the relevant internet browser panel, then tick or untick the boxes to specify the data you want Avast Cleanup Premium to delete from your browser.
Automatic scanning is enabled for the selected browser.
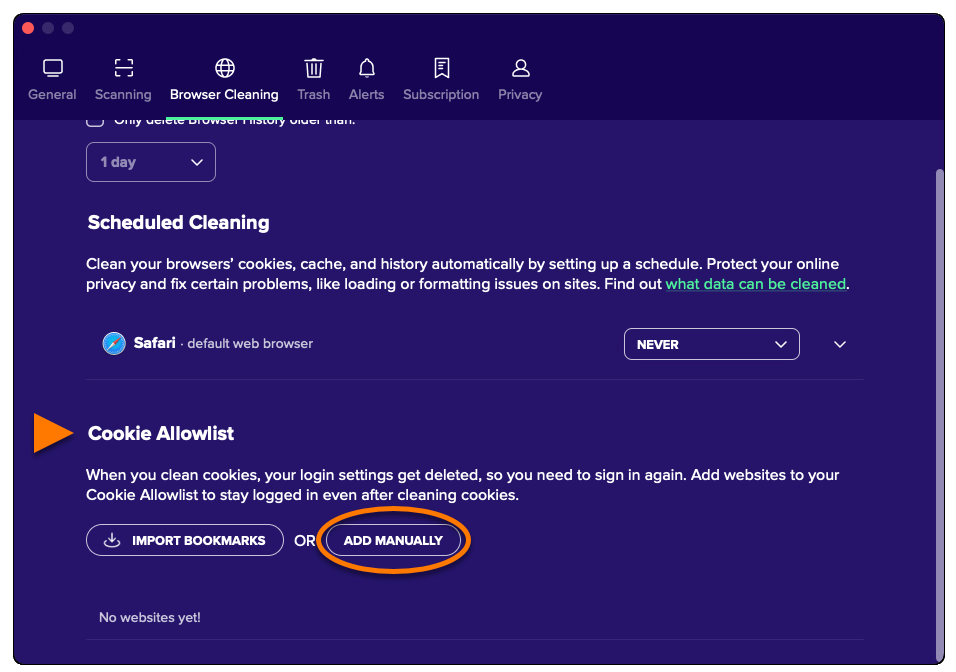
Add allowed websites
- Open Avast Cleanup Premium, hover your cursor over the side menu, and select Clean browser.
- Click Scan browsers.
- Click Settings.
- Scroll to the Cookie Allowlist section and select Add manually.
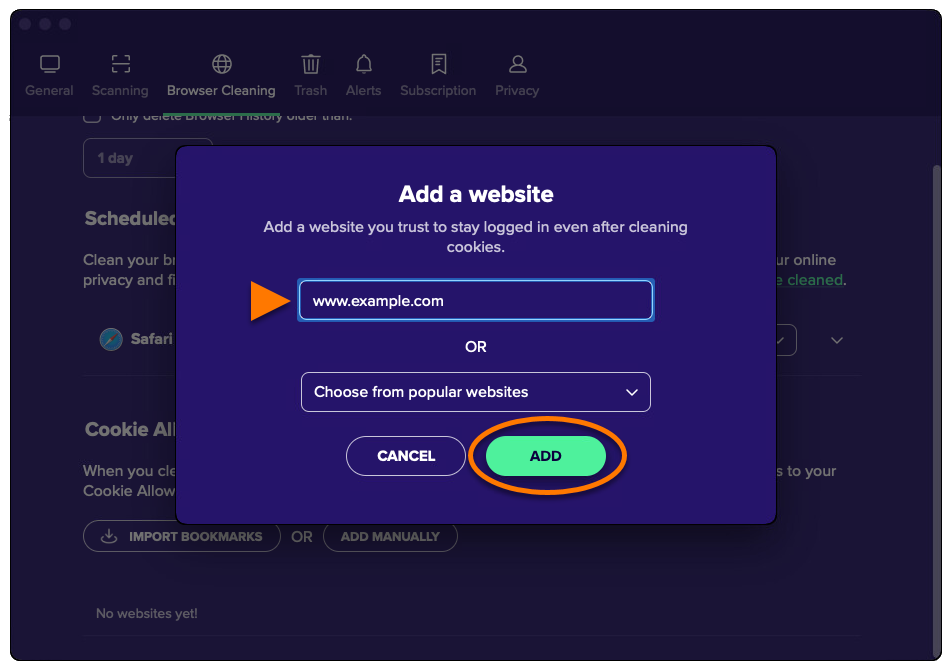
- Add a website using either Option A or Option B below:
- Option A: Enter a website (for example, example.com) into the text box, then click Add.
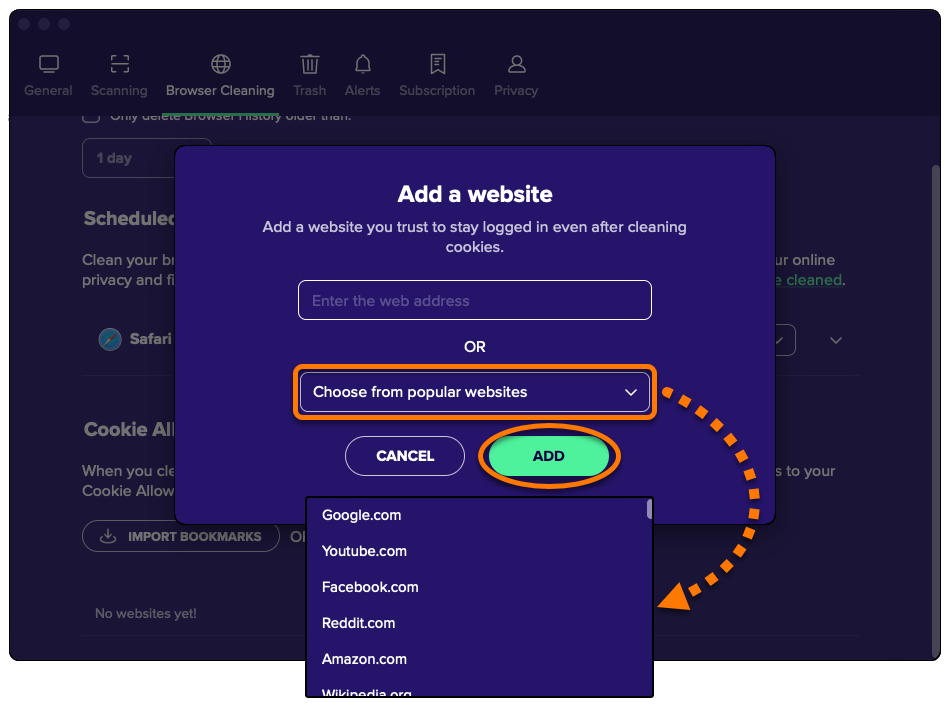
- Option B: Select a website from the Choose from popular websites drop-down menu, then click Add.
- Option A: Enter a website (for example, example.com) into the text box, then click Add.
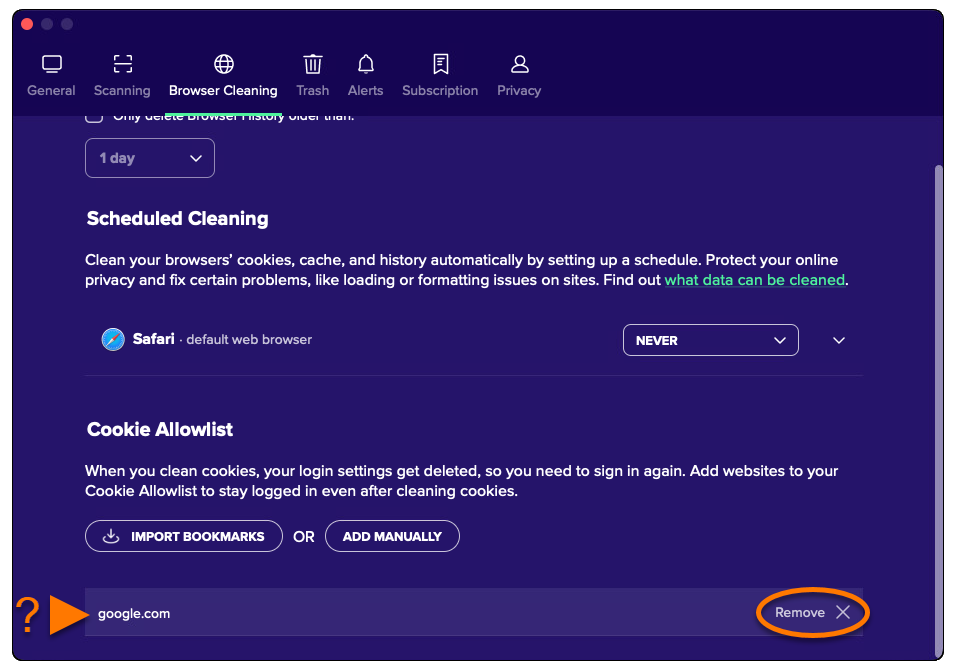
The selected website is now excluded from cookie clearing.
X icon) in the relevant websites' panel.
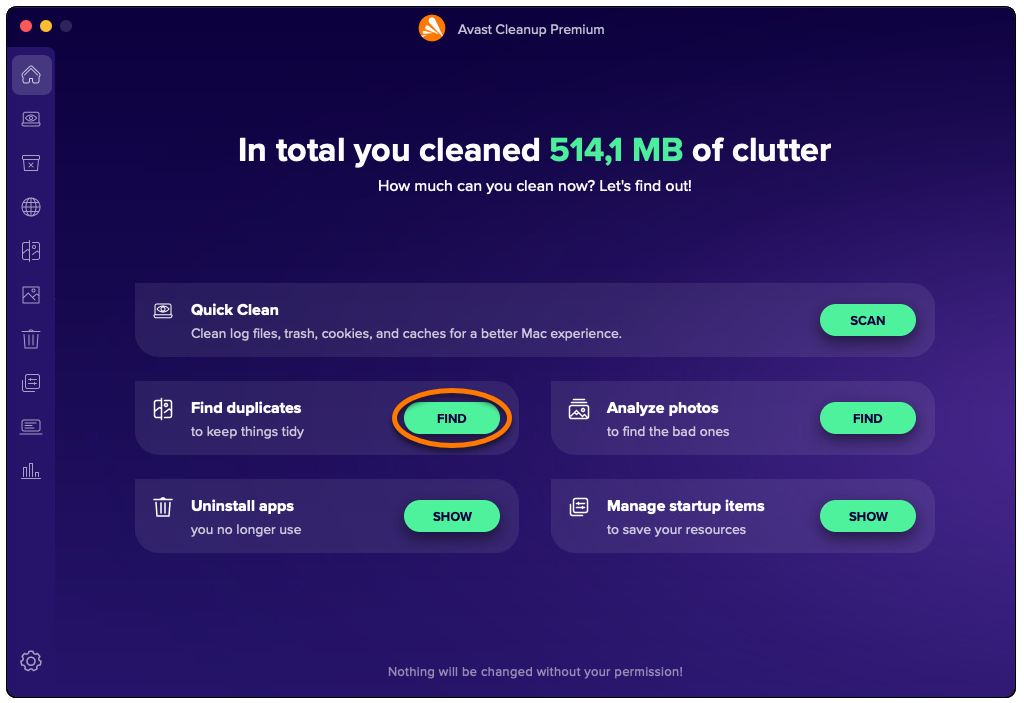
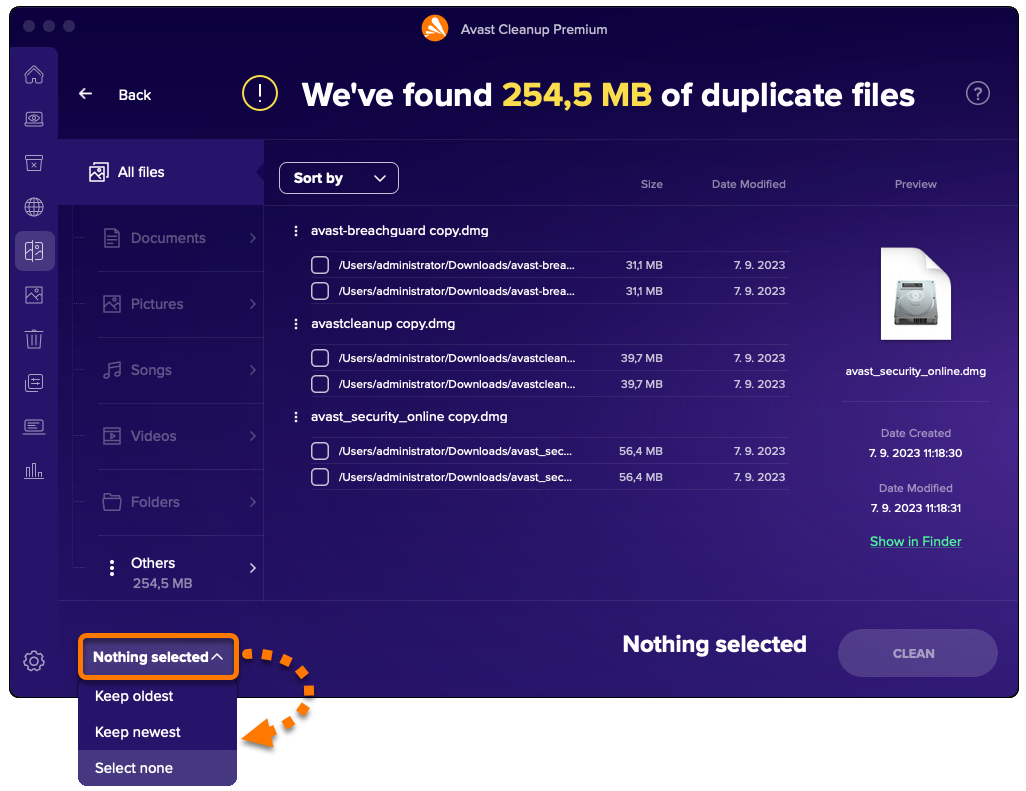
Remove duplicate files
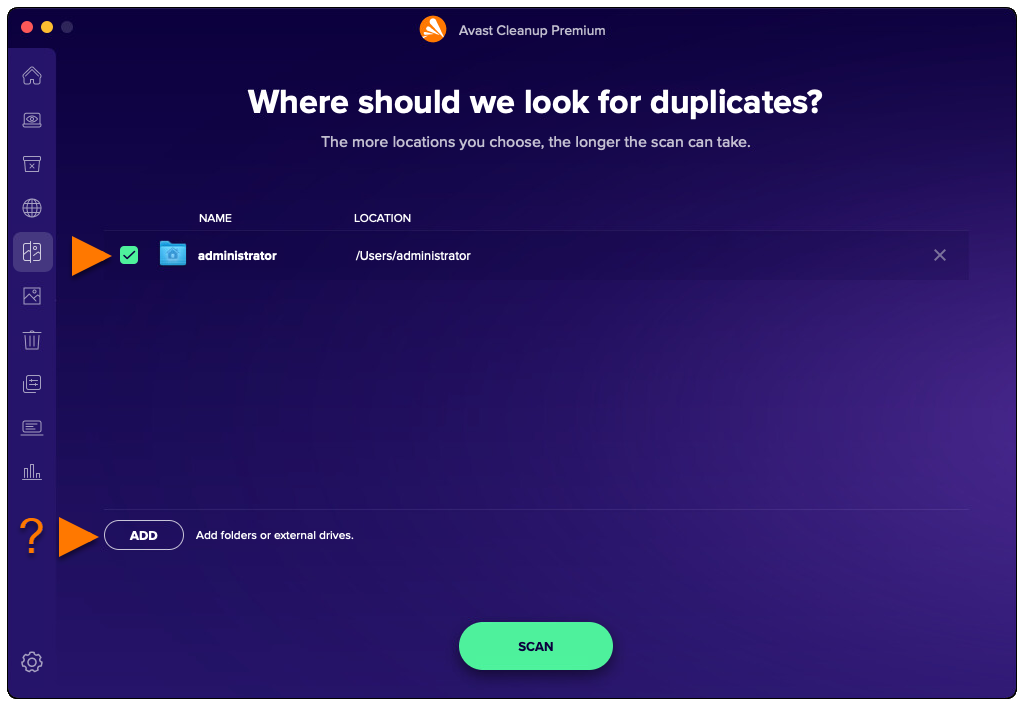
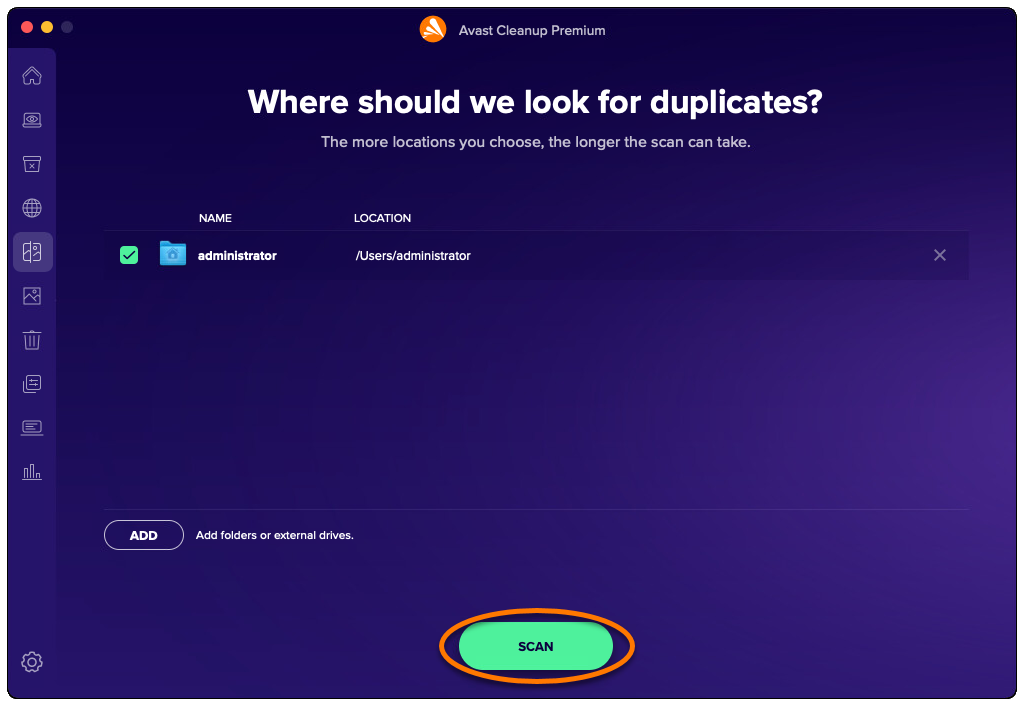
The Find duplicates option scans your Mac for duplicate files. To run a scan and remove duplicate files:
- Open Avast Cleanup Premium and click Find next to Find duplicates.
- Tick the location(s) you want to scan for duplicate files. To add additional folders or external drives, click Add, and select a folder or drive.
- Click Scan.
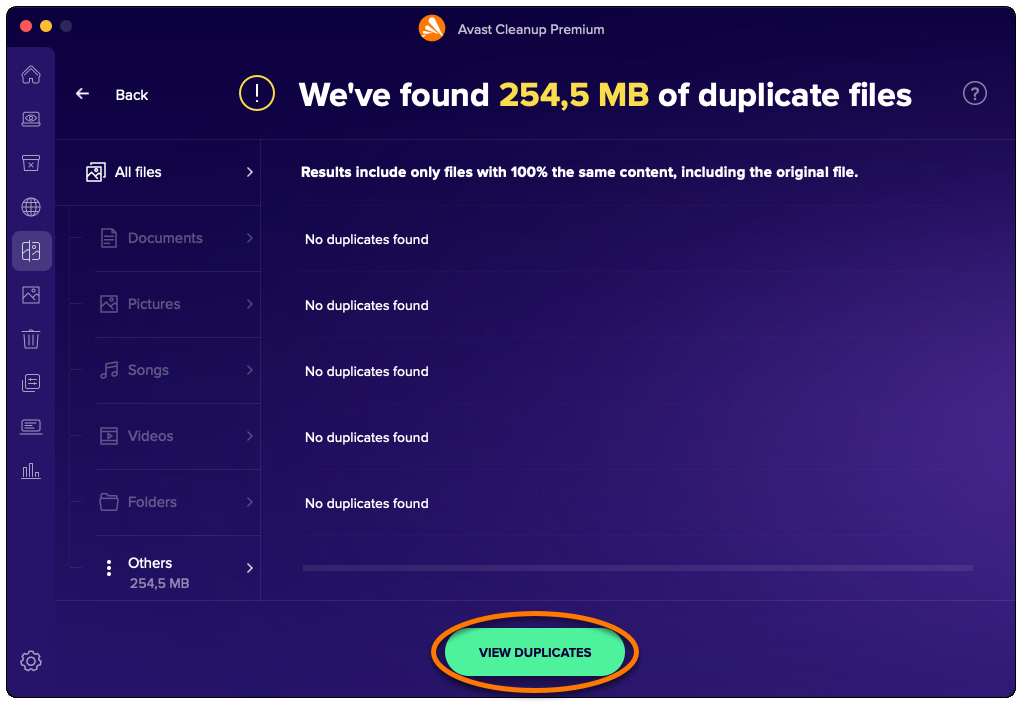
- After the scan completes, click View duplicates.
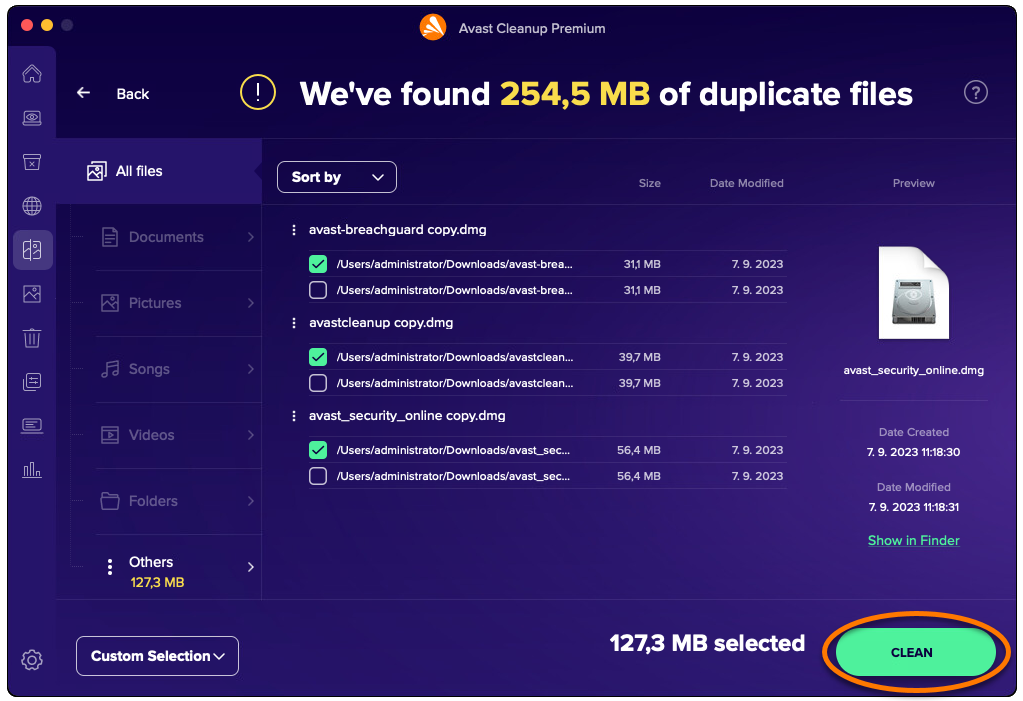
- Use the drop-down menu in the bottom-left corner to select the files you want to remove. The following options are available:
- Keep oldest: Automatically selects the newest version of each file for removal.
- Keep newest: Automatically selects the oldest version of each file for removal.
- Select none: Deselects all files and allows you to manually select files for removal. Tick each file that you want to remove. After you tick a file, Select none becomes Custom selection.
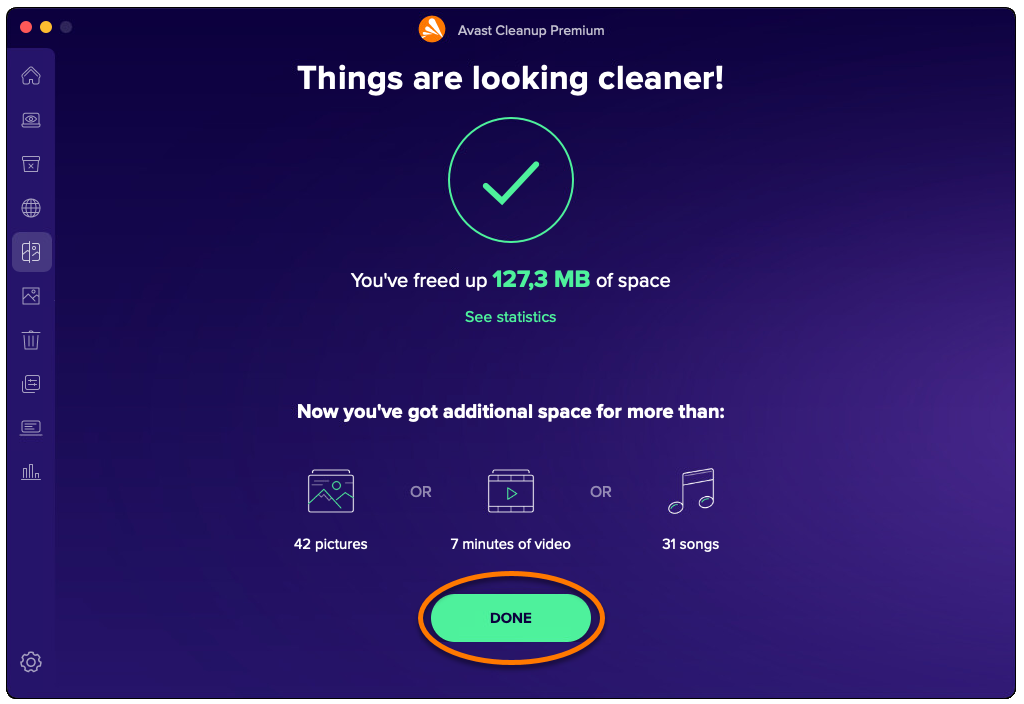
- After selecting the files you want to remove, click Clean.
- If prompted, enter the password that you use when you start your Mac, then click OK.
- Click Done to return to the main Avast Cleanup Premium screen.
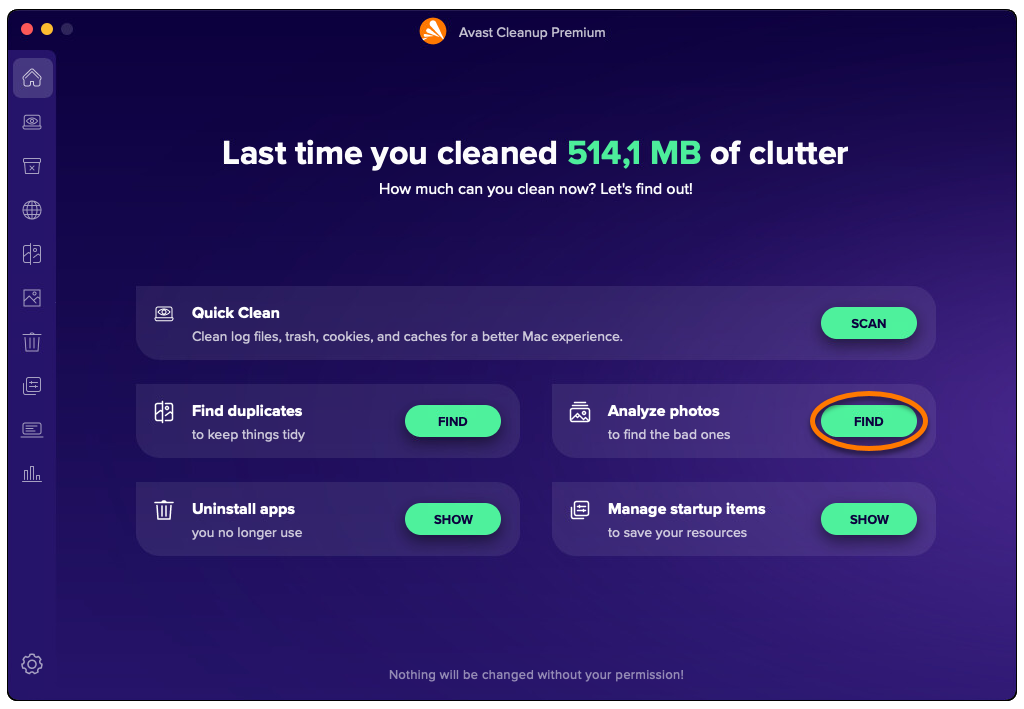
Identify bad or similar photos
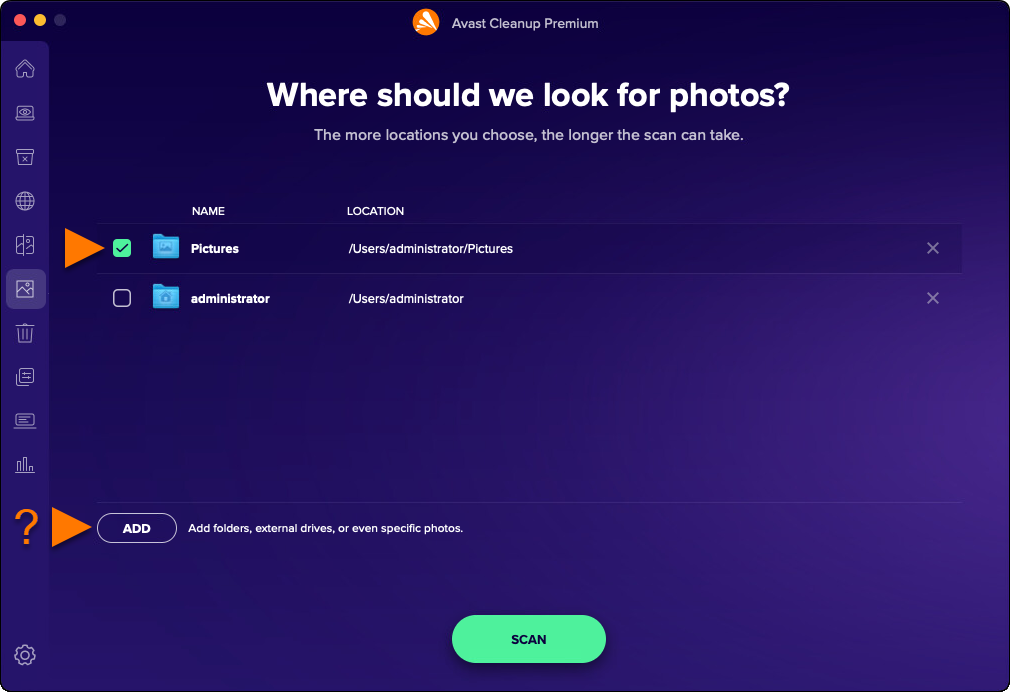
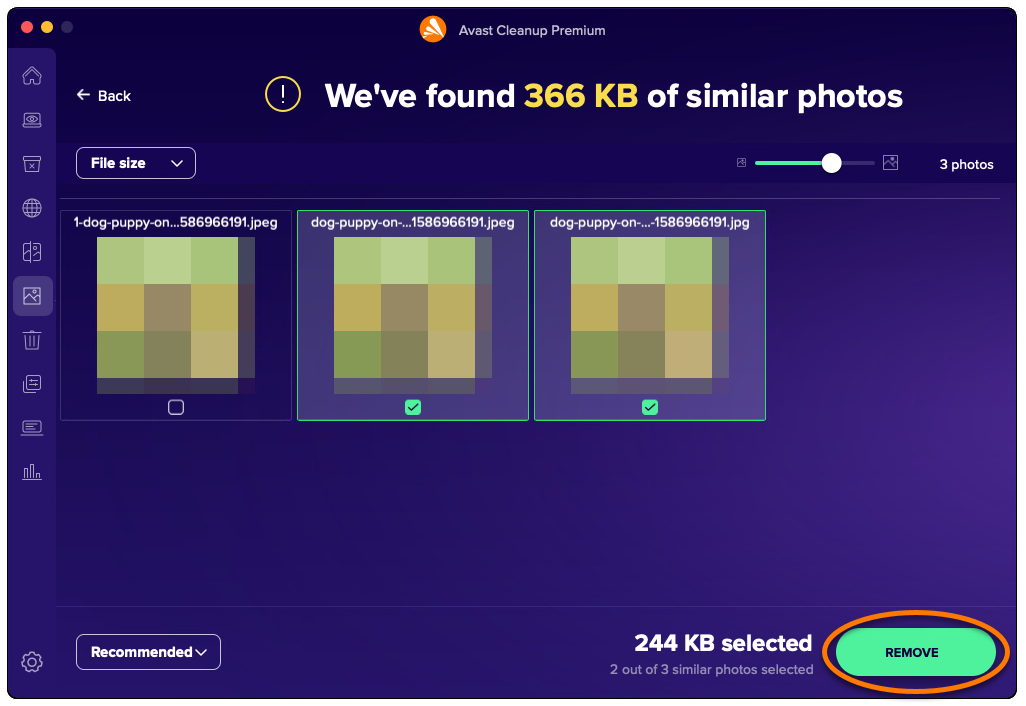
The Find photos option scans your Mac for photos that are blurry, badly lit, or similar. To run a scan and review bad or similar photos:
- Open Avast Cleanup Premium and click Find next to Analyze photos.
- Tick the location(s) you want to scan for photos. To add additional folders, external drives, or specific photos, click Add, then select the folder, drive, or photo.
- Click Scan.
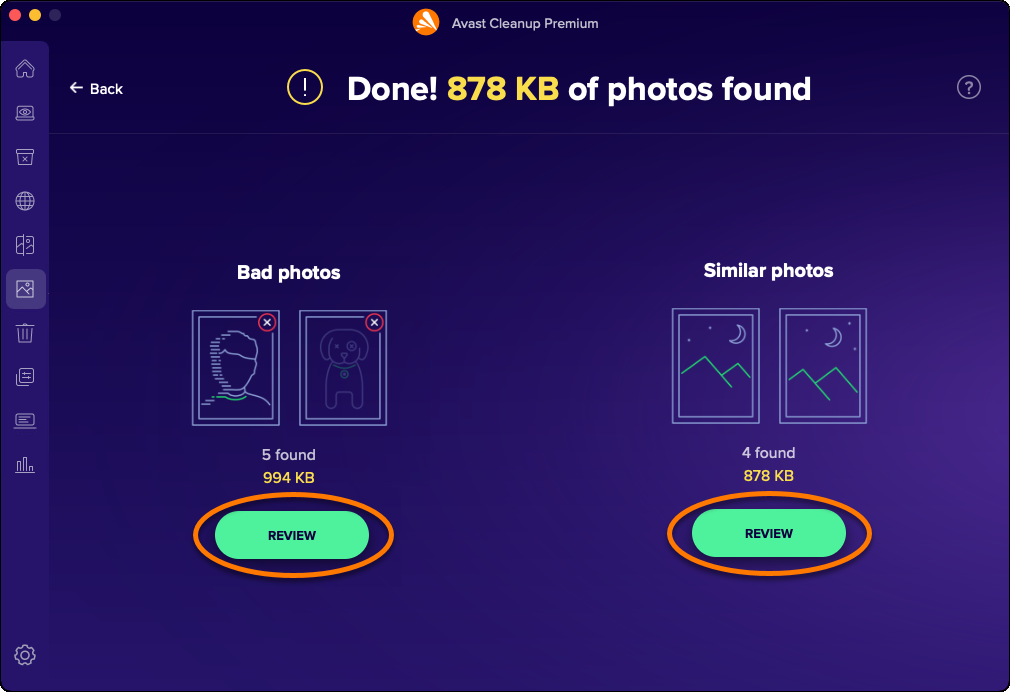
- After the scan completes, click Review under either Bad photos or Similar photos to see the photos that Avast Cleanup Premium has identified.
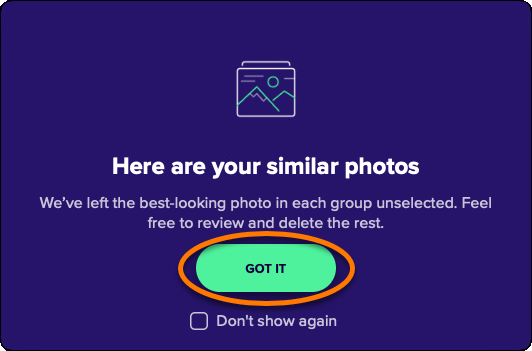
- Click Got it to remove the pop-up message.
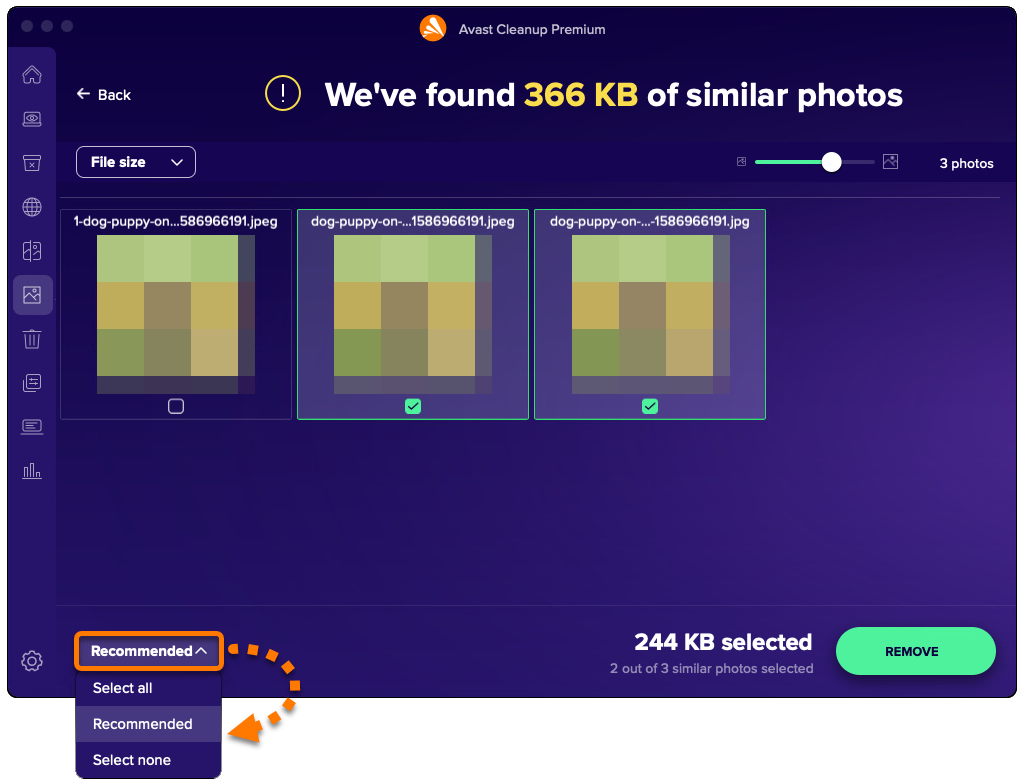
- Use the drop-down menu in the bottom-left corner to select the files you want to remove. The following options are available:
- Select all: Selects all photos that were found.
- Recommended: Selects the photos that Avast Cleanup Premium recommends for removal.
- Select none: Deselects all photos and allows you to manually select photos for removal. Tick each photo that you want to remove. After you tick a photo, Select none becomes Custom selection.
- After selecting the photos you want to delete, click Remove.
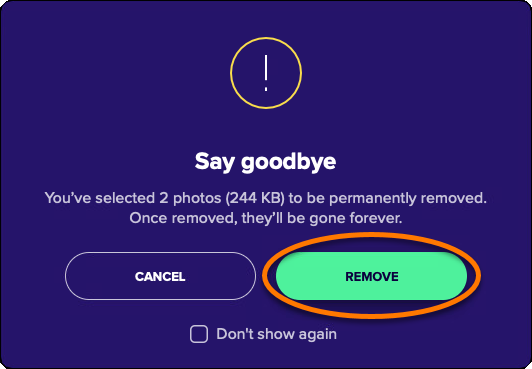
- Click Remove to confirm deletion of your selected photos.
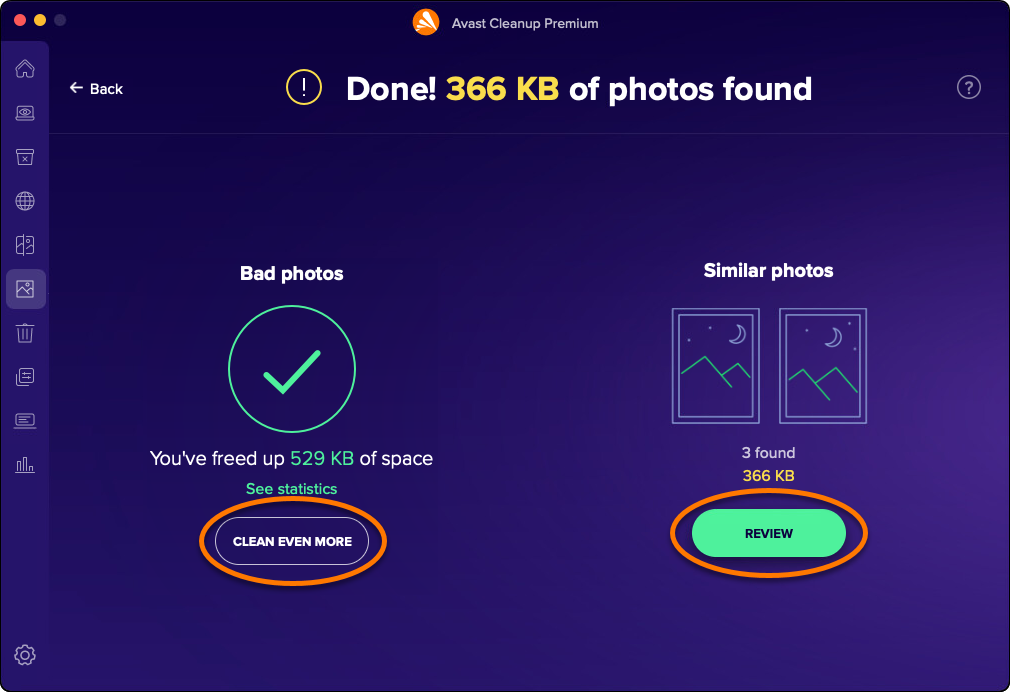
- Click Clean even more or Review and repeat steps 5-8 above to continue reviewing and deleting photos.
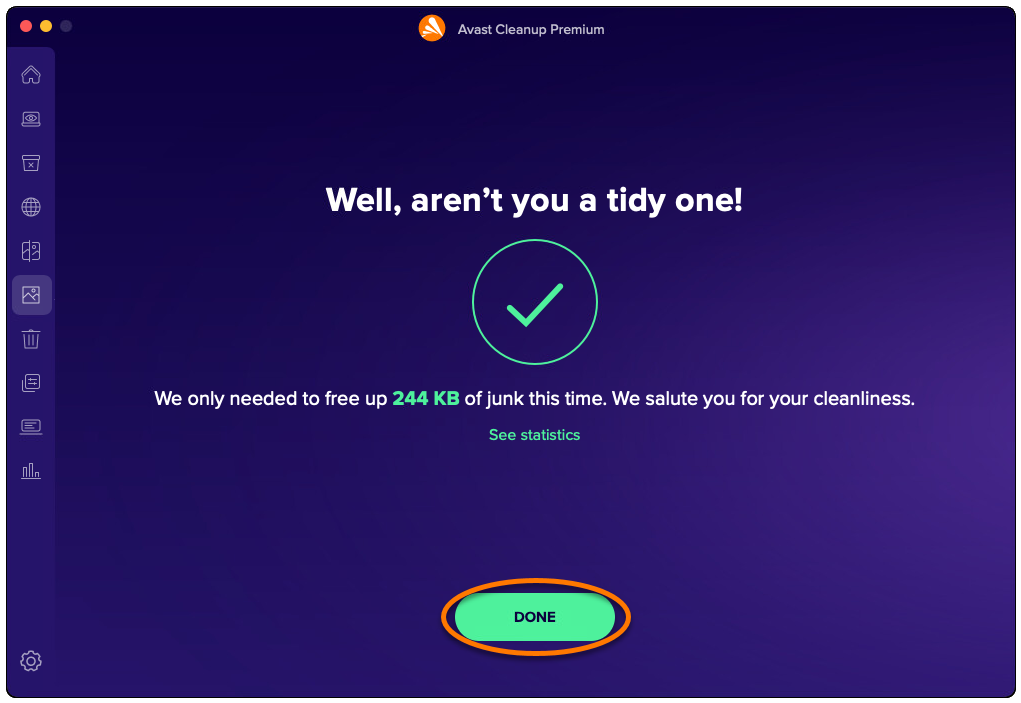
- Click Done to return to the main Avast Cleanup Premium screen.

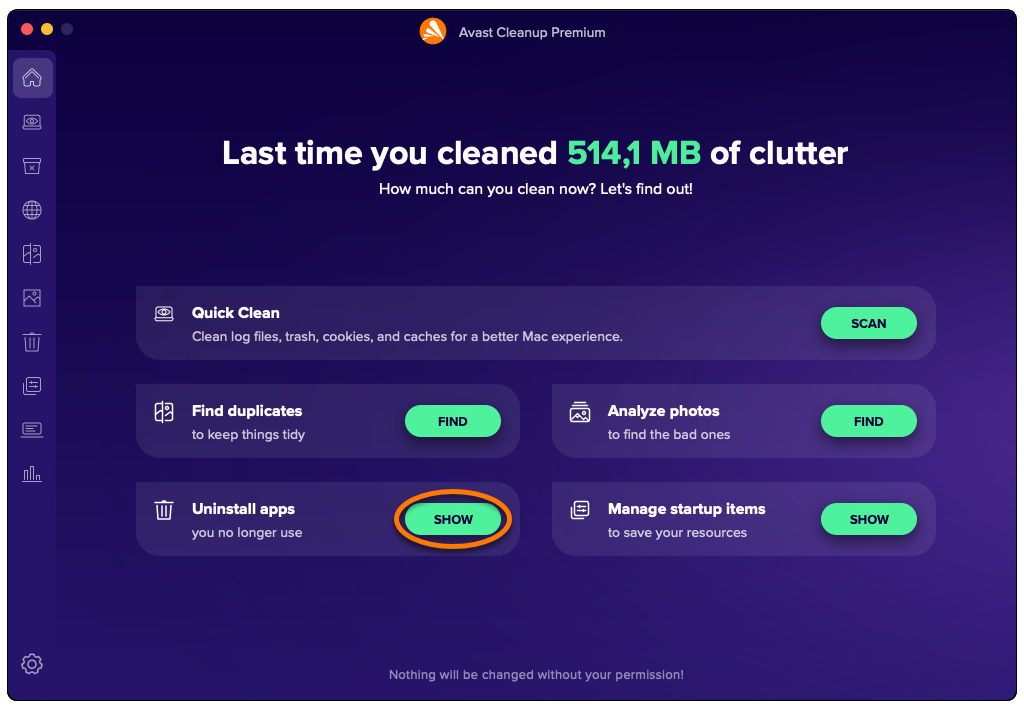
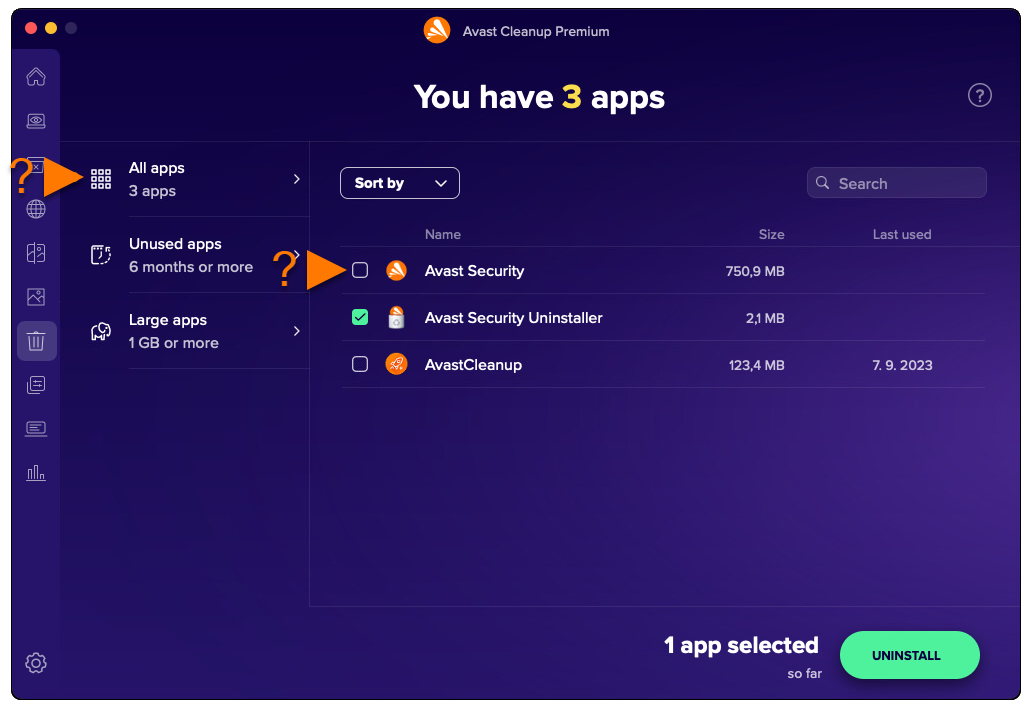
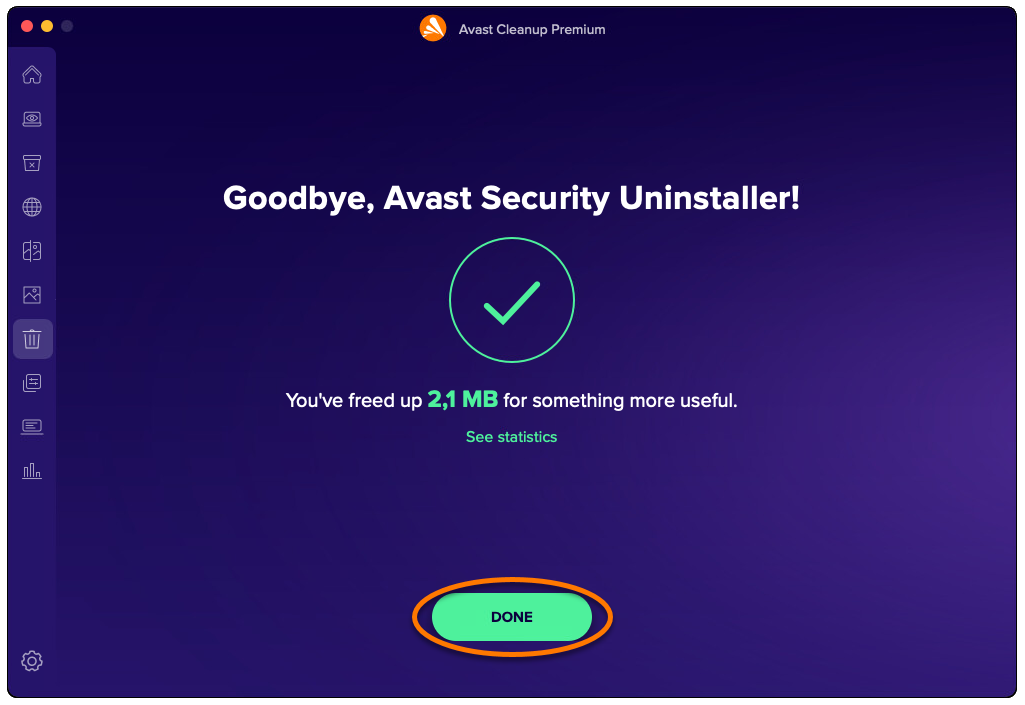
Uninstall apps you no longer use
The Uninstall apps option allows you to easily find and remove applications you no longer use, to keep your Mac tidy and free up space. To uninstall apps you no longer use:
- Open Avast Cleanup Premium and click Show next to Uninstall apps.
- Tick the box next to an app to select it. You can also filter the list of apps using the Unused apps and Large apps categories in the left panel.
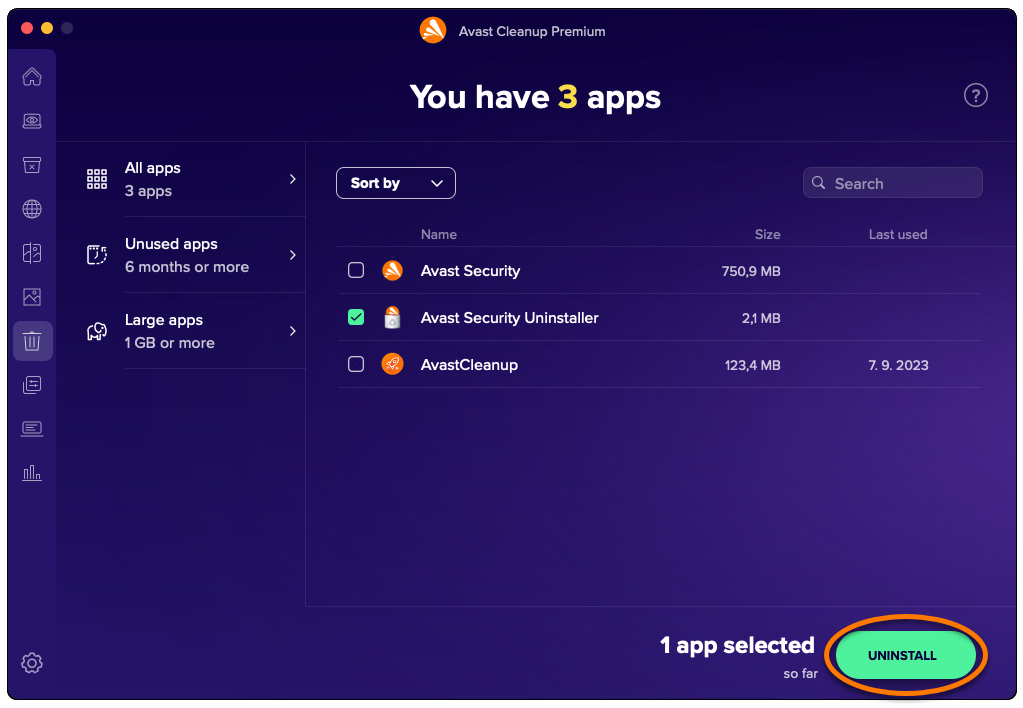
- After selecting the apps you want to remove, click Uninstall.
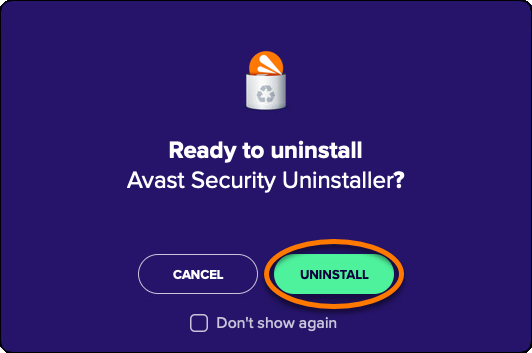
- Click Uninstall to confirm removal of the selected apps from your Mac.
- If prompted, enter the password that you use when you start your Mac, then click OK.
- Click Done to return to the main Avast Cleanup Premium screen.
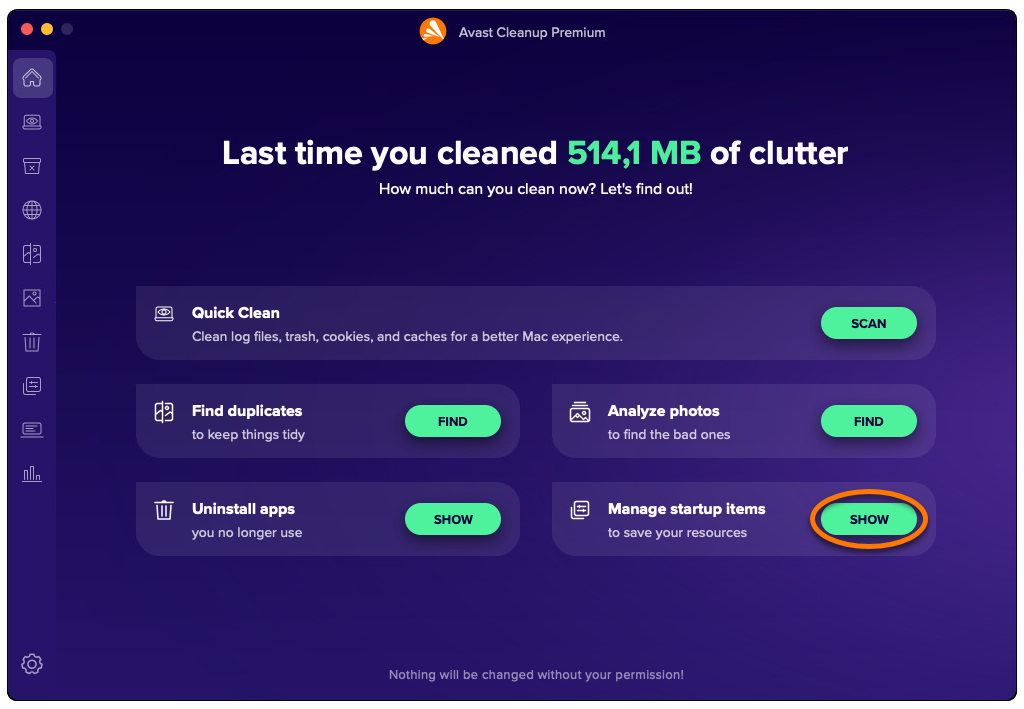
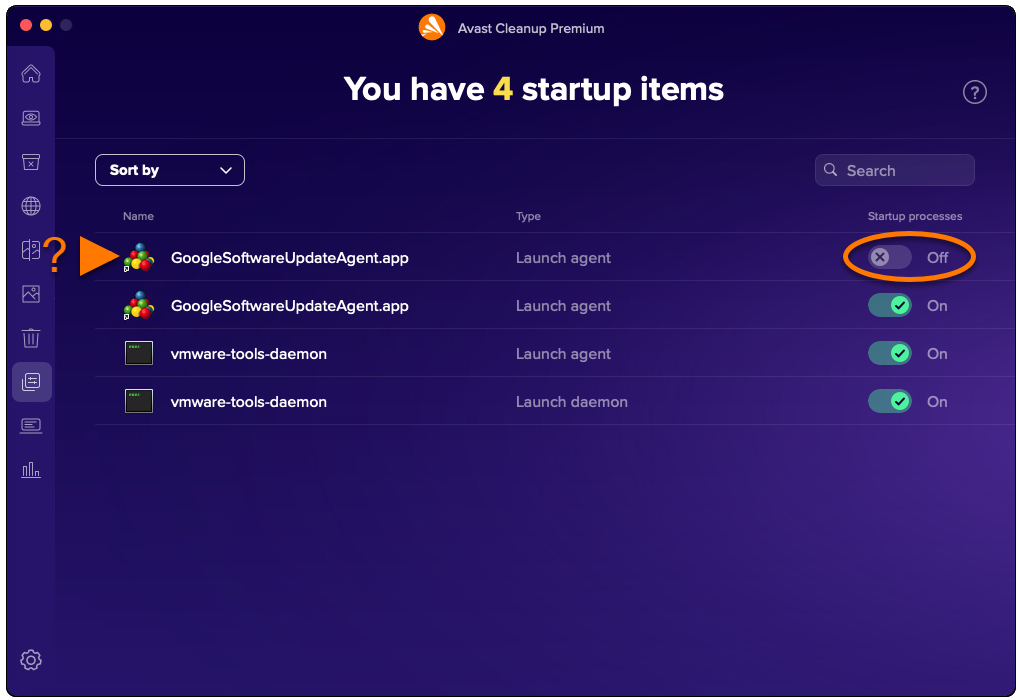
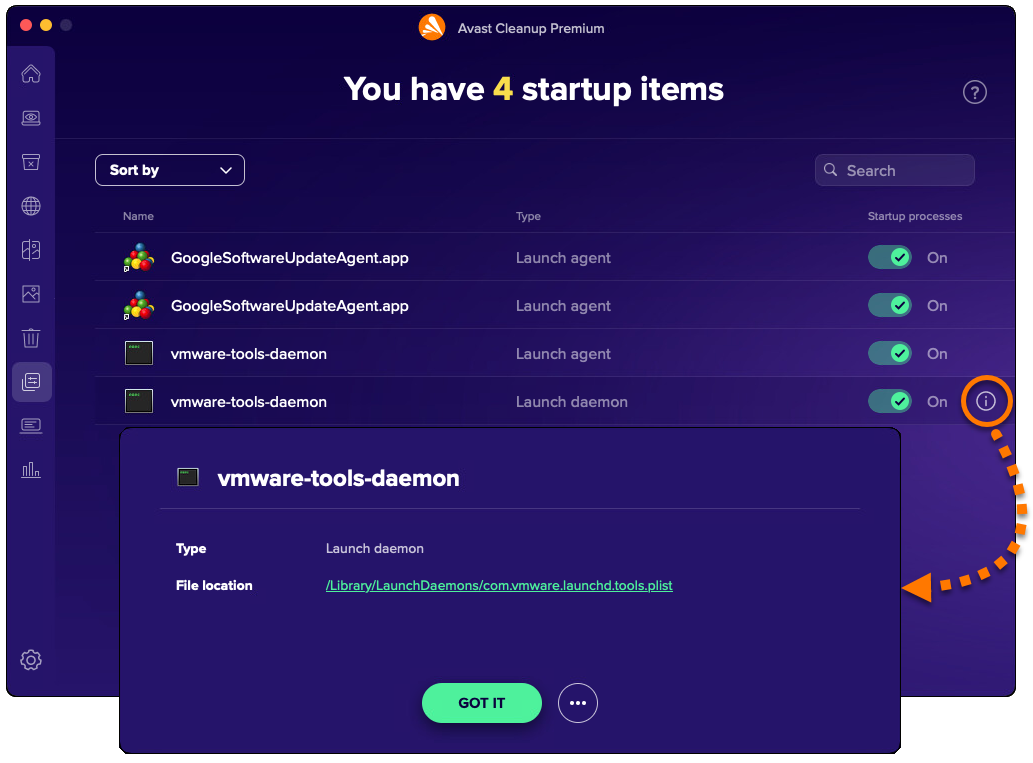
Manage startup items
The Manage startup items option allows you to turn off unnecessary processes that launch automatically when you start up your Mac, preventing issues like slowness or long loading screens. To manage your startup items:
- Open Avast Cleanup Premium and click Show next to Manage startup items.
- Click the green (ON) slider next to a startup item, so that it changes to gray (OFF).
- To view additional details and options, hover your cursor over a startup item and click the Information icon that appears.
Further recommendations
To learn more about Avast Cleanup Premium, refer to the following article:
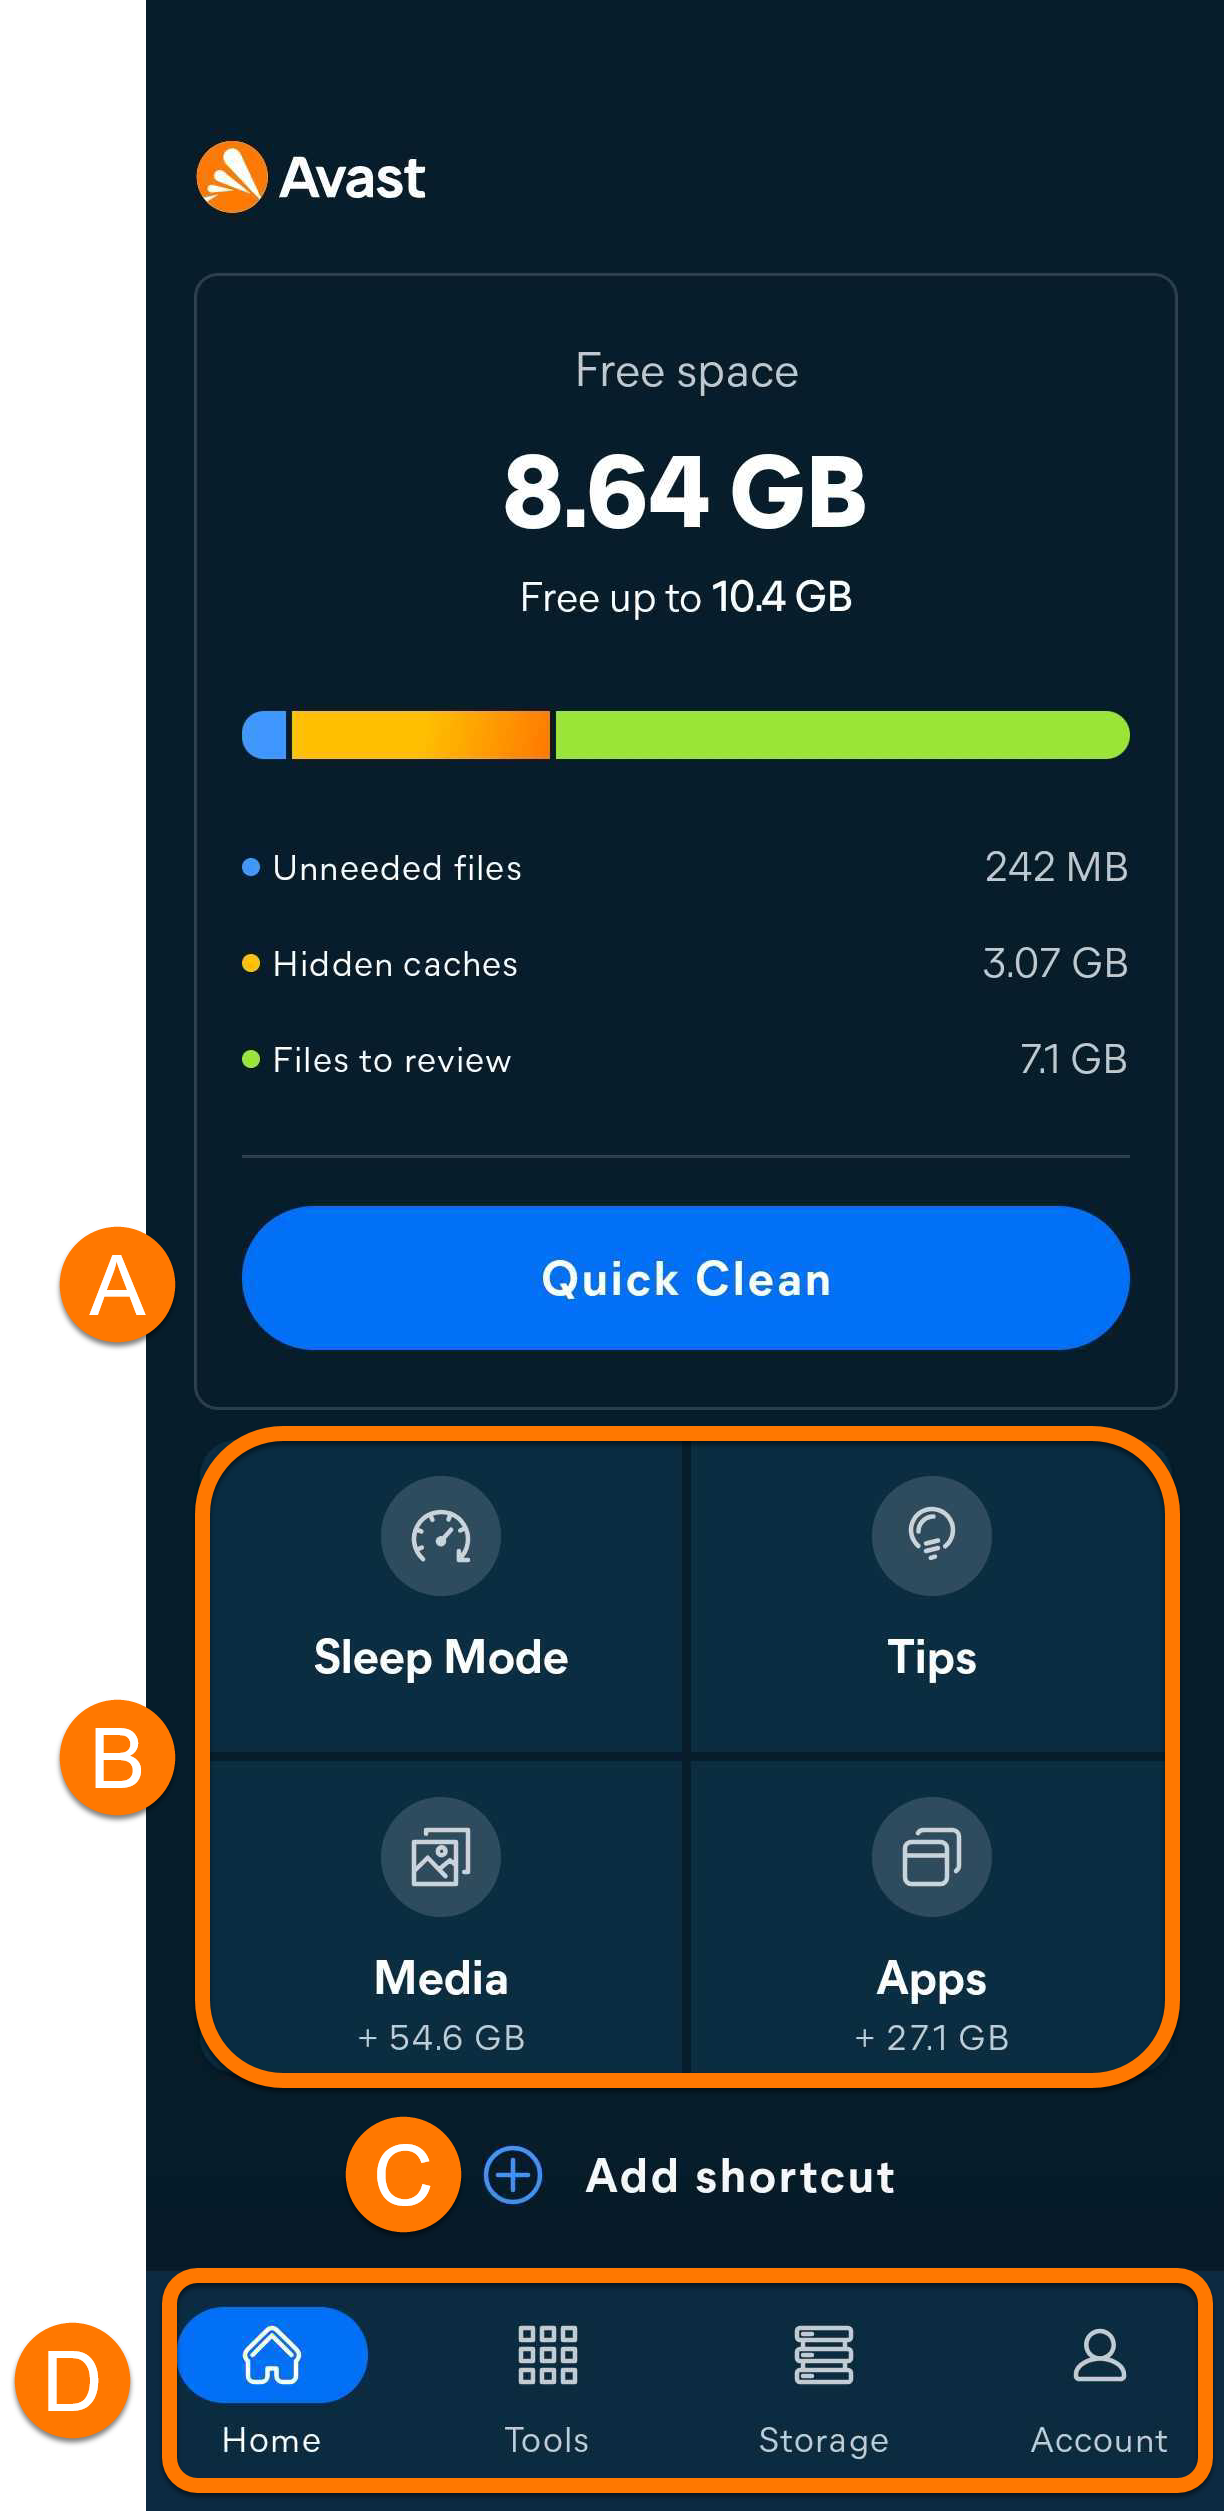
Avast Cleanup for Android is a mobile app designed to help improve the performance of your device and preserve storage space by removing unnecessary media, files, apps, and app data. Remove these items by transferring them to a cloud storage account and/or deleting them from your device. You can also optimize photos to consume less space.
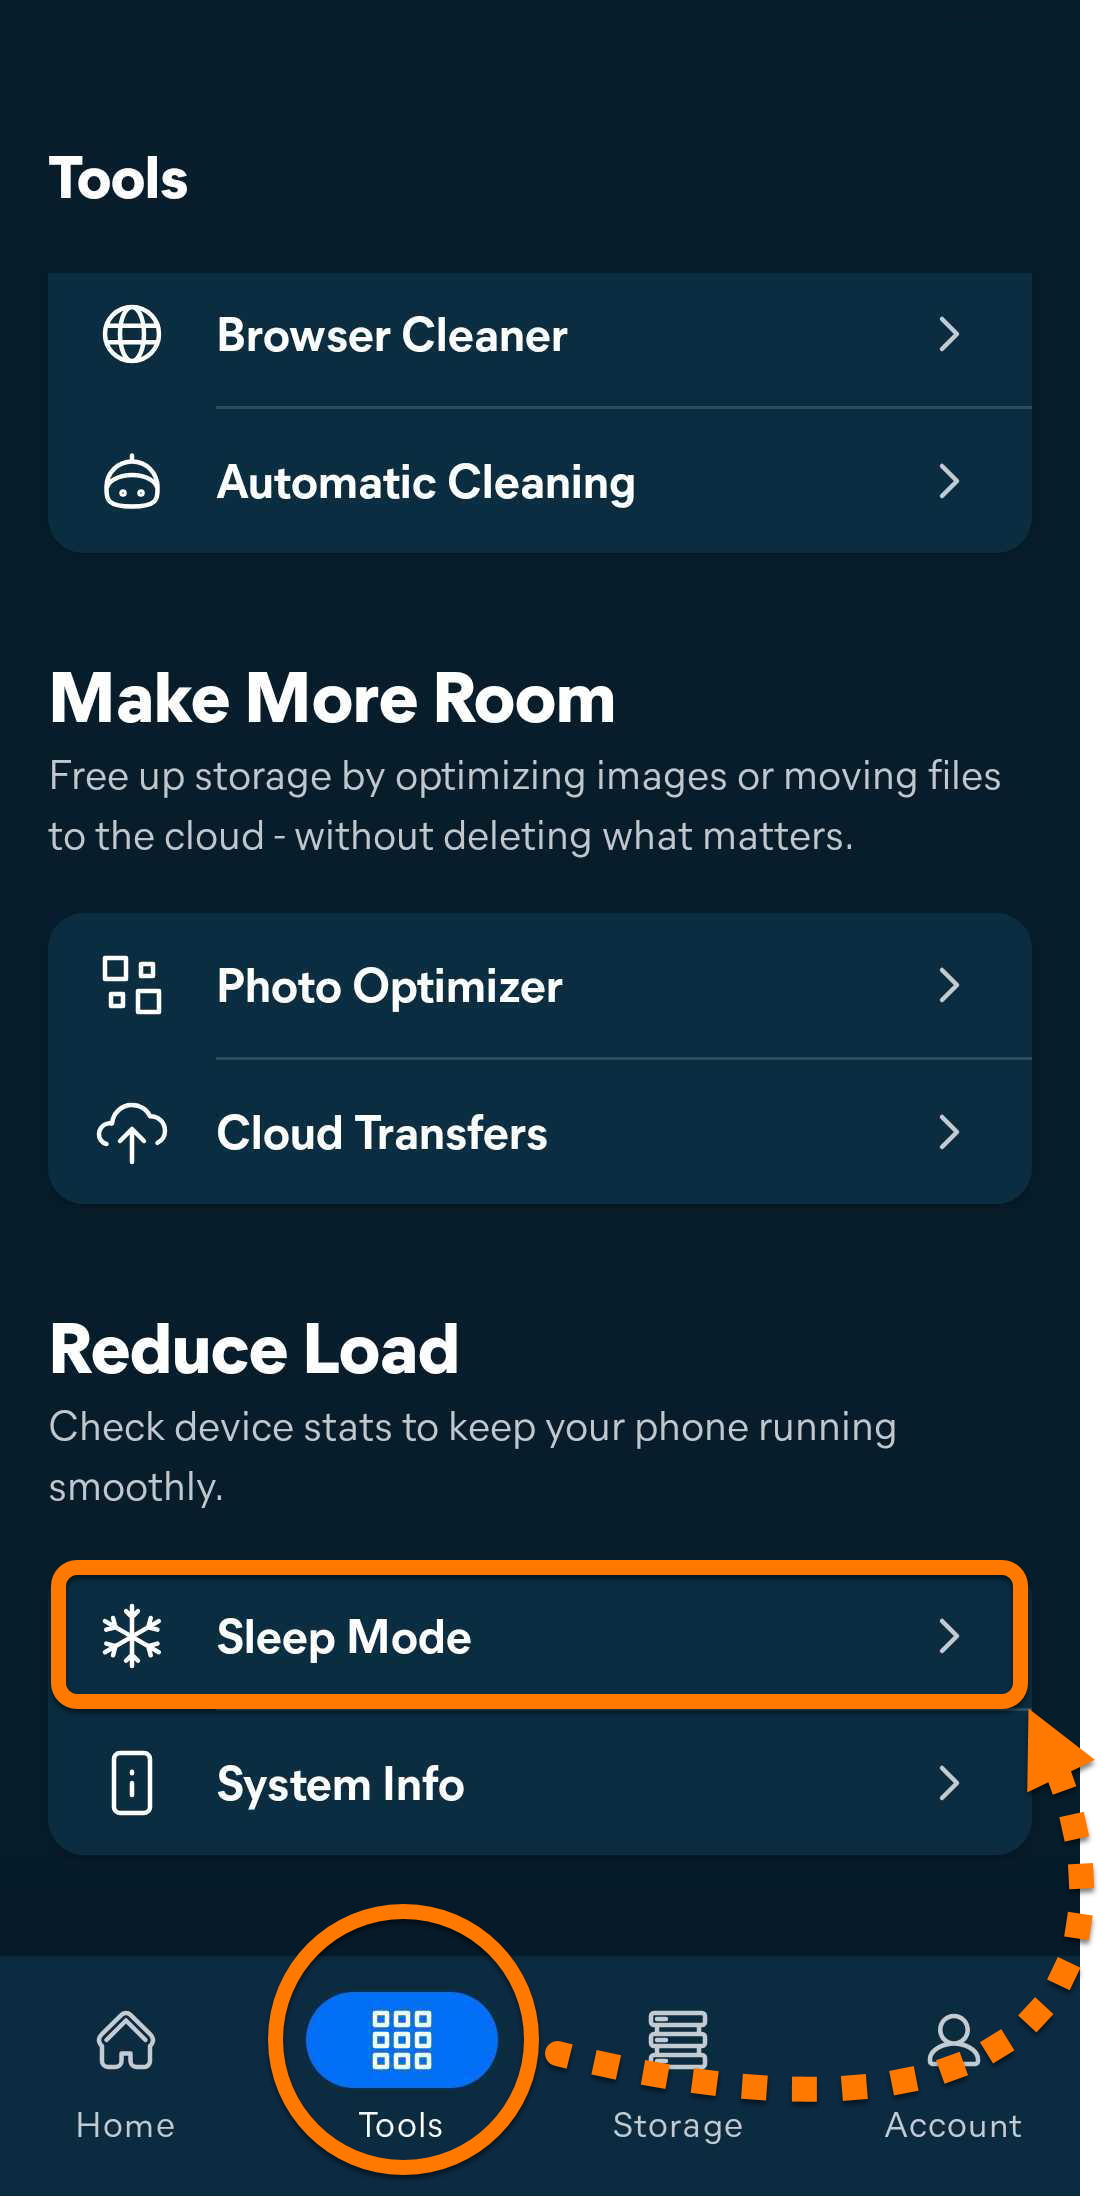
Navigate Avast Cleanup
- On the Home screen of your device, tap the Cleanup icon to open the app.
- The following options are available via the main app screen:
- Quick Clean: Scan for and delete dispensable items, including thumbnails, APKs, residual files, and hidden, visible, and shared cache.
- Shortcuts:
- Sleep Mode: Hibernate apps that are running in the background, stopping them from slowing down your device and draining your battery.
- Tips: Review tips for clearing space on your device. The first time you use the Tips feature, you are prompted to specify which kinds of tips you want Avast Cleanup to prioritize via the Analysis preferences screen.
- Media: Access an overview of the media that is stored on your device, including suggestions for clearing space.
- Apps: Access an overview of the apps that are installed on your device, including suggestions for clearing space.
- Add Shortcut: Customize the main dashboard by adding shortcuts.
- The navigation bar:
- Home: A quick access to Avast Cleanup Home screen.
- Tools: Access Avast Cleanup features.
- Storage: An overview of different apps and files.
- Account: Includes various options, such as signing in to your Avast Account, checking your subscription details, and accessing the Settings.
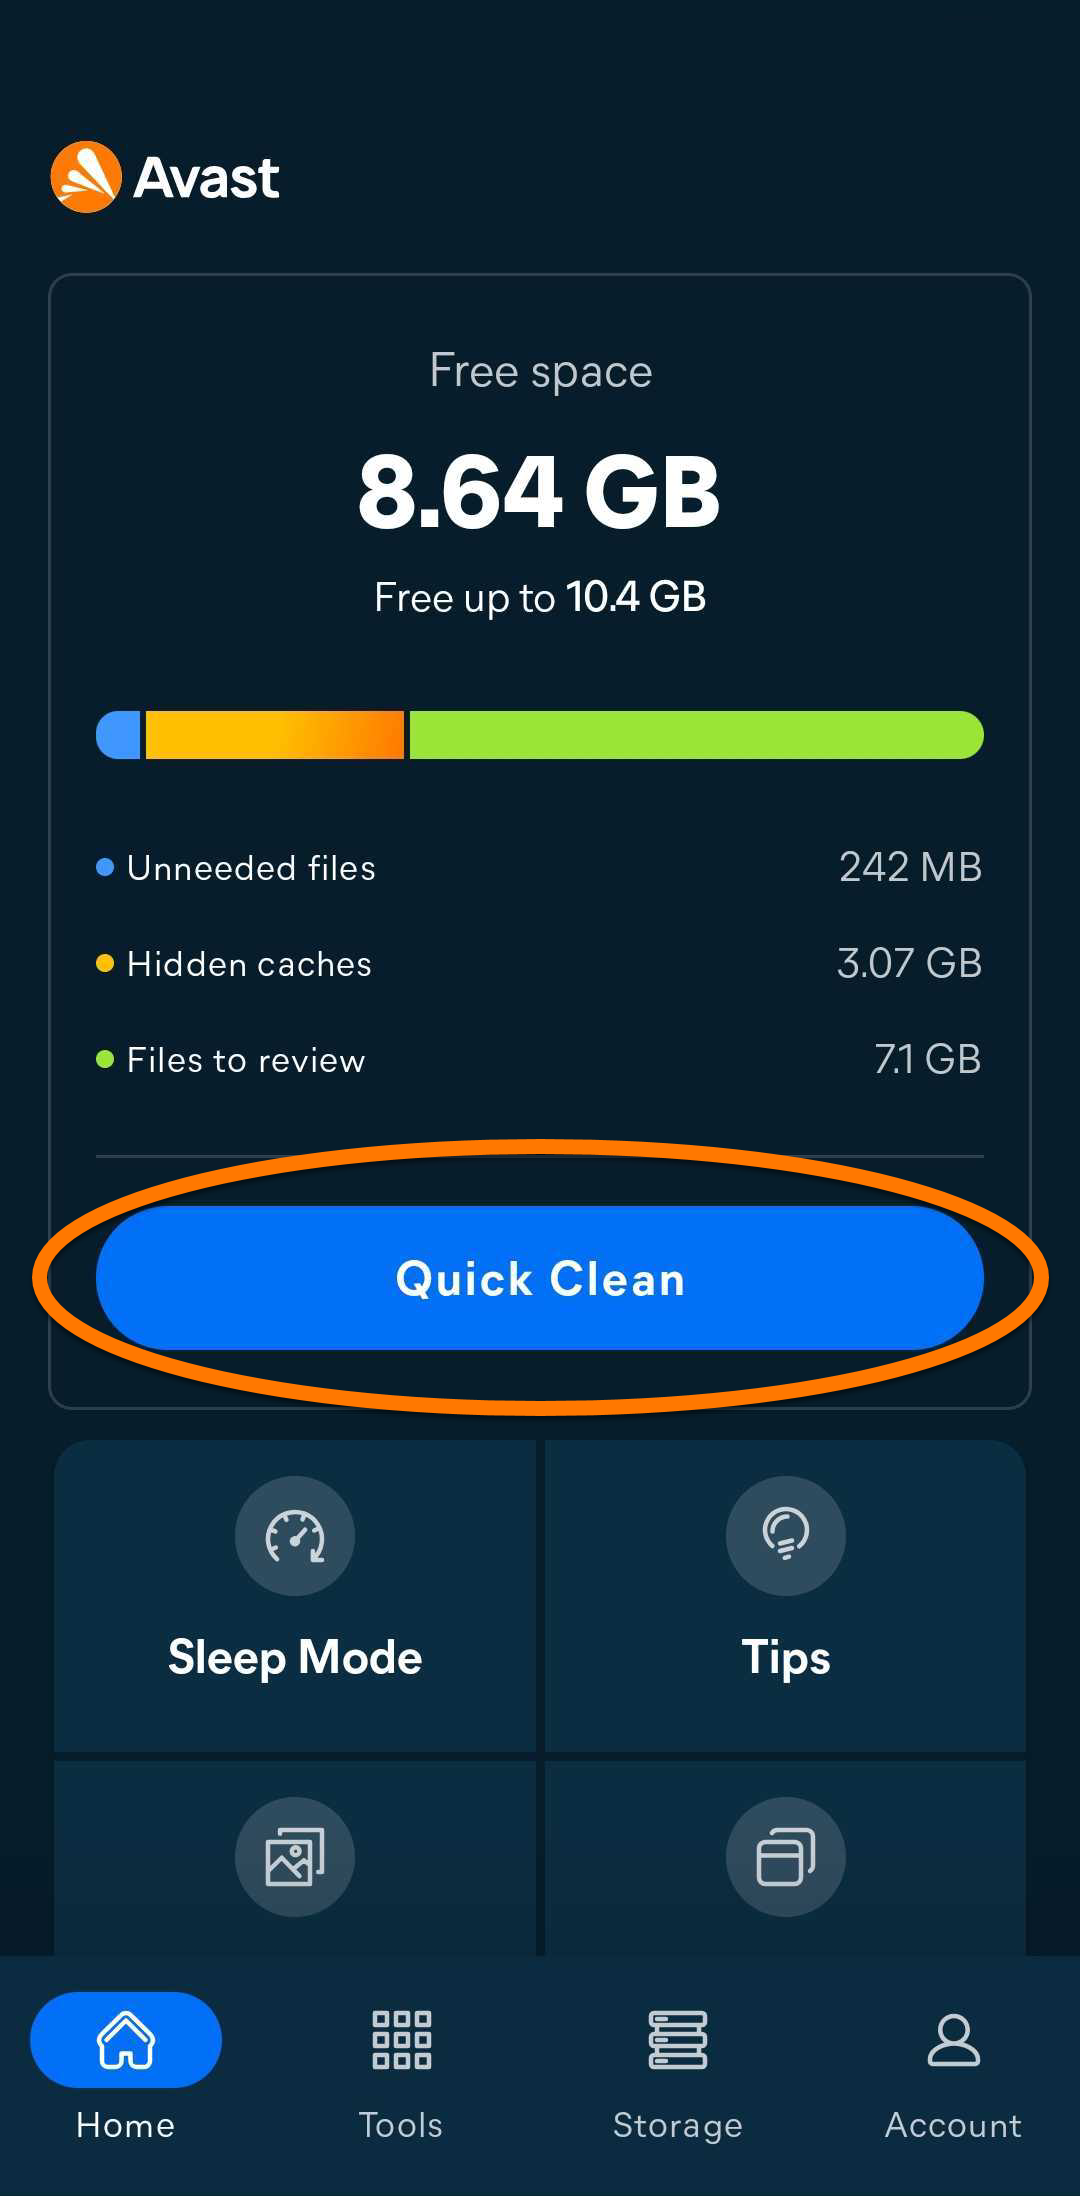
Perform a Quick Clean
Quick Clean cleans your device by removing unnecessary files to free storage space. You can select which item types are removed before you clean.
- Tap the Quick Clean button.
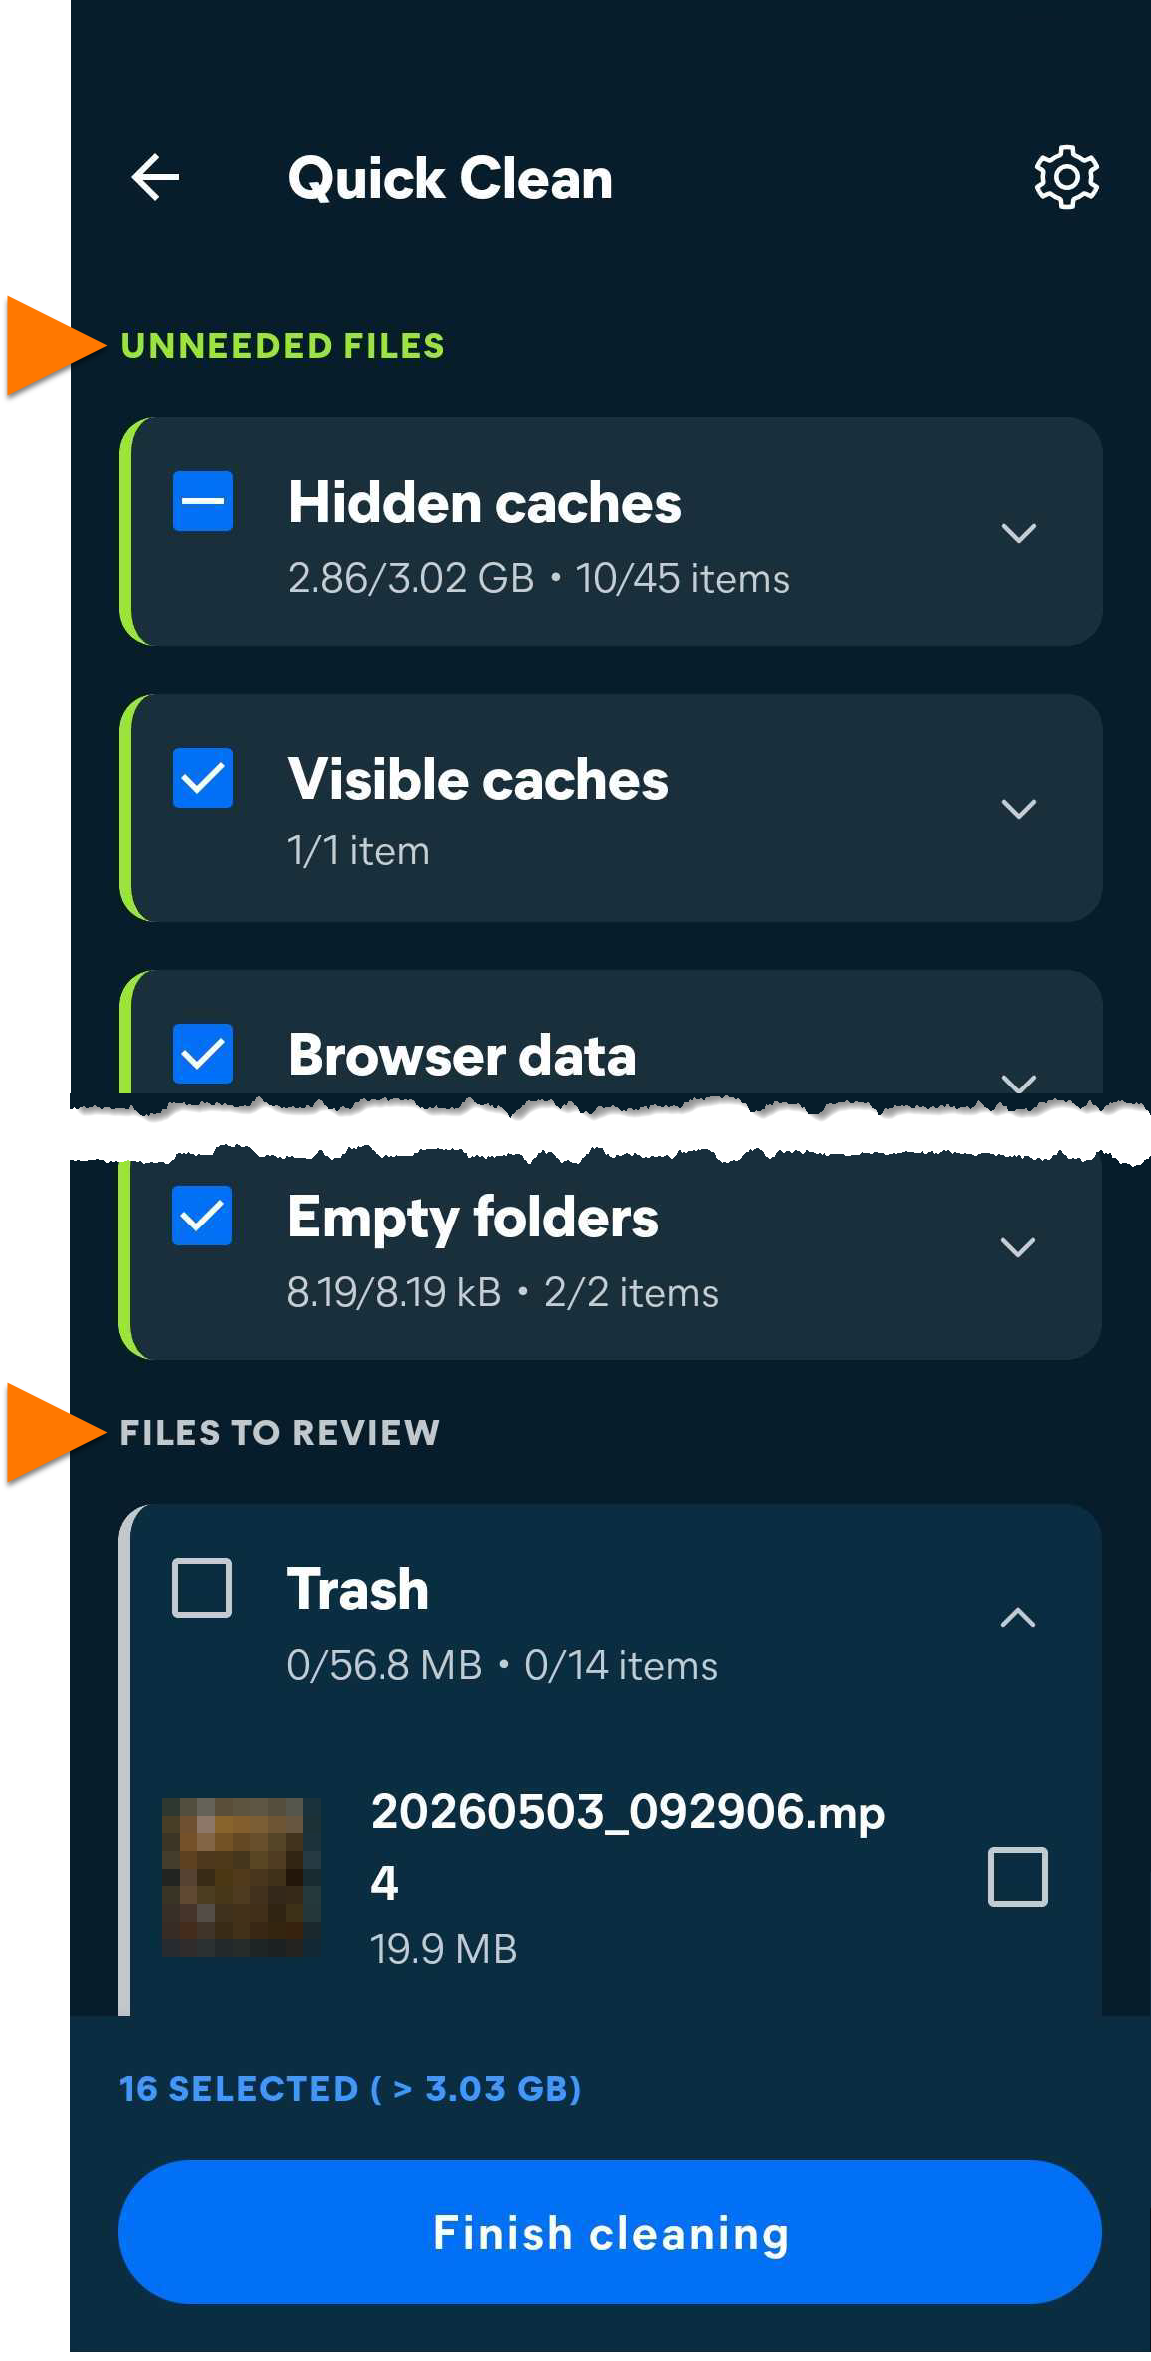
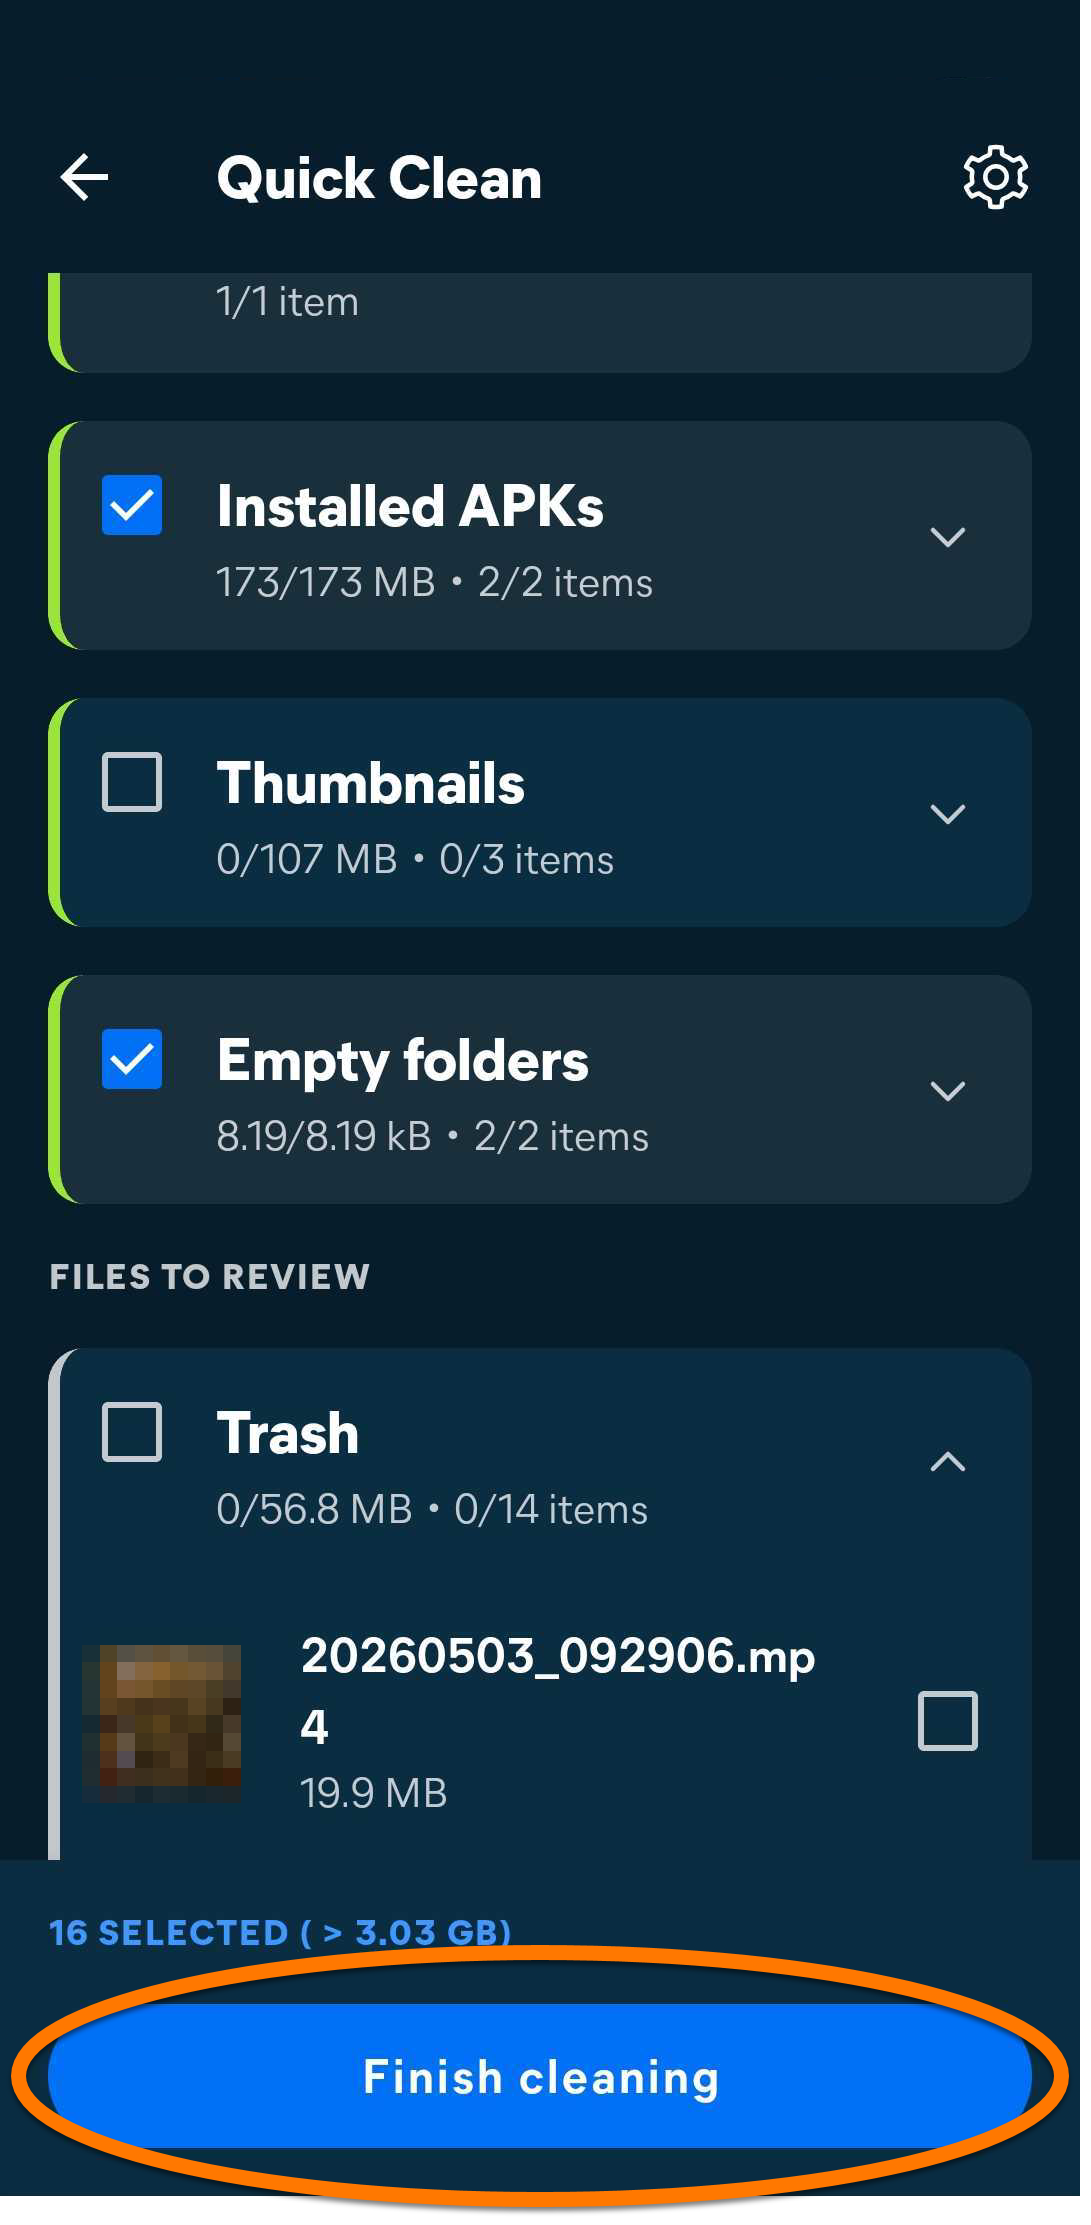
- Tick the item types you want to clean. Item types are divided into two sections (you may see one or both sections, depending on which data types are stored on your device):
- Unneeded files: Data that has been carefully selected to ensure that it is truly dispensable, including visible and hidden cache, browser data, residual files, installed APKs, thumbnails, ad caches, and empty folders.
- Files to review: Data that may not be valuable to you. We recommend reviewing items included in this group and only ticking items that are dispensable. All items are unticked by default and will not be deleted unless you manually select them.
- Tap Finish cleaning to delete the selected items.
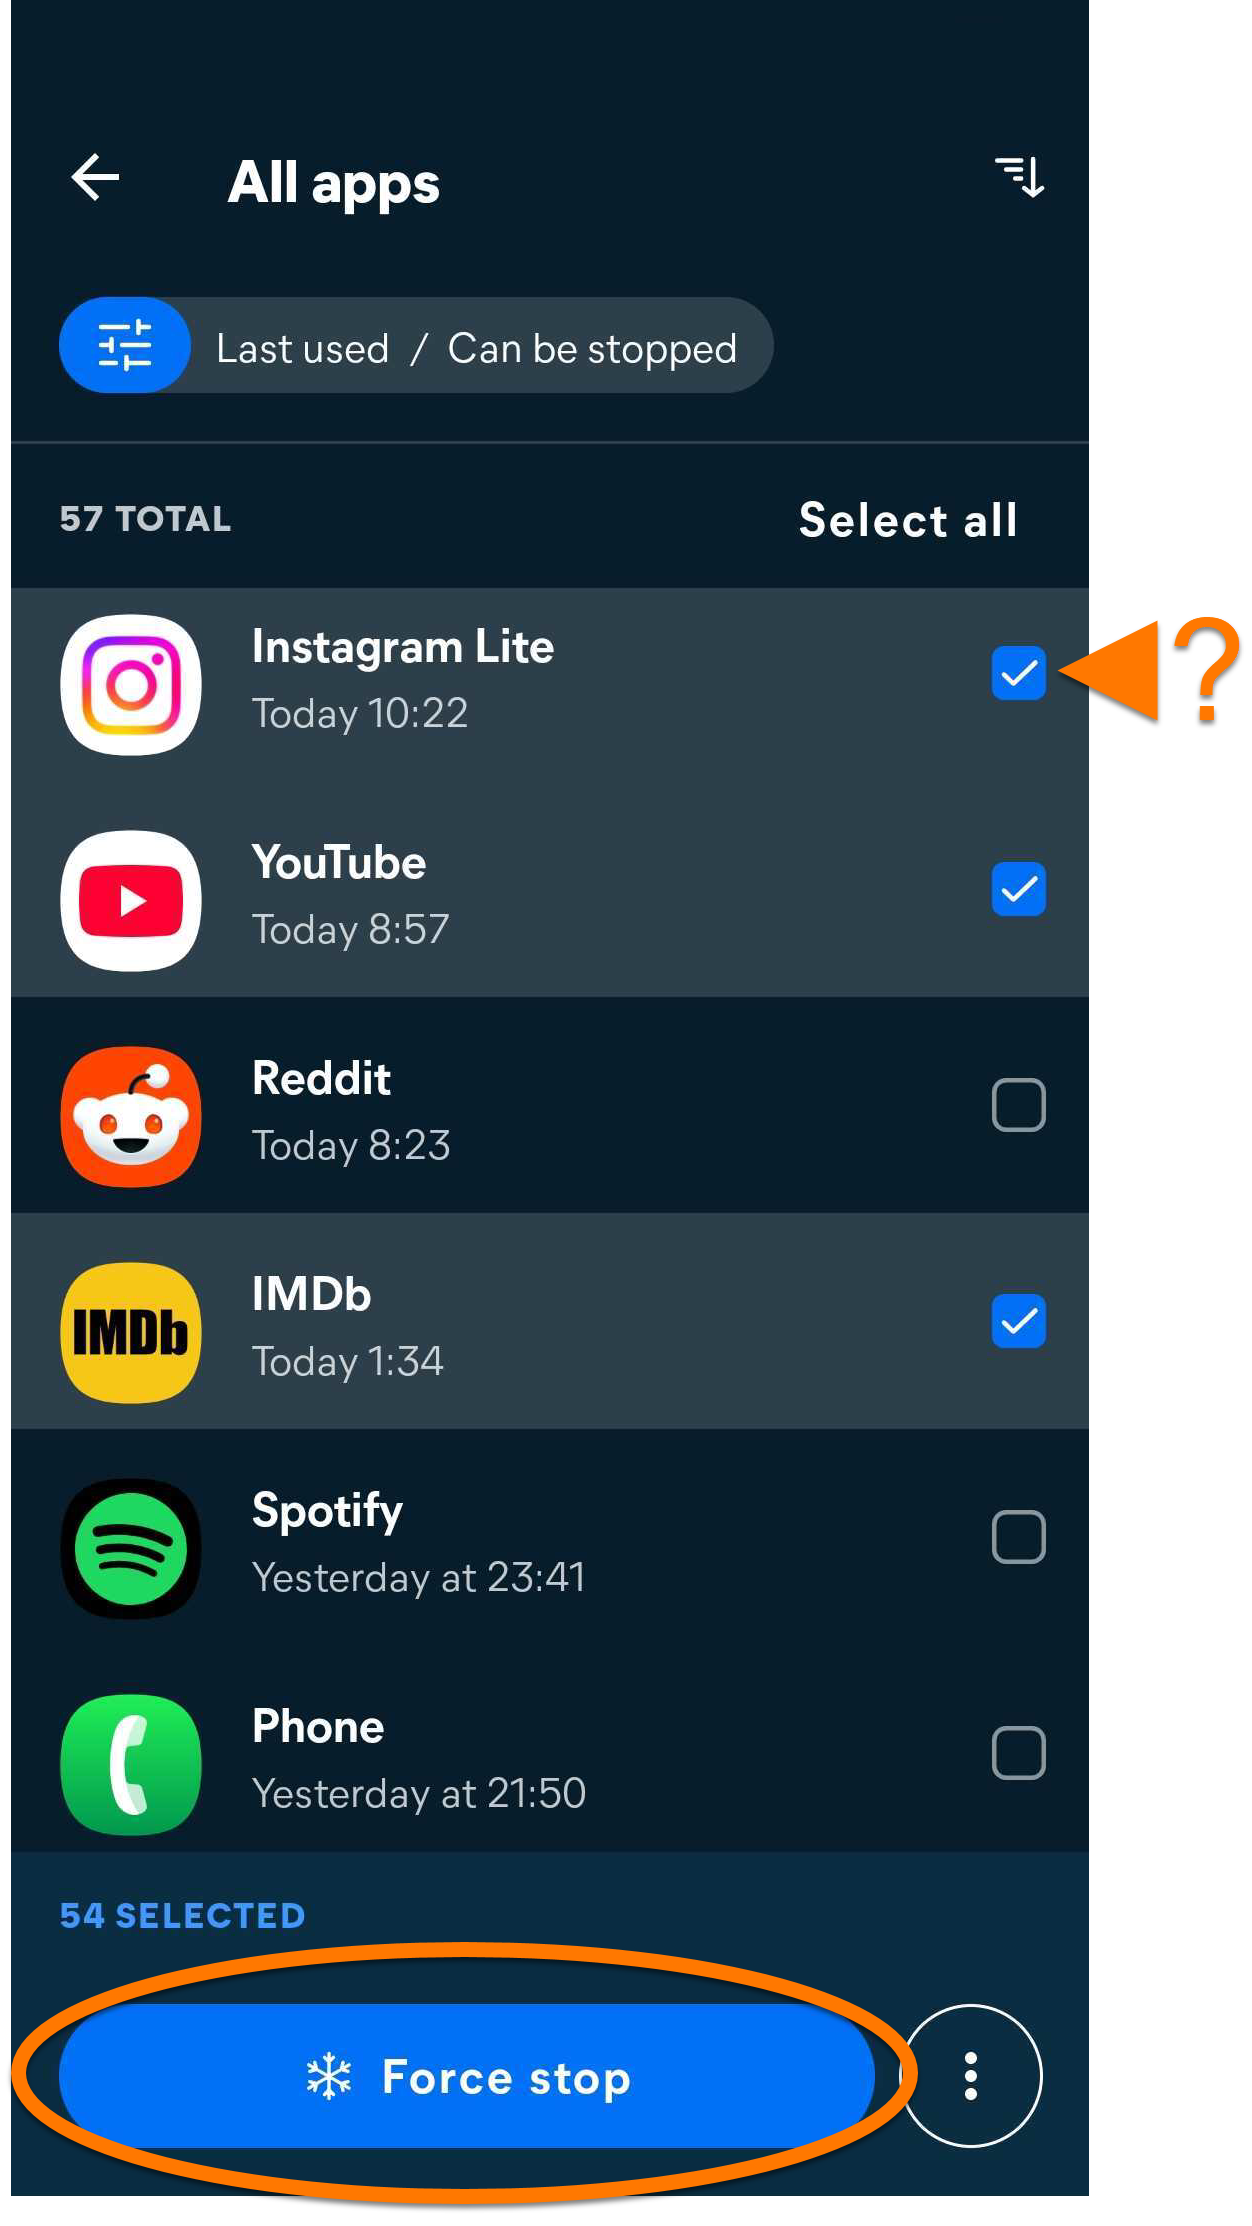
Hibernate apps
The Sleep Mode feature stops apps from running in the background, releasing memory for other tasks.
- Open Avast Cleanup and tap Tools (in the bottom navigation bar) ▸ Sleep Mode.
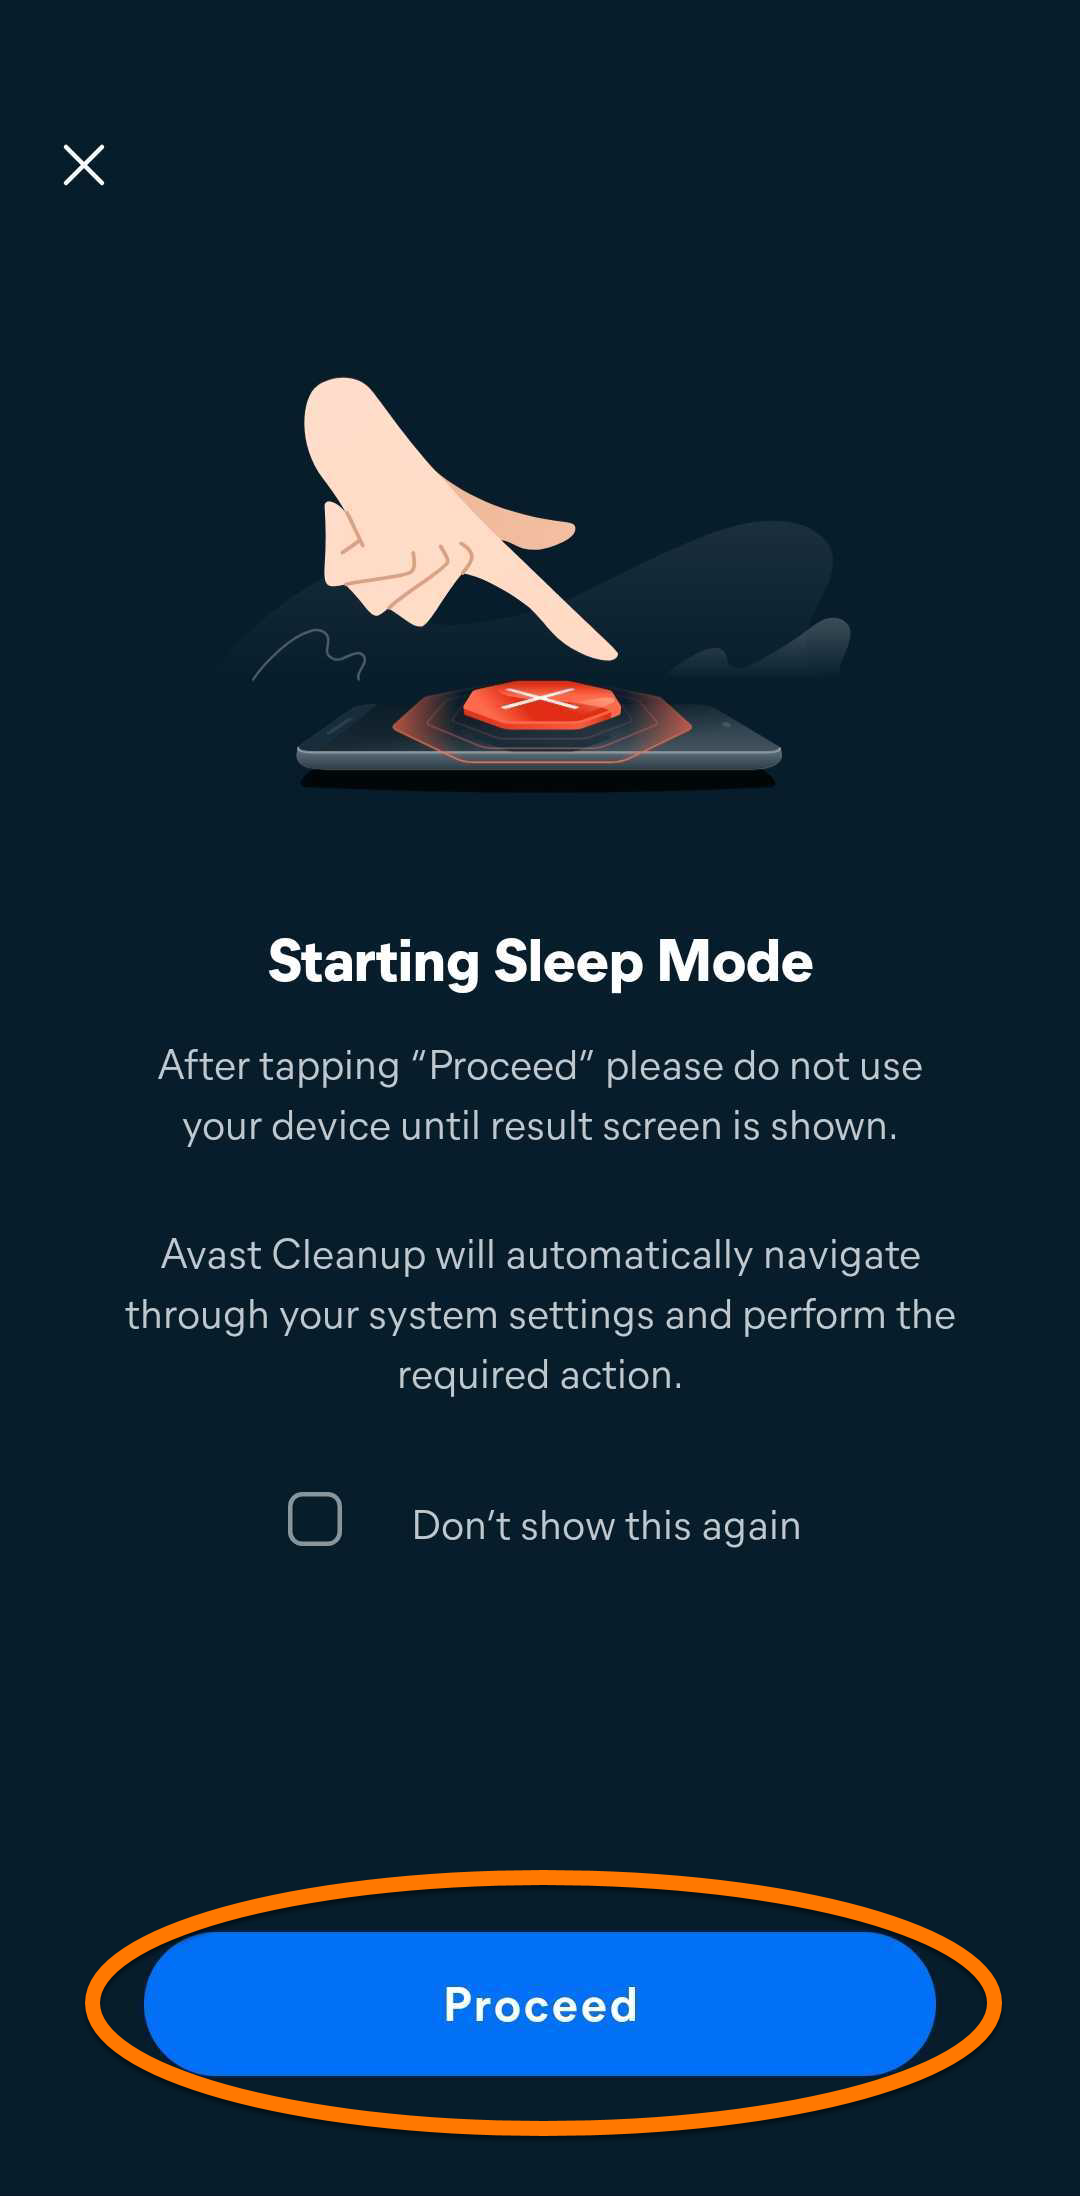
- Tick the apps that you want to stop, then tap Force stop.
You may need to grant Avast Cleanup permission to force stop apps in bulk via your device settings. Tap Grant, then follow the on-screen instructions. If you do not grant this permission, you are prompted to hibernate each selected app individually.
- Tap Proceed.
The selected apps are no longer running in the background.
Optimize your photos and videos
Photo & Video Optimizer help you reduce the size of photos and videos stored on your device to free up storage space while maintaining good quality. You can also choose to keep a backup of the original files.
To optimize photos or videos on your device:
Photo Optimizer
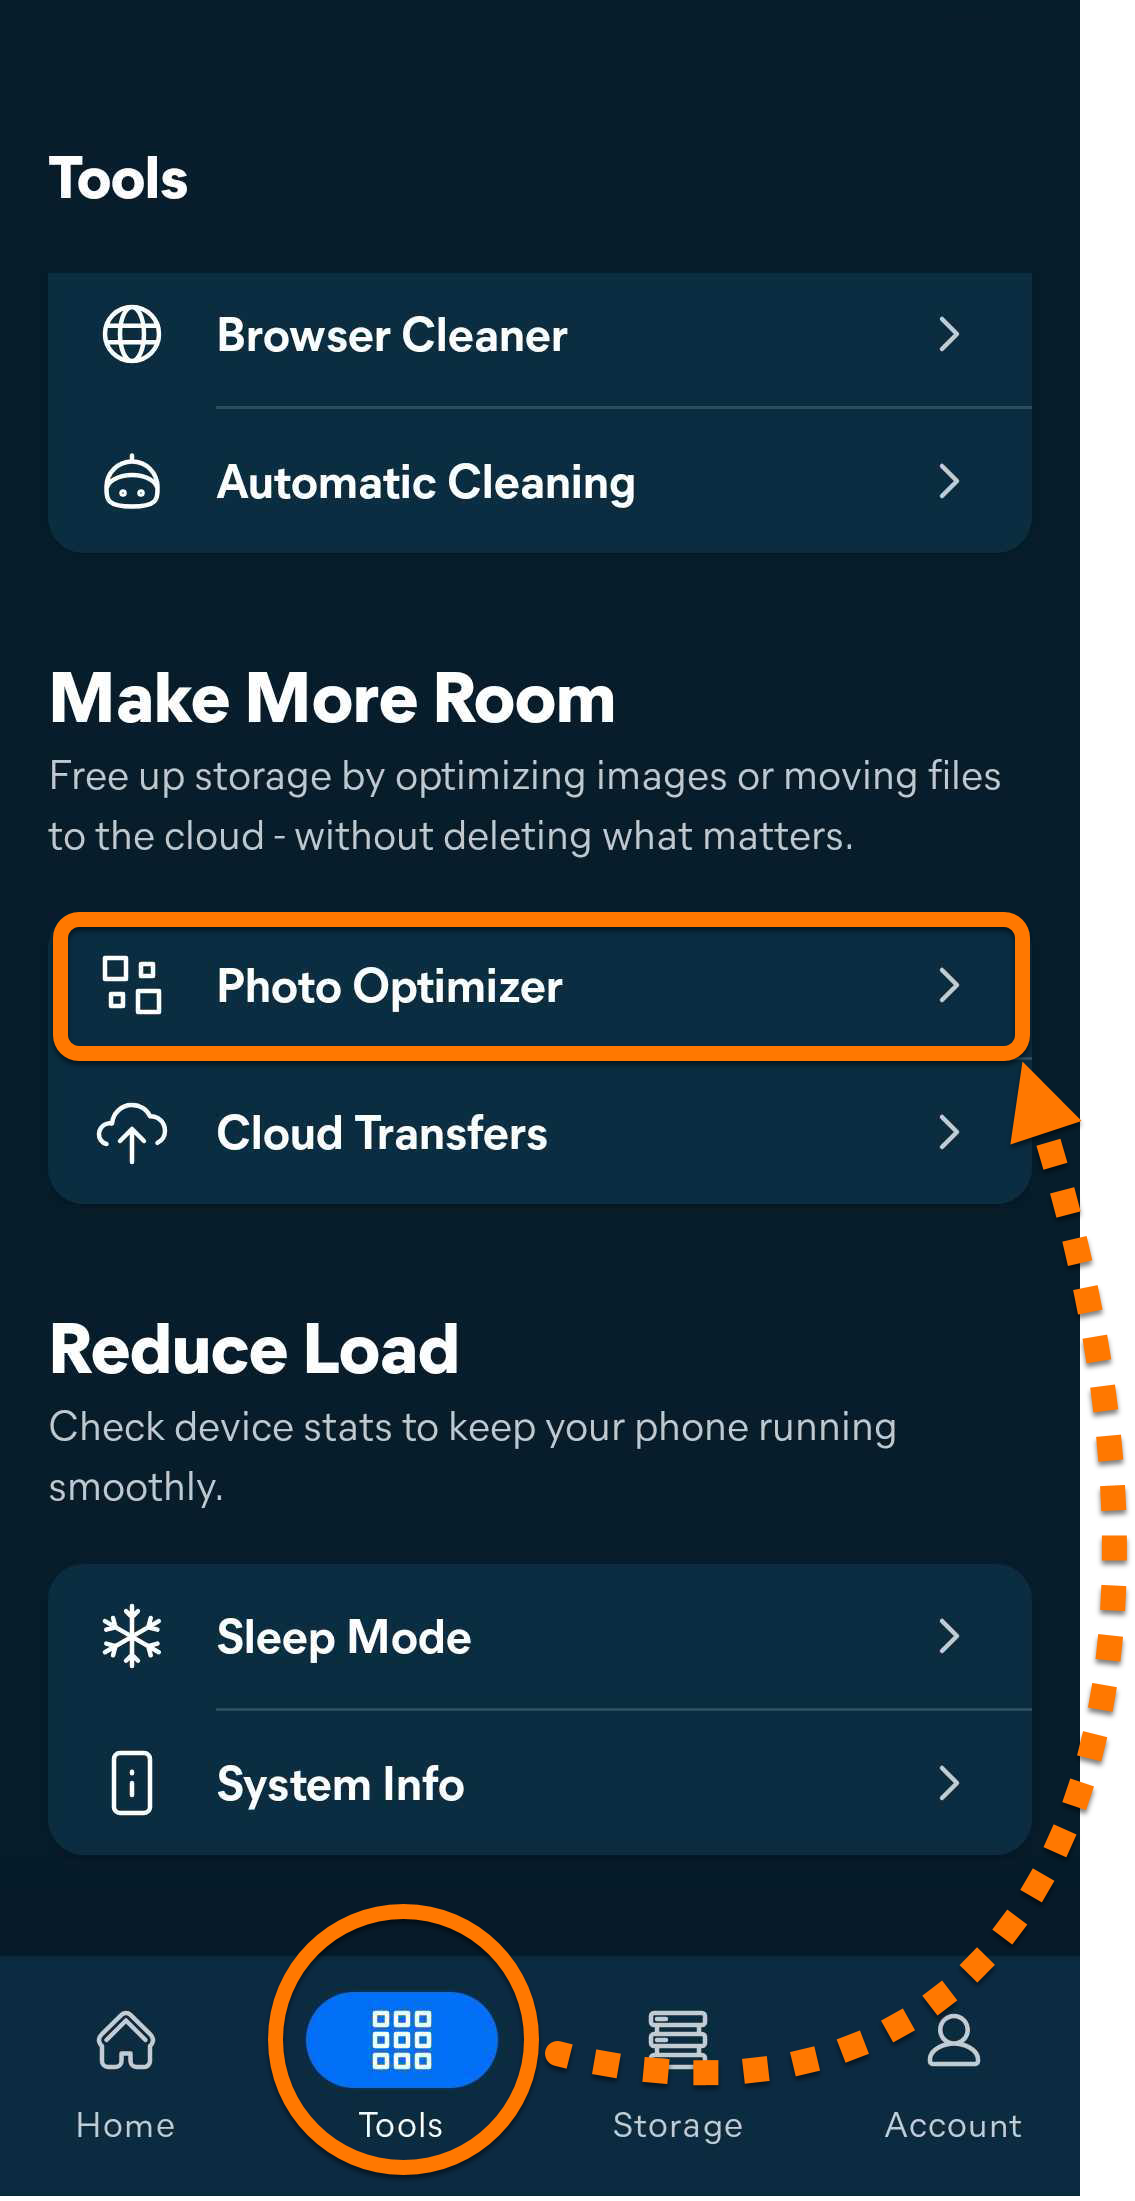
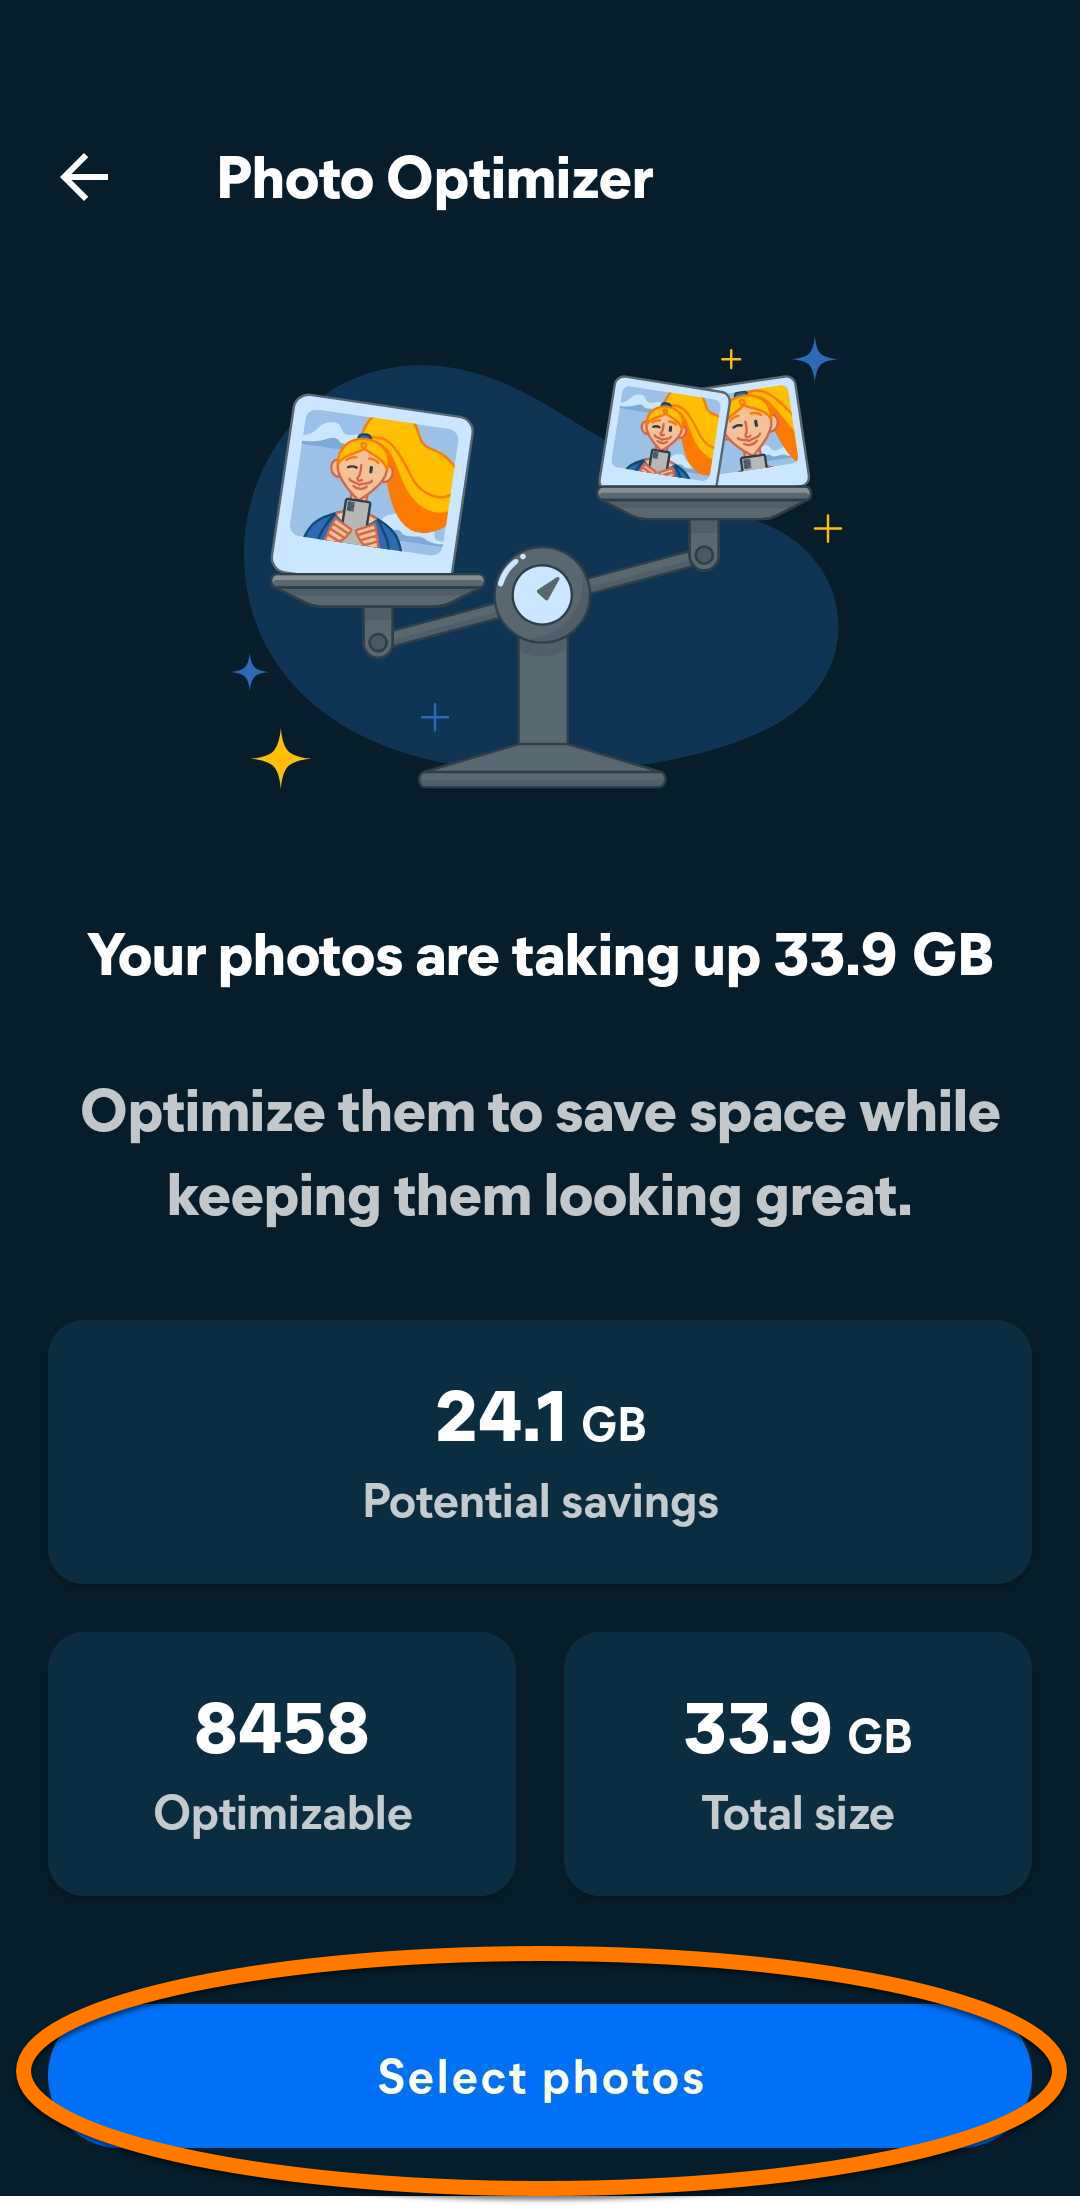
- Open Avast Cleanup and tap Tools (in the bottom navigation bar), then select Photo Optimizer.
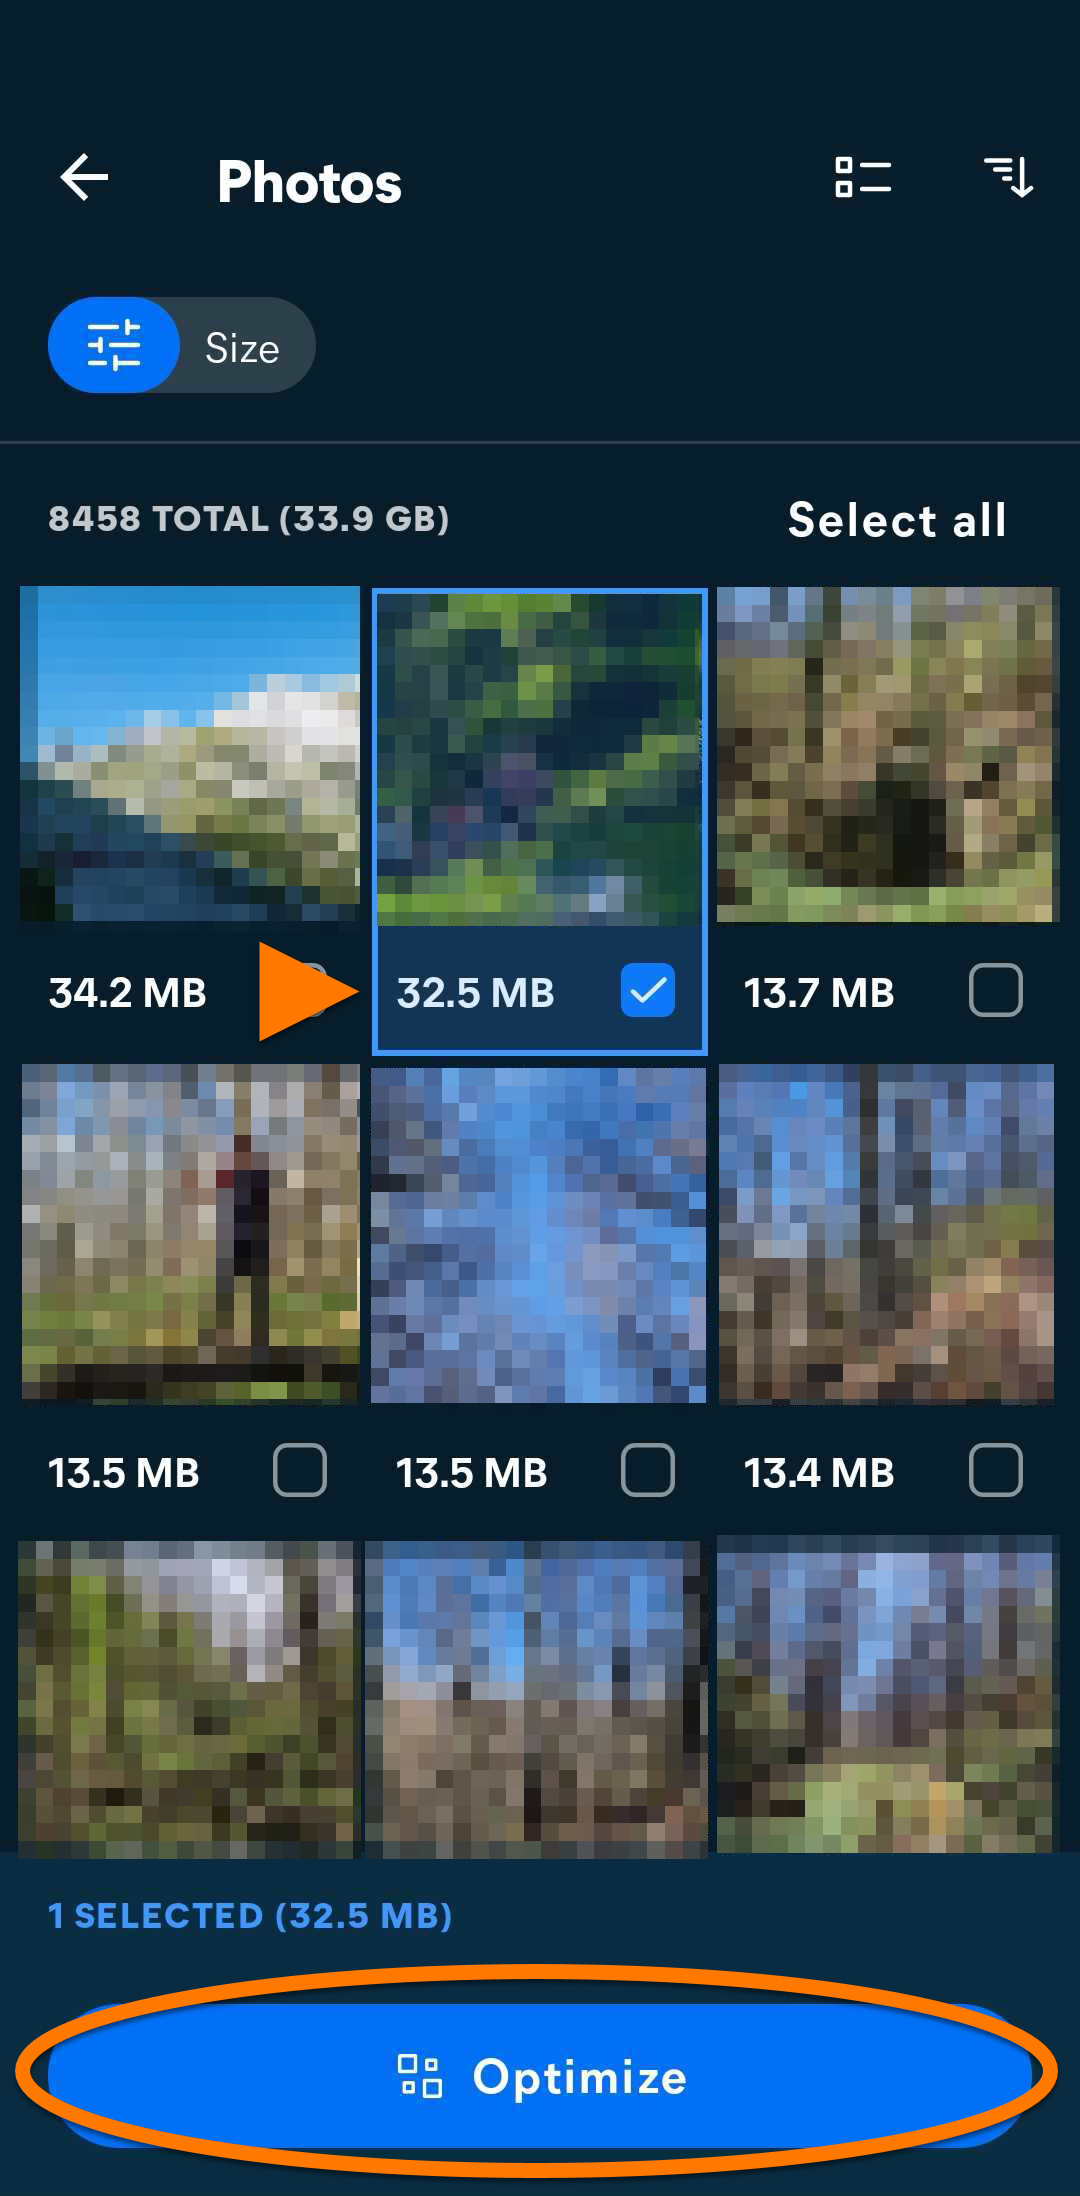
- Wait while Avast Cleanup analyzes your files, then tap Select photos.
- Select the photos you want to optimize, then tap Optimize.
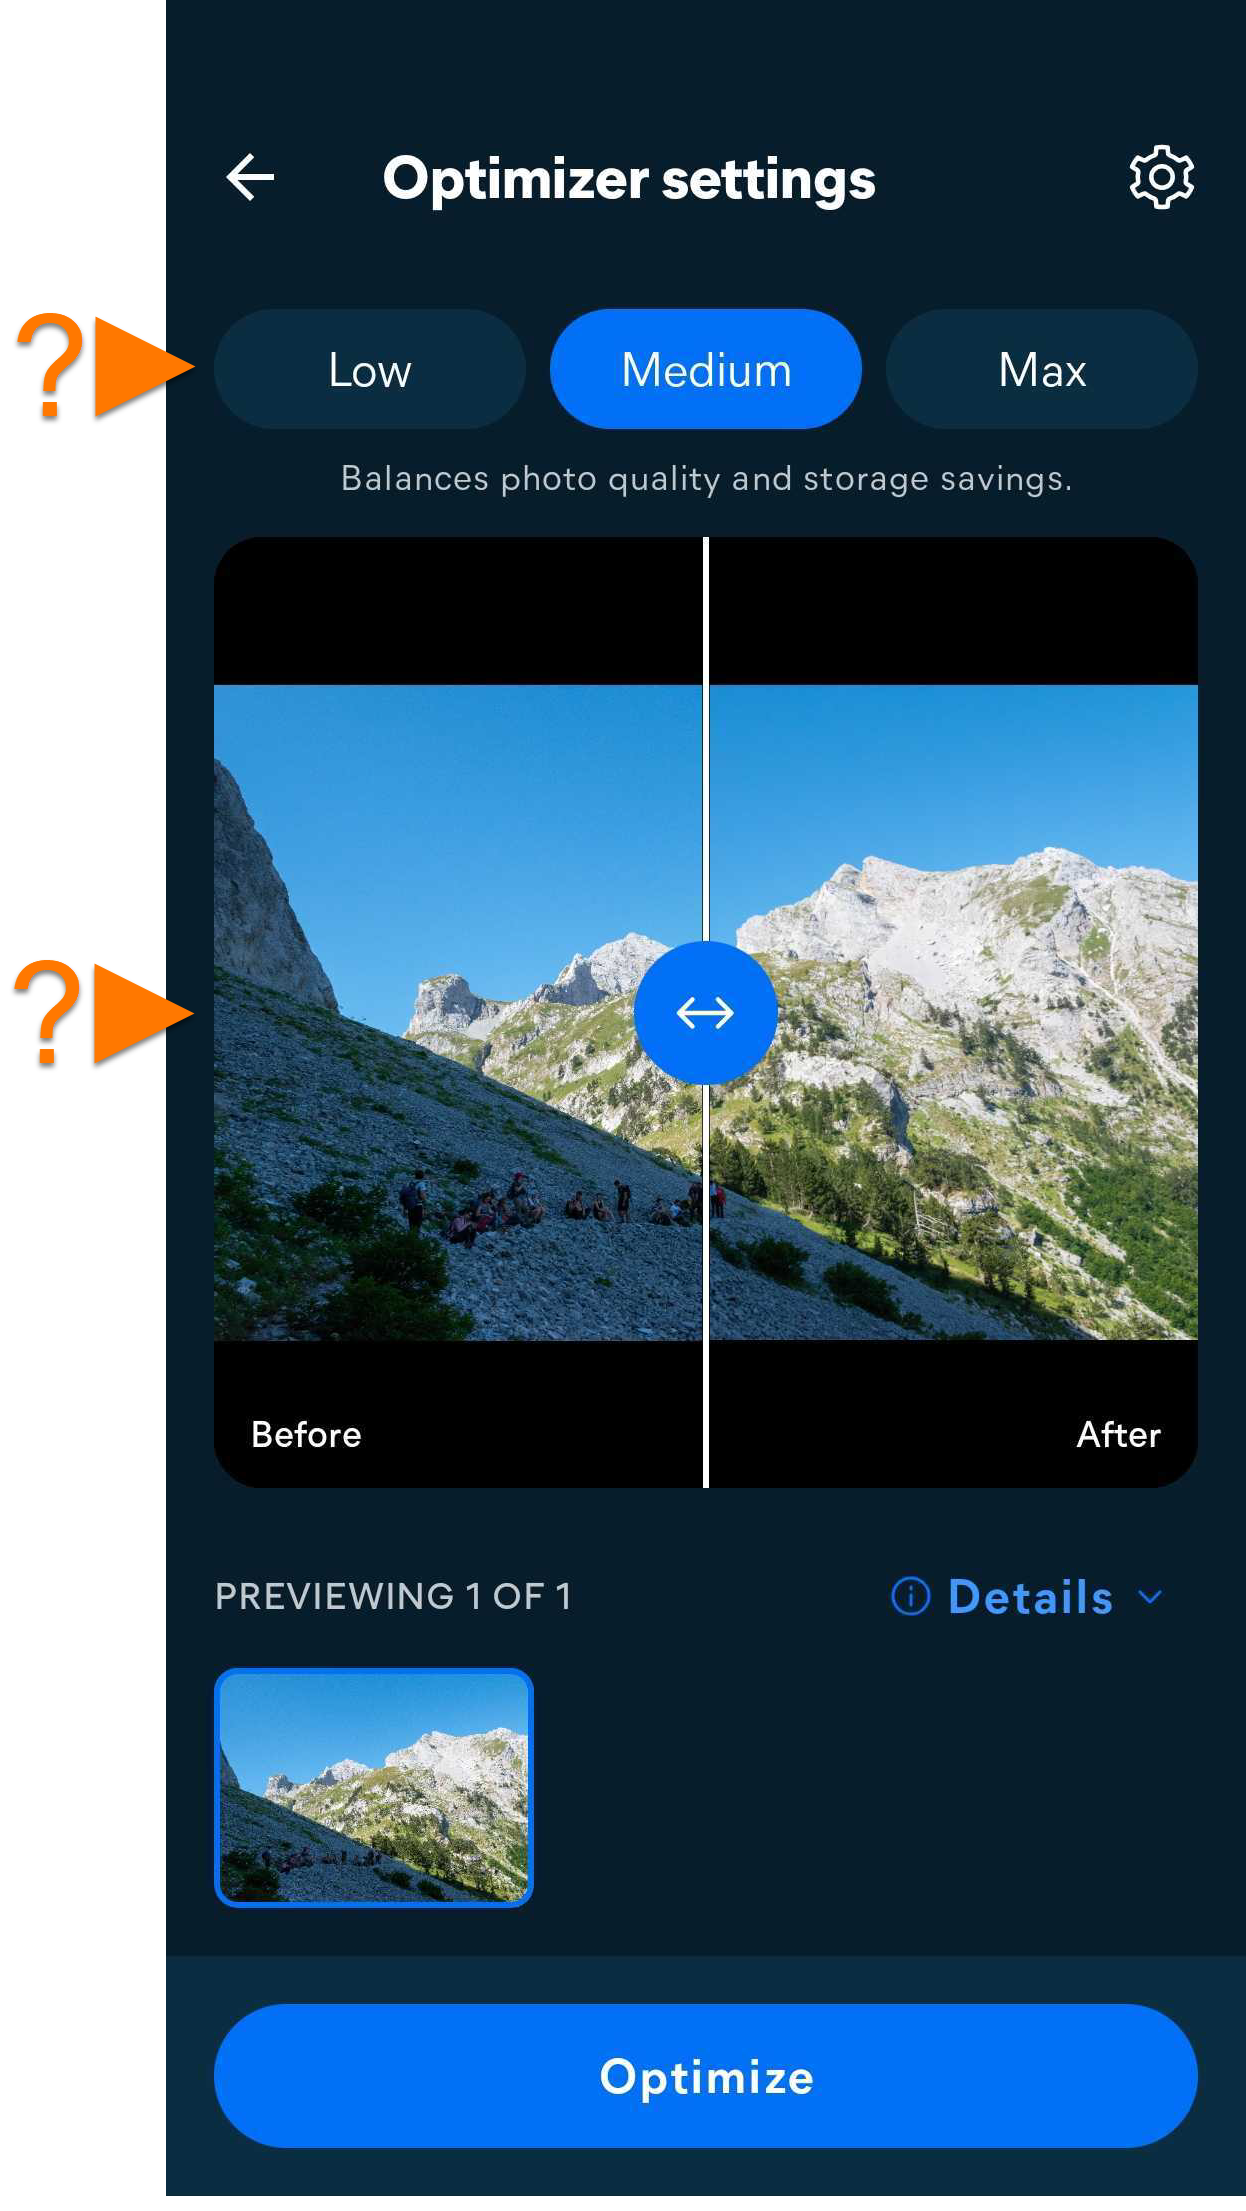
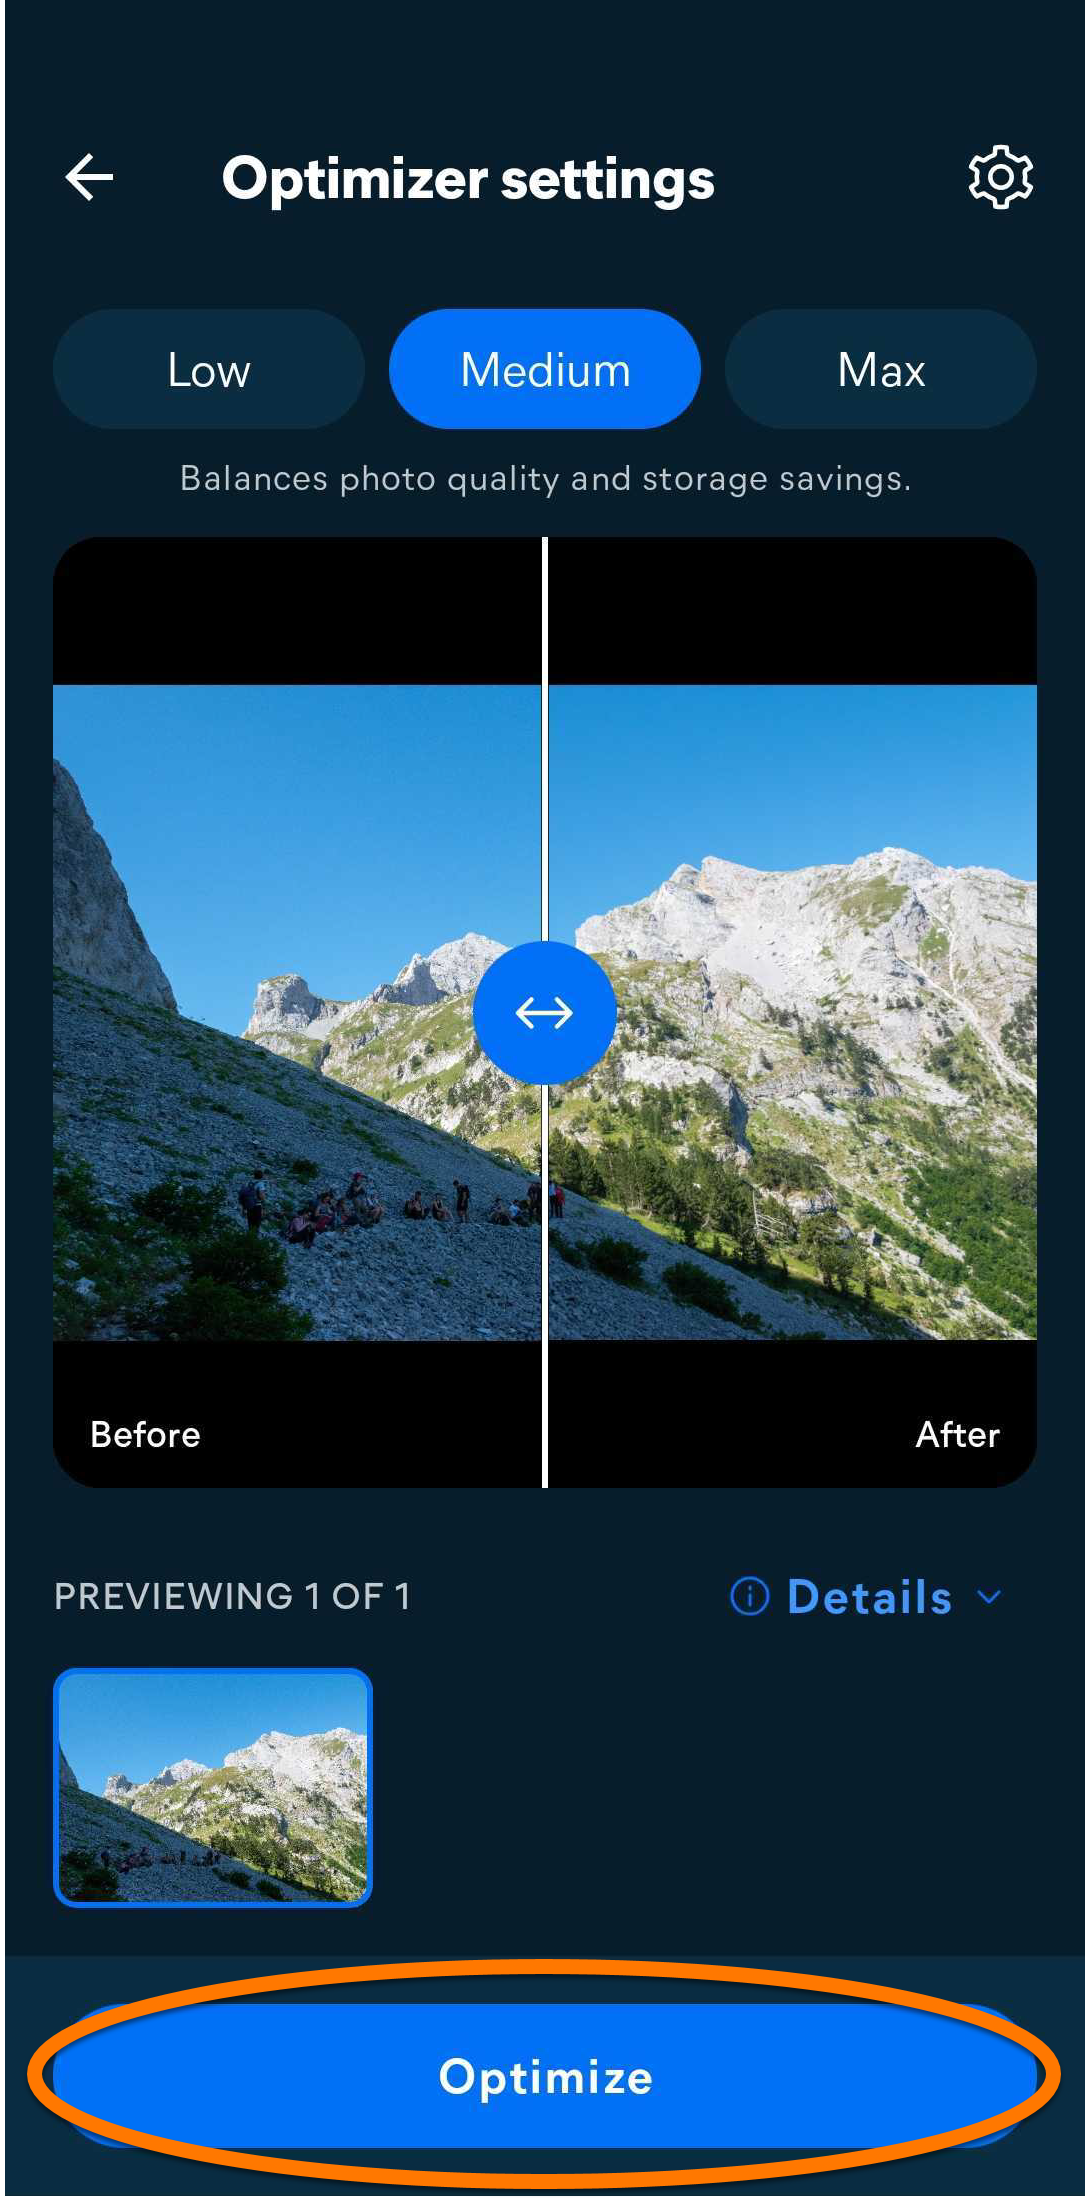
- Choose an optimization level: Low, Medium, or High. Use the slider in the middle to compare the quality before and after optimization.
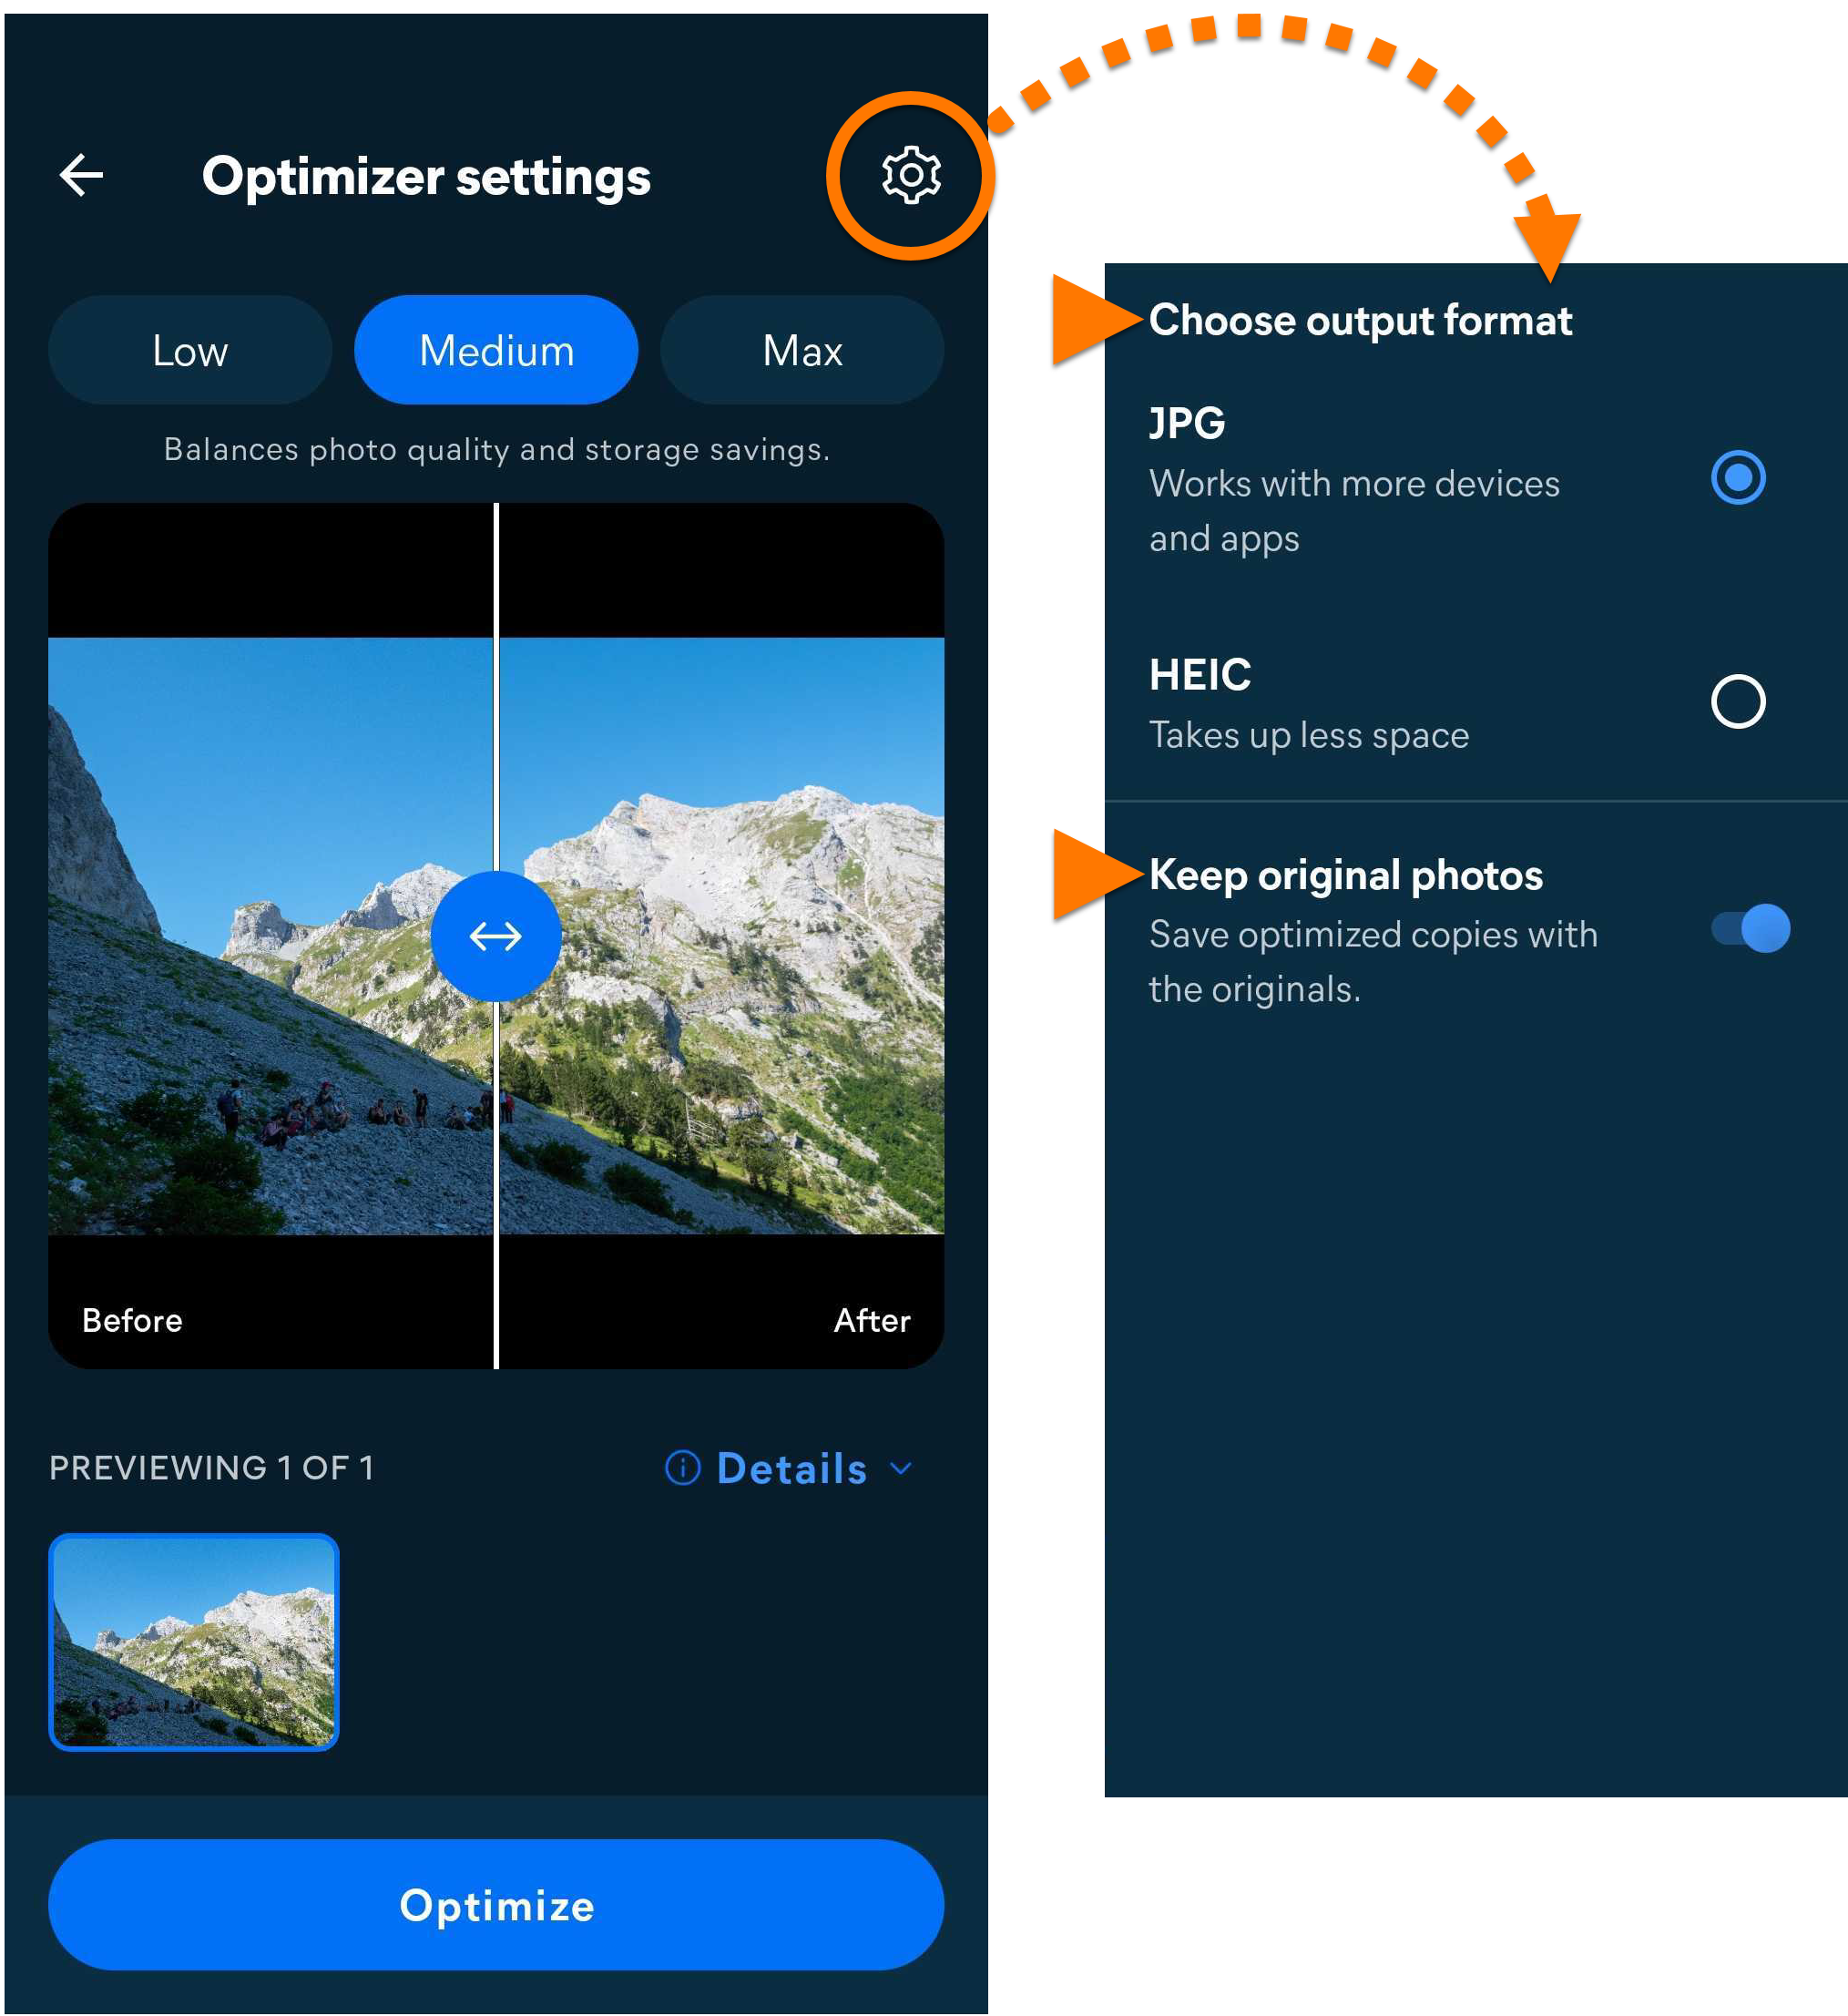
- Optionally, tap Settings (the gear icon) in the top-right corner to select the output format and choose whether to keep the original photos.
- Optionally, tap Details to compare the quality and file size before and after optimization.
- Tap Optimize to start optimizing the selected items.
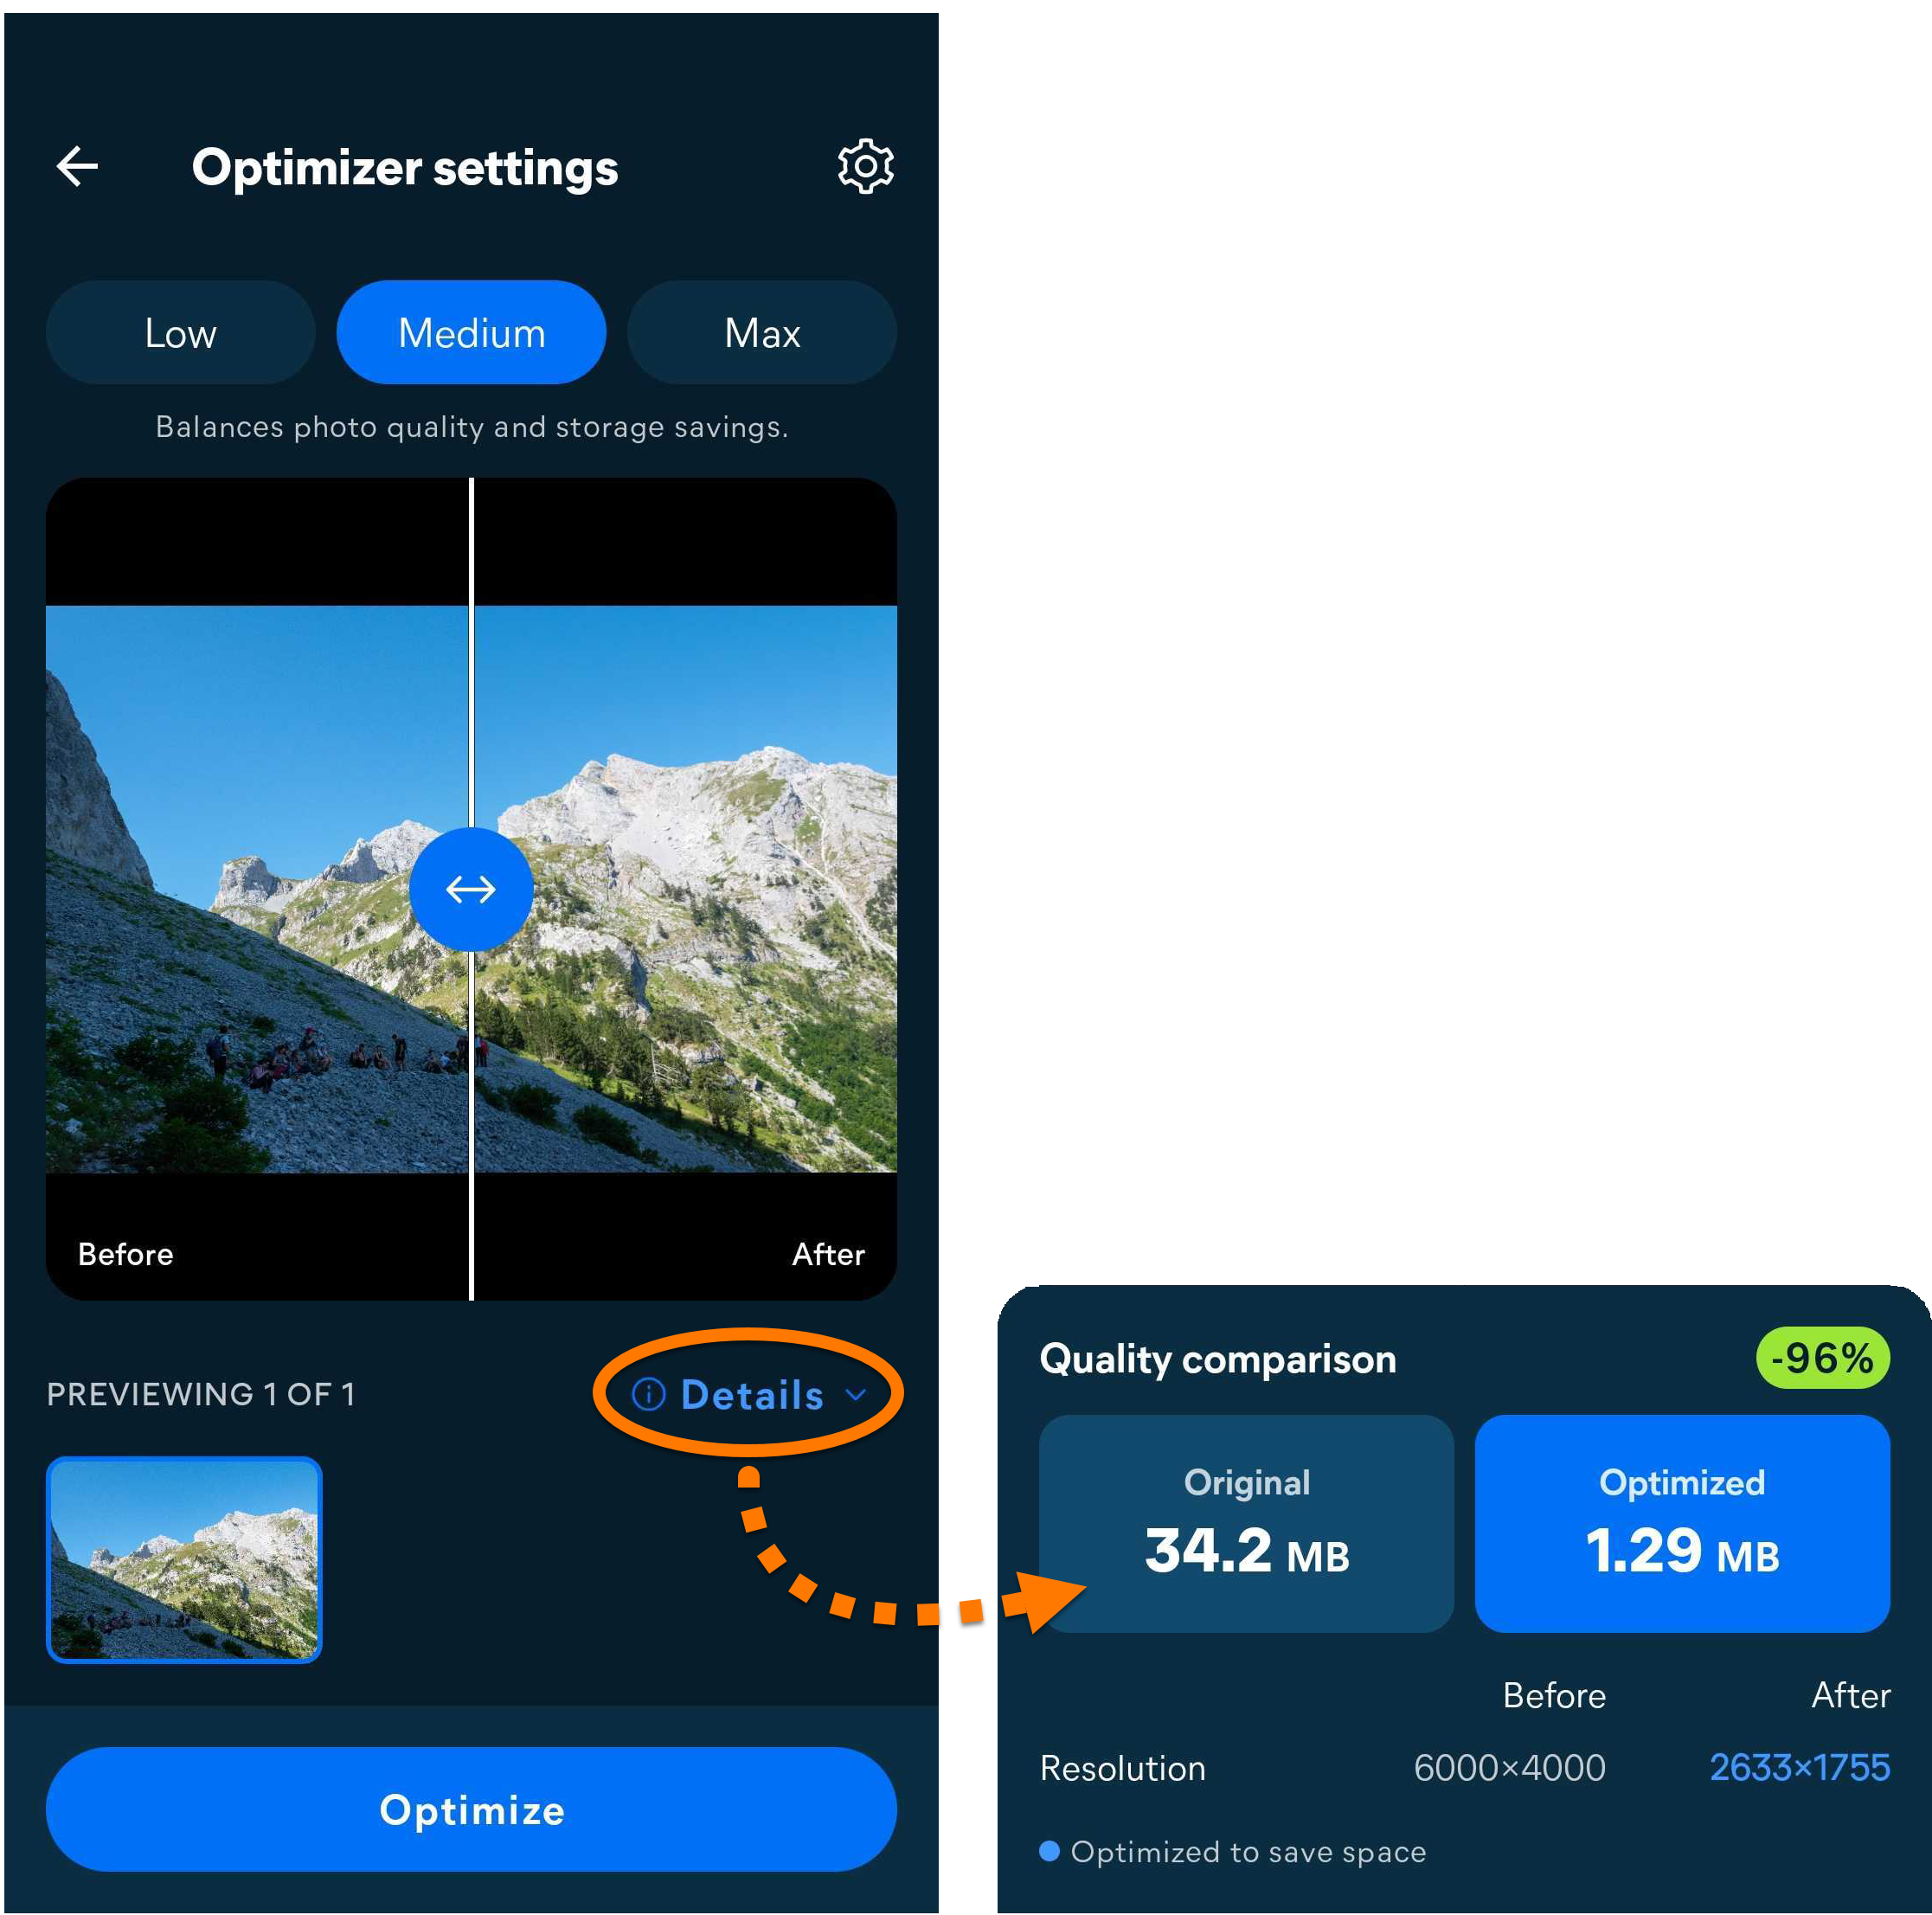
When the optimization is complete, tap Optimized results to view the optimized items and the storage space saved.
Video Optimizer
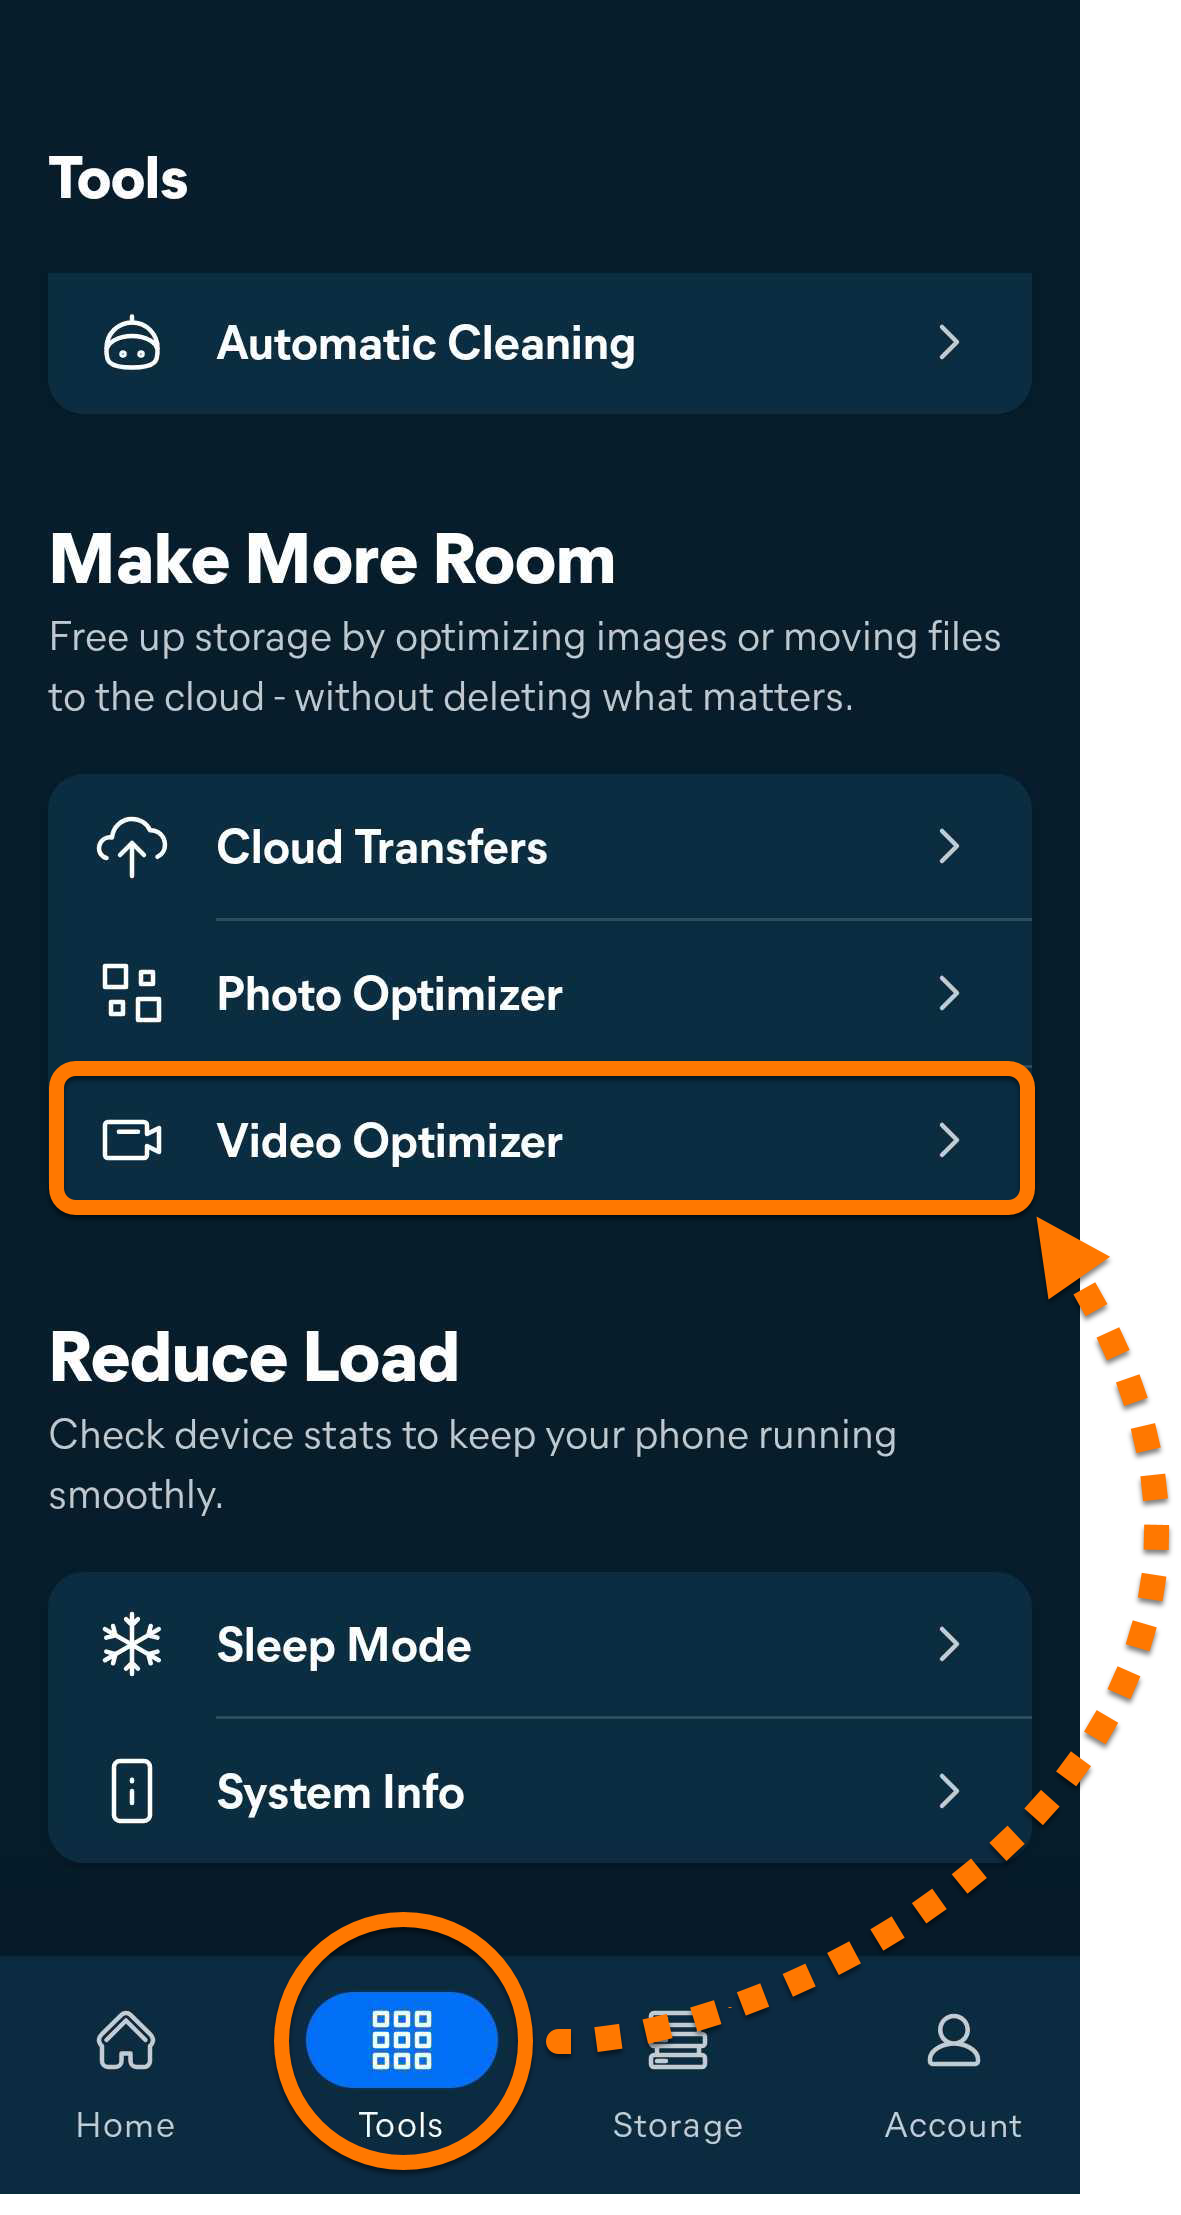
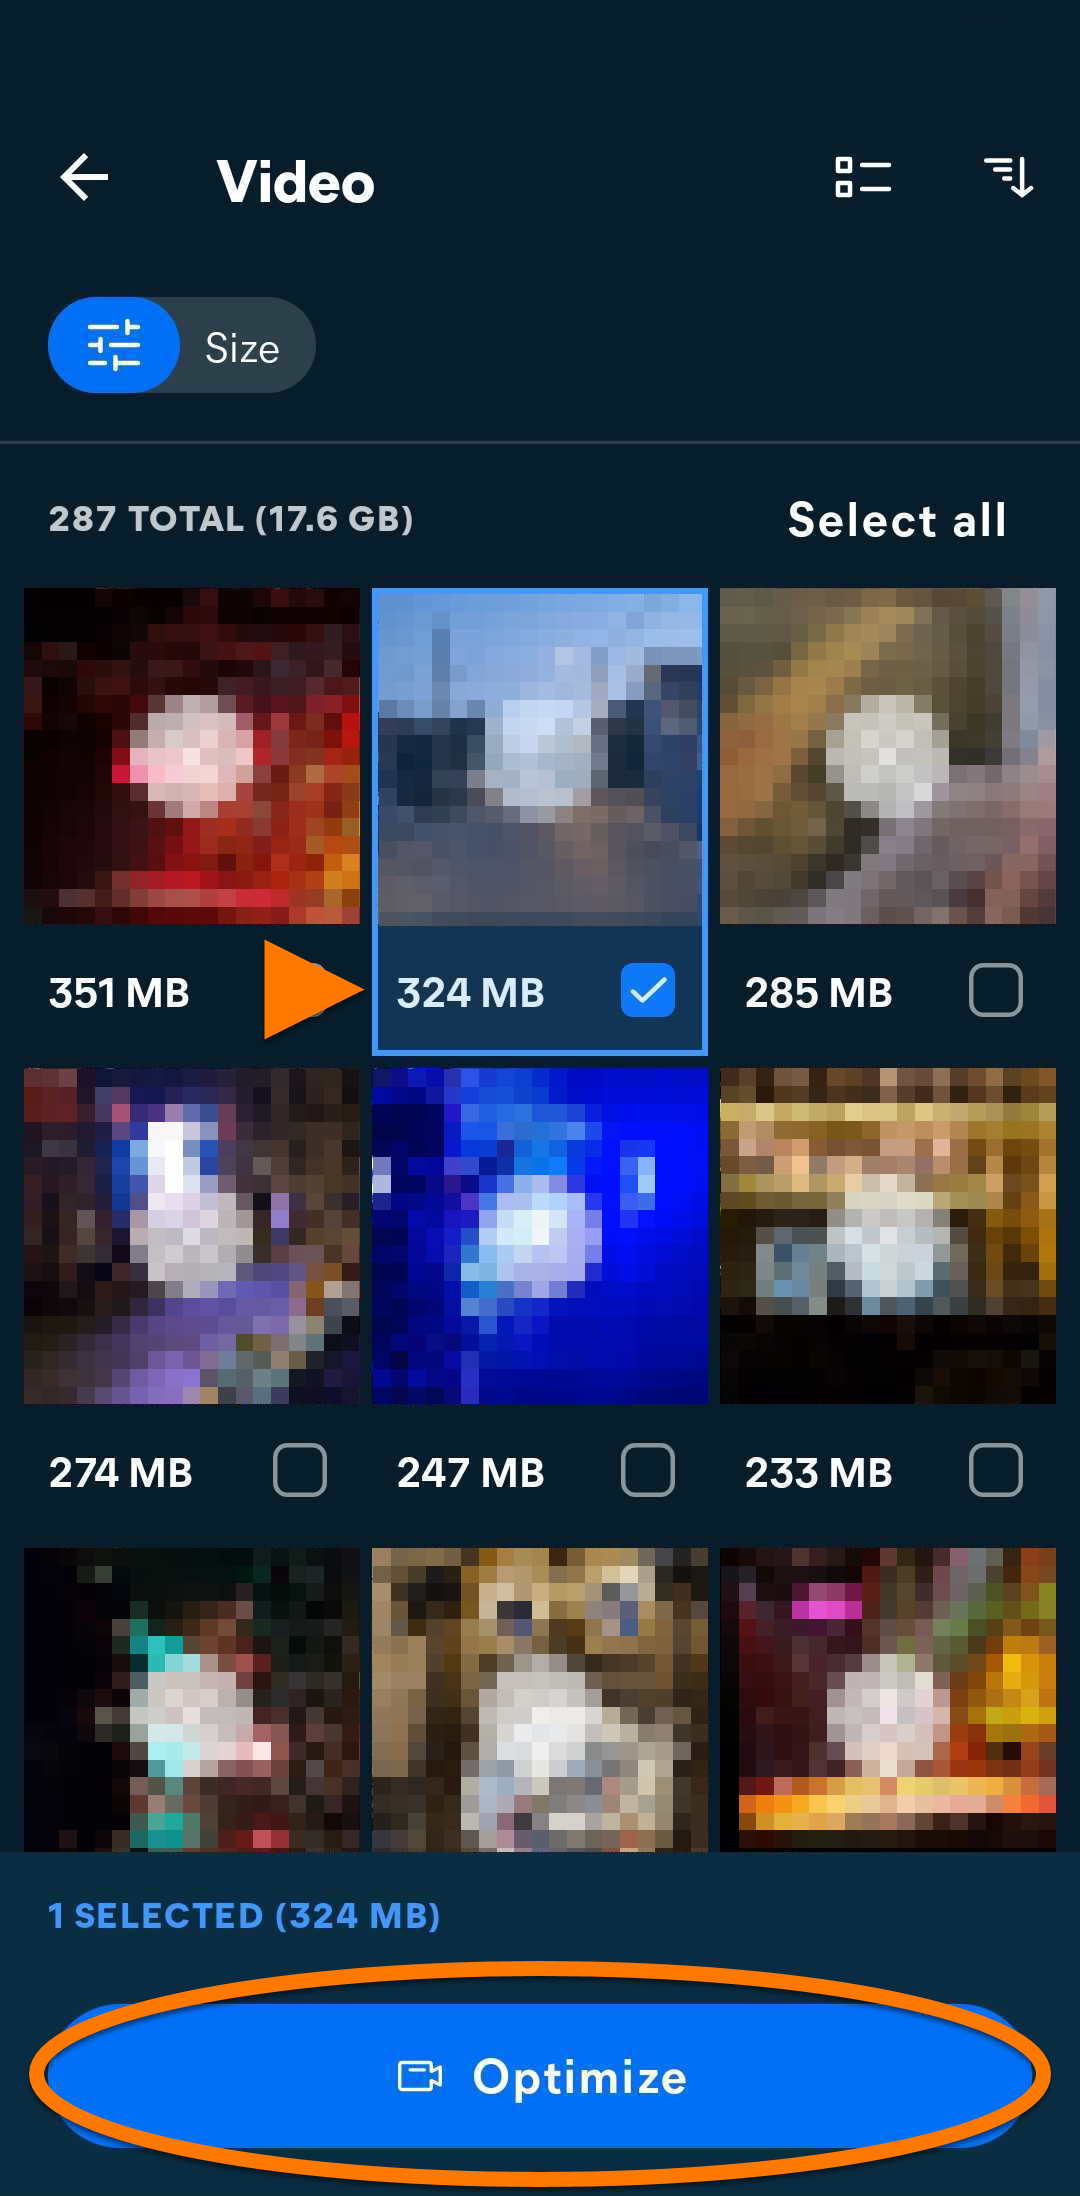
- Open Avast Cleanup and tap Tools (in the bottom navigation bar), then select Video Optimizer.
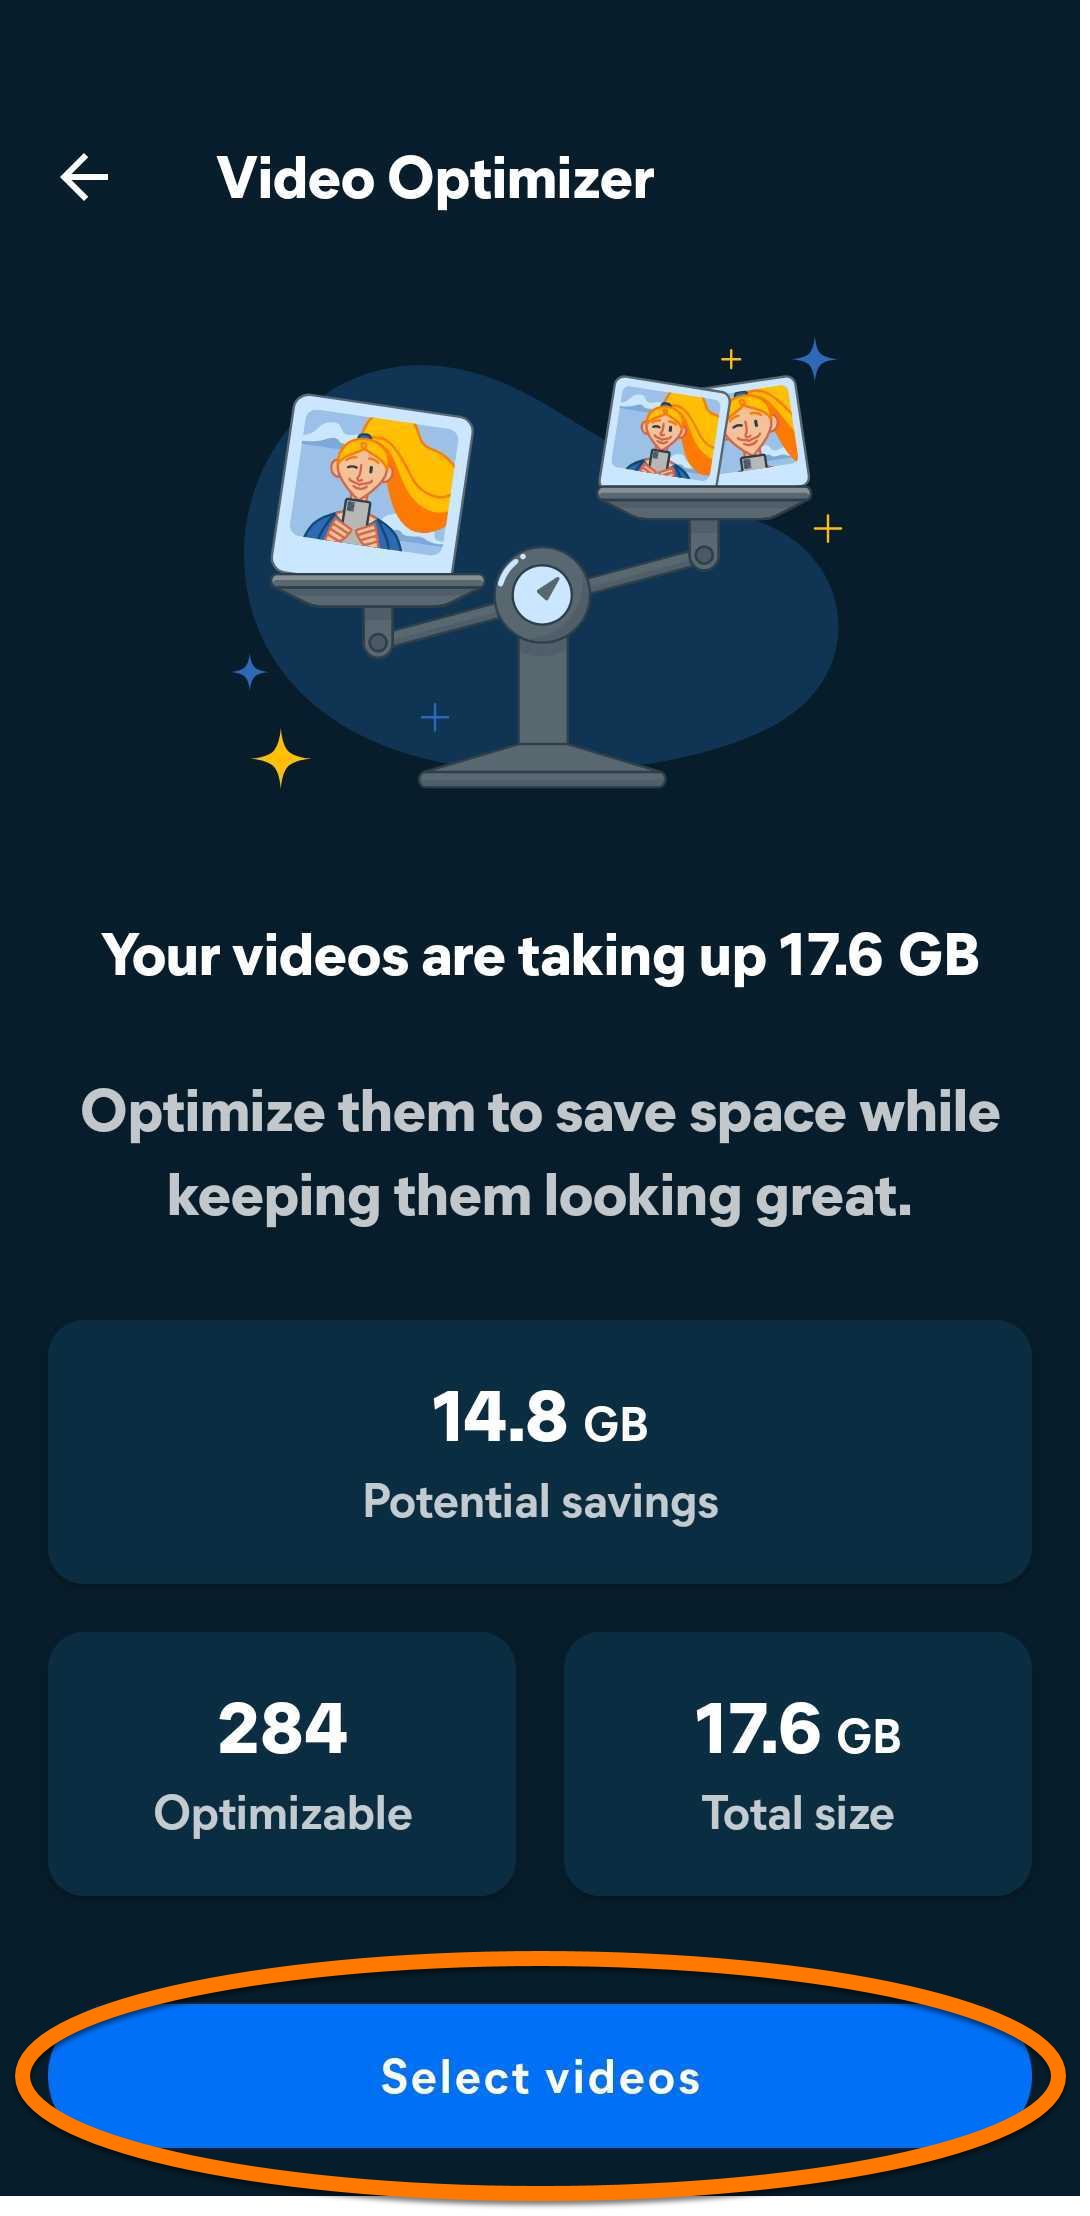
- Wait while Avast Cleanup analyzes your files, then tap Select videos.
- Select the videos you want to optimize, then tap Optimize.
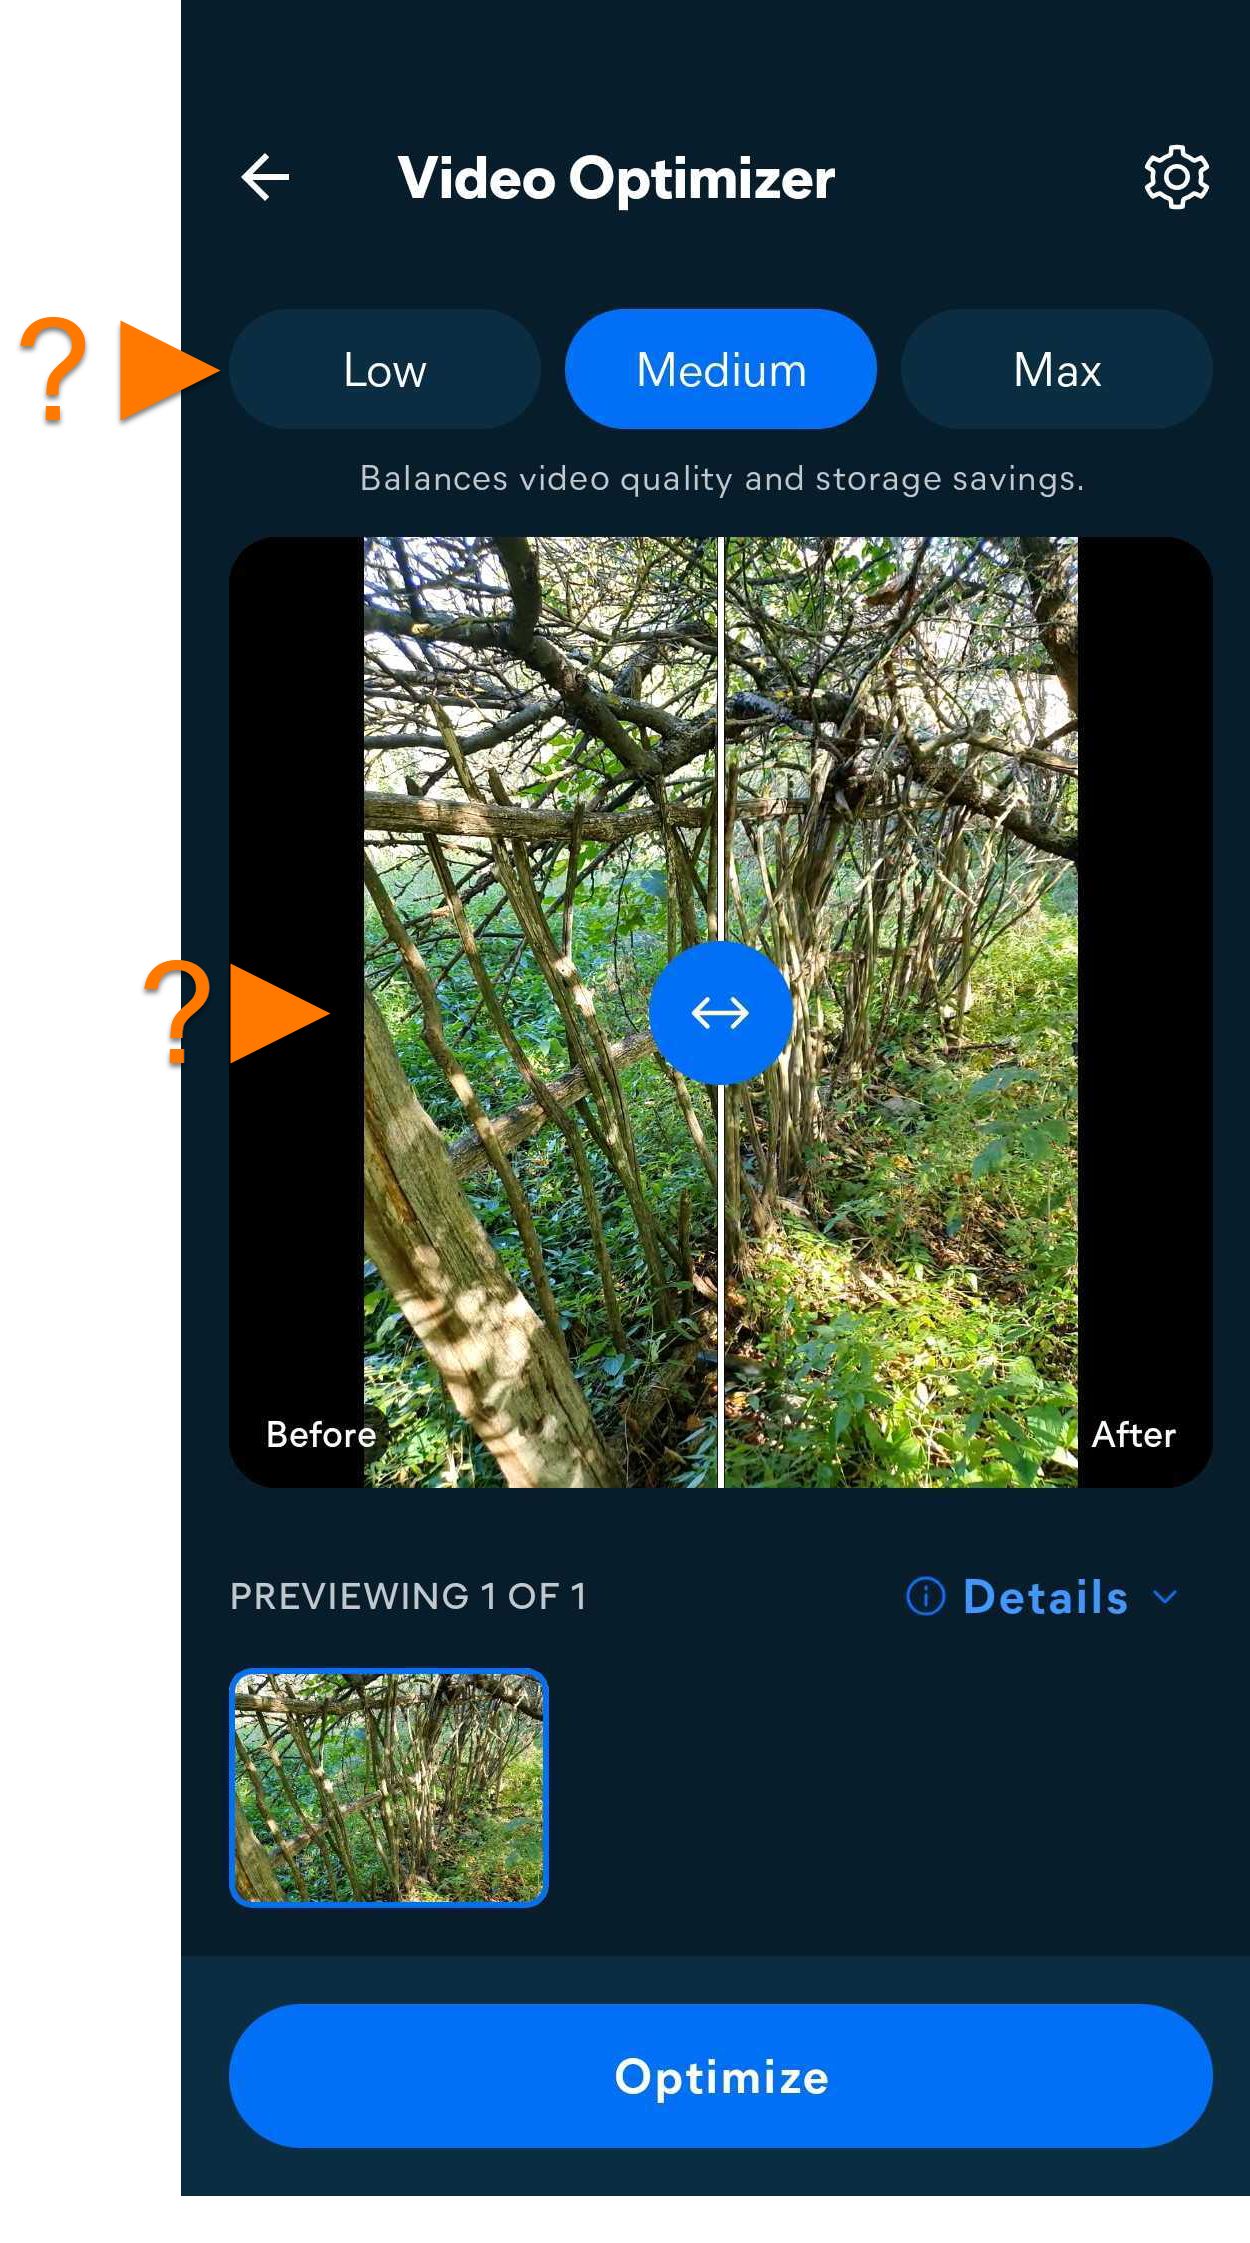
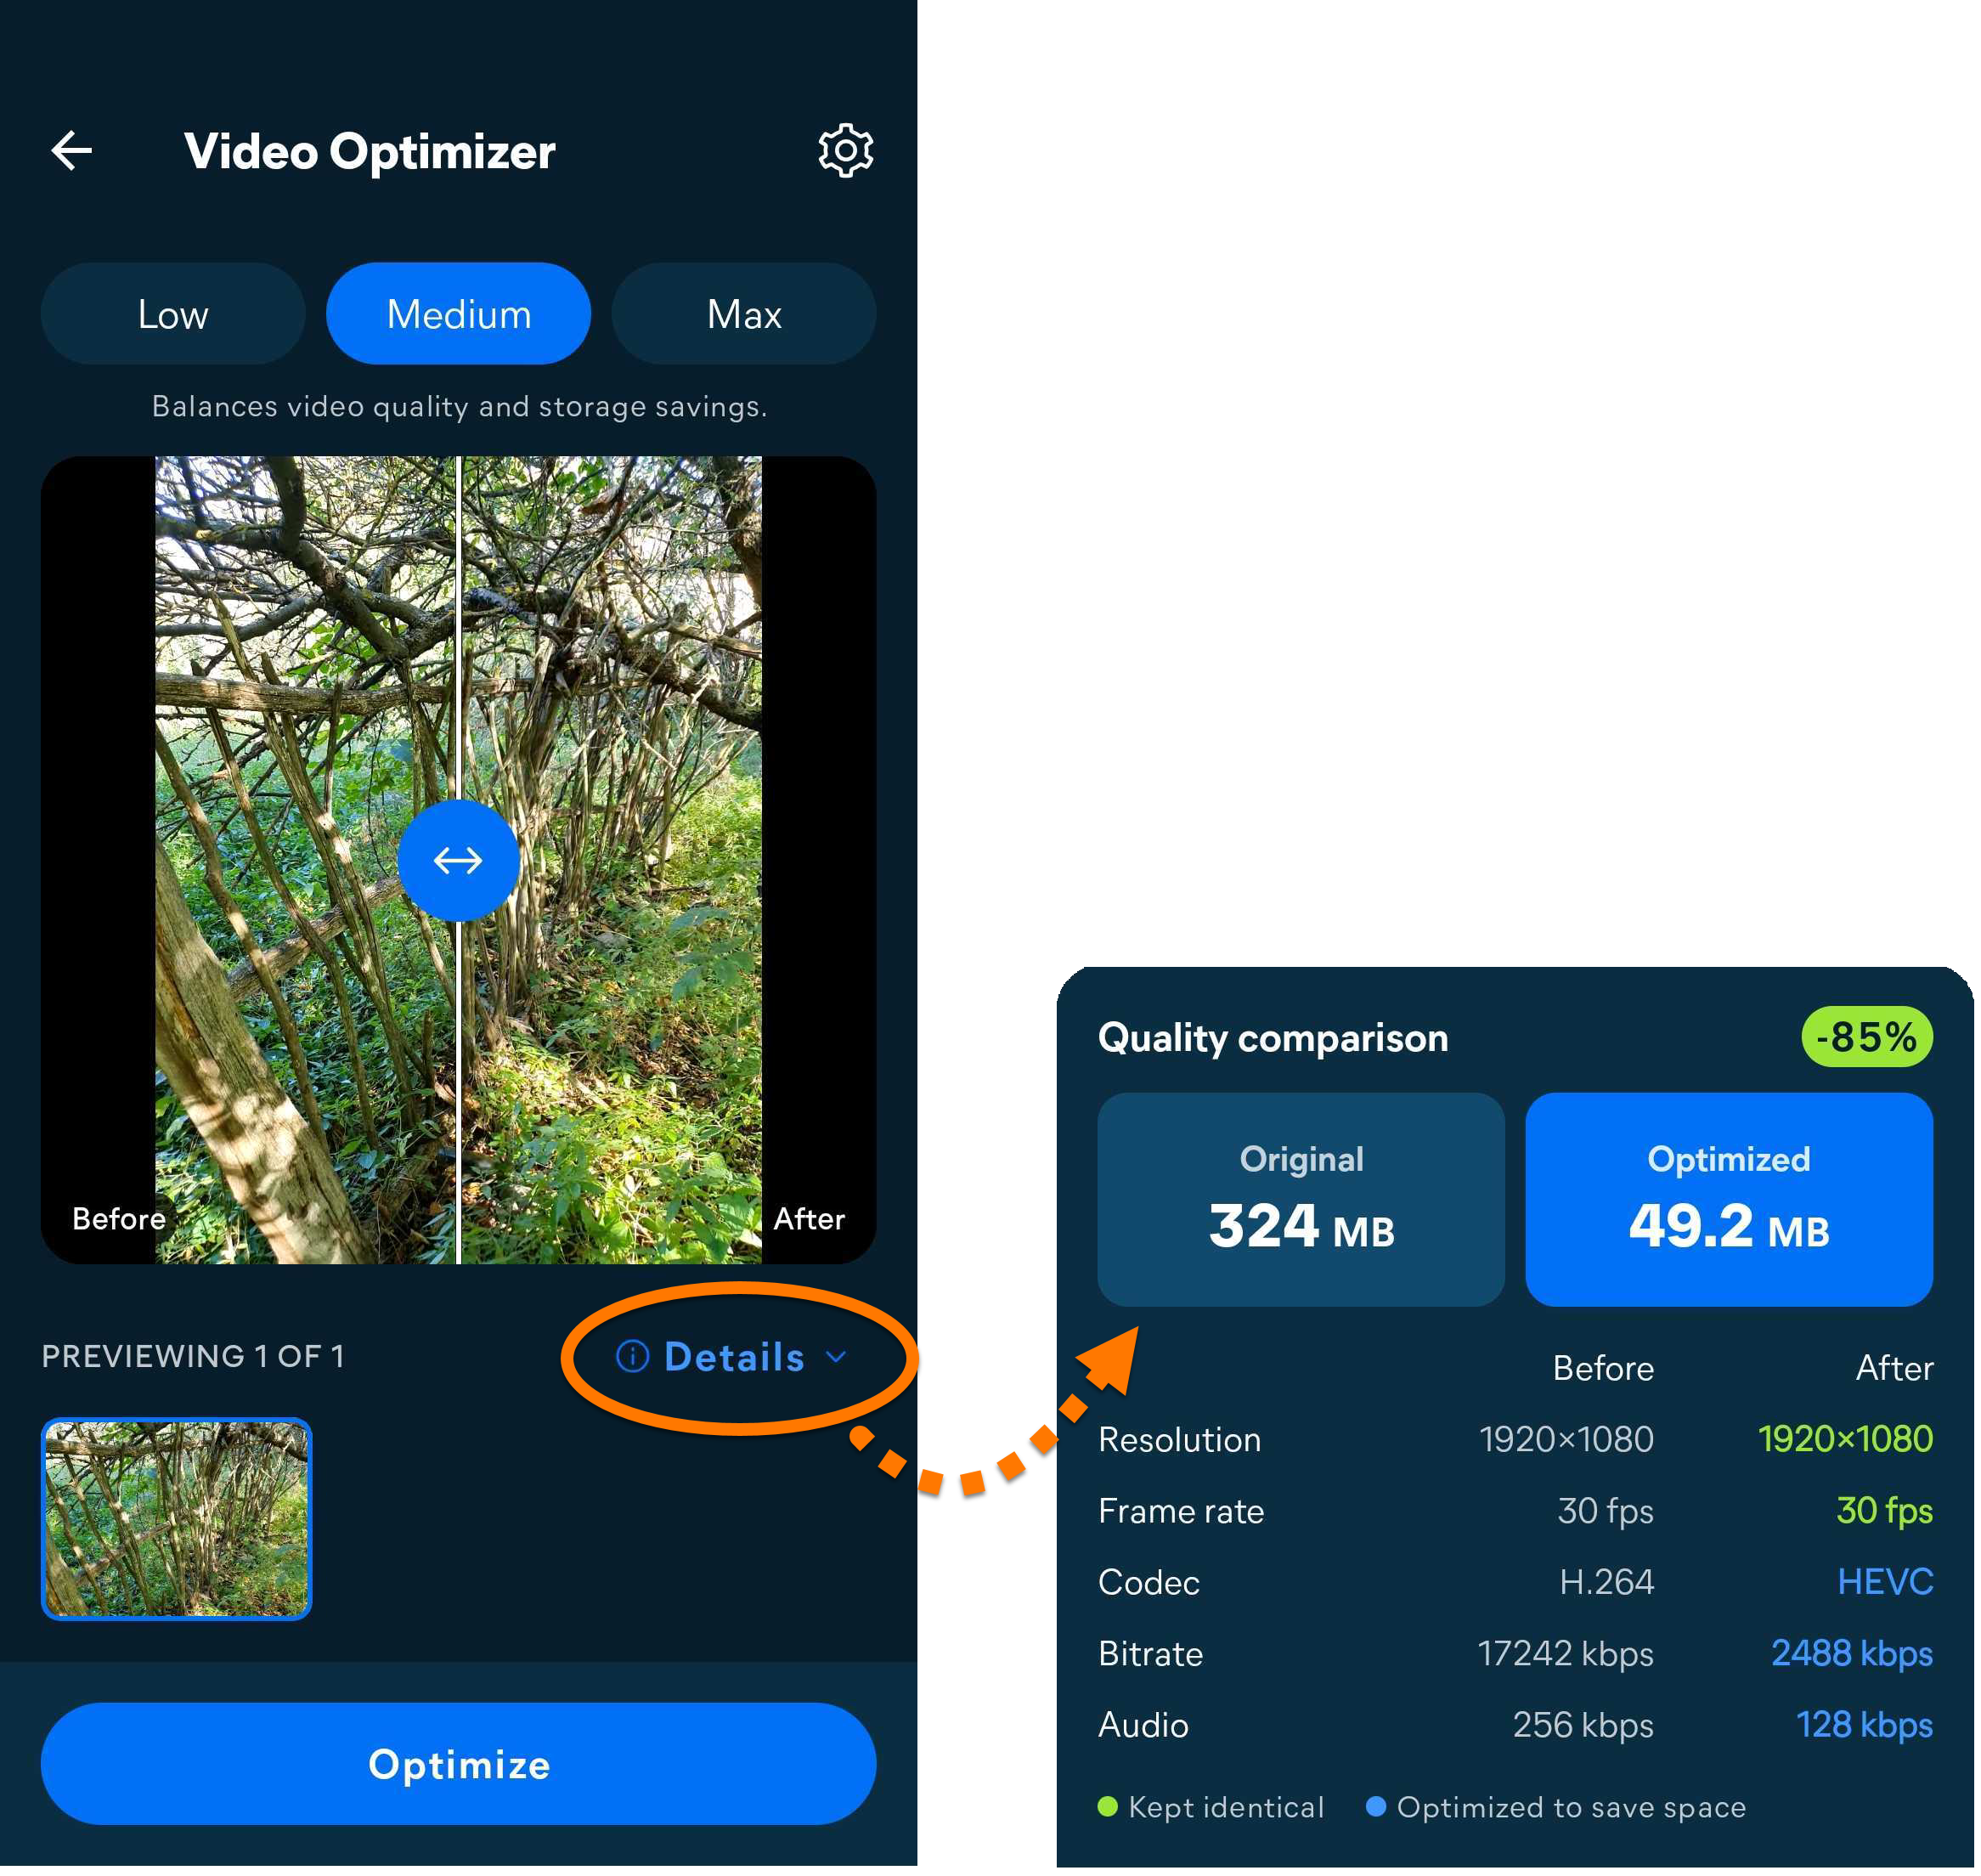
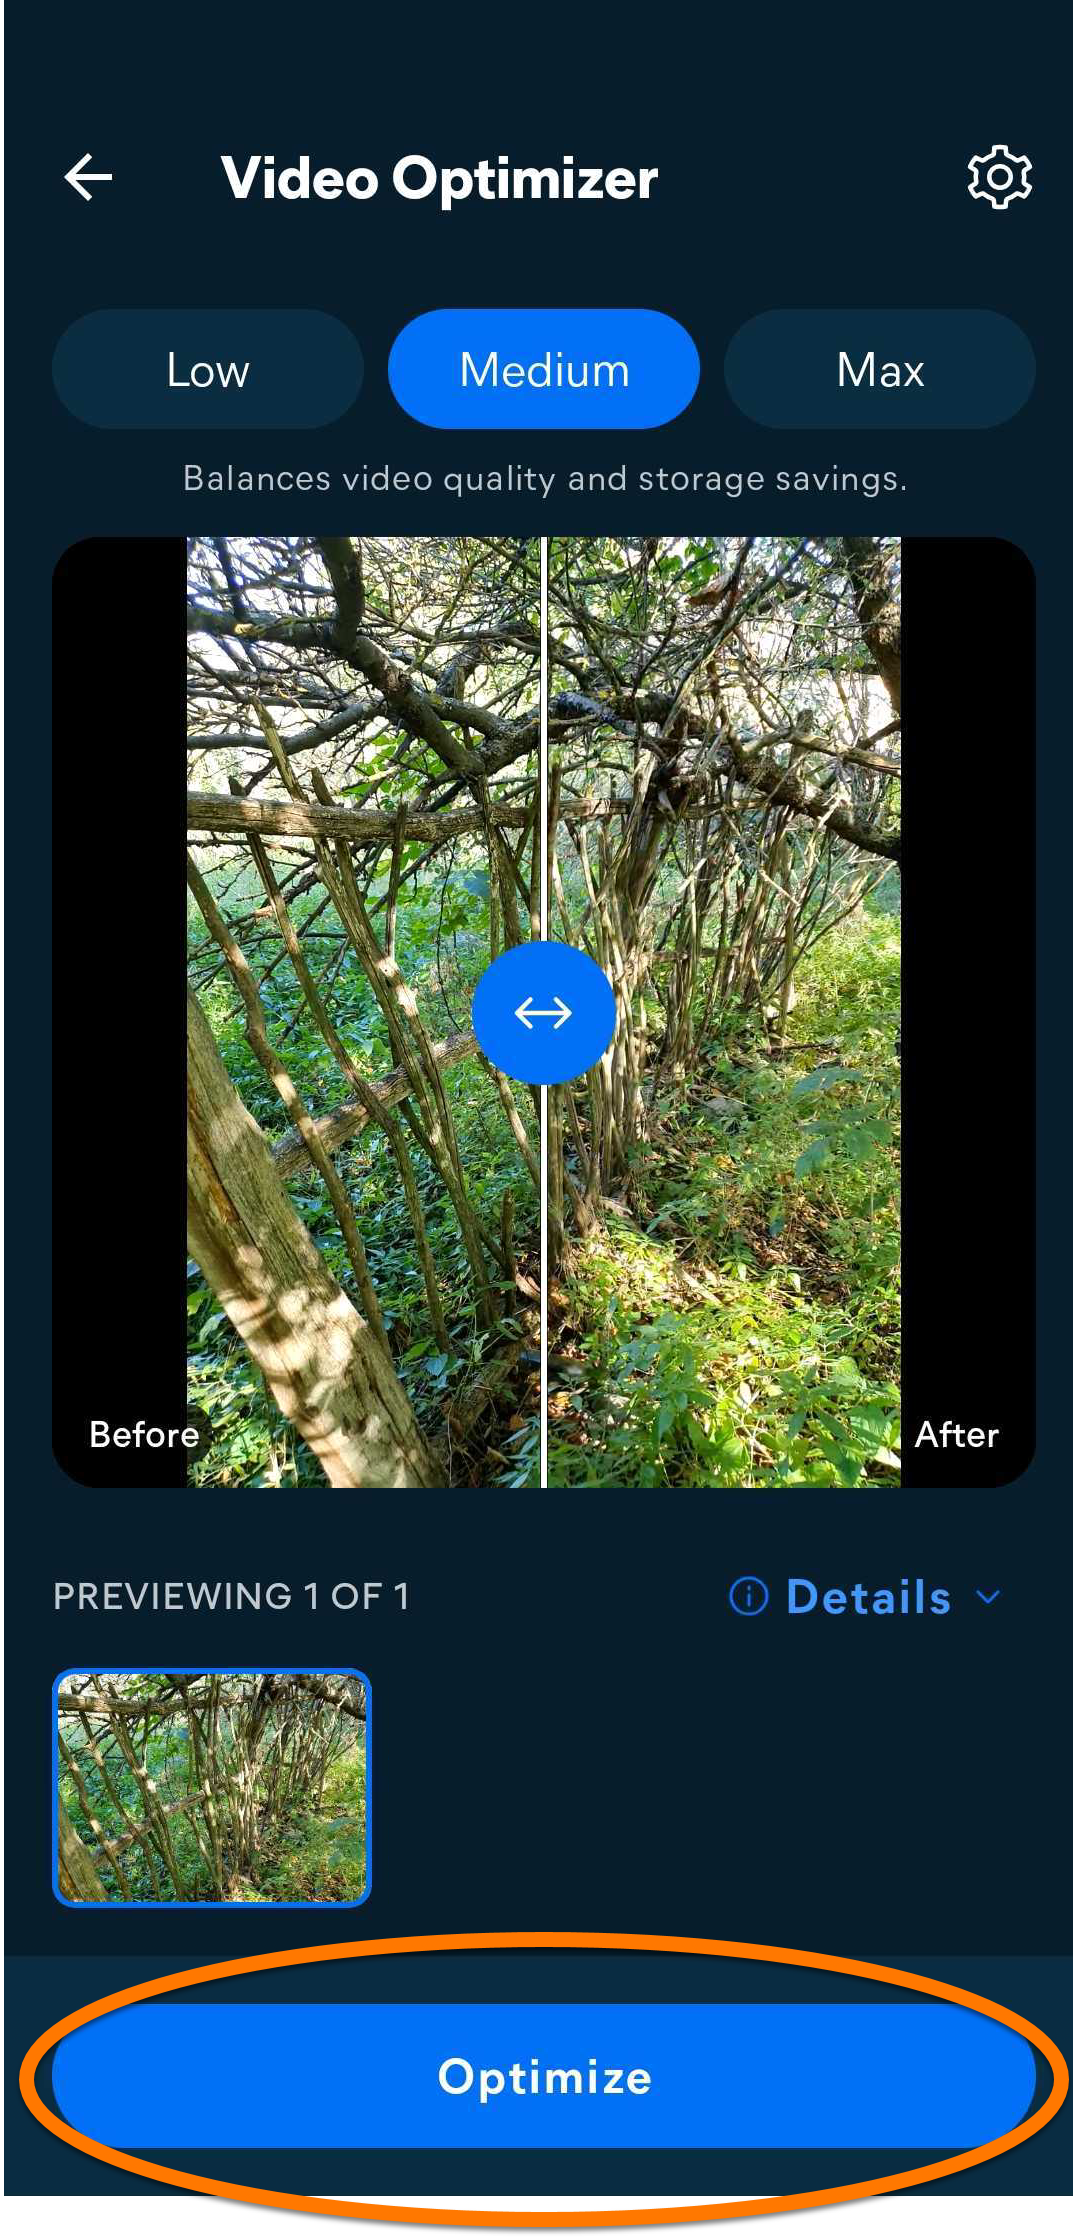
- Choose an optimization level: Low, Medium, or High. Use the slider in the middle to compare the quality before and after optimization.
- Optionally, tap Settings (the gear icon) in the top-right corner to select the output format and choose whether to keep the original videos.
- Optionally, tap Details to compare the quality and file size before and after optimization.
- Tap Optimize to start optimizing the selected items.

When the optimization is complete, tap Optimized results to view the optimized items and the storage space saved.
Define your Analysis preferences
When you tap the Tips tile on the main app screen, you can review tips for clearing space on your device. You can specify which kinds of tips you want Avast Cleanup to prioritize via the Analysis preferences screen:
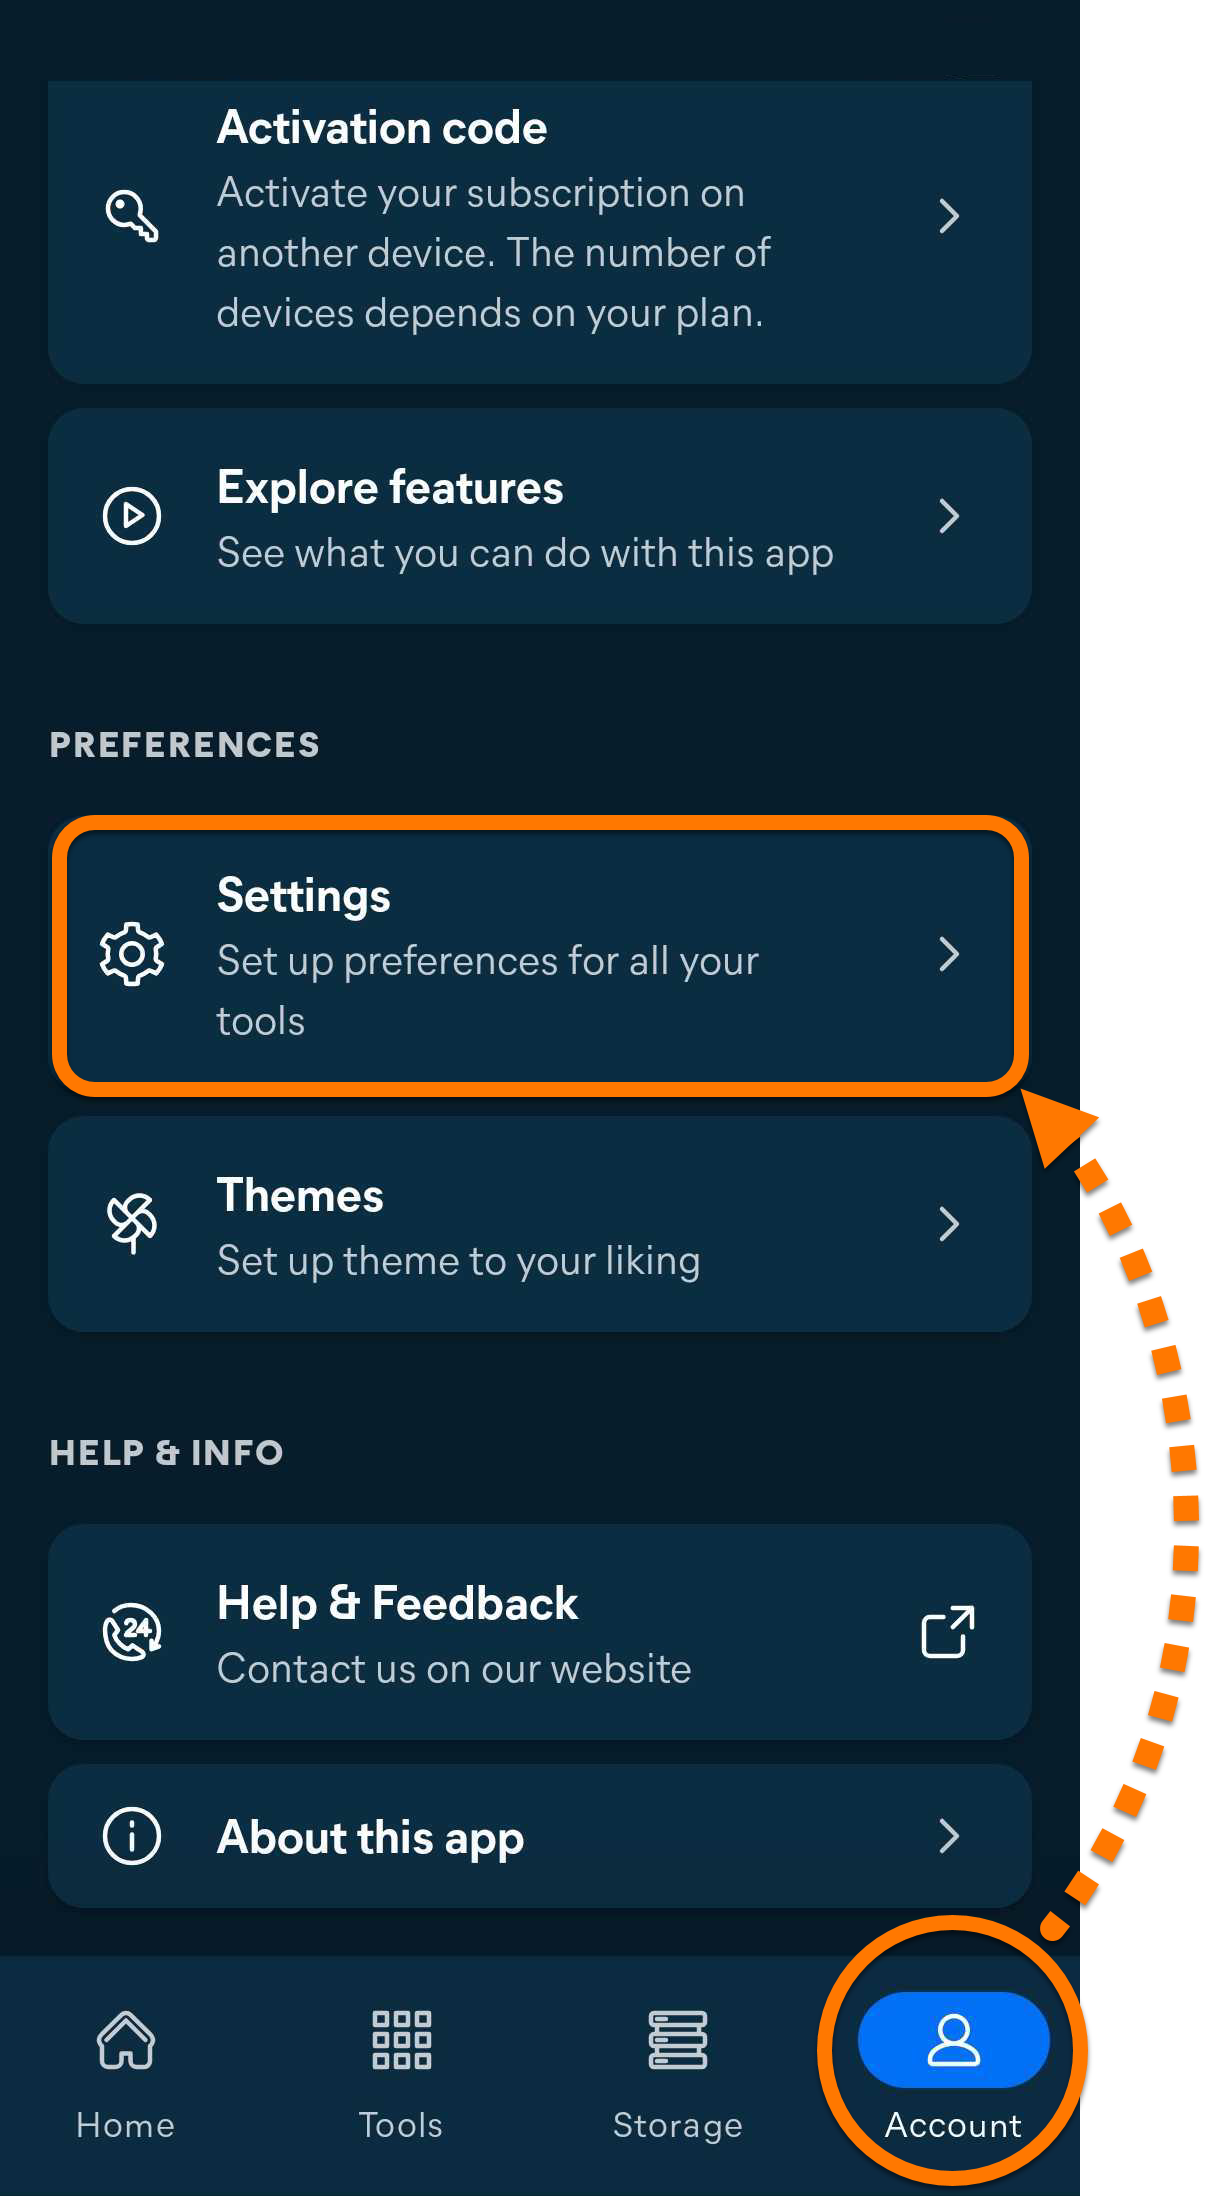
- Open Avast Cleanup and tap Account (in the bottom navigation bar) ▸ Settings.
- Tap Analysis preferences.
- Touch and hold the icon (four lines) next to a tip category and drag the panel up or down to reorder your preferences. Optionally, tap the slider beside Find unwanted photos to turn the feature on (blue) or off (gray).

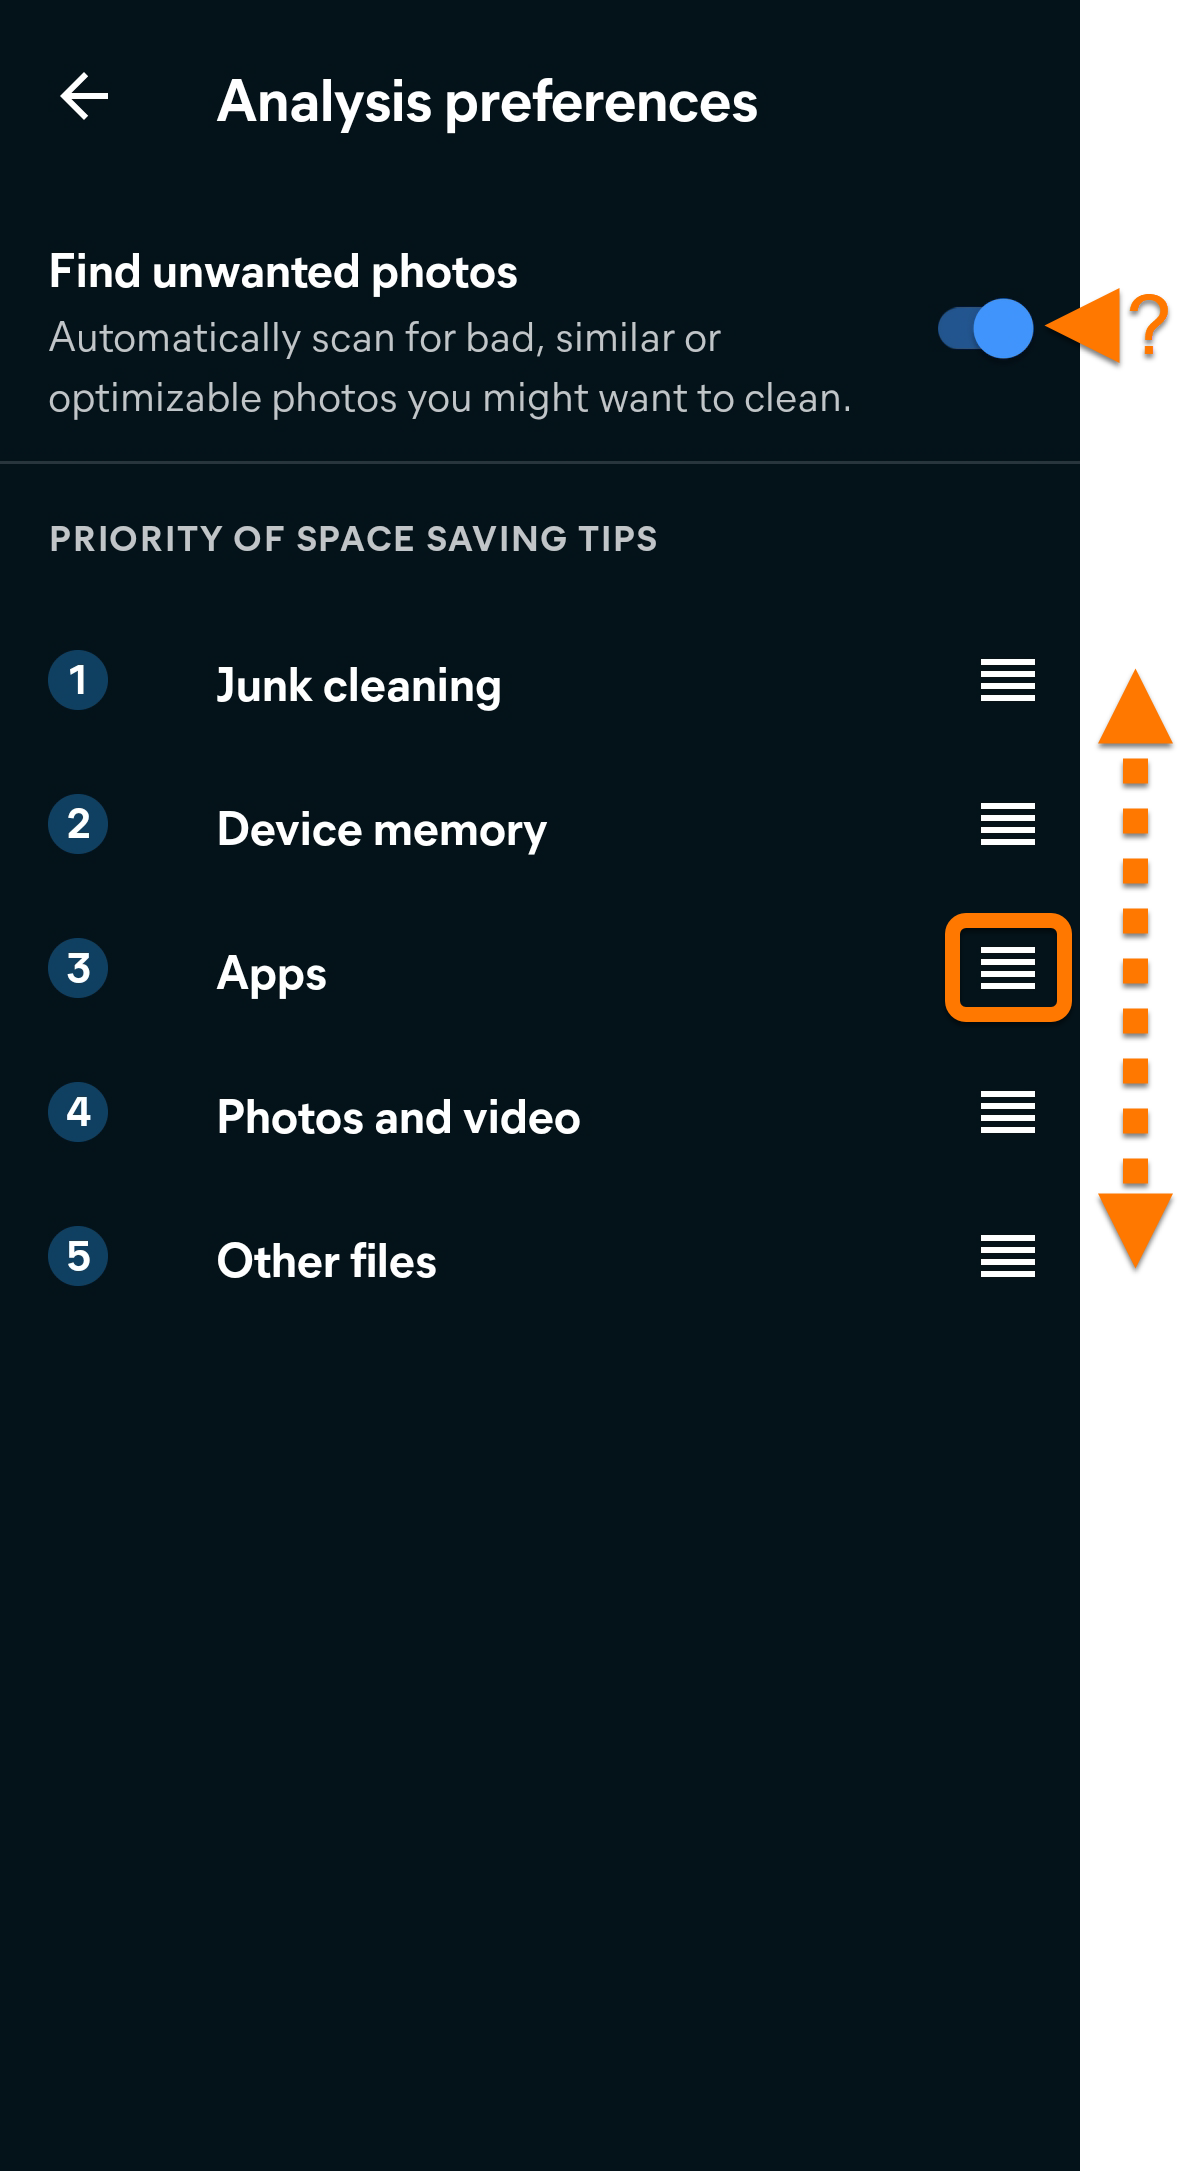
Avast Cleanup shows tips that match your specified preferences.
Manage cloud transfers
'The cloud' refers to virtual storage space where you can keep media and files such as photos, videos, and documents. Avast Cleanup allows you to easily transfer items from your device to a connected cloud storage account. To connect Avast Cleanup to a cloud storage account:
- Open Avast Cleanup and tap Account (in the bottom navigation bar) ▸ Cloud Transfers.
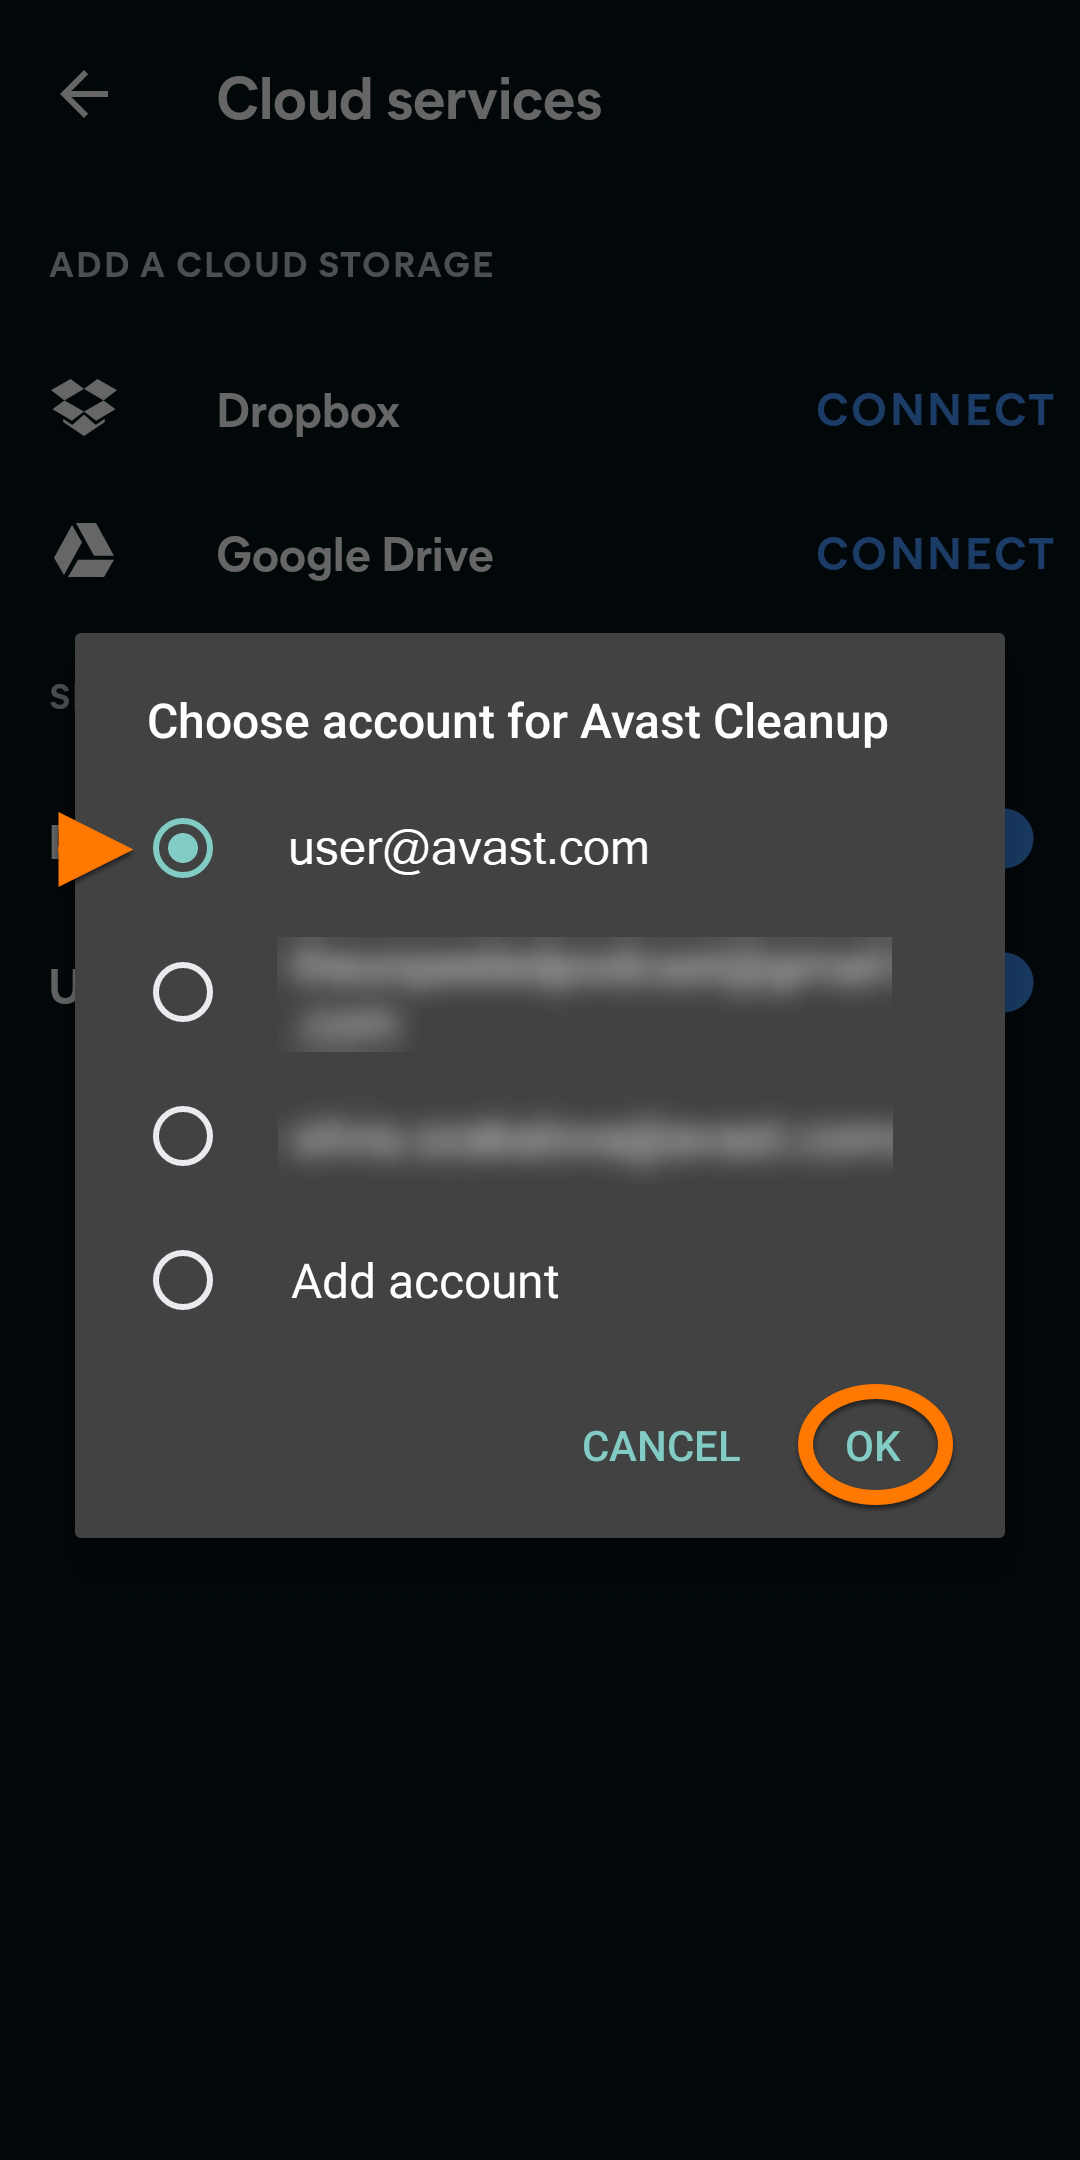
- Tap Connect next to your chosen cloud service (Dropbox or Google Drive).
- Select your preferred account and tap OK. Enter login credentials if prompted.
- The account now appears under Connected. To sign out of an account, tap
⋮More options (the three dots) next to the account and select Sign out.

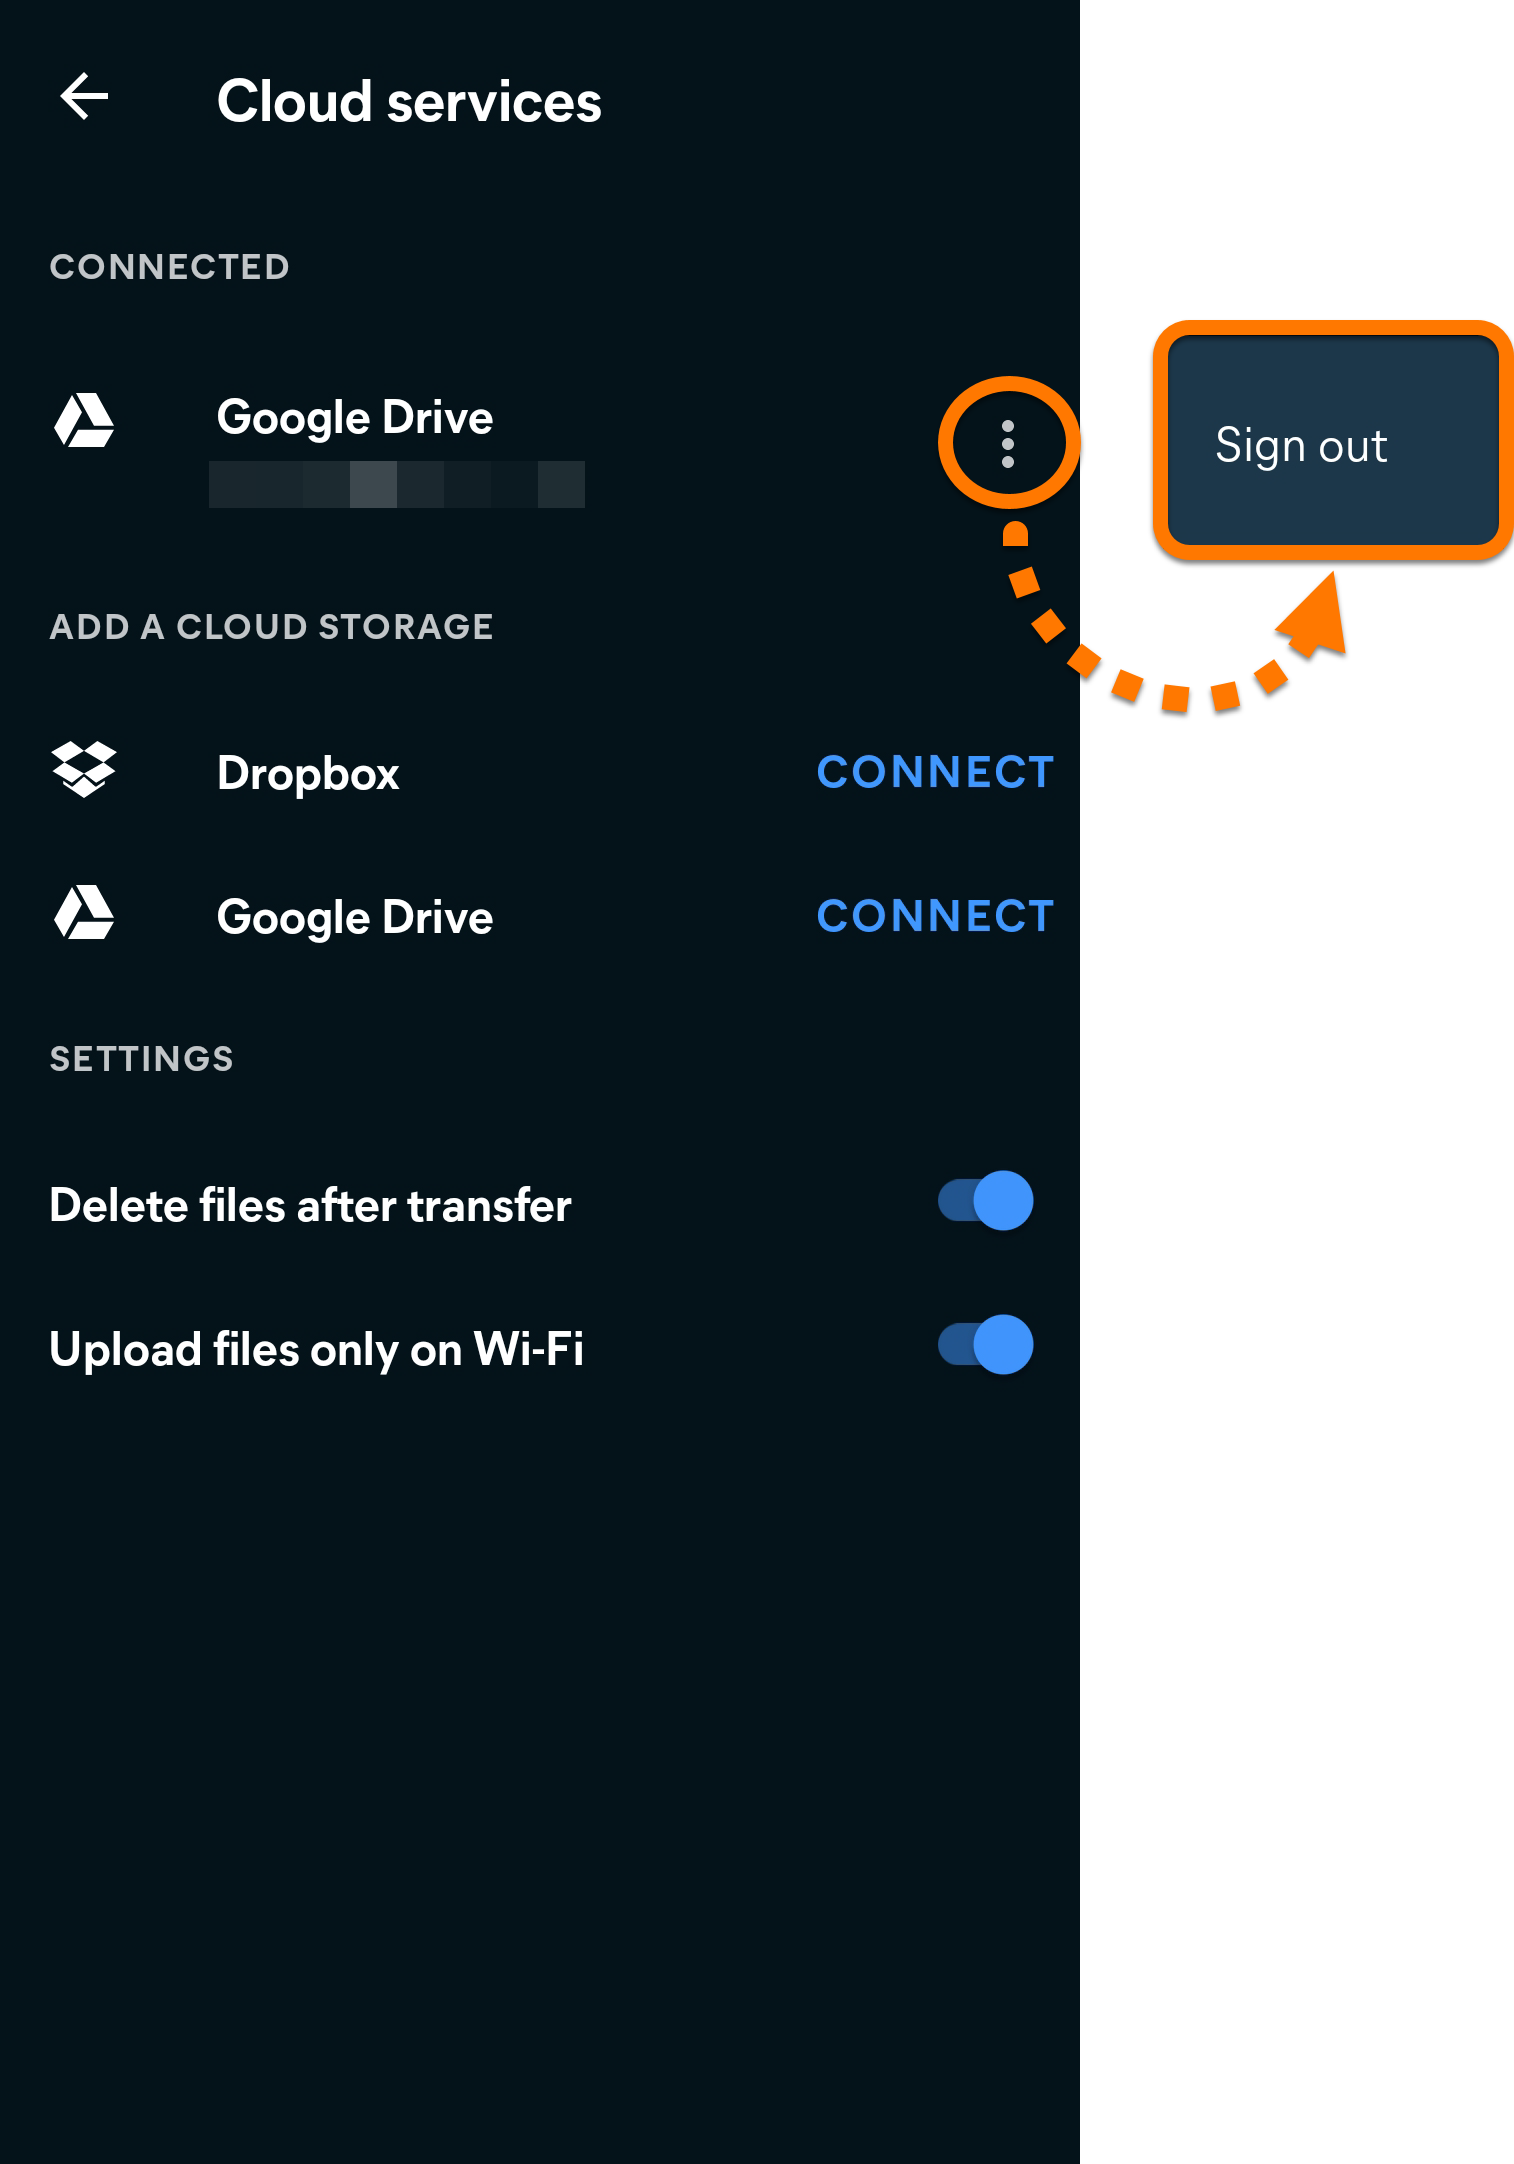
You can be connected to multiple Google Drive accounts and one Dropbox account at the same time. If you are connected to multiple accounts simultaneously, you are prompted to choose an account each time you attempt to transfer data to cloud storage.
Further recommendations
For more information about Avast Cleanup Premium, refer to the following article:
- Avast Cleanup Premium
- Avast Cleanup
- Windows, macOS, and Android
Updated on: 07/07/2026