This article explains how to resolve the issue if Network Inspector in Avast Antivirus shows the following alert:
- Weak or default password
Description
If you see the alert above after running a Network Inspector scan:
We have found that a service running on your network device is secured with a weak password. This might be the default password, a password that can easily be guessed, or no password at all. You can verify which service is vulnerable via the Network Inspector results screen. Click See how to fix, and check the service that is listed under Risks.
Refer to the relevant information below according to the service that Network Inspector has identified as vulnerable:
- HTTP or HTTPS: Most routers have an admin interface that you can use to configure router behavior. Your router uses the HTTP or HTTPS service each time you access the admin interface via a web browser. If the HTTP or HTTPS service is not secured using a strong password, an attacker could easily log in to the admin interface to reconfigure your router, which puts all of the devices on your network at risk.
- FTP, Telnet, or SSH (or any other service): These services may be enabled on certain network devices and can be used to access the device remotely (for example, via a command-line interface). If one of these services is enabled on your network device, but it is not secured using a strong password, an attacker could misuse the service to reconfigure your network device, which puts all of the devices on your network at risk.
Solution
You need to create a strong password for the service that Network Inspector has identified as vulnerable. If you are not sure which service is vulnerable, refer to the information in the Description section above.
- The password should contain at least 10 characters, but ideally 12 or more. The more characters you use, the more secure your password is.
- The password should not be used to access any other accounts or services.
- The safest passwords are phrases rather than single words. Select a phrase that is memorable for you, but not easily predictable.
The exact instructions vary according to the vulnerable service on your router:
- HTTP or HTTPS: Follow the steps in the HTTP / HTTPS section below.
- FTP, Telnet, or SSH (or any other service): Follow the steps in the Other services section below.
Select the brand of your network device for detailed instructions on how to create a strong password for your admin interface:
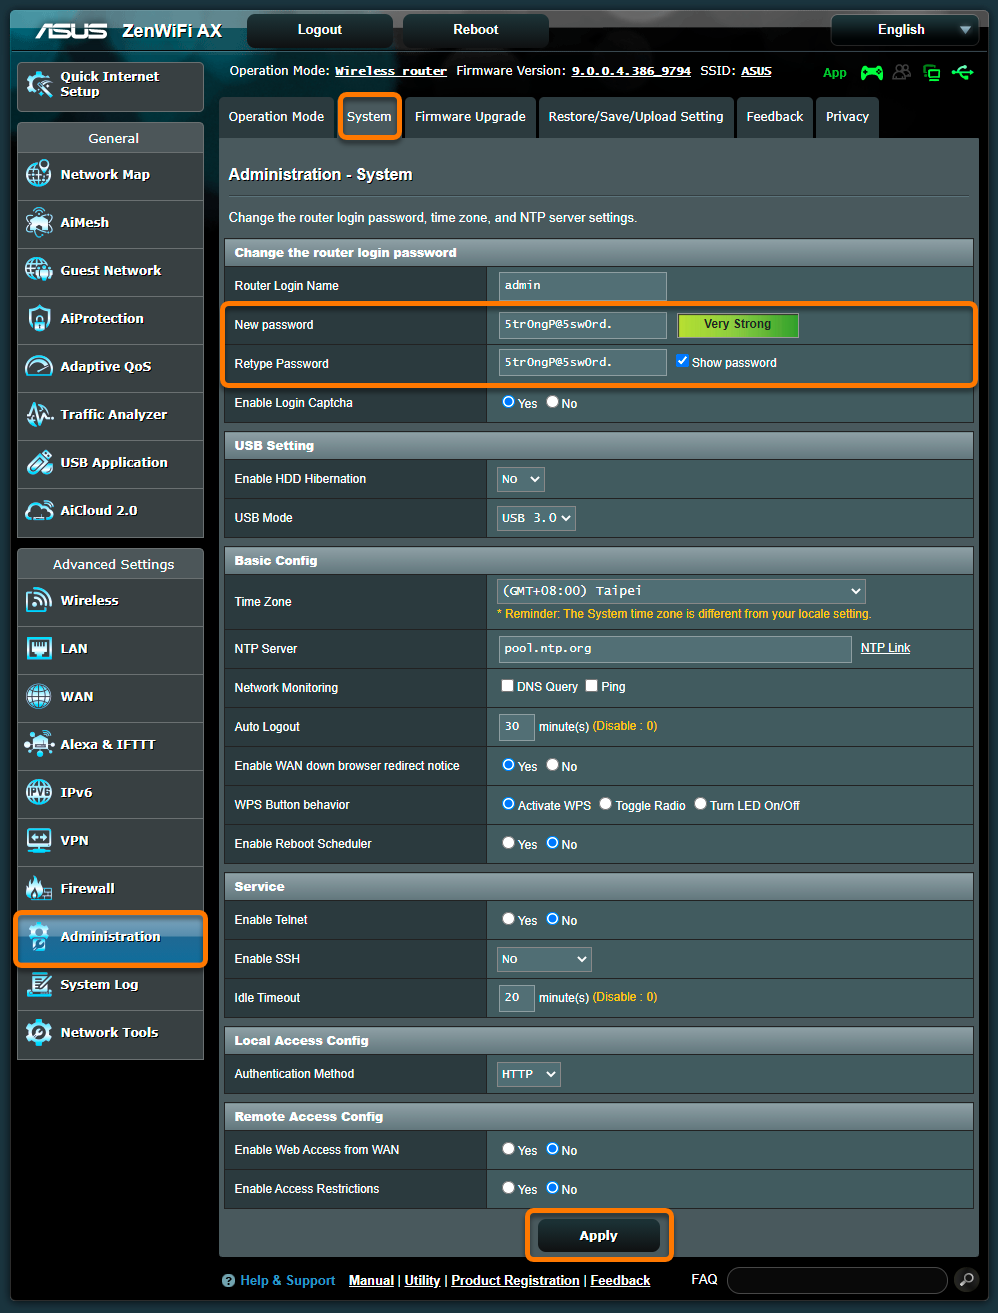
ASUS
To configure an ASUS wireless network device:
| 1. |
From the Network Inspector results screen, select Go to your router settings to open the administration page of your ASUS device. |
| 2. |
Enter the username and password for your network device. If you do not know your login credentials, contact the party who provided the device. This is normally your Internet Service Provider (ISP). |
| 3. |
Follow the step below that matches your device settings: Go to Advanced Settings ▸ Administration ▸ System ▸ Change the router login password. OR Go to System Setup ▸ Change Password. OR Go to Management ▸ Access Control ▸ Passwords. |
| 4. |
Choose a strong password for your network device. IMPORTANT: Ensure that you remember the new password. If you forget it, you will have to reset and reconfigure your device. |
| 5. |
Confirm your changes by selecting Apply or Save, and reboot your device if necessary. |
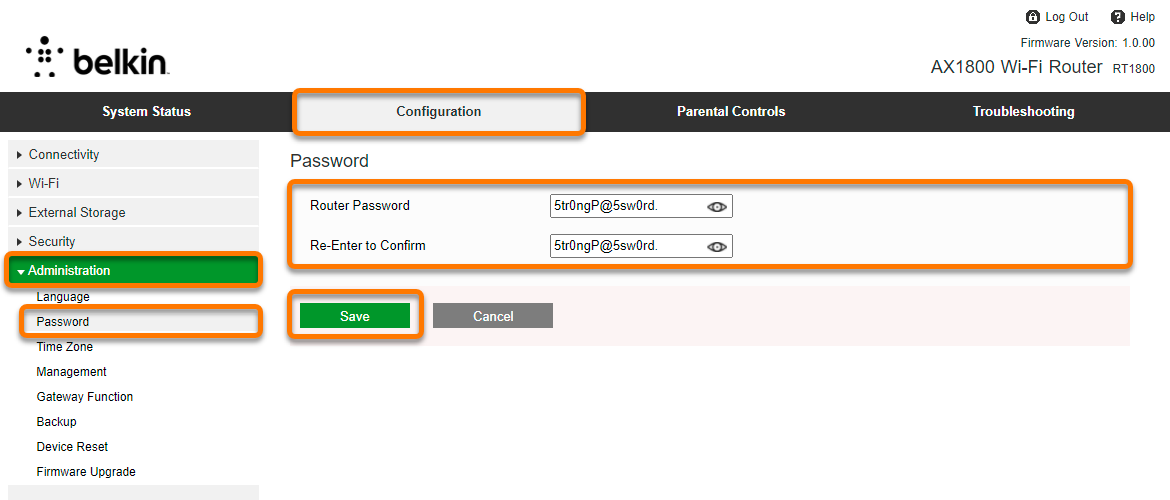
Belkin
To configure a Belkin wireless network device:
| 1. |
From the Network Inspector results screen, select Go to your router settings to open the administration page of your Belkin device. |
| 2. |
Enter the username and password for your network device. If you do not know your login credentials, contact the party who provided the device. This is normally your Internet Service Provider (ISP). |
| 3. |
Go to Configuration ▸ Administration ▸ password. |
| 4. |
Choose a strong password for your network device. IMPORTANT: Ensure that you remember the new password. If you forget it, you will have to reset and reconfigure your device. |
| 5. |
Confirm your changes by selecting Save, and reboot your device if necessary. |
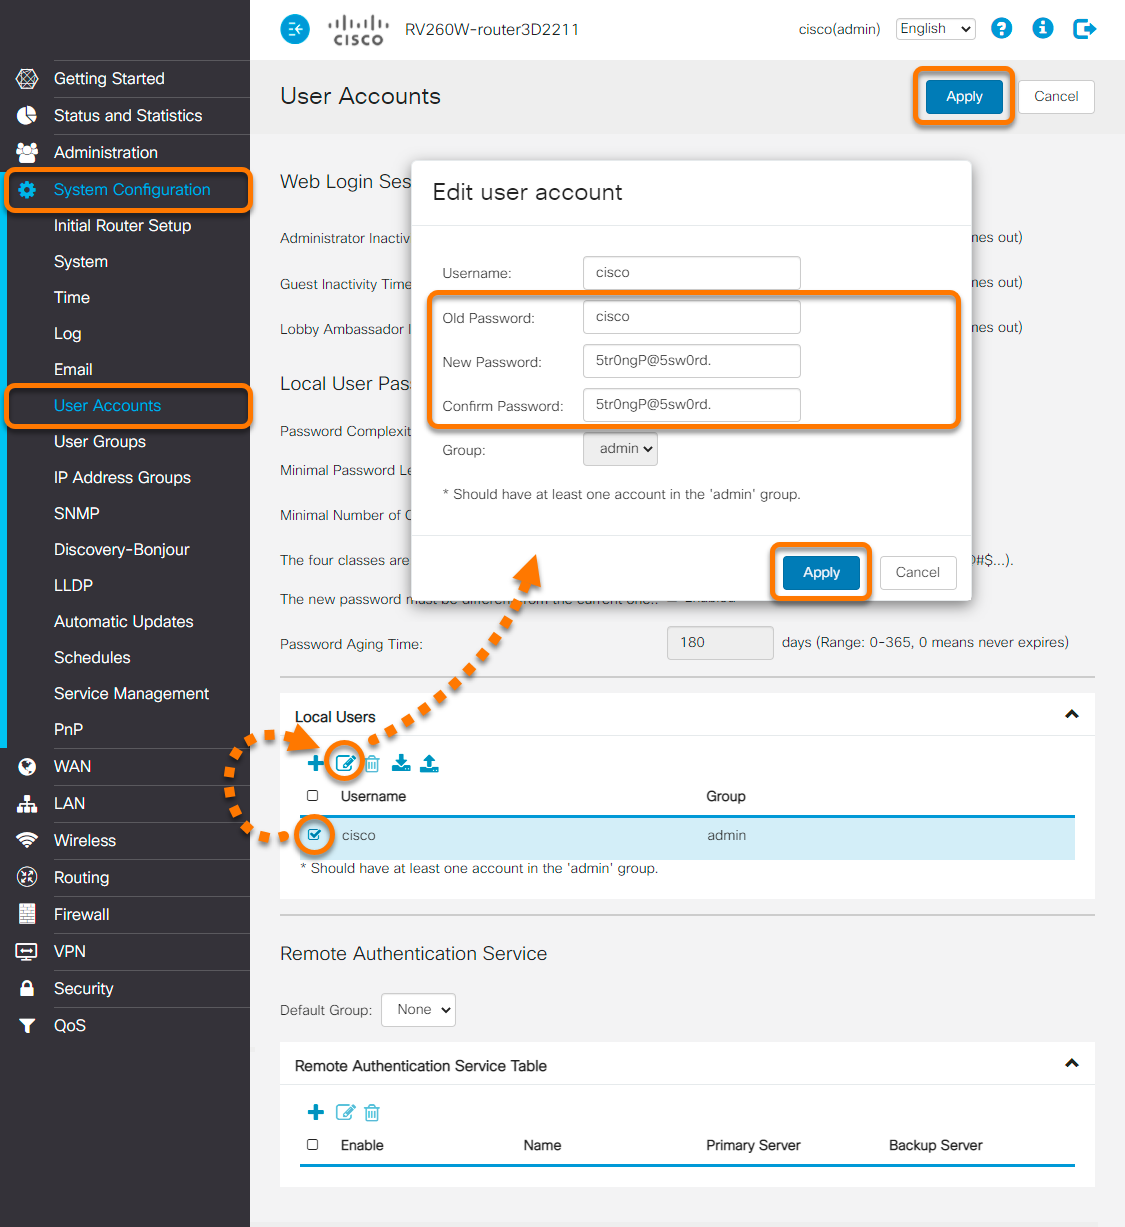
Cisco
To configure a Cisco wireless network device:
| 1. |
From the Network Inspector results screen, select Go to your router settings to open the administration page of your Cisco device. |
| 2. |
Enter the username and password for your network device. If you do not know your login credentials, contact the party who provided the device. This is normally your Internet Service Provider (ISP). |
| 3. |
Go to System Configuration ▸ User Accounts. |
| 4. |
Tick the box next to your user account, then select edit (the pencil icon). |
| 5. |
Choose a strong password for your network device. IMPORTANT: Ensure that you remember the new password. If you forget it, you will have to reset and reconfigure your device. |
| 6. |
Confirm your changes by selecting Apply. |
| 7. |
Repeat steps 3. - 6. above for all user accounts on your device. Confirm your changes by selecting Apply on the User Accounts screen, and reboot your device if necessary. |
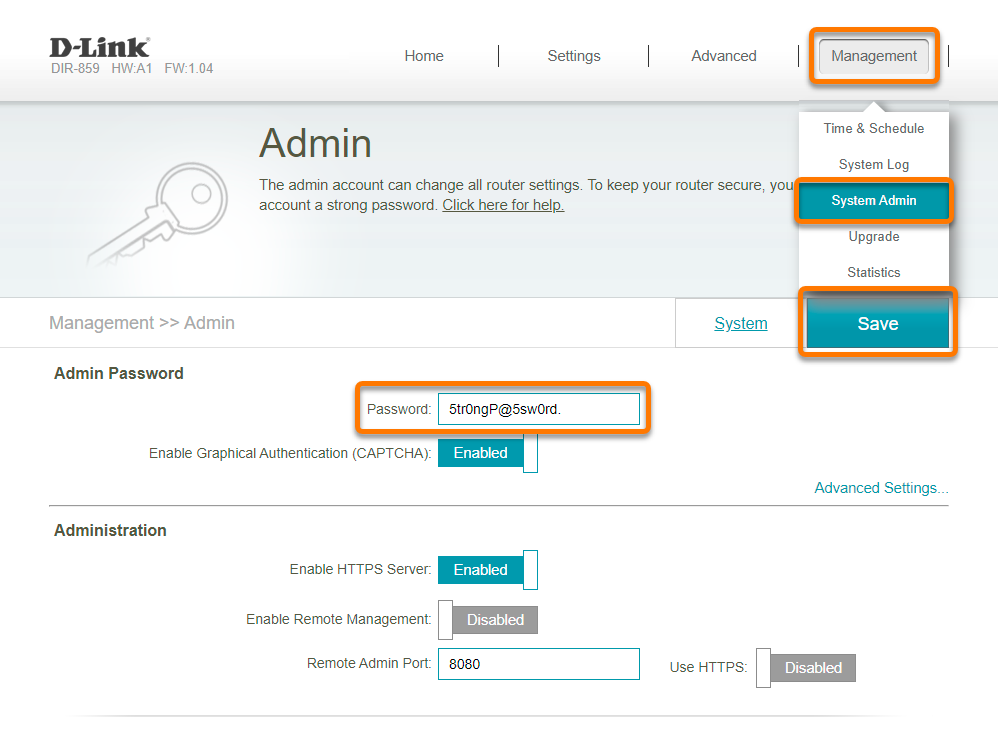
D-Link
To configure a D-Link wireless network device:
| 1. |
From the Network Inspector results screen, select Go to your router settings to open the administration page of your D-Link device. |
| 2. |
Enter the username and password for your network device. If you do not know your login credentials, contact the party who provided the device. This is normally your Internet Service Provider (ISP). |
| 3. |
Follow the step below that matches your device settings: Go to Management ▸ System Admin. OR Go to Tools ▸ Admin. OR Go to Maintenance ▸ Device Administration. |
| 4. |
Choose a strong Admin Password. IMPORTANT: Ensure that you remember the new password. If you forget it, you will have to reset and reconfigure your device. |
| 5. |
If the option is available, also choose a strong User Password. |
| 6. |
Confirm your changes by selecting Save or Save settings, and reboot your device if necessary. |
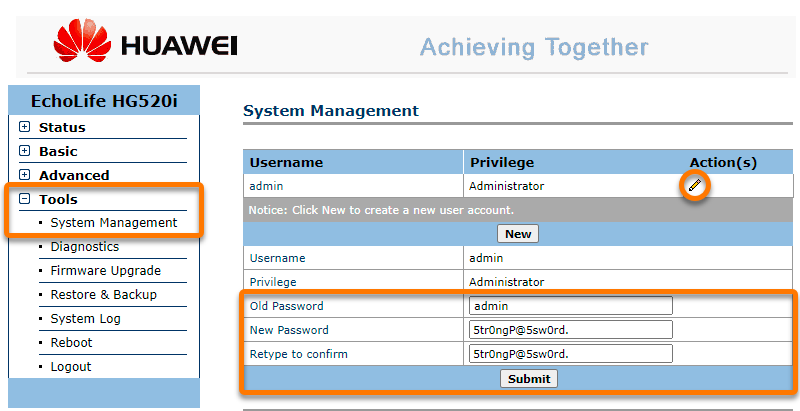
Huawei
To configure a Huawei wireless network device:
| 1. |
From the Network Inspector results screen, select Go to your router settings to open the administration page of your Huawei device. |
| 2. |
Enter the username and password for your network device. If you do not know your login credentials, contact the party who provided the device. This is normally your Internet Service Provider (ISP). |
| 3. |
Follow the step below that matches your device settings: Go to Tools ▸ System Management. OR Go to Maintenance ▸ Account ▸ Account. |
| 4. |
Follow the step below that matches your device settings: In the admin row, click edit (the pencil icon) under Action(s). OR Select admin from the username drop-down menu. |
| 5. |
Choose a strong password for your network device. IMPORTANT: Ensure that you remember the new password. If you forget it, you will have to reset and reconfigure your device. |
| 6. |
Confirm your changes by selecting Submit. |
| 7. |
Repeat steps 3. - 6. for each additional username (if available), and reboot your device if necessary. |
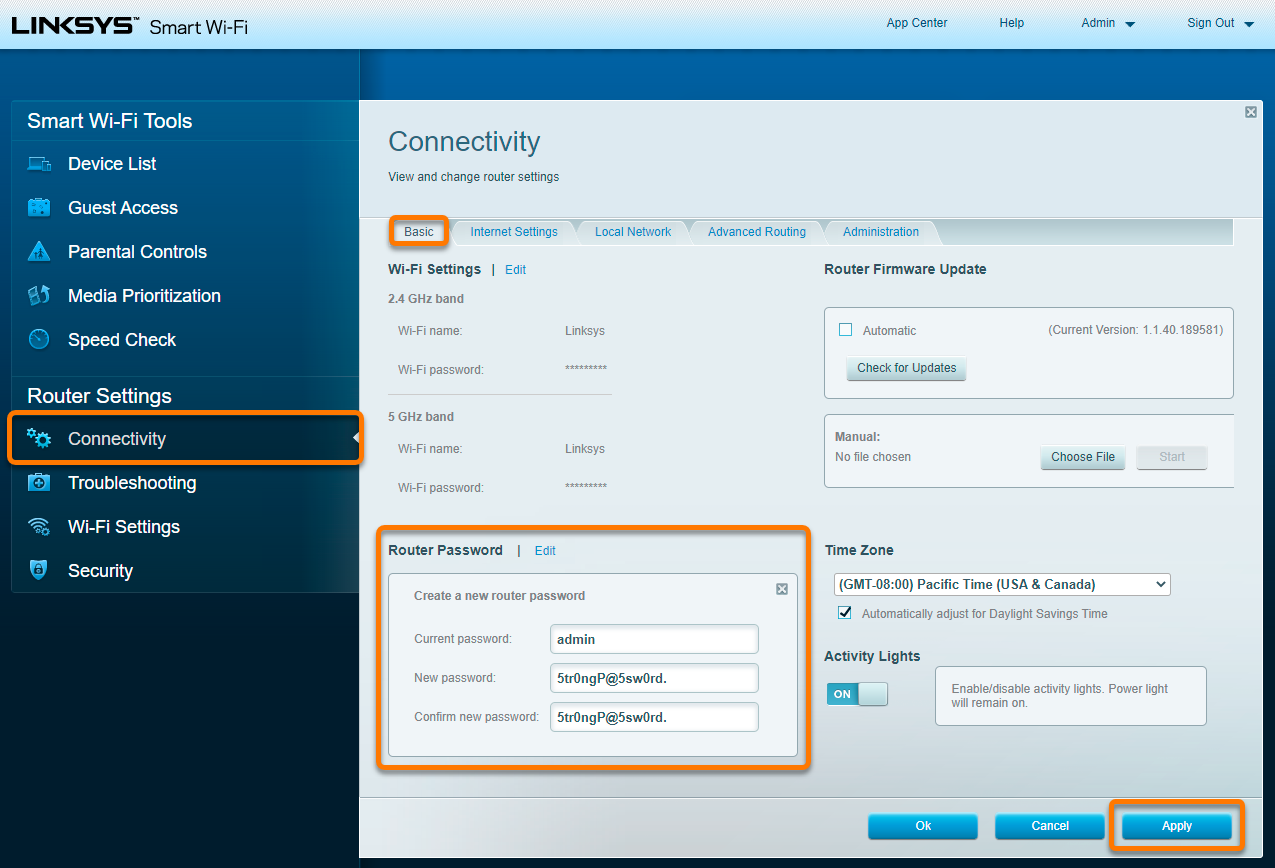
Linksys
To configure a Linksys wireless network device:
| 1. |
From the Network Inspector results screen, select Go to your router settings to open the administration page of your Linksys device. |
| 2. |
Enter the username and password for your network device. If you do not know your login credentials, contact the party who provided the device. This is normally your Internet Service Provider (ISP). |
| 3. |
Follow the step below that matches your device settings: Go to Connectivity ▸ Basic ▸ Router Password ▸ Edit. OR Go to Administration ▸ Management ▸ Router Access. |
| 4. |
Choose a strong Router Password. IMPORTANT: Ensure that you remember the new password. If you forget it, you will have to reset and reconfigure your device. |
| 5. |
Confirm your changes by selecting Apply or Save settings, and reboot your device if necessary. |
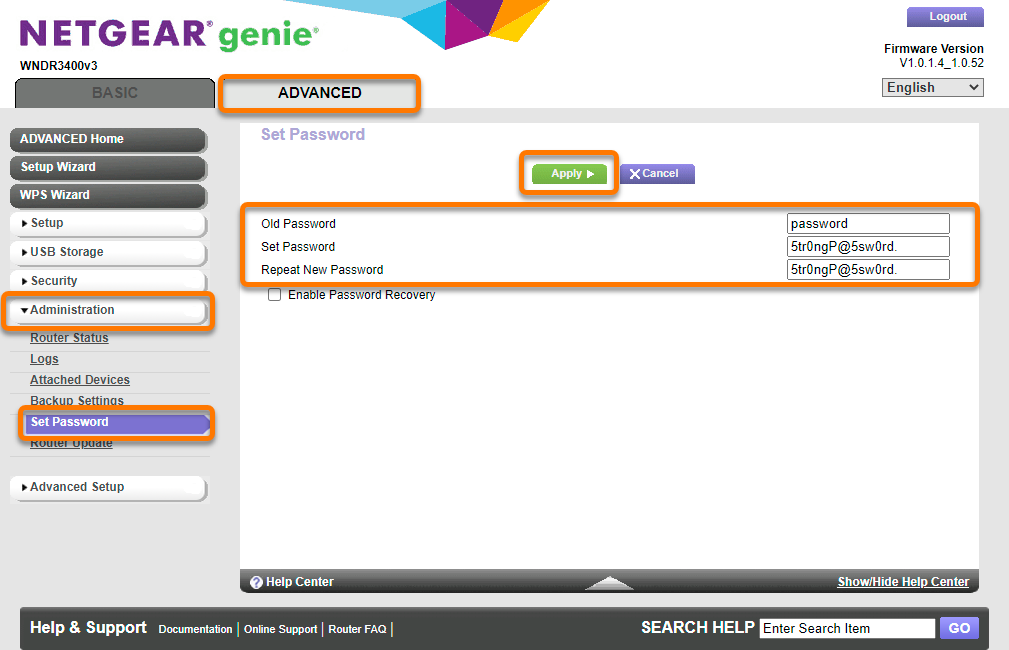
NETGEAR
To configure a NETGEAR wireless network device:
| 1. |
From the Network Inspector results screen, select Go to your router settings to open the administration page of your NETGEAR device. |
| 2. |
Enter the username and password for your network device. If you do not know your login credentials, contact the party who provided the device. This is normally your Internet Service Provider (ISP). |
| 3. |
Follow the step below that matches your device settings: Go to Advanced ▸ Administration ▸ Set Password. OR Go to Maintenance ▸ Set Password. |
| 4. |
Choose a strong password for your network device. IMPORTANT: Ensure that you remember the new password. If you forget it, you will have to reset and reconfigure your device. |
| 5. |
Confirm your changes by selecting Apply, and reboot your device if necessary. |
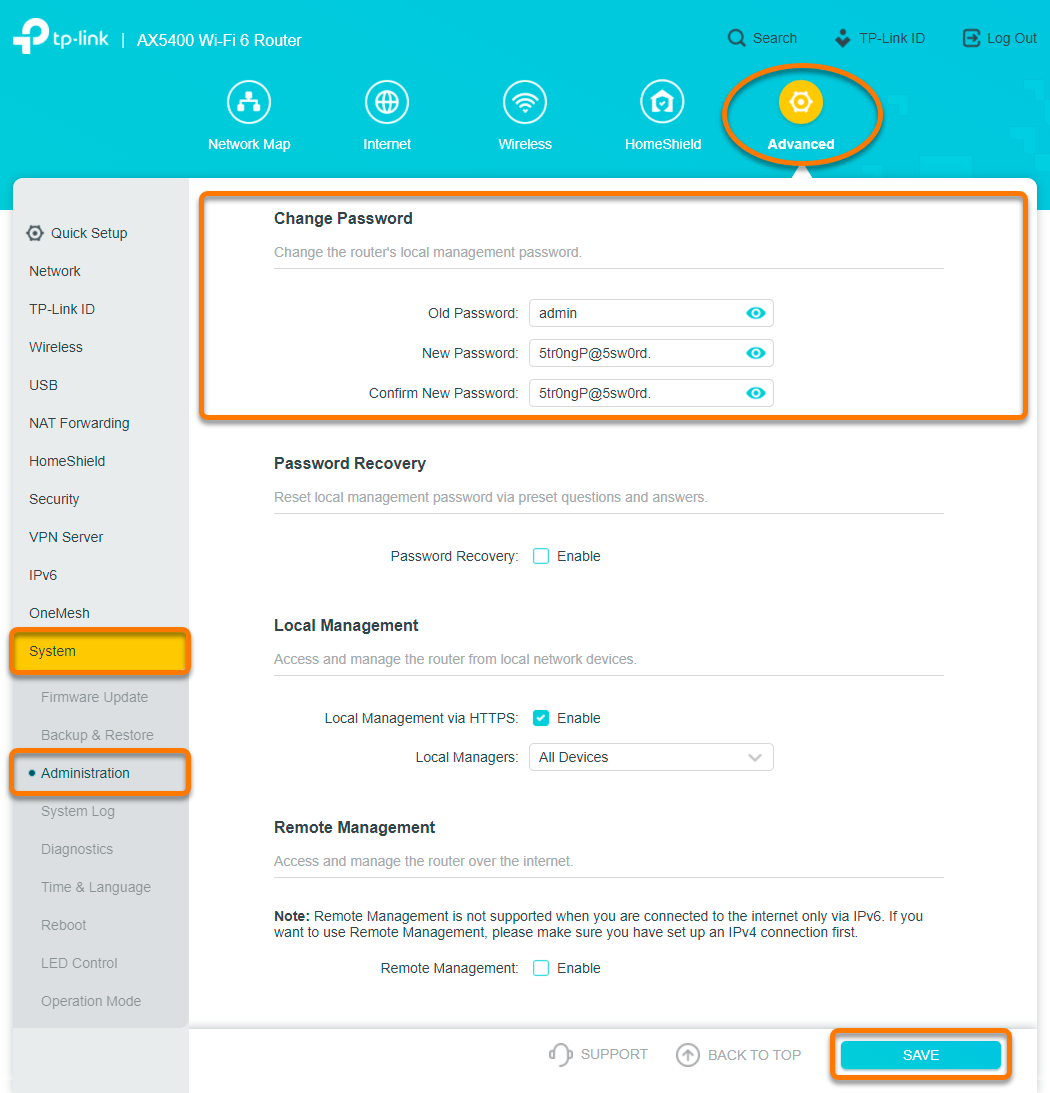
TP-Link
To configure a TP-Link wireless network device:
| 1. |
From the Network Inspector results screen, select Go to your router settings to open the administration page of your TP-Link device. |
| 2. |
Enter the username and password for your network device. If you do not know your login credentials, contact the party who provided the device. This is normally your Internet Service Provider (ISP). |
| 3. |
Follow the step below that matches your device settings: Go to Advanced ▸ System ▸ Administration ▸ Change Password. OR Go to System Tools ▸ Password. OR Go to Advanced ▸ System Tools ▸ Password. |
| 4. |
Choose a strong password for your network device. IMPORTANT: Ensure that you remember the new password. If you forget it, you will have to reset and reconfigure your device. |
| 5. |
Confirm your changes by selecting Save, and reboot your device if necessary. |
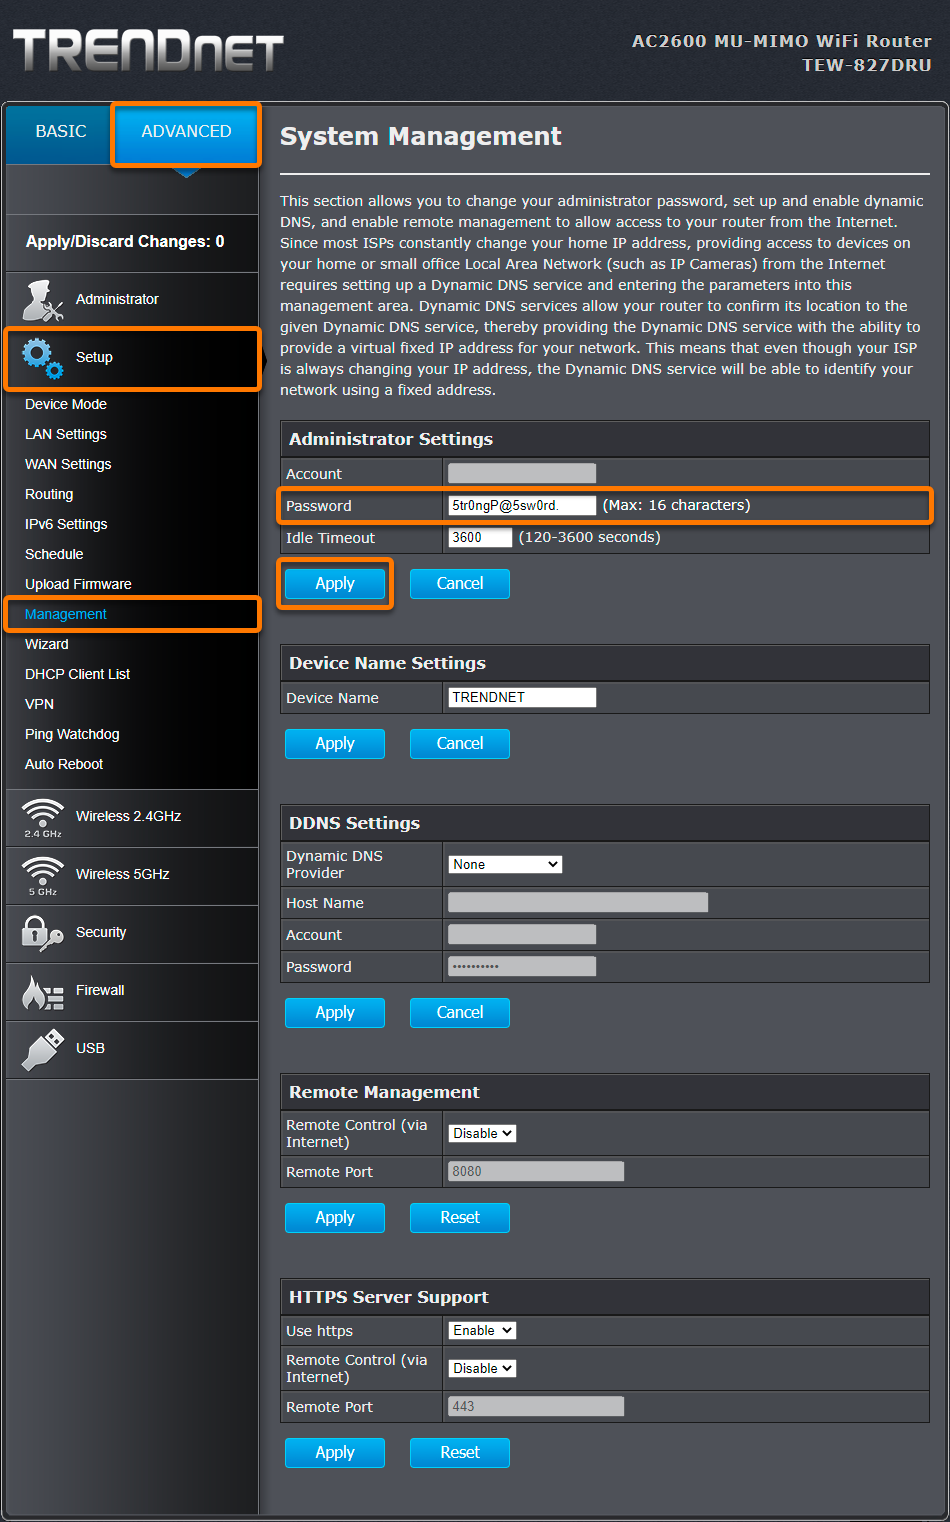
TRENDnet
To configure a TRENDnet wireless network device:
| 1. |
From the Network Inspector results screen, select Go to your router settings to open the administration page of your TRENDnet device. |
| 2. |
Enter the username and password for your network device. If you do not know your login credentials, contact the party who provided the device. This is normally your Internet Service Provider (ISP). |
| 3. |
Go to Advanced ▸ Setup ▸ Management ▸ Administrator Settings. |
| 4. |
Next to Password, choose a strong password for your device. IMPORTANT: Ensure that you remember the new password. If you forget it, you will have to reset and reconfigure your device. |
| 5. |
Confirm your changes by selecting Apply, and reboot your device if necessary. |
Other network devices
Below are links to the support pages for other brands of network device:
Apple | AT&T | Dell | DrayTek | Eero | GL.iNET | Google | MicroTik | Motorola | NEC | Sagem/Sagemcom | Speedefy | Ubiquiti | UniFi | Vodafone | ZyXEL
To configure a wireless network device:
| 1. |
From the Network Inspector results screen, select Go to your router settings to open the administration page of your device. |
| 2. |
Enter the username and password for your network device. If you do not know your login credentials, contact the party who provided the device. This is normally your Internet Service Provider (ISP). |
| 3. |
Locate the option to change the password for the admin interface of your network device. Then, choose a strong password for your device. IMPORTANT: Ensure that you remember the new password. If you forget it, you will have to reset and reconfigure your device. |
| 4. |
Confirm your changes (select Save settings, Update, OK, or similar), and reboot your device if necessary. |
Follow the steps below to create a strong password for a vulnerable service such as FTP, SSH, or Telnet:
- From the Network Inspector results screen, select Go to your router settings to open the administration page of your network device.
- Enter the username and password for your device. If you do not know your login credentials, contact the party who provided the device. This is normally your Internet Service Provider (ISP).
- Locate the option to change the password for the service that Network Inspector has identified as vulnerable. Then, choose a strong password for this service.
- Not all models of network device include a separate password option for services such as FTP, SSH, and Telnet. If you do not see the option to separately manage the password for the vulnerable service, try following the steps in the HTTP / HTTPS section above to change the password for your admin interface.
- If Network Inspector still shows the Weak or default password alert after following all of the steps above, we recommend completely disabling the vulnerable service via the settings for your network device.
Apple | Asus | AT&T | Belkin | Cisco | Dell | D-Link | DrayTek | Eero | GL.iNET | Google | Huawei | Linksys | MicroTik | Motorola | NEC | NETGEAR | Sagem/Sagemcom | Speedefy | TP-Link | TRENDnet | Ubiquiti | UniFi | Vodafone | Zyxel
- Avast One 22.x for Windows
- Avast One 22.x for Mac
- Avast Premium Security 22.x for Windows
- Avast Free Antivirus 22.x for Windows
- Avast Premium Security 15.x for Mac
- Avast Security 15.x for Mac
- Microsoft Windows 11 Home / Pro / Enterprise / Education
- Microsoft Windows 10 Home / Pro / Enterprise / Education - 32 / 64-bit
- Microsoft Windows 8.x / Pro / Enterprise - 32 / 64-bit
- Microsoft Windows 8 / Pro / Enterprise - 32 / 64-bit
- Microsoft Windows 7 Home Basic / Home Premium / Professional / Enterprise / Ultimate - Service Pack 1 with Convenient Rollup Update, 32 / 64-bit
- Apple macOS 12.x (Monterey)
- Apple macOS 11.x (Big Sur)
- Apple macOS 10.15.x (Catalina)
- Apple macOS 10.14.x (Mojave)
- Apple macOS 10.13.x (High Sierra)
- Apple macOS 10.12.x (Sierra)
- Apple Mac OS X 10.11.x (El Capitan)
Updated on: 02/06/2022