This article explains how to resolve the issue if Network Inspector in Avast Antivirus shows the following alert:
- Device is accessible from the internet
If you see the alert above after running a Network Inspector scan, we have found that either your router or a Windows PC on your network has open ports, which could allow attackers to remotely access your network and any connected devices. You can verify exactly which port numbers are open via the Network Inspector results screen. Click See how to fix, and check the open port numbers listed under Risks.
Description
Refer to the relevant information below according to the open port numbers on your router:
- Port 80, 8080, or 443: These ports are used to access the administration interface of your router. When these ports are open, your administration interface can be accessed by anyone on the internet. This means that somebody could configure your router settings to make your network less secure.
- Port 23 or 22: These ports are sometimes left open by device manufacturers because they are used for remote management via the Telnet and Secure Shell (SSH) network protocols. When these ports are open, an attacker could access your device and plant malware. This applies even if you do not use the Telnet or SSH services.
- Port 135, 445, or 3389: These ports are sometimes left open on Windows PCs and forwarded (exposed to the internet) by routers. When these ports are open and forwarded, an attacker could connect to your PC and plant malware by either exploiting known vulnerabilities or guessing your password via a brute-force attack.
- Port 7547: This port is used by some Internet Service Providers (ISPs) to remotely manage customers' routers via CWMP which is a protocol (often called TR-069) used to communicate with your router via a configuration server. If your ISP leaves this port open, an attacker could exploit potential vulnerabilities in the CWMP protocol to access your router and plant malware, or gain access to the devices on your network via a brute-force attack. You can find more information about this vulnerability via the Avast blog.
If Network Inspector continues to show the Device is accessible from the internet alert after following the steps in both of the recommended sections, try performing a web search that includes the word 'disable', the open port number, and your router brand. If the issue remains unresolved, contact your router manufacturer directly.
Solution
The solution for this issue varies according to the specific port number(s) that are open on your router:
- Port 80, 8080, or 443: You need to disable remote administration for your router. Follow the steps in the Disable Remote Admin section below.
- Port 22 or 23: First try disabling remote access via Telnet and / or SSH. If this does not resolve the issue, disable remote administration for your router. Follow the steps in the Disable Remote Admin and Disable Telnet / SSH sections below.
- Port 135, 445, or 3389: You need to disable port forwarding via your router settings. Follow the steps in the Disable Port Forwarding section below.
- Port 7547: Refer to the information in the Disable CWMP section below.
This section explains how to disable remote admin for your router (applies if port 80, 8080, or 443 is open).
Select your router brand for detailed instructions:
ASUS
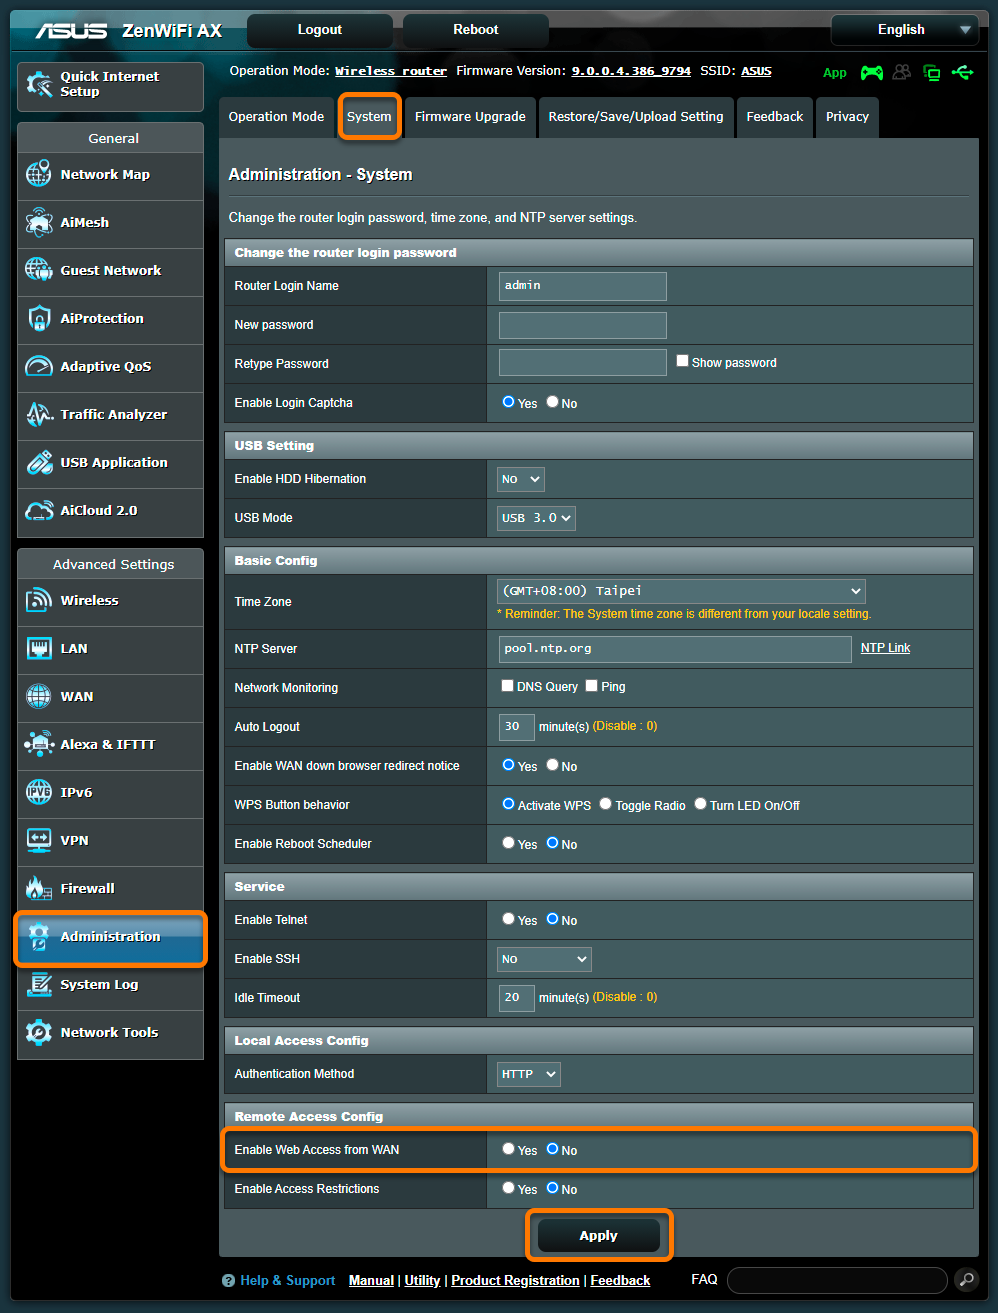
To configure an ASUS wireless router:
| 1. |
From the Network Inspector results screen, select Go to your router settings to open the administration page of your ASUS router. |
| 2. |
Enter your router username and password. If you do not know your login credentials, contact the party who provided the router. This is normally your Internet Service Provider (ISP). |
| 3. |
Follow the step below that matches your router settings: Go to Advanced Settings ▸ Administration ▸ System. OR Go to Internet Firewall ▸ Basic Config. |
| 4. |
Follow the step below that matches your router settings: For Enable Web Access from WAN, select No. OR For each service in the WAN section, untick the Enable option. |
| 5. |
Confirm your changes by selecting Apply or Save, and reboot your router if necessary. |
Belkin
To configure a Belkin wireless router:
| 1. |
From the Network Inspector results screen, select Go to your router settings to open the administration page of your Belkin router. |
| 2. |
Enter your router username and password. If you do not know your login credentials, contact the party who provided the router. This is normally your Internet Service Provider (ISP). |
| 3. |
Go to Configuration ▸ Administration ▸ Management. |
| 4. |
Under Remote Management Access, unitck the box next to Remote Management. |
| 5. |
Confirm your changes by selecting Save, and reboot your router if necessary. |
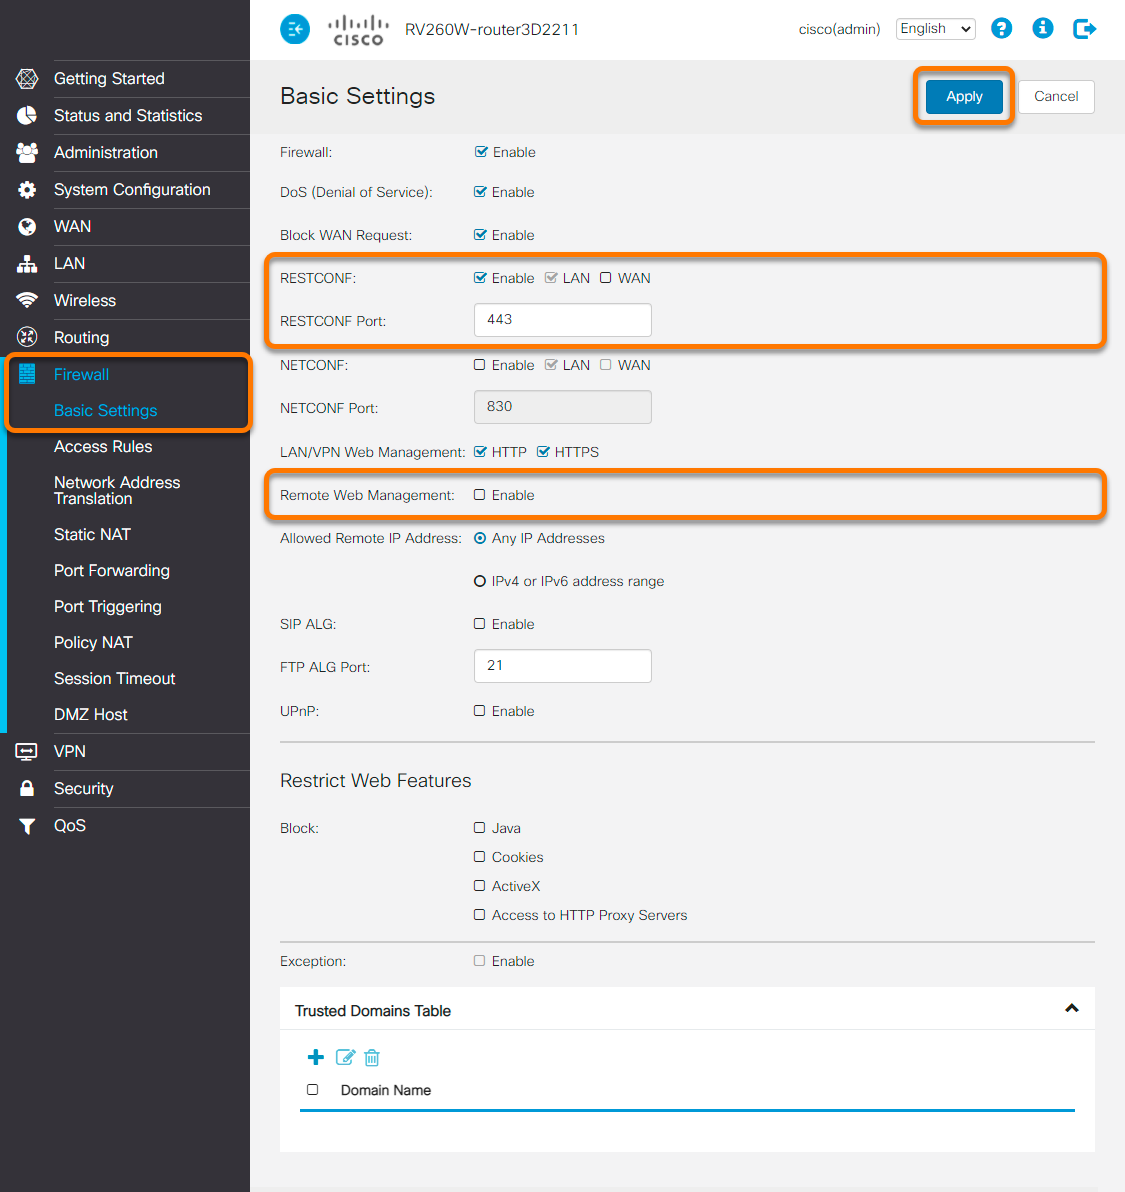
Cisco
To configure a Cisco wireless router:
| 1. |
From the Network Inspector results screen, select Go to your router settings to open the administration page of your Cisco router. |
| 2. |
Enter your router username and password. If you do not know your login credentials, contact the party who provided the router. This is normally your Internet Service Provider (ISP). |
| 3. |
Select Firewall ▸ Basic Settings in the left panel. |
| 4. |
Check the port number that is listed next to RESTCONF Port and NETCONF Port. If port 80, 8080, or 443 is listed, ensure that the WAN box is unticked. |
| 5. |
Next to Remote Web Management, untick the box next to Enable. |
| 6. |
Confirm your changes by selecting Apply, and reboot your router if necessary. |
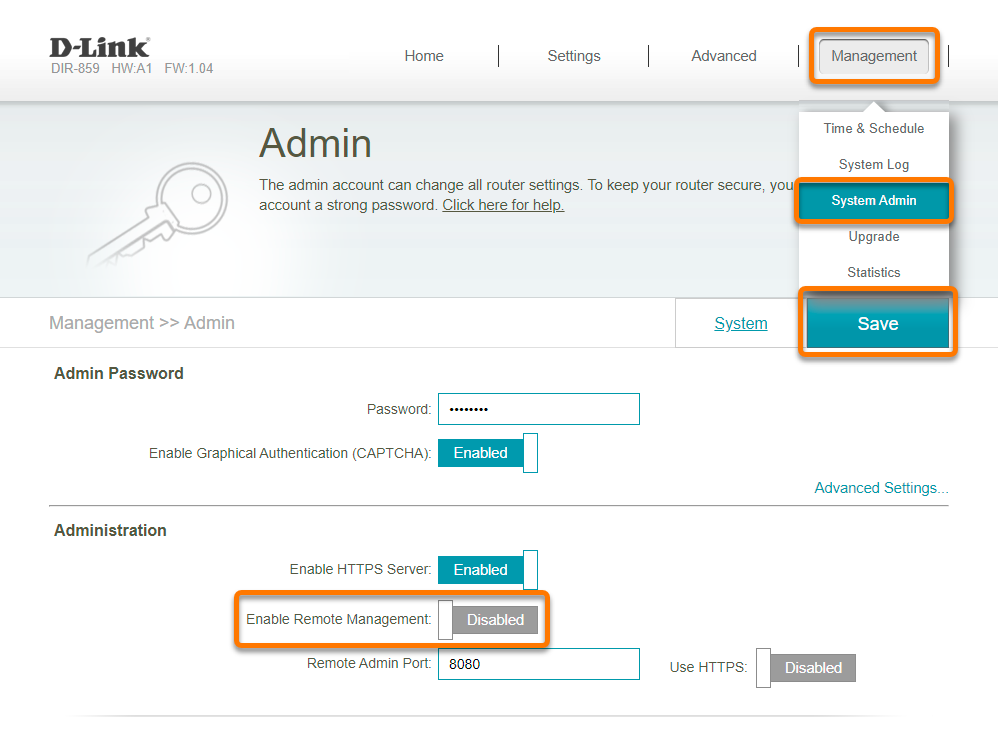
D-Link
To configure a D-Link wireless router:
| 1. |
From the Network Inspector results screen, select Go to your router settings to open the administration page of your D-Link router. |
| 2. |
Enter your router username and password. If you do not know your login credentials, contact the party who provided the router. This is normally your Internet Service Provider (ISP). |
| 3. |
Follow the step below that matches your router settings: Go to Management ▸ System Admin. OR Go to Tools ▸ Admin. OR Go to Maintenance ▸ Device Administration. |
| 4. |
Follow the step below that matches your router settings: Ensure that Enable Remote Management is set to Disabled. OR In the Administration or Remote Management section, untick Enable Remote Management. |
| 5. |
Confirm your changes by selecting Save or Save settings, and reboot your router if necessary. |
Huawei
To configure a Huawei wireless router:
| 1. |
From the Network Inspector results screen, select Go to your router settings to open the administration page of your Huawei router. |
| 2. |
Enter your router username and password. If you do not know your login credentials, contact the party who provided the router. This is normally your Internet Service Provider (ISP). |
| 3. |
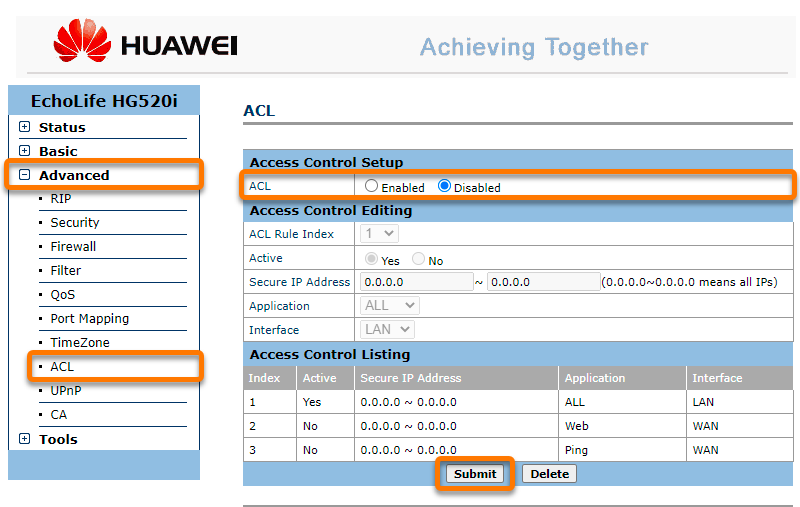
Follow the step below that matches your router settings: Go to Advanced ▸ ACL ▸ Access Control Setup. OR Go to Advanced ▸ Firewall. |
| 4. |
Follow the step below that matches your router settings: Set ACL to Disabled. OR For other routers with remote access supported only via the Firewall configuration, select ACL, and ensure that for each Service Type (such as HTTP, ACL), Access Direction is set to LAN (rather than WAN, for example). |
| 5. |
Confirm your changes by selecting Submit, and reboot your router if necessary. |
Linksys
To configure a Linksys wireless router:
| 1. |
From the Network Inspector results screen, select Go to your router settings to open the administration page of your Linksys router. |
| 2. |
Enter your router username and password. If you do not know your login credentials, contact the party who provided the router. This is normally your Internet Service Provider (ISP). |
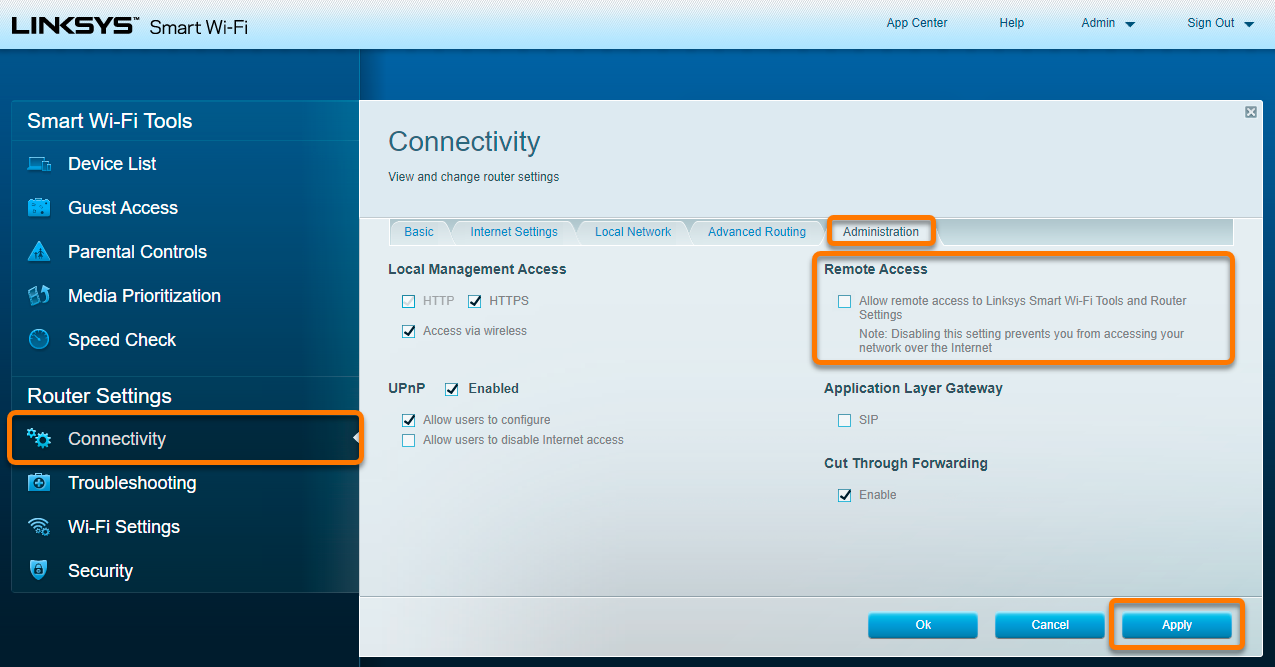
| 3. |
Follow the step below that matches your router settings: Go to Connectivity ▸ Administration. OR Go to Administration ▸ Management ▸ Remote Management Access. |
| 4. |
Untick the box under Remote Access. OR For the Remote management option, select Disabled. |
| 5. |
Confirm your changes by selecting Apply or Save settings, and reboot your router if necessary. |
NETGEAR
To configure a NETGEAR wireless router:
| 1. |
From the Network Inspector results screen, select Go to your router settings to open the administration page of your NETGEAR router. |
| 2. |
Enter your router username and password. If you do not know your login credentials, contact the party who provided the router. This is normally your Internet Service Provider (ISP). |
| 3. |
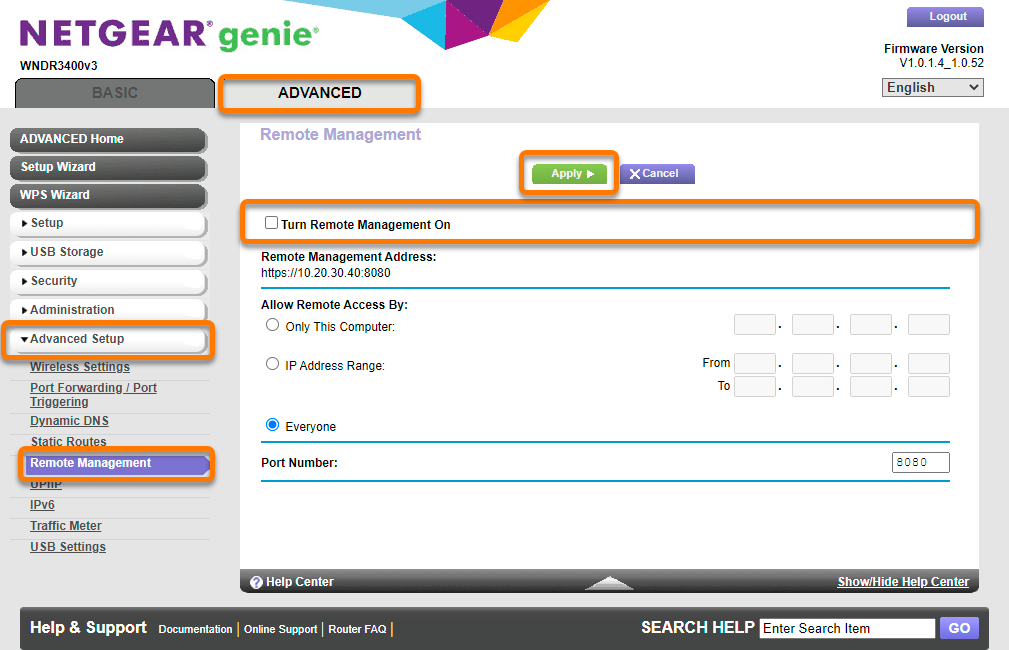
Follow the step below that matches your router settings: Go to Advanced ▸ Advanced Setup ▸ Remote Management. OR Go to Advanced ▸ Remote Management. OR Go to Maintenance ▸ Remote Management. |
| 4. |
Follow the step below that matches your router settings: Untick the box next to Turn Remote Management On. OR Untick the Allow Remote Management option. |
| 5. |
Confirm your changes by selecting Apply, and reboot your router if necessary. |
TP-Link
To configure a TP-Link wireless router:
| 1. |
From the Network Inspector results screen, select Go to your router settings to open the administration page of your TP-Link router. |
| 2. |
Enter your router username and password. If you do not know your login credentials, contact the party who provided the router. This is normally your Internet Service Provider (ISP). |
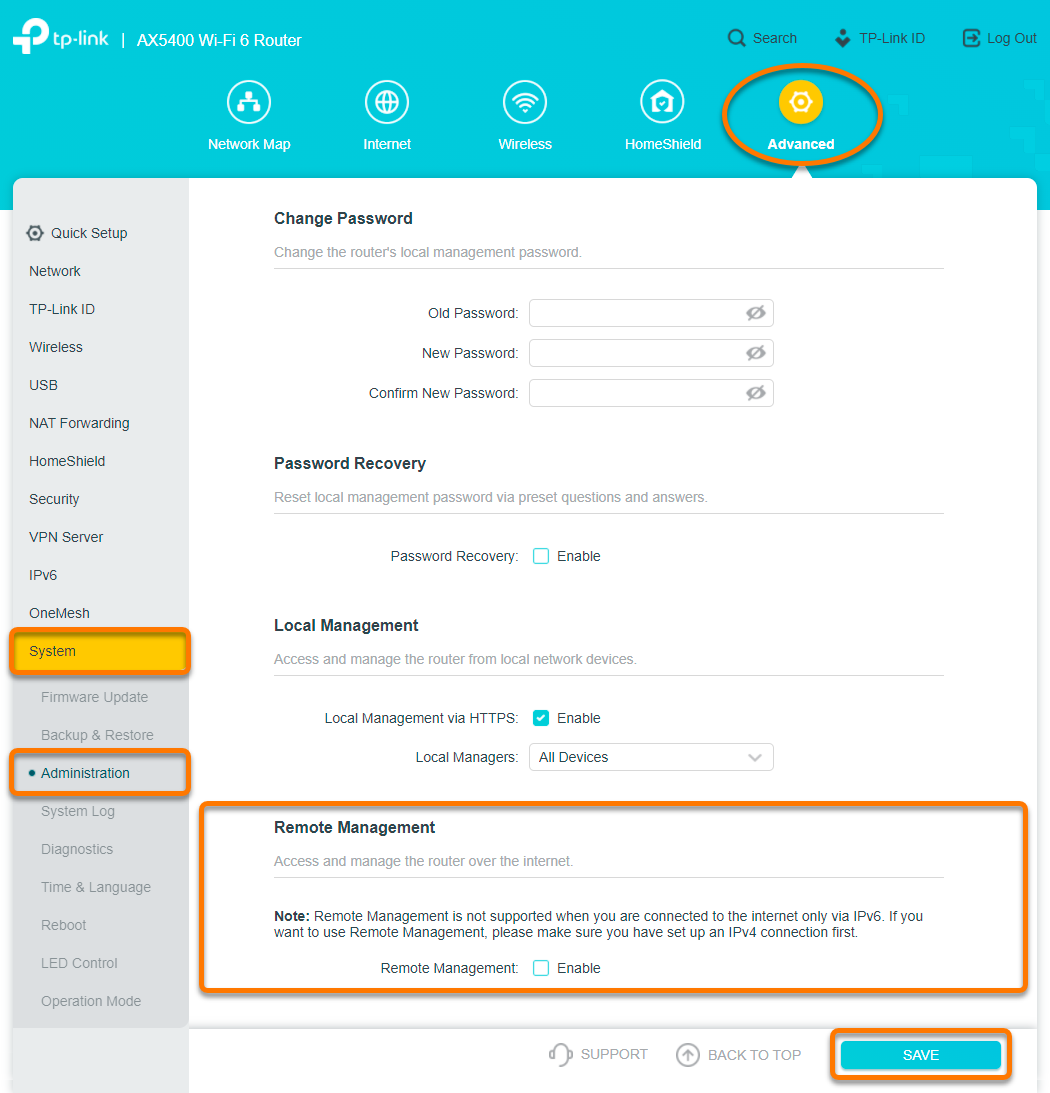
| 3. |
Follow the step below that matches your router settings: Go to Advanced ▸ System ▸ Administration ▸ Remote Management. OR Go to Security ▸ Remote Management. OR Go to Advanced ▸ Security ▸ Remote Management. |
| 4. |
Next to Remote Management, ensure that Enable is unticked. OR In the Remote Management IP Address field, disable remote management by entering the IP address |
| 5. |
Confirm your changes by selecting Save, and reboot your router if necessary. |
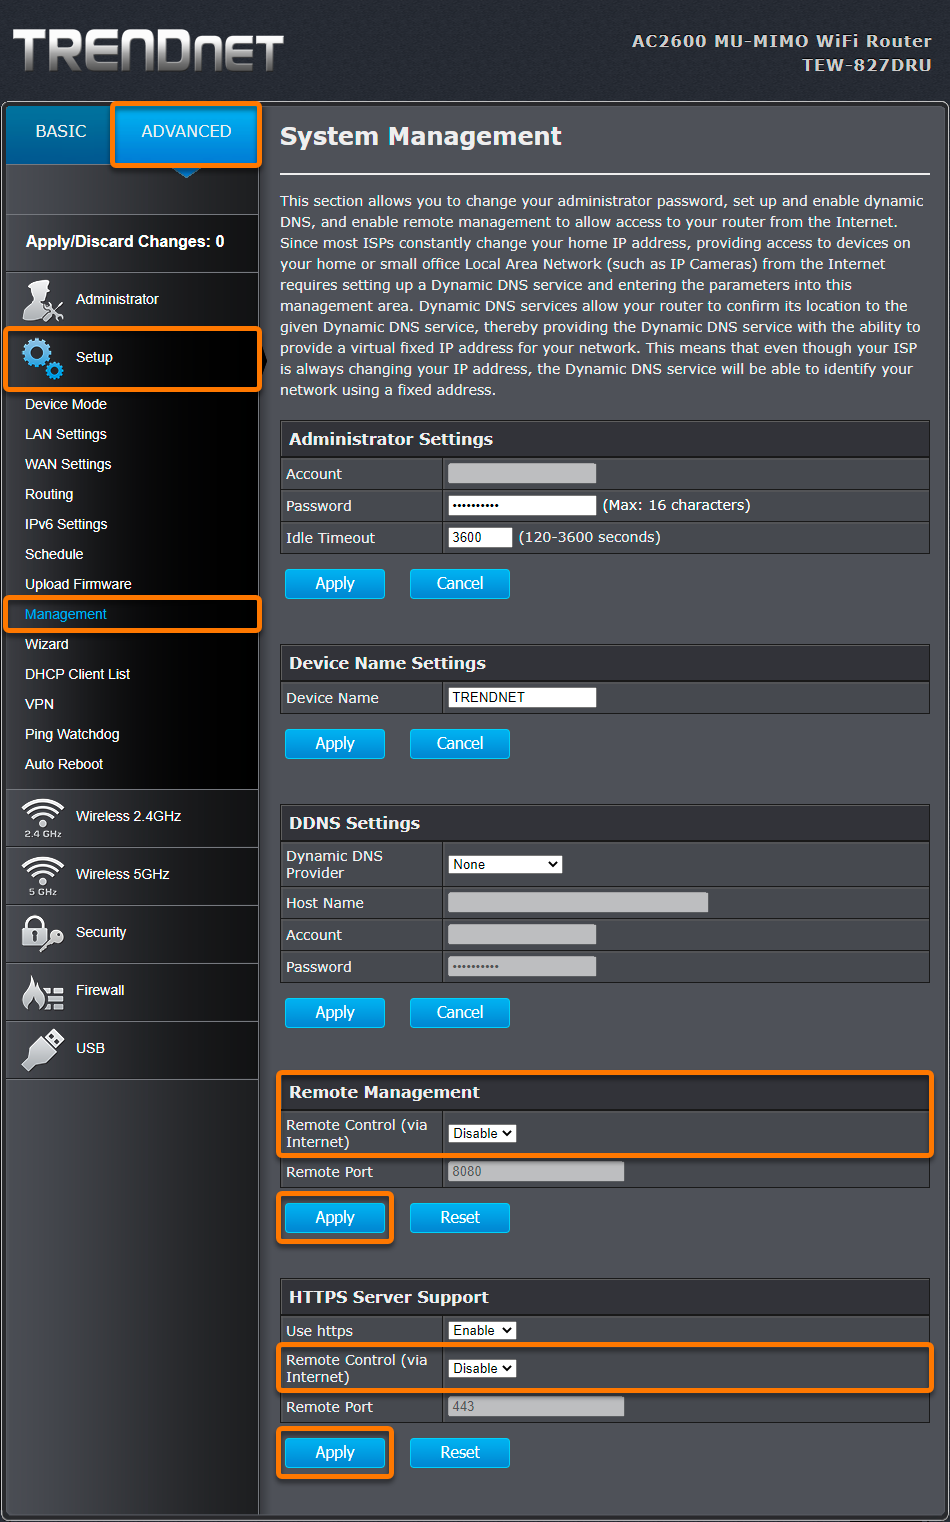
TRENDnet
To configure a TRENDnet wireless router:
| 1. |
From the Network Inspector results screen, select Go to your router settings to open the administration page of your TRENDnet router. |
| 2. |
Enter your router username and password. If you do not know your login credentials, contact the party who provided the router. This is normally your Internet Service Provider (ISP). |
| 3. |
Go to Advanced ▸ Setup ▸ Management. |
| 4. |
Under Remote Management, ensure that Remote Control (via Internet) is set to Disable. Confirm your changes by selecting Apply. |
| 5. |
If available, under HTTPS Server Support, ensure that Remote Control (via Internet) is set to Disable. Confirm your changes by selecting Apply. |
| 6. |
Reboot your router if necessary. |
Other routers
Below are links to the support pages for other router brands:
Apple | AT&T | Dell | DrayTek | Eero | GL.iNET | Google | MicroTik | Motorola | NEC | Sagem/Sagemcom | Speedefy | Ubiquiti | UniFi | Vodafone
To configure a wireless router:
| 1. |
From the Network Inspector results screen, select Go to your router settings to open the administration page of your router. |
| 2. |
Enter your router username and password. If you do not know your login credentials, contact the party who provided the router. This is normally your Internet Service Provider (ISP). |
| 3. |
Find the Administration section (this might also be called Admin, Setup, Tools, or similar). |
| 4. |
Find and Disable the Remote management service (this might also be called Remote access, or Remote control, or similar). |
| 5. |
Confirm your changes (select Save settings, Update, OK, or similar) and reboot your router if necessary. |
This section explains how to disable remote access via Telnet and SSH on your router (applies if port 22 or 23 is open).
Select your router brand for detailed instructions:
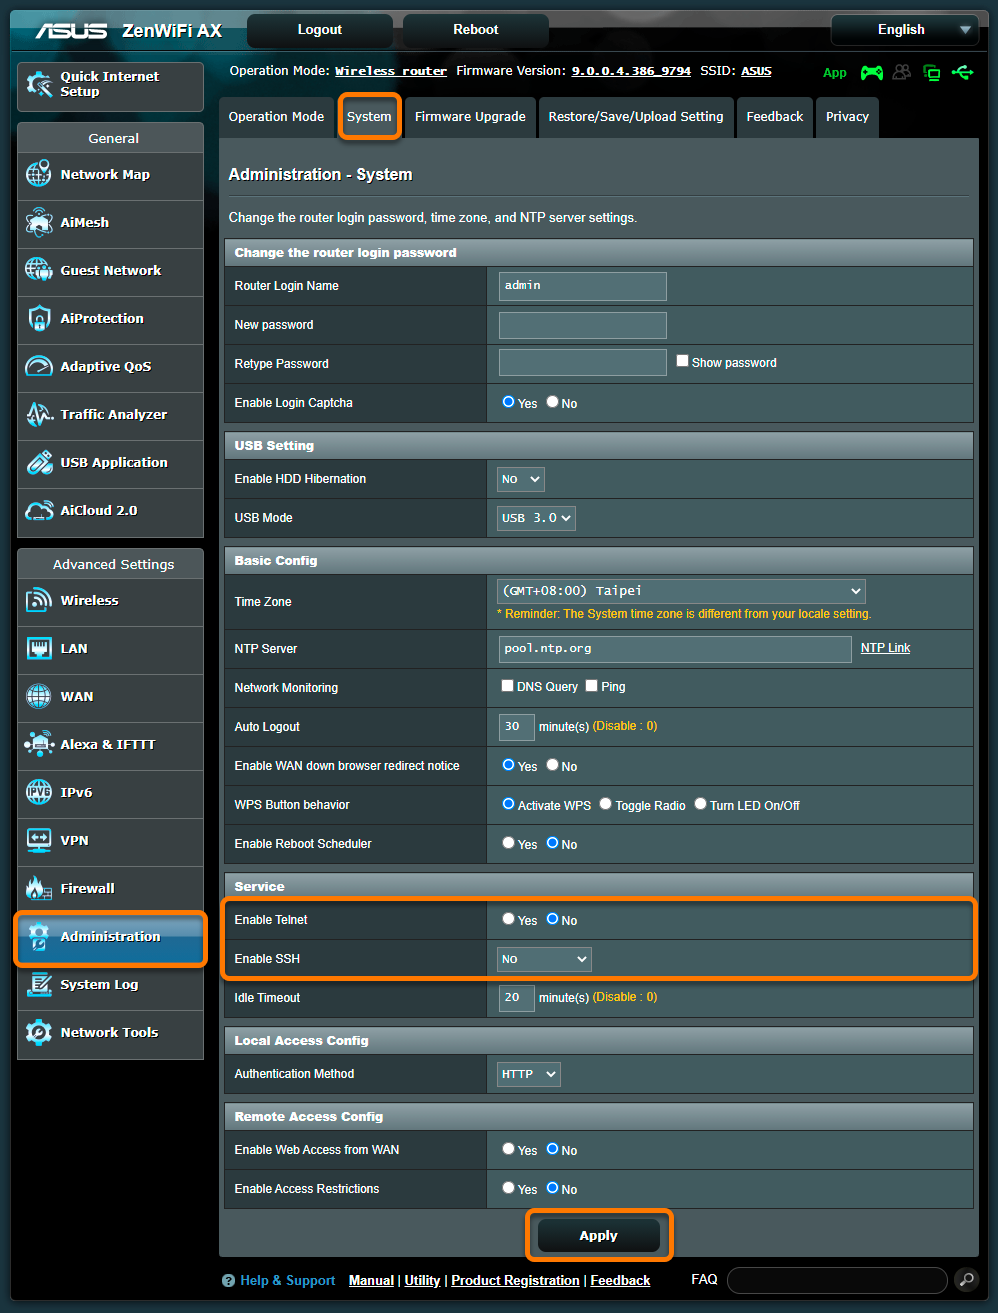
ASUS
To configure an ASUS wireless router:
| 1. |
From the Network Inspector results screen, select Go to your router settings to open the administration page of your ASUS router. |
| 2. |
Enter your router username and password. If you do not know your login credentials, contact the party who provided the router. This is normally your Internet Service Provider (ISP). |
| 3. |
Go to Advanced Settings ▸ Administration ▸ System ▸ Service. Perform both actions below:
|
| 4. |
Go to Advanced Settings ▸ WAN ▸ Virtual Server / Port Forwarding. |
| 5. |
Choose your preferred option below:
|
| 6. |
Reboot your router if necessary. |

Belkin
To configure a Belkin wireless router:
| 1. |
From the Network Inspector results screen, select Go to your router settings to open the administration page of your Belkin router. |
| 2. |
Enter your router username and password. If you do not know your login credentials, contact the party who provided the router. This is normally your Internet Service Provider (ISP). |
| 3. |
Go to Configuration ▸ Security. |
| 4. |
Select Single Port Forwarding in the left panel. Check for any entries that list port 135, 445, or 338922 or 23 under External Port. Select Remove next to each relevant entry, then confirm your changes by selecting Save. |
| 5. |
Select Port Range Forwarding in the left panel. Under Start ~ End Port, check for any entries with a range that includes port 135, 445, or 338922 or 23. Select Remove next to each relevant entry, then confirm your changes by selecting Save. |
| 6. |
Reboot your router if necessary. |
Single Port Forwarding

Port Range Forwarding

Cisco
To configure a Cisco wireless router:
| 1. |
From the Network Inspector results screen, select Go to your router settings to open the administration page of your Cisco router. |
| 2. |
Enter your router username and password. If you do not know your login credentials, contact the party who provided the router. This is normally your Internet Service Provider (ISP). |
| 3. |
Select Firewall ▸ Port Forwarding ▸ Service Management.... |
| 4. |
Make a note of the Name that is provided for each entry that lists port 135, 445, or 338922 or 23 under Port Start/ICMP Type/IP Protocol. |
| 5. |
Select Firewall ▸ Port Forwarding in the left panel. |
| 6. |
Under External Service, locate each Name that you made a note of in step 4. For each relevant entry, untick the box next to Enable. |
| 7. |
Confirm your changes by selecting Apply, and reboot your router if necessary. |

D-Link
To configure a D-Link wireless router:
| 1. |
From the Network Inspector results screen, select Go to your router settings to open the administration page of your D-Link router. |
| 2. |
Enter your router username and password. If you do not know your login credentials, contact the party who provided the router. This is normally your Internet Service Provider (ISP). |
| 3. |
Go to Advanced ▸ Port Forwarding. |
| 4. |
Check for any entries that list port 135, 445, or 338922 or 23 under TCP Port. For each relevant entry, untick the box in the Status column. Confirm your changes by selecting Save. |
| 5. |
Select Virtual Server at the top of the screen. Then, check for any entries that list port 135, 445, or 338922 or 23 under External Port. For each relevant entry, untick the box in the Status column. Confirm your changes by selecting Save. |
| 6. |
Reboot your router if necessary. |

Huawei
To configure a Huawei wireless router:
| 1. |
From the Network Inspector results screen, select Go to your router settings to open the administration page of your Huawei router. |
| 2. |
Enter your router username and password. If you do not know your login credentials, contact the party who provided the router. This is normally your Internet Service Provider (ISP). |
| 3. |
Go to Basic ▸ NAT ▸ Virtual Server. |
| 4. |
In the Virtual Server Listing table, make a note of the Rule number that is provided for each entry with a port range that includes port 135, 445, or 338922 or 23 (the range includes all ports between the Start Port and End Port numbers). |
| 5. |
Under NAT - Virtual Server, use the Rule Index drop-down menu to select each Rule number that you made a note of in step 4. Select the delete button at the bottom of the screen to remove each relevant entry. |
| 6. |
Confirm your changes by selecting Submit, and reboot your router if necessary. |

Linksys
To configure a Linksys wireless router:
| 1. |
From the Network Inspector results screen, select Go to your router settings to open the administration page of your Linksys router. |
| 2. |
Enter your router username and password. If you do not know your login credentials, contact the party who provided the router. This is normally your Internet Service Provider (ISP). |
| 3. |
Go to Security ▸ Apps and Gaming ▸ Single Port Forwarding. |
| 4. |
Locate any entries that list port 135, 445, or 338922 or 23 under External Port. Then, choose your preferred option below for each relevant entry:
Confirm your changes by selecting Apply. |
| 5. |
Select the Port Range Forwarding tab. Under Start ~ End Port, check for any entries with a range that includes port 135, 445, or 338922 or 23. Then, choose your preferred option below for each relevant entry:
Confirm your changes by selecting Apply. |
| 6. |
Reboot your router if necessary. |
Single Port Forwarding

Port Range Forwarding

NETGEAR
To configure a NETGEAR wireless router:
| 1. |
From the Network Inspector results screen, select Go to your router settings to open the administration page of your NETGEAR router. |
| 2. |
Enter your router username and password. If you do not know your login credentials, contact the party who provided the router. This is normally your Internet Service Provider (ISP). |
| 3. |
Go to Advanced ▸ Advanced Setup ▸ Port Triggering / Port Forwarding. Under Please select the service type, select Port Forwarding. |
| 4. |
Locate any entries that meet either of the following criteria:
Select each relevant entry, then select the Delete Service button. |
| 5. |
Reboot your router if necessary. |

TP-Link
To configure a TP-Link wireless router:
| 1. |
From the Network Inspector results screen, select Go to your router settings to open the administration page of your TP-Link router. |
| 2. |
Enter your router username and password. If you do not know your login credentials, contact the party who provided the router. This is normally your Internet Service Provider (ISP). |
| 3. |
Go to Advanced ▸ NAT Forwarding ▸ Port Forwarding. |
| 4. |
Locate any entries that list port 135, 445, or 338922 or 23 under External Port. Then, choose your preferred option below for each relevant entry:
|
| 5. |
Reboot your router if necessary. |

TRENDnet
To configure a TRENDnet wireless router:
| 1. |
From the Network Inspector results screen, select Go to your router settings to open the administration page of your TRENDnet router. |
| 2. |
Enter your router username and password. If you do not know your login credentials, contact the party who provided the router. This is normally your Internet Service Provider (ISP). |
| 3. |
Go to Advanced ▸ Firewall ▸ Virtual Server. |
| 4. |
On the Virtual Server List, locate any entries that list port 135, 445, or 338922 or 23 under Protocol, Public Port/Private Port. Then, choose your preferred option below for each relevant entry:
|
| 5. |
Select Gaming in the left panel. In the Gaming Rule List, check the Ports column for any entries with a range that includes port 135, 445, or 338922 or 23. Then, choose your preferred option below for each relevant entry:
|
| 6. |
Reboot your router if necessary. |
Virtual Server

Gaming

Other routers
Below are links to the support pages for other router brands:
Apple | AT&T | Dell | DrayTek | Eero | GL.iNET | Google | MicroTik | Motorola | NEC | Sagem/Sagemcom | Speedefy | Ubiquiti | UniFi | Vodafone | ZyXEL
To configure a wireless router:
| 1. |
From the Network Inspector results screen, select Go to your router settings to open the administration page of your router. |
| 2. |
Enter your router username and password. If you do not know your login credentials, contact the party who provided the router. This is normally your Internet Service Provider (ISP). |
| 3. |
Find the Port Forwarding settings for your router. These settings are normally in the Advanced or Advanced Setup section. If you do not immediately see the Port Forwarding option, try looking in the following categories:
|
| 4. |
In the table showing your active port forwarding entries, locate any entries that list port 135, 445, or 338922 or 23 under External Port (might also be listed under Port, External Start Port, TCP Port, or similar). Either delete or disable each relevant entry. If necessary, confirm your changes (select Save, Apply, OK, or similar). |
| 5. |
If available, select Port Range Forwarding. In the table showing your active port range forwarding entries, locate any entries with a range that includes port 135, 445, or 338922 or 23. Either delete or disable each relevant entry. If necessary, confirm your changes (select Save, Apply, OK, or similar). |
| 6. |
Reboot your router if necessary. |
For information on how to disable port forwarding on your router (applies if port 135, 445, or 3389 is open), visit the following article:
This section applies if port 7547 is open.
CWMP is often called TR-069. On some cable modems, you may be able to disable remote TR-069 configuration by unticking a setting labeled Provider Services (TR-069) (or similarly), in the web interface of the modem.
However, if this option is not available, you need to contact your Internet Service Provider (ISP) directly to resolve the issue.
- Avast One
- Avast Premium Security
- Avast Free Antivirus
- Windows and macOS
Updated on: 12/06/2025