The Firewall feature in Avast One monitors the network traffic between your PC and the outside world to help protect you from unauthorized communication and intrusions. This feature is designed to require minimal input from you. To ensure you have protection, all you need to do is keep Firewall enabled and, when prompted, specify whether each network that you connect to is trusted or untrusted.
Add trusted and untrusted networks
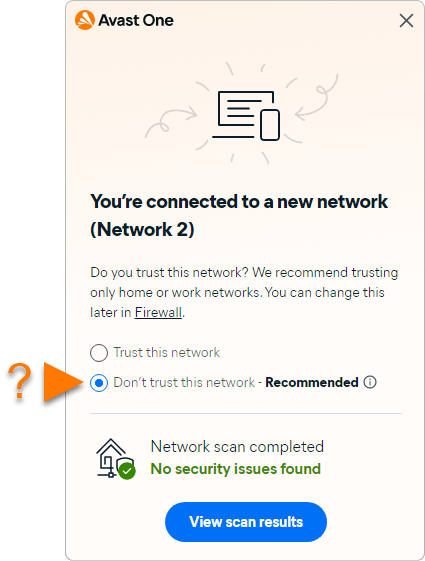
Each time you connect to a new network, Firewall prompts you to specify if you trust or don't trust the network. Don't trust is the default option if you do not manually select one.

To manually specify at any time whether an individual network is trusted or untrusted, follow the steps below:
- Open Avast One and go to
 Explore ▸ Firewall.
- Click Open Firewall.

- In the Connected to box, click the down arrow, then choose one of the following options:
- Trust this network: The recommended option for a private network, such as your home or work network. When you select this option, the network is marked as a Trusted network. Each time you connect to a trusted network, Firewall permits all communication within the network and applies a lower level of security to enable better connectivity.
- Don't trust this network: The recommended option for a public network, such as in an airport or cafe. When you select this option, the network is marked as an Untrusted network. Each time you connect to an untrusted network, Firewall blocks all incoming communication and applies a higher level of security to ensure your privacy and safety.

Each time you connect to this network, Firewall applies the appropriate settings according to your preferences.
Manage apps
Firewall controls when the apps on your PC can connect to the internet or to other networks. It creates default rules for an application when it starts for the first time.
To manually specify how Firewall handles connection attempts from individual apps:
- Open Avast One and go to
 Explore ▸ Firewall.
- Click Open Firewall.

- Ensure the Apps tab is selected, then select one of the following sub-tabs:
- Active: View the apps that are currently using your internet connection.
- Inactive: View the apps that are not currently using your internet connection.
- Blocked: View the apps that are currently blocked from using your internet connection.
- All: View the apps that are installed on your PC.

- The following options are available for each app:
- Click Block next to an application to ensure that Firewall always stops this application from connecting to the internet or to other networks.
- Click the arrow icon to view basic information about this application such as download and upload amounts and speeds.

Unblock apps
When you block an app, it appears on your list of blocked apps. To unblock an app:
- Ensure the Apps tab is selected, then select the Blocked sub-tab.

- Click Unblock next to the relevant app.

This application can now connect to the internet and to other networks.
Enable or disable Firewall
To ensure your security, Firewall is enabled by default. We recommend keeping Firewall enabled at all times, unless you need to temporarily disable it for troubleshooting purposes.
To disable Firewall:
- Open Avast One and go to
 Explore ▸ Firewall.
- Click Open Firewall.

- Click the green (ON) slider, then specify for how long Firewall will remain disabled.
 We do not recommend selecting the Until I turn it on again option to permanently stop Firewall.
 - Click OK, stop to confirm.

Firewall is disabled. To manually enable it, click the red (OFF) slider so that it changes to green (ON).
Further recommendations
To learn more about the Firewall feature in Avast One, refer to the following article:
The Firewall feature in Avast One monitors the network traffic between your Mac and the outside world to help protect you from unauthorized communication and intrusions. This feature is designed to require minimal input from you. To ensure you have protection, all you need to do is enable Firewall and, when prompted, specify whether each network that you connect to is trusted.
Enable Firewall
To enable Firewall:
- Open Avast One and go to
 Explore ▸ Firewall.
- Click Open Firewall.

- To enable Firewall, click the red (OFF) slider so it changes to green (ON).

- If prompted, enter the password that you use when you start your Mac and click OK.

Firewall is enabled.
Add trusted networks
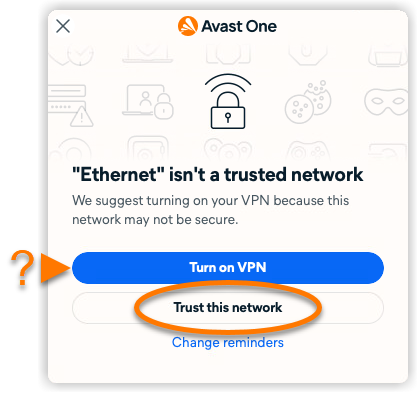
Each time you connect to a new network, Firewall prompts you to either turn on your VPN or select Trust this network.

To manually specify whether an individual network is trusted:
- Open Avast One and go to
 Explore ▸ Firewall.
- Click Open Firewall.

- Select Settings, then click Manage next to Private networks.

- Next to the detected network connection, click Trust. The network connection is added to the Trusted Networks list.

- Alternatively, click the X icon next to a network to remove it from the Trusted Networks list. It is recommended to keep your VPN on when connected to untrusted networks.

Firewall applies the settings according to your preferences.
Manage app connections
Firewall controls when the apps on your Mac can connect to the internet or to other networks. It creates default rules for an application when it starts for the first time.
To manually specify how Firewall handles connection attempts from all of your apps:
- Open Avast One and go to
 Explore ▸ Firewall.
- Click Open Firewall.

- Ensure that Traffic Monitor is selected, then click the Firewall mode button to select from the following modes:
- Smart Mode: Asks if you want to block or allow untrusted application connections.
- Block all new connections: Automatically blocks all new connections without notifying you, except the connections with set rules.
- Allow all new connections: Automatically allows all new connections without notifying you, except the connections with set rules.
- Monitor only: No connections are blocked, and any previously set rules are ignored.
 The Smart Mode feature is supported only on Apple macOS 11.x (Big Sur) or later versions.
 - If prompted, enter the password that you use when you start your Mac and click OK.

The selected rules apply for all your apps.
Set rules for specific apps
To manually specify how Firewall handles connection attempts from individual apps:
- Select an application to view details about its data usage.

- The following options are available:
- Use the slider next to the chosen application to
 block,
  allow,
  trust or have the application
  ask for your permission when connecting to the internet.
 - Under App connections, use the slider to
 block or
  allow each connection.
- Use the slider next to the chosen application to
- Click Create rule to confirm the rule for the connection.

Firewall now allows or blocks your connections according to the set rules.
Disable Firewall
We recommend keeping Firewall enabled at all times, unless you need to temporarily disable it for troubleshooting purposes.
To disable Firewall:
- Open Avast One and go to
 Explore ▸ Firewall.
- Click Open Firewall.

- Click the green (ON) slider, then specify for how long Firewall will remain disabled.
 We do not recommend selecting the Until I turn it on again option to permanently stop Firewall.
 - If prompted, enter the password that you use when you start your Mac and click OK.

Firewall is disabled.
Further recommendations
To learn more about the Firewall feature in Avast One, refer to the following article:
- Avast One 24.x for Windows
- Avast One 24.x for Mac
- Microsoft Windows 11 Home / Pro / Enterprise / Education
- Microsoft Windows 10 Home / Pro / Enterprise / Education - 32 / 64-bit
- Microsoft Windows 8.1 / Pro / Enterprise - 32 / 64-bit
- Microsoft Windows 8 / Pro / Enterprise - 32 / 64-bit
- Microsoft Windows 7 Home Basic / Home Premium / Professional / Enterprise / Ultimate - Service Pack 1 with Convenient Rollup Update, 32 / 64-bit
- Apple macOS 14.x (Sonoma)
- Apple macOS 13.x (Ventura)
- Apple macOS 12.x (Monterey)
- Apple macOS 11.x (Big Sur)
- Apple macOS 10.15.x (Catalina)
- Apple macOS 10.14.x (Mojave)
- Apple macOS 10.13.x (High Sierra)
Updated on: 06/08/2024


