Troubleshooting for sending emails when connected via Avast SecureLine VPN
When connected to Avast SecureLine VPN, you may experience problems sending emails from an email client, such as Microsoft Outlook, Mozilla Thunderbird, or Apple Mail (Mac). This article explains how to resolve such issues.
Avast SecureLine VPN has no impact on email behavior if you use a web-based email account via an internet browser.
Change your VPN server location
Avast SecureLine VPN has servers in several locations and switching your VPN connection to one of our torrenting servers will often solve the issue.
-
Open Avast SecureLine VPN, then click Change on the main application screen. 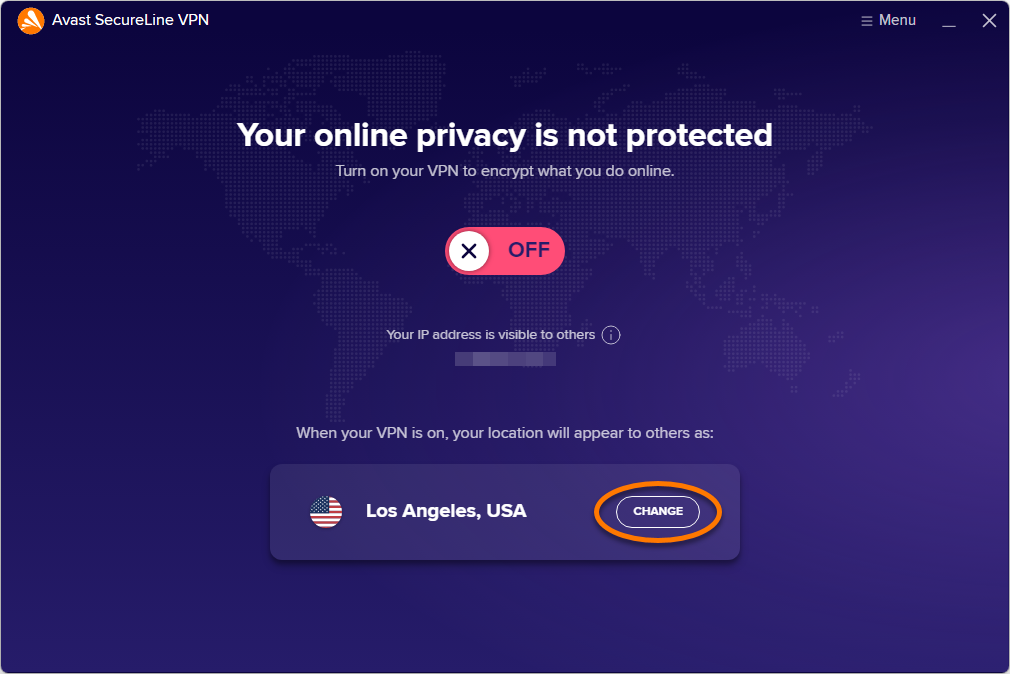
-
In the left panel, click Torrenting. 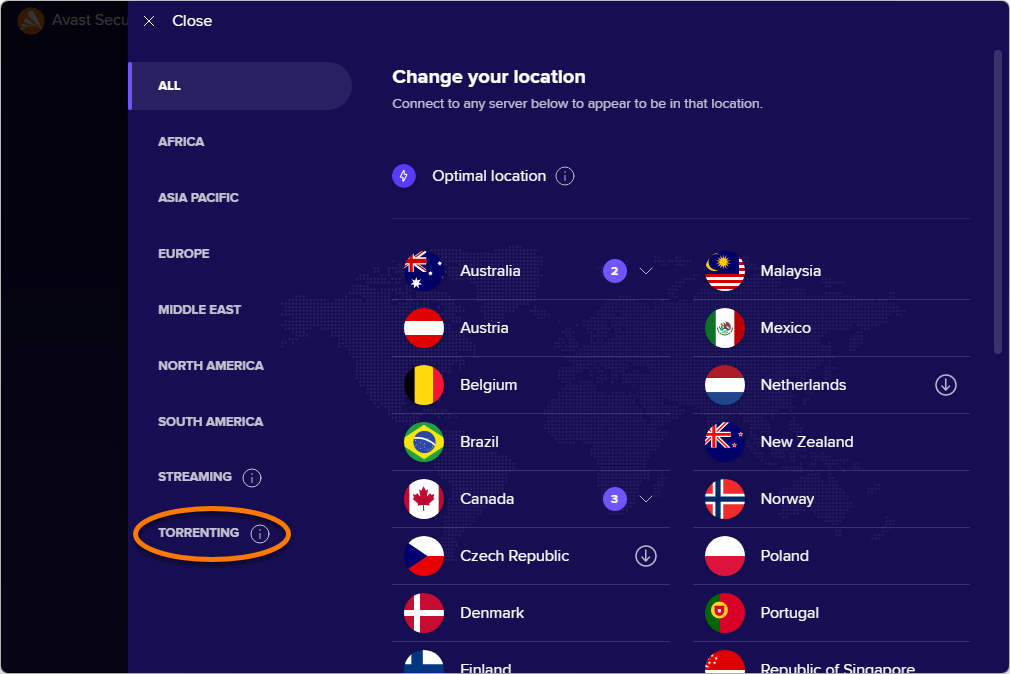
-
Select one of the listed server locations and click Change location. 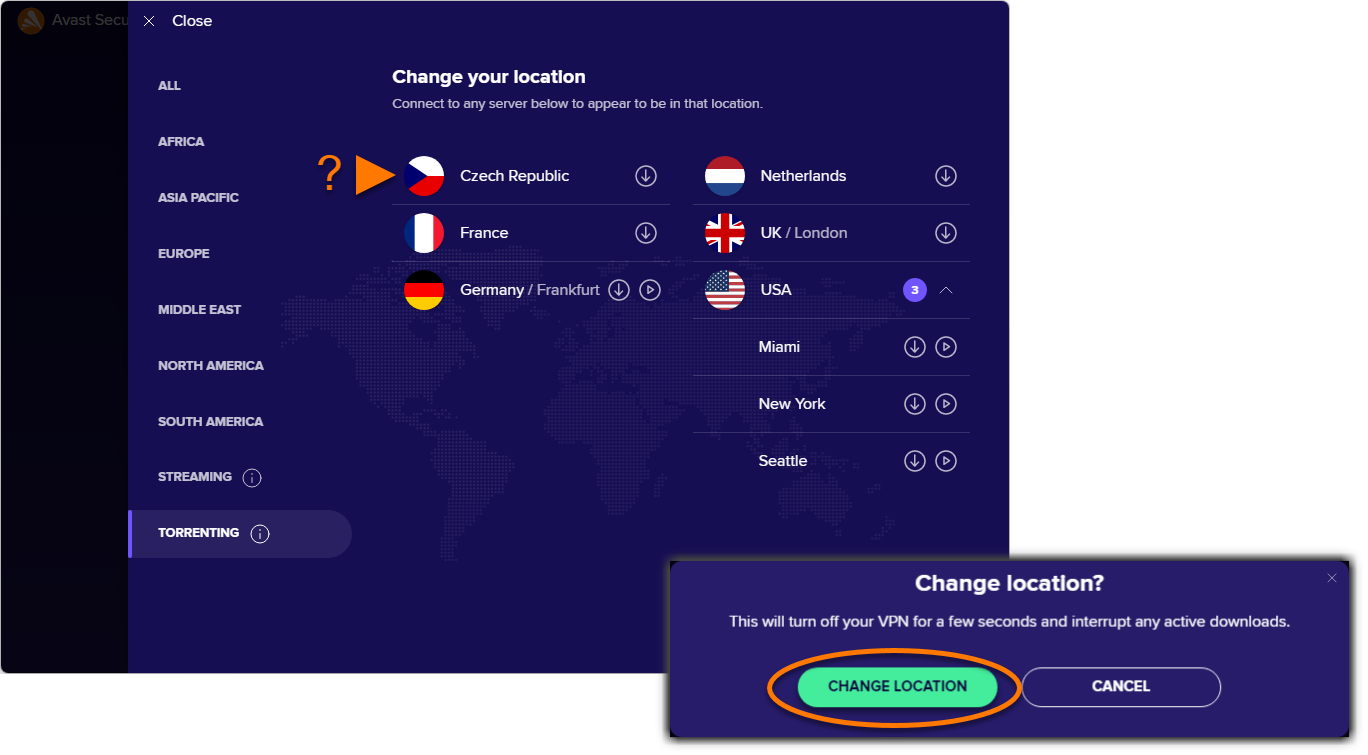
The option to change the VPN server location via the main application screen is not available when Smart VPN Mode is enabled. This is because Smart VPN always connects to the fastest server location available automatically, or to the server location that you specified in your Smart VPN settings.
Your VPN server location is now changed.
-
Open Avast SecureLine VPN, then click Change on the main application screen. 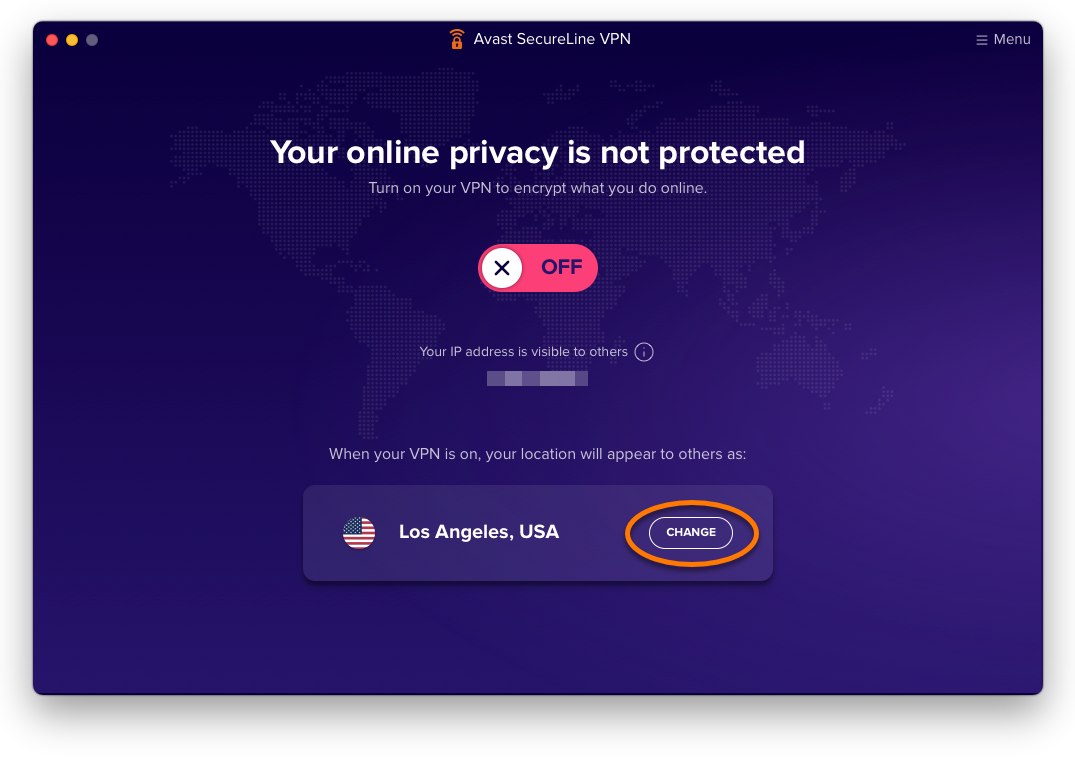
-
In the left panel, click Torrenting. 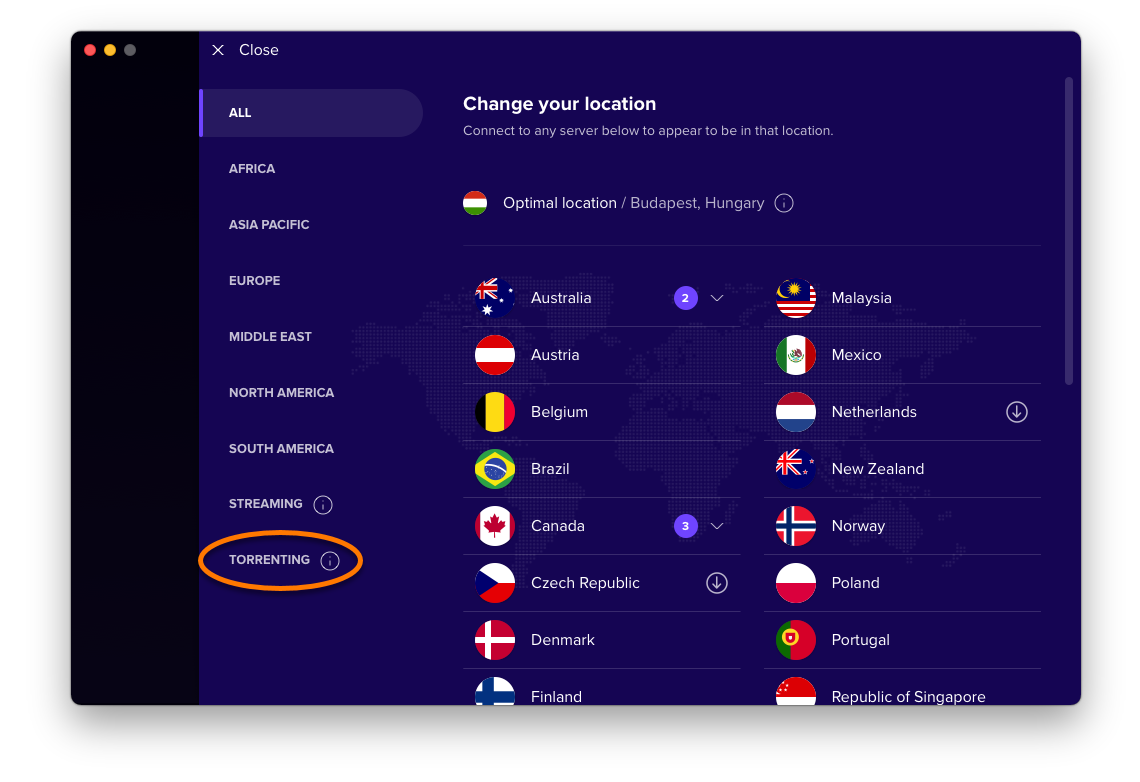
-
Select one of the listed server locations and click Change location. 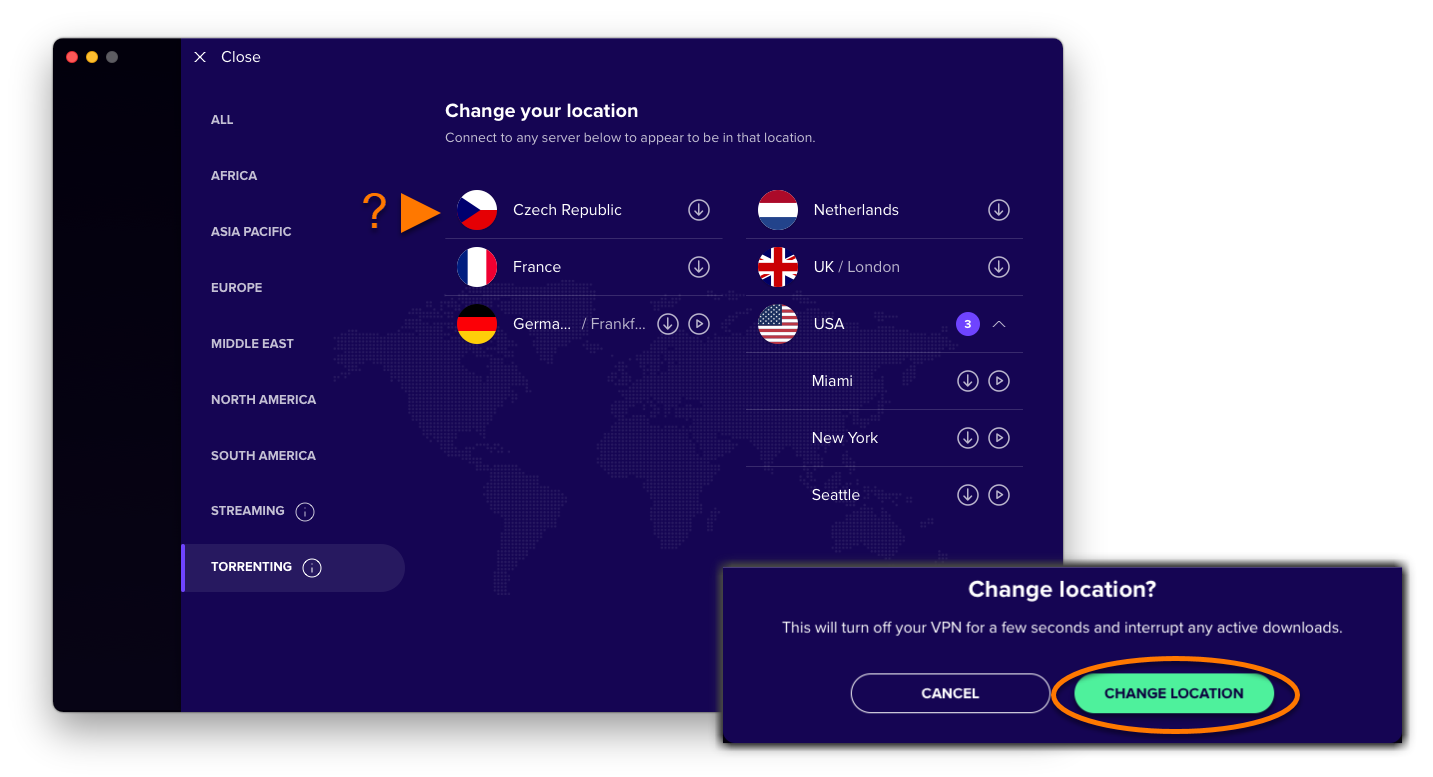
The option to change the VPN server location via the main application screen is not available when Smart VPN Mode is enabled. This is because Smart VPN always connects to the fastest server location available automatically, or to the server location that you specified in your Smart VPN settings.
Your VPN server location is now changed.
Change the SMTP server settings
Configuring outgoing SMTP server settings in your email client to use port 465 or 587, and enabling SSL/TLS encryption usually solves the issue.
Your email client:
To change SMTP settings in Microsoft Outlook:
-
Click File ▸ Info ▸ Account Settings, then select Server Settings. 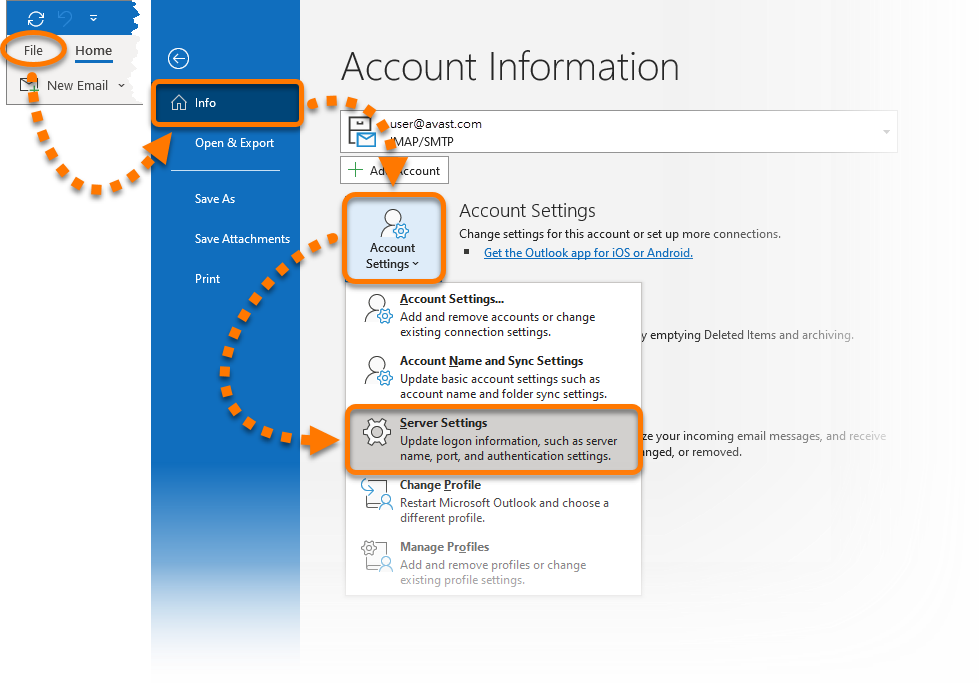
-
Select Outgoing mail. 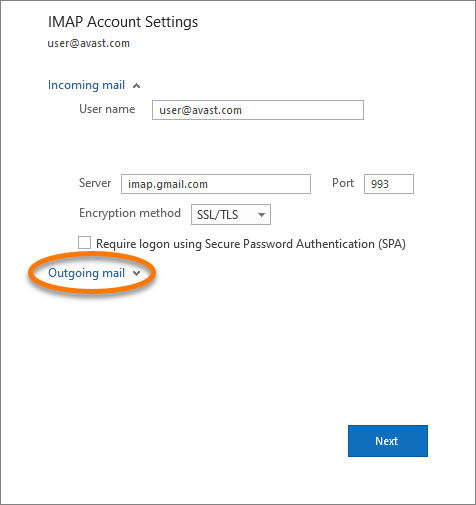
-
Modify the following parameters:
-
Server: Ensure the correct hostname or IP address is entered. We recommend using a specific IP address for the SMTP server, especially if the provider uses specific IP addresses.
-
Port: Change the number to 465 or 587, based on the requirements of your email service provider.
-
Encryption method: Select SSL/TLS to enable an encrypted connection, if supported by your email service provider.
-
My outgoing (SMTP) server requires authentication: Tick the box to enable and specify an authentication method, if required by your email service provider. 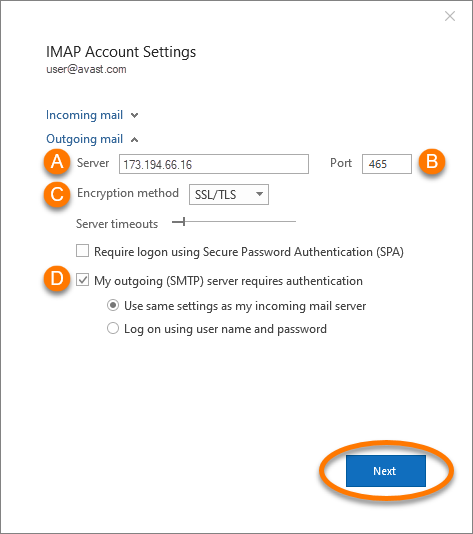
-
Click Next, then Done to confirm your changes.
Your server settings are now updated. Repeat steps 2-4 for each email account that you use.
To change SMTP settings in Mozilla Thunderbird:
-
Ensure your account name is selected in the left panel, then click Account Settings. 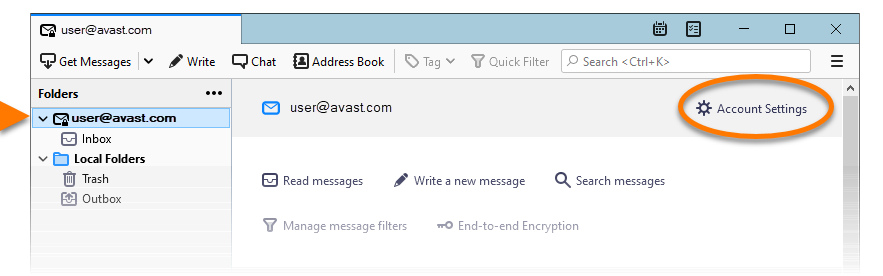
-
Select Outgoing Server (SMTP) in the left panel. 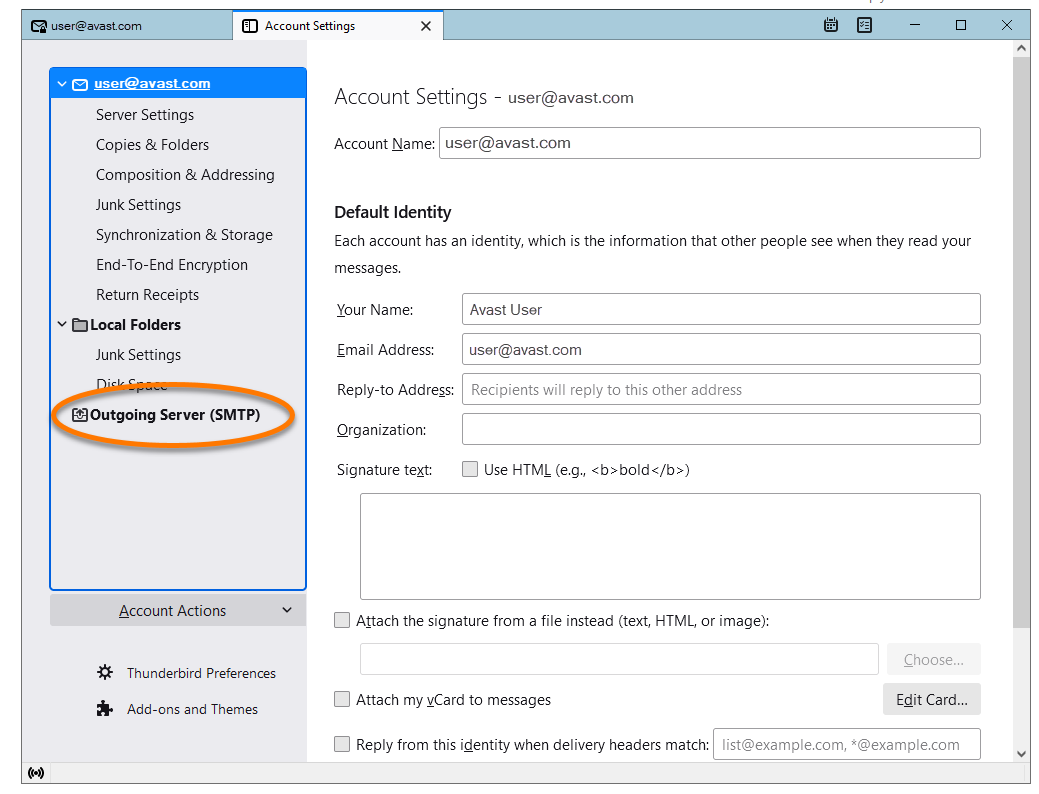
-
Select the SMTP server from the list, then click Edit.... 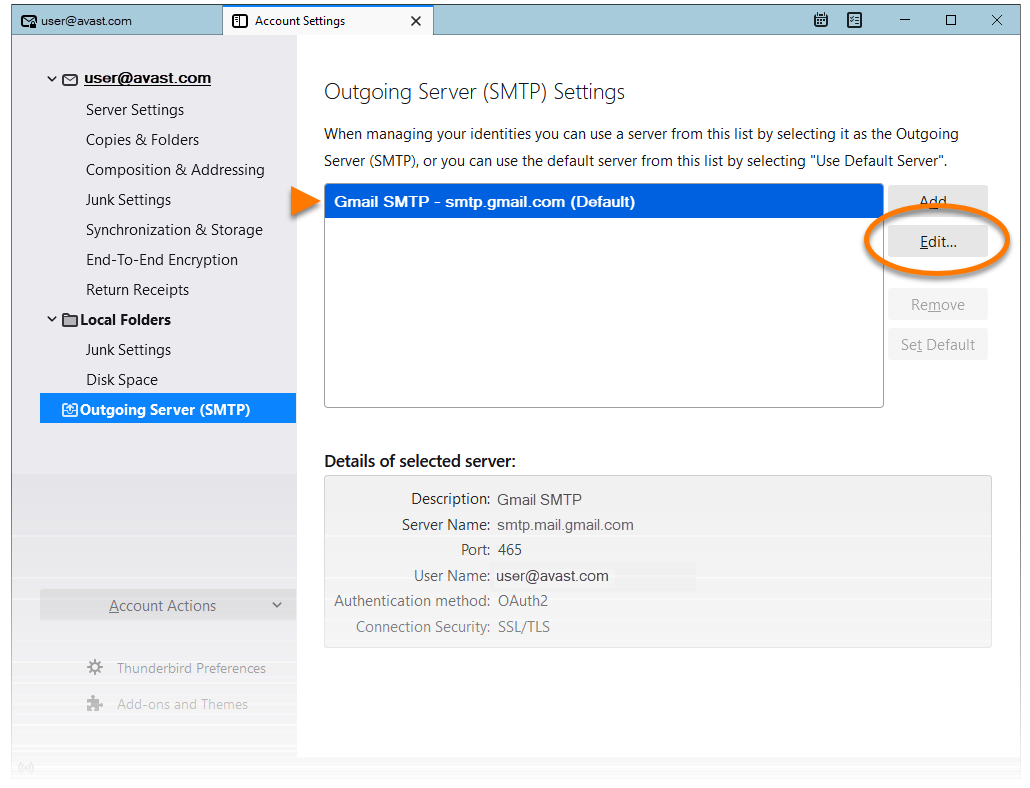
-
Modify the following parameters:
-
Server Name: Ensure the correct hostname or IP address is entered. We recommend using a specific IP address for the SMTP server, especially if the provider uses specific IP addresses.
-
Port: Change the number to 465 or 587, based on the requirements of your email service provider.
-
Connection security: Select SSL/TLS encryption, if supported by your email service provider.
-
Authentication method: Specify your preferred method, if required by your email service provider. 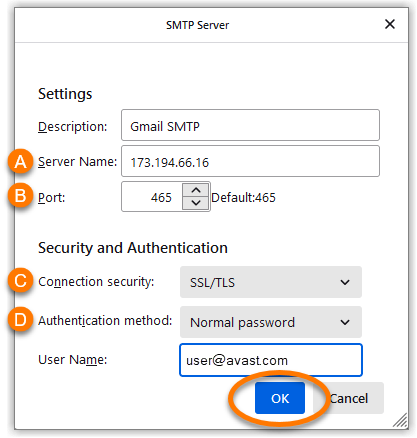
-
Click OK to confirm your changes.
Your server settings are now updated. Repeat steps 2-5 for each email account that you use.
To change SMTP settings in the Mail app on Mac:
-
Open Apple Mail, then ensure the Apple Mail window is active, and click Mail ▸ Preferences... in the Apple menu bar. 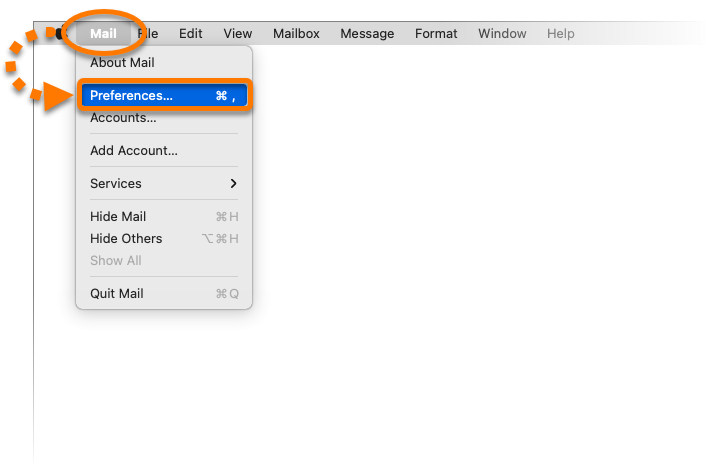
-
Select the Accounts tab. 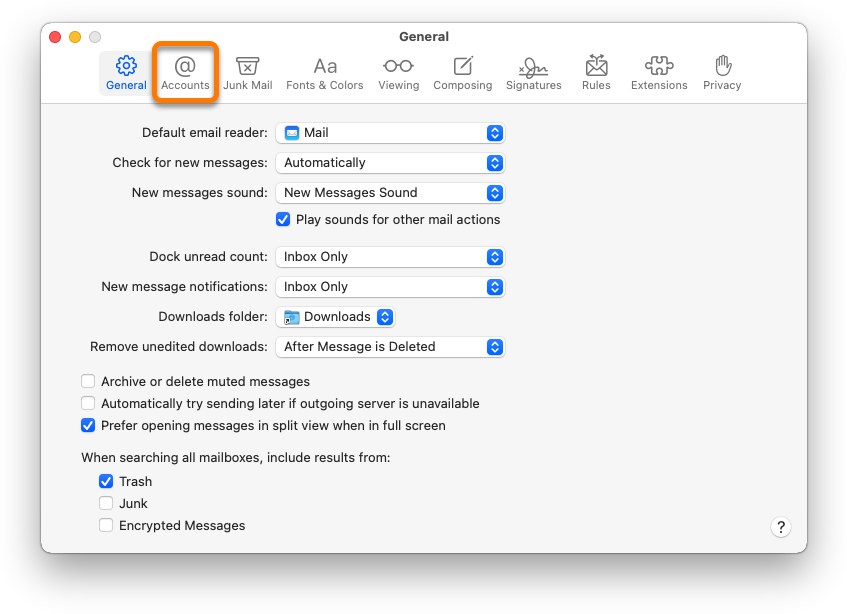
-
Ensure your account is selected in the left panel, then click the Server Settings tab. 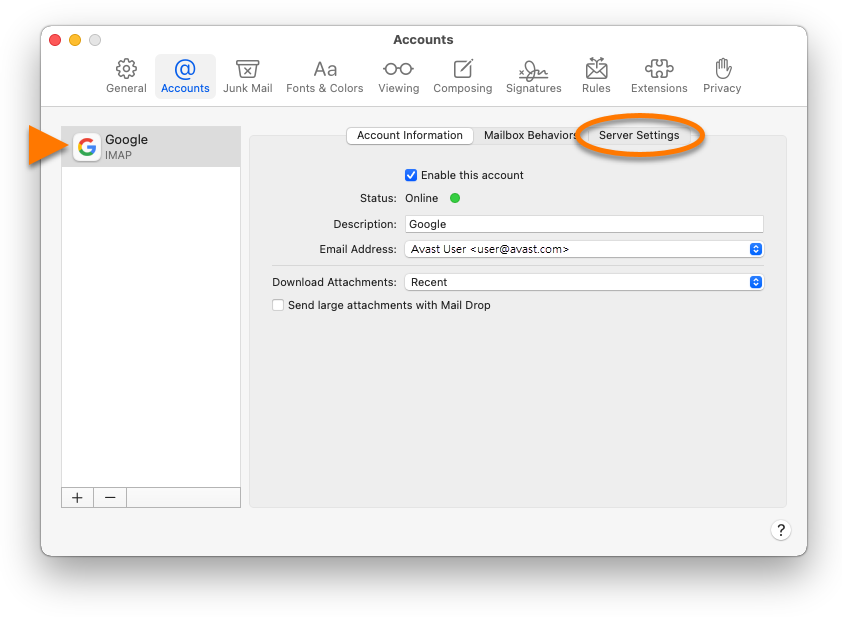
-
Next to Outgoing Mail Account, use the drop-down menu to select Edit SMTP Server List.... 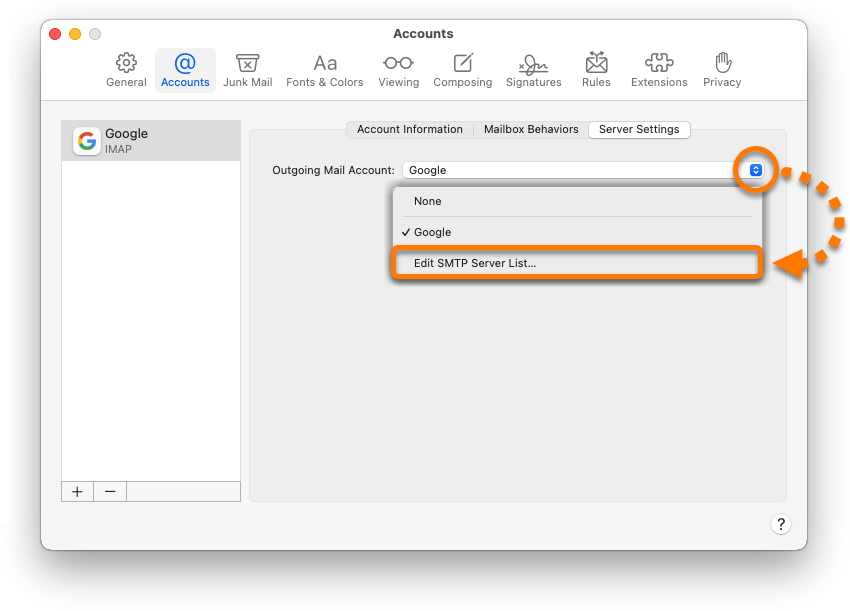
-
Ensure that your SMTP server is selected, then click the Server Settings tab and untick the box next to Automatically manage connection settings. 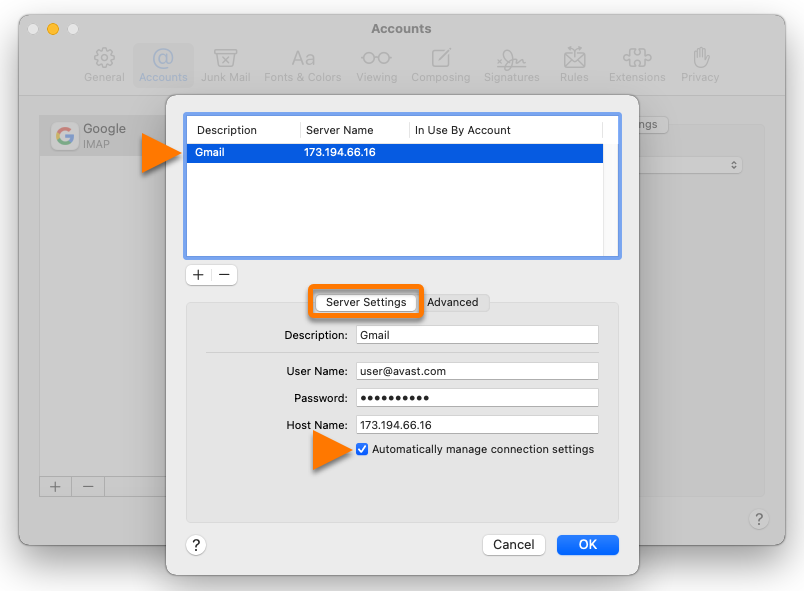
-
Modify the following parameters:
-
Host Name: Ensure the correct hostname or IP address is entered. We recommend using a specific IP address for the SMTP server, especially if the provider uses specific IP addresses.
-
Port: Change the number to 465 or 587, based on the requirements of your email service provider.
-
Use TLS/SSL: Tick the box to enable an encrypted connection, if supported by your email service provider.
-
Authentication: Specify your preferred method, if required by your email service provider. 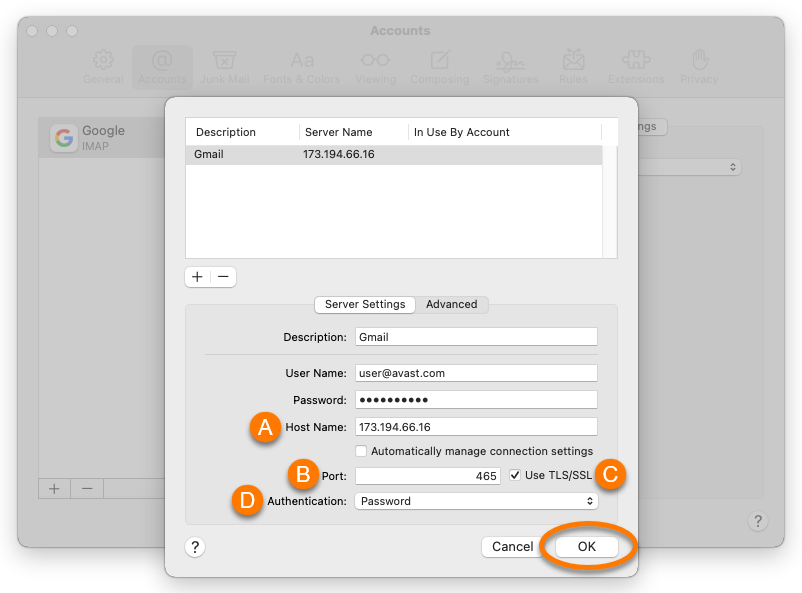
-
Click OK to confirm your changes.
Your server settings are now updated. Repeat steps 2-7 for each email account that you use.
If you are still having trouble, your email service provider may be restricting access. Some possible restrictions:
-
Access blocked to datacenter IP addresses
-
Access only allowed to residential IP addresses
-
Access only allowed to IP addresses of its own country
-
Access only allowed to certain internet service providers
Specific IP addresses
If you are using Gmail or Windows Live we recommend to configure your email client to use a specific IP address for the SMTP server instead of its hostname (smtp.gmail.com or smtp.live.com), as these email service providers are known to use multiple SMTP servers.
Since we have no control over these servers, we cannot provide the full list of IP addresses.
Your email provider:
Below is a partial list of IP addresses of the SMTP servers known to belong to Gmail:
|
74.125.136.108
|
|
74.125.133.108
|
|
74.125.142.108
|
|
74.125.143.108
|
|
173.194.66.16
|
|
173.194.66.108
|
|
173.194.66.109
|
|
173.194.67.108
|
|
173.194.67.109
|
|
173.194.70.108
|
|
173.194.70.16
|
Below is a partial list of IP addresses of the SMTP servers known to belong to Windows Live:
|
65.55.172.254
|
|
65.55.96.11
|
|
65.55.162.200
|