This article is about using Avast Passwords for Android and iOS mobile devices. For information about using Avast Passwords on Mac or Windows PCs with Avast Antivirus, refer to the following articles:
Set up Avast Passwords
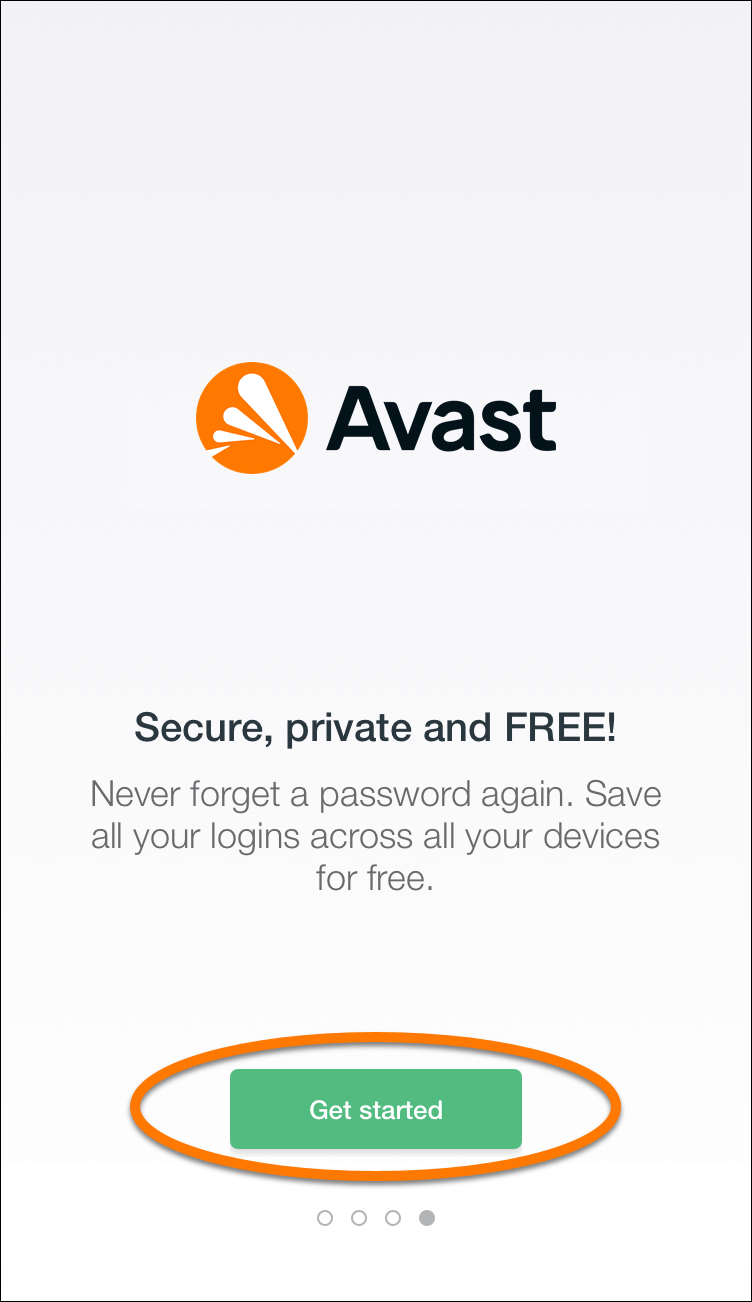
- Tap the Avast Passwords icon to open the app, then read the intro or start configuration immediately by tapping Skip in the bottom-left corner.

- Tap Get Started to begin configuration.
- Create a Master Password and tap Create Password. Your Master Password can be either a plain text password or a 4-digit password. On the next screen enter your Master Password again and tap Confirm.
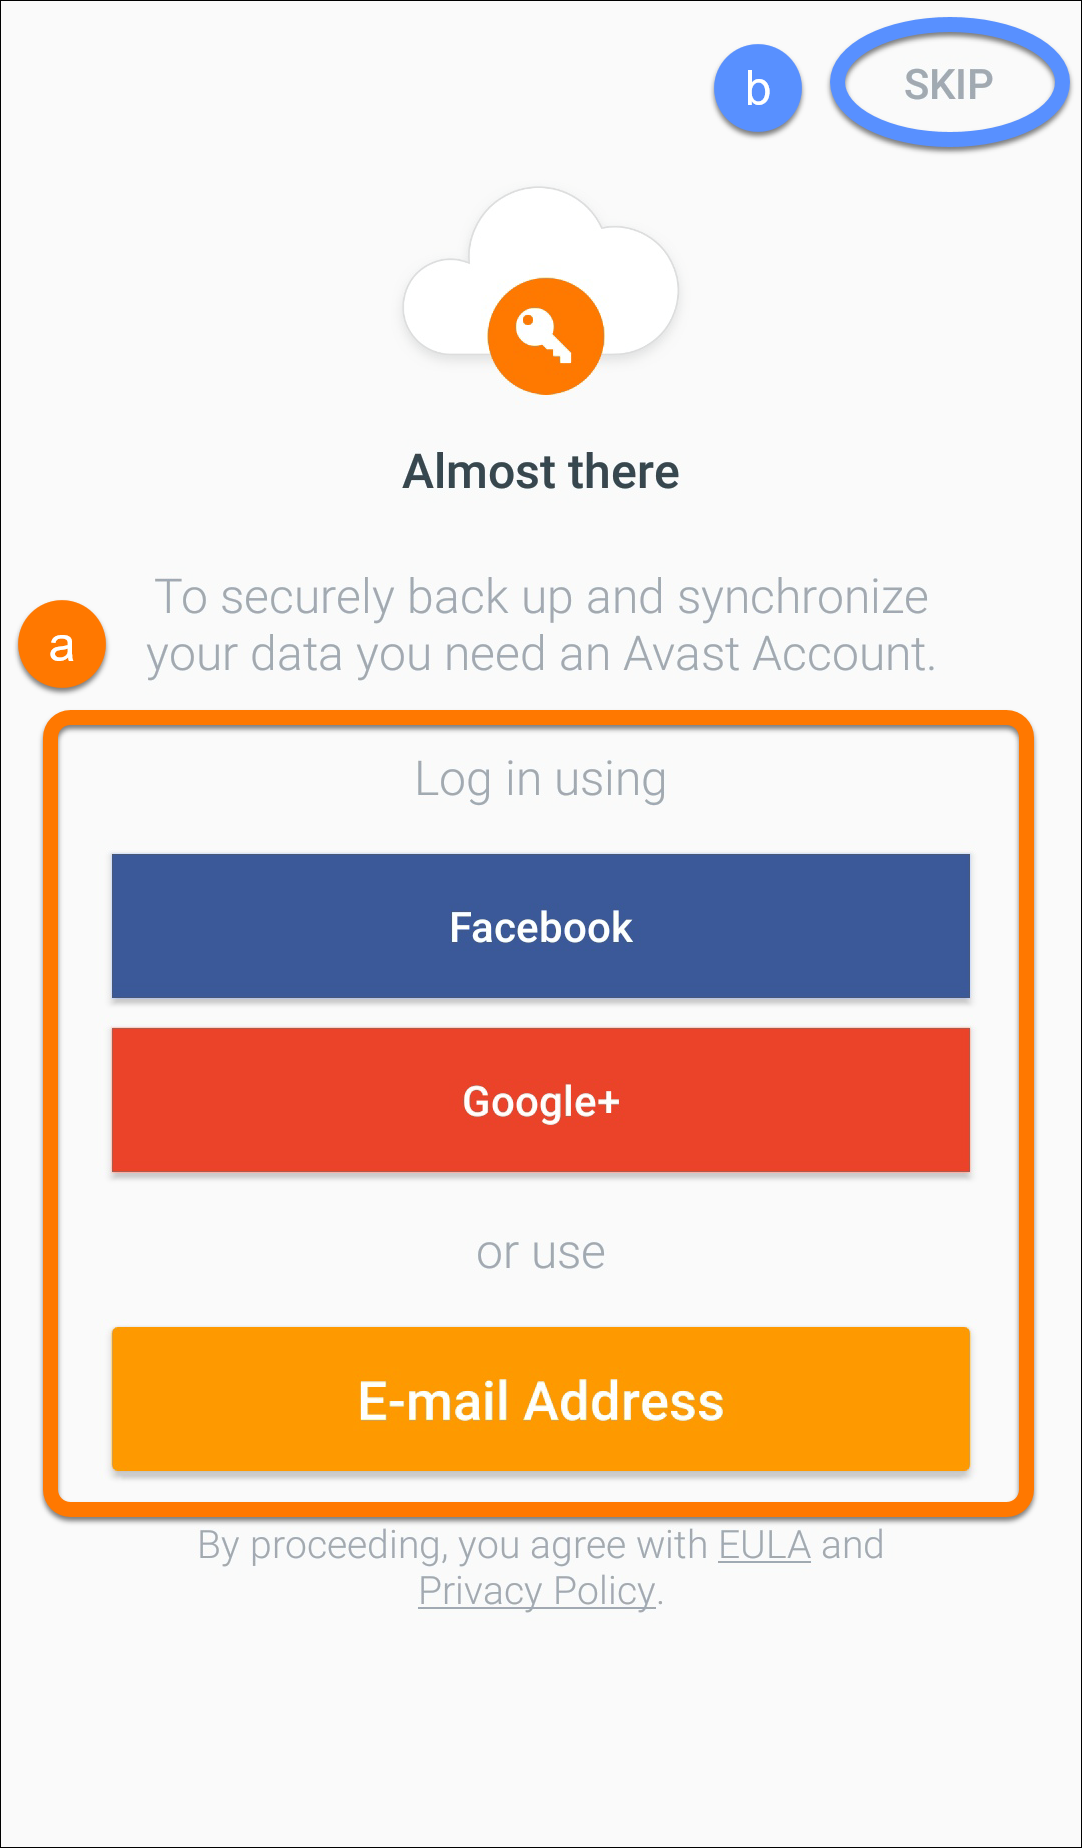
- Log into your Avast Account to set up synchronization and backup your data. Tap Skip if you don't want to synchronize passwords across your devices.
- If this is the first device you are synchronizing, an Avast Passwords synchronization group is created and a backup is sent to your email address. The password for this backup is the same as the Master Password for the device (the first device added to the group).
- If you are adding this device to an existing synchronization group for Avast Passwords, you must authorize it on a device which is already authorized. Confirm the authorization message which appears on your previously authorized Windows PC, Mac, Android or iOS device.
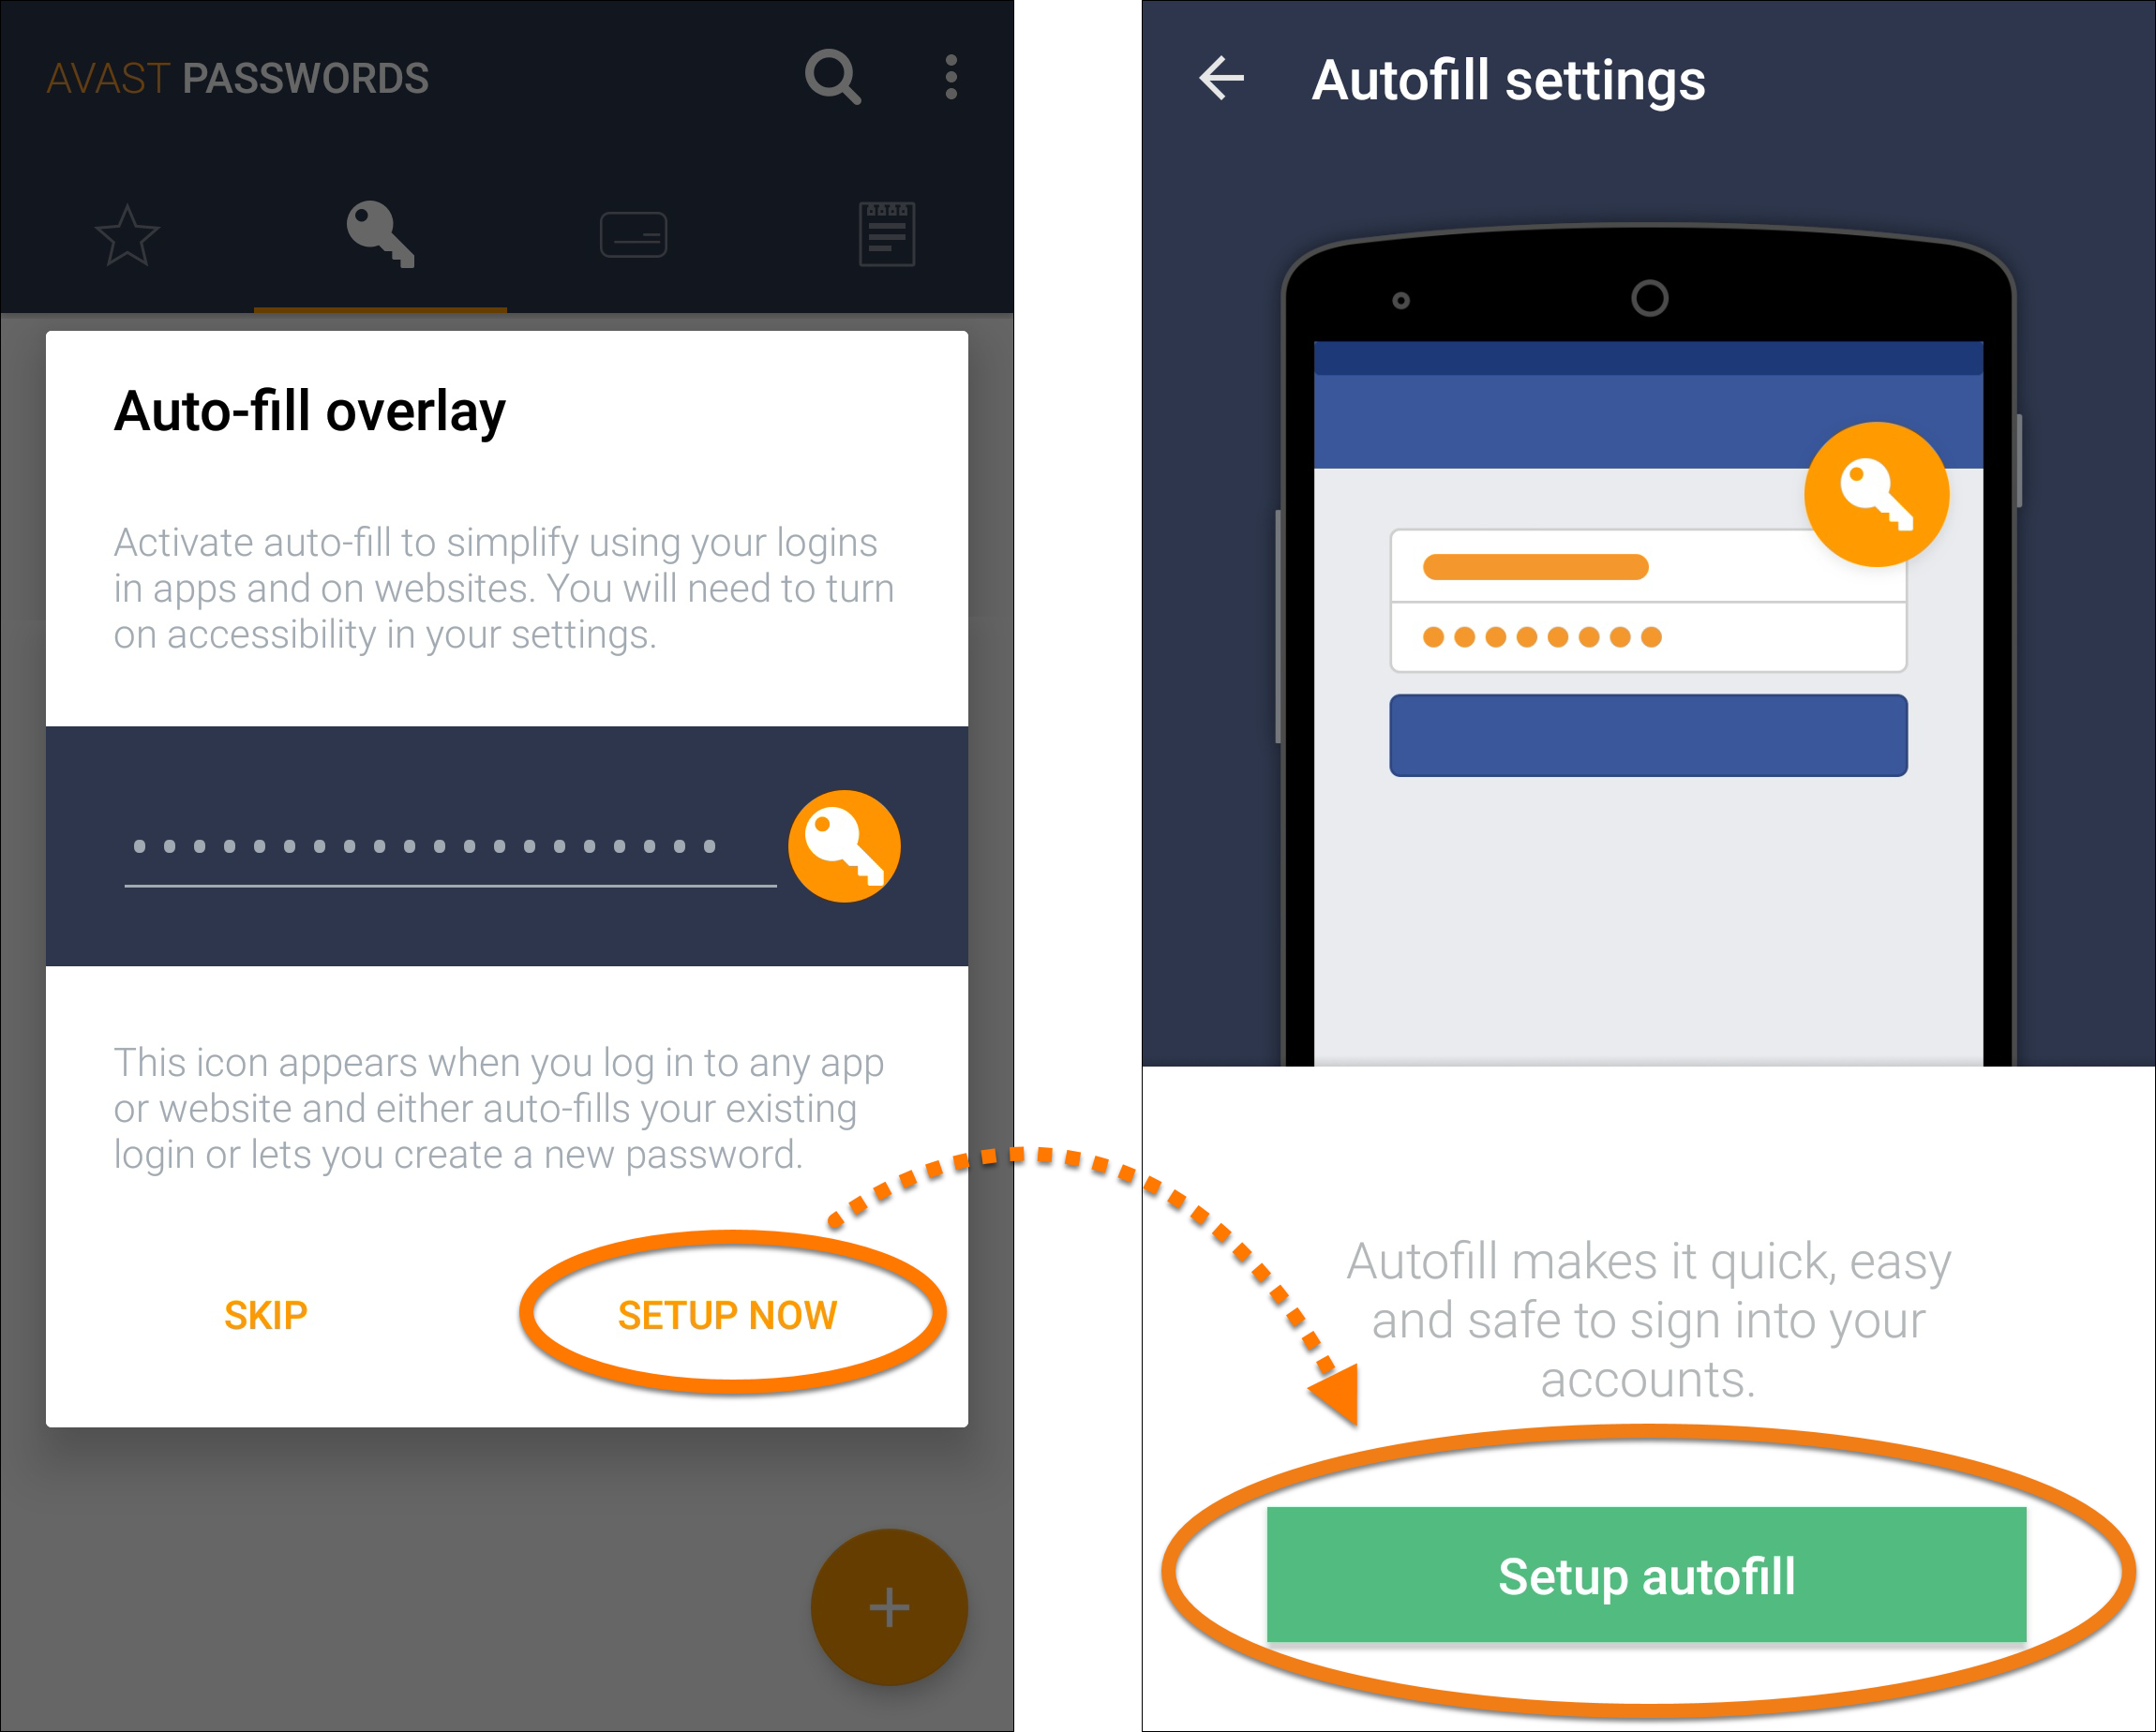
If you skip this authorization step, your passwords on this device are not synchronized with your other devices until you authorize this device. For more information, refer to the following article: - Tap Setup Now, then tap Setup autofill.
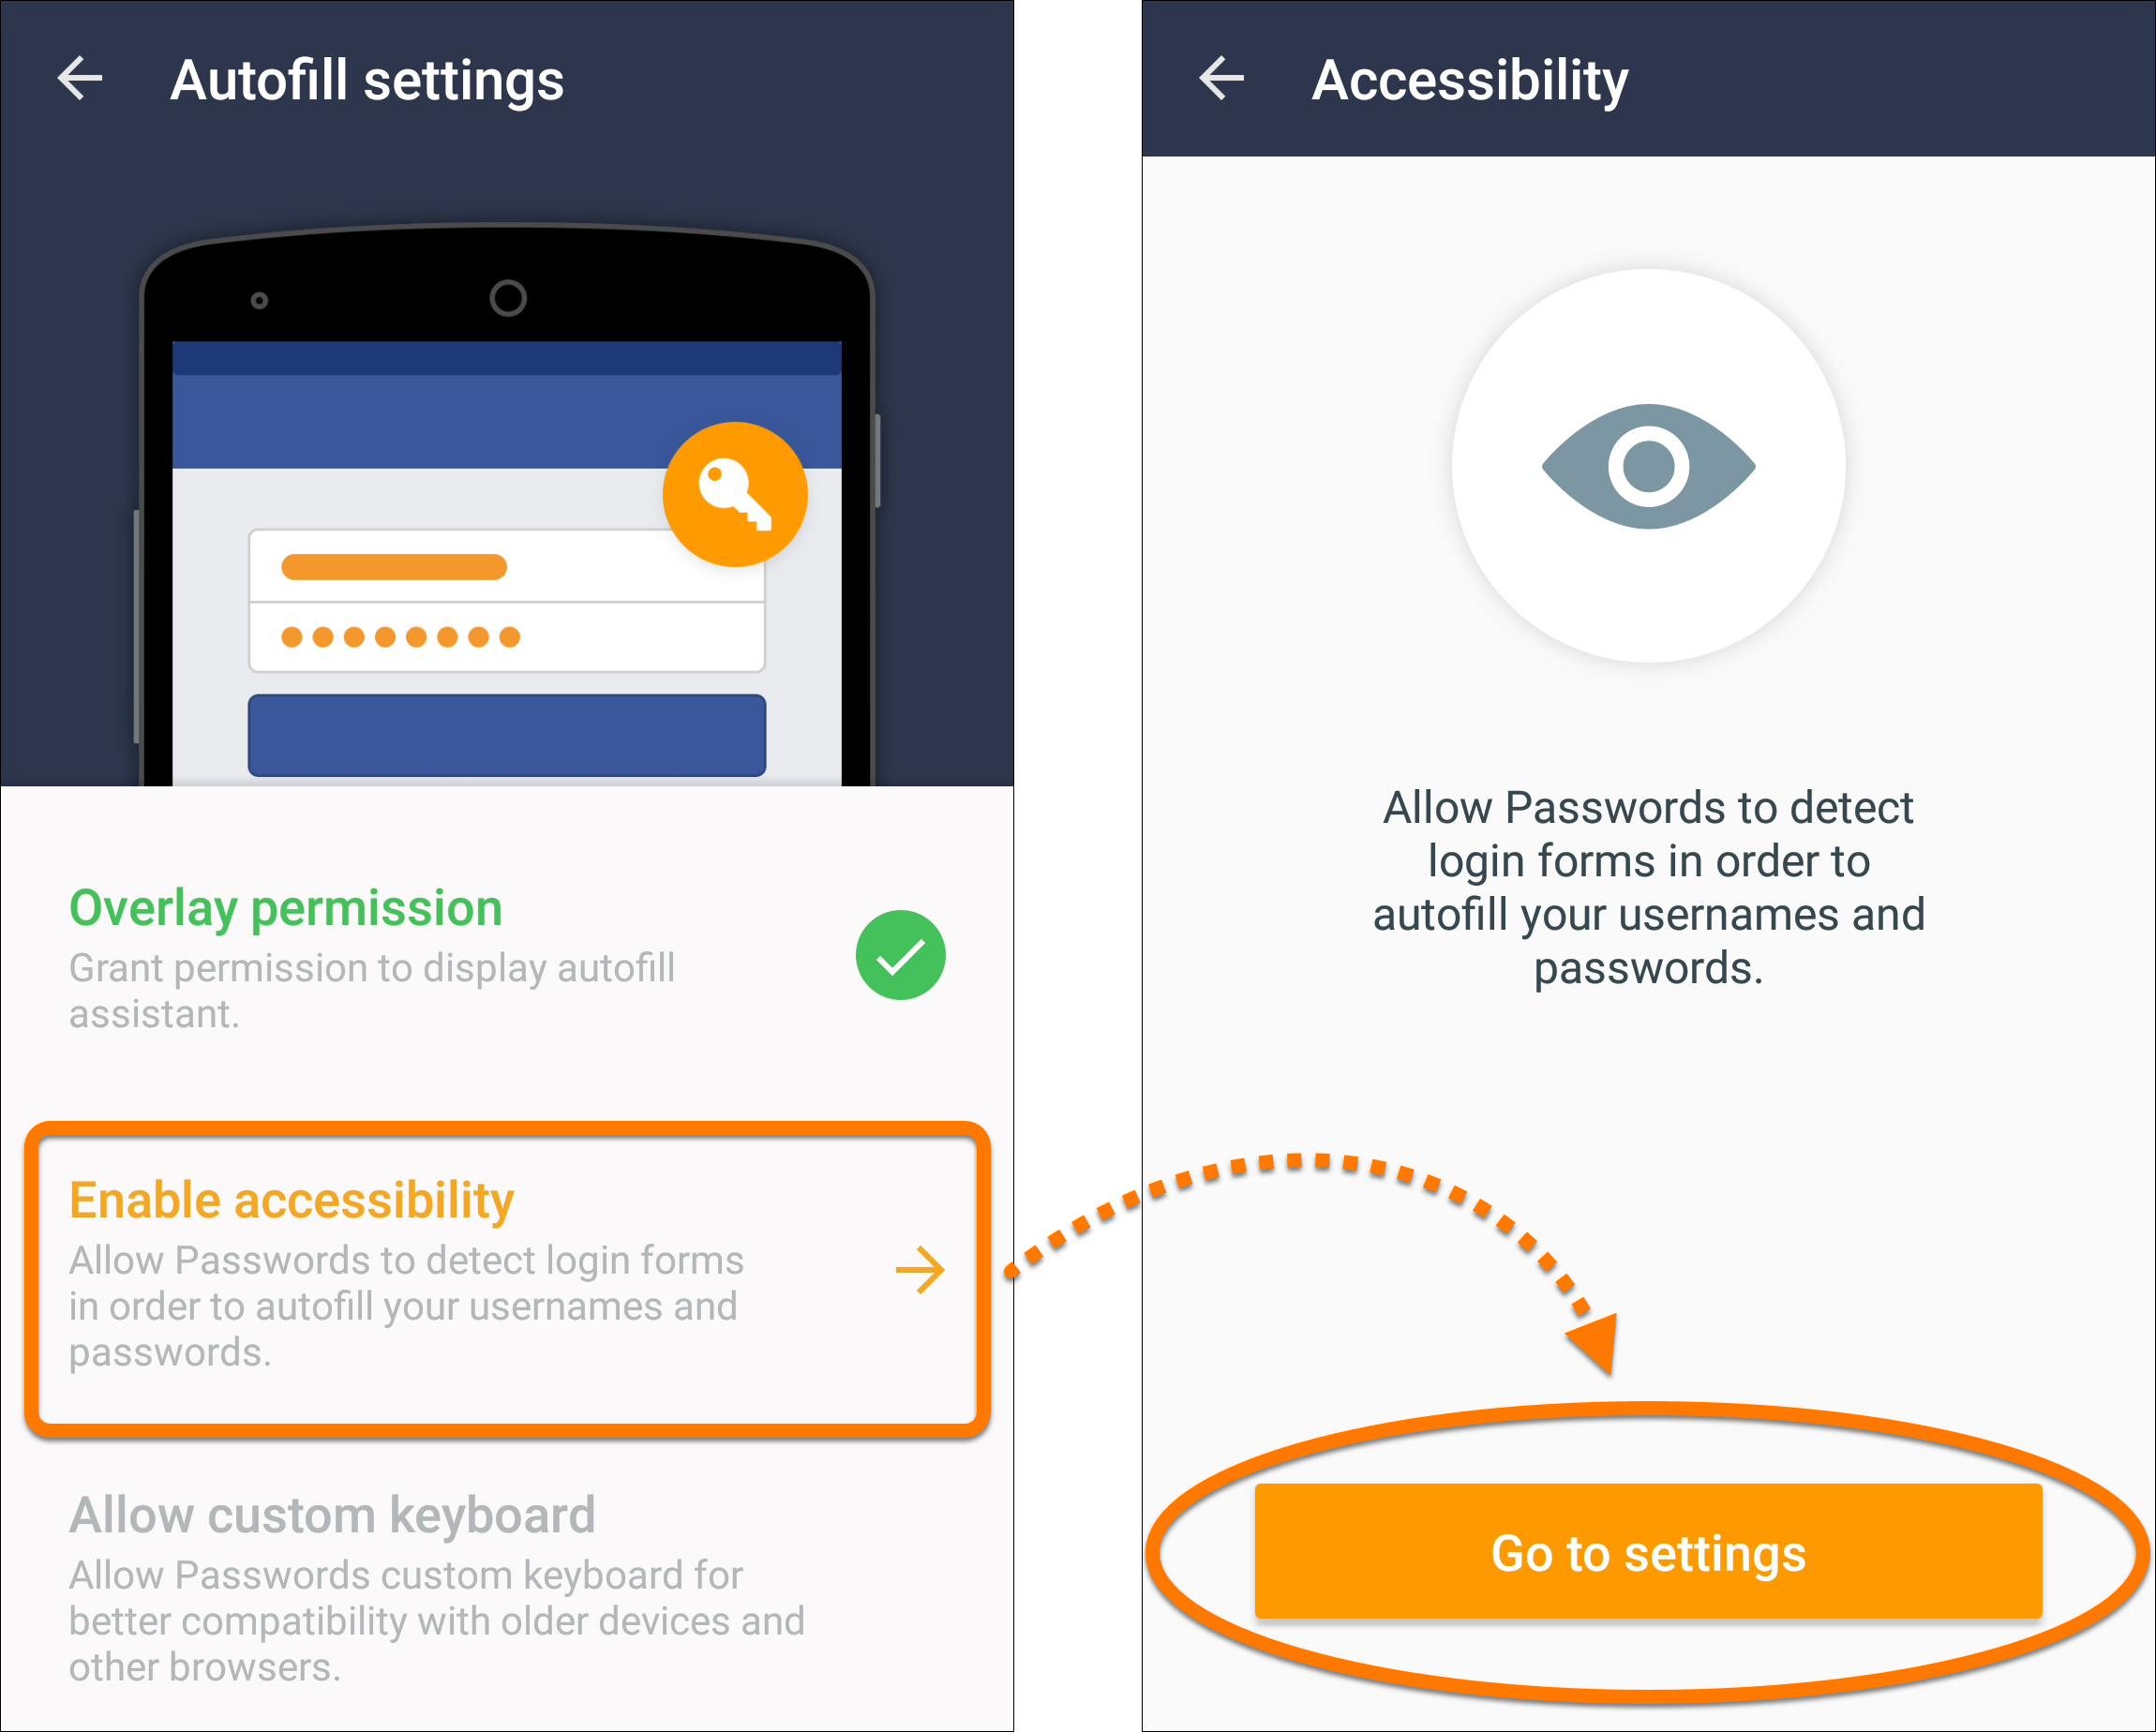
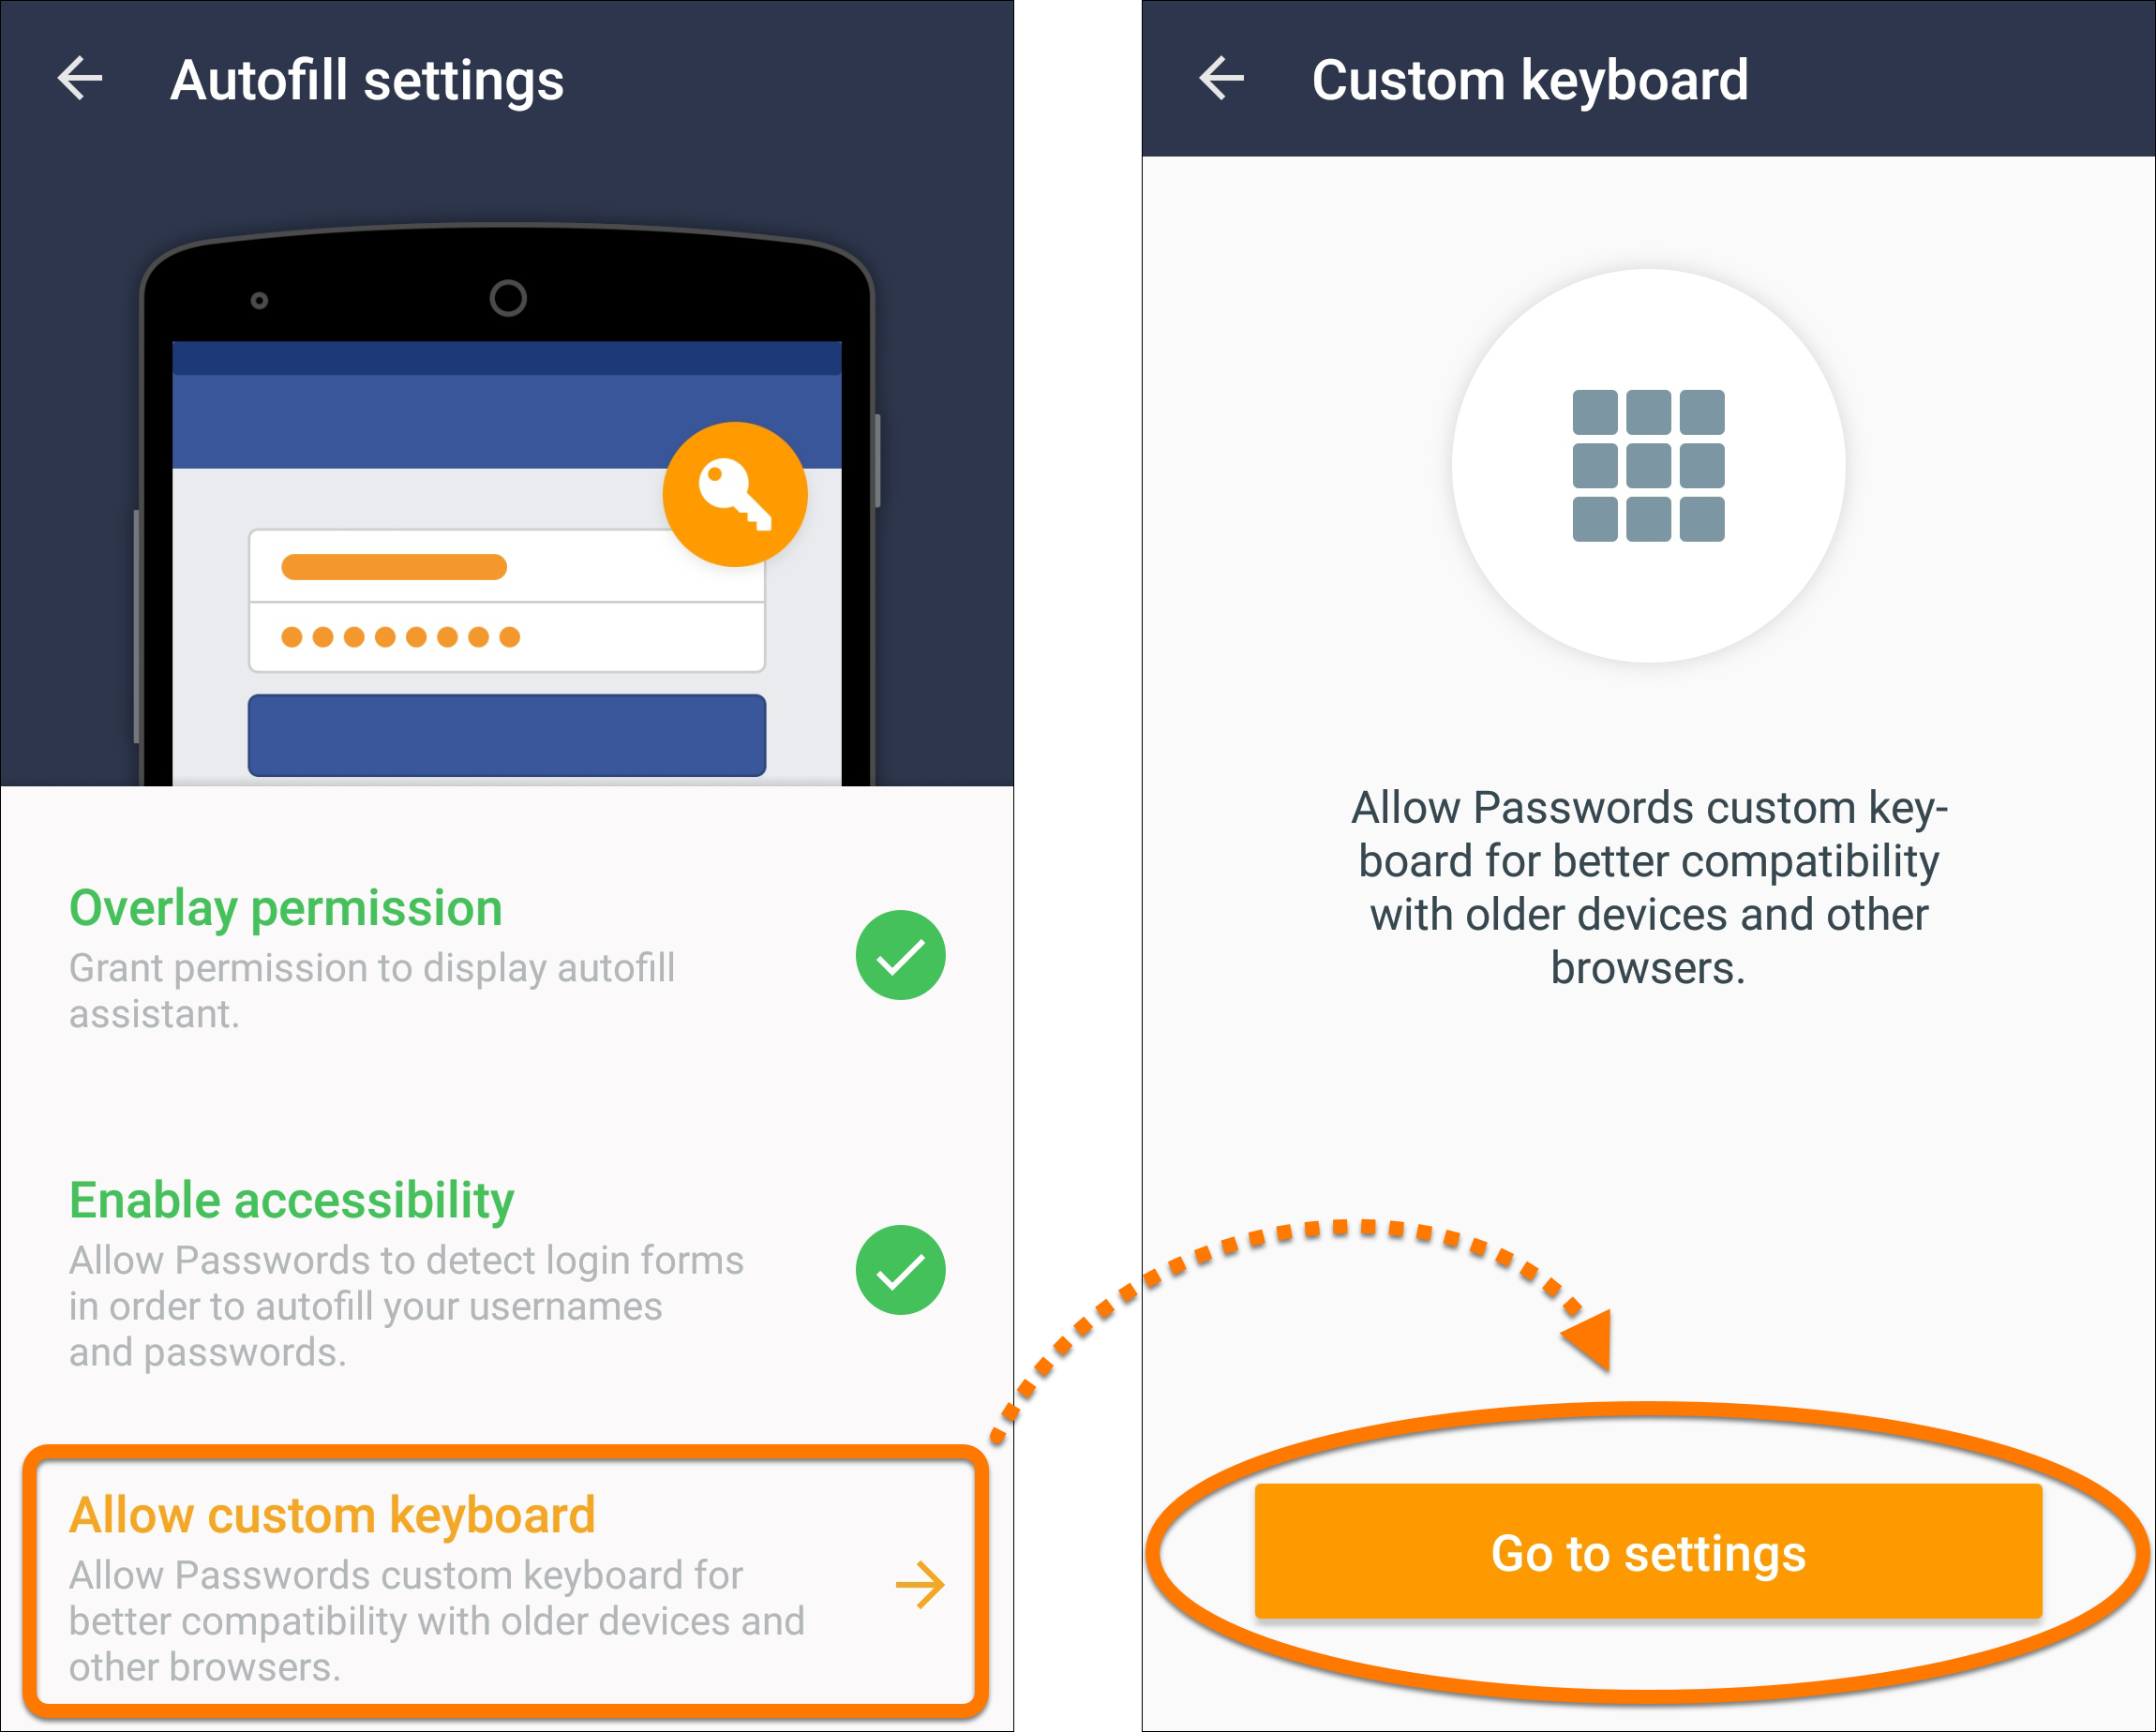
- Tap Enable accessibility, then tap Go to settings.
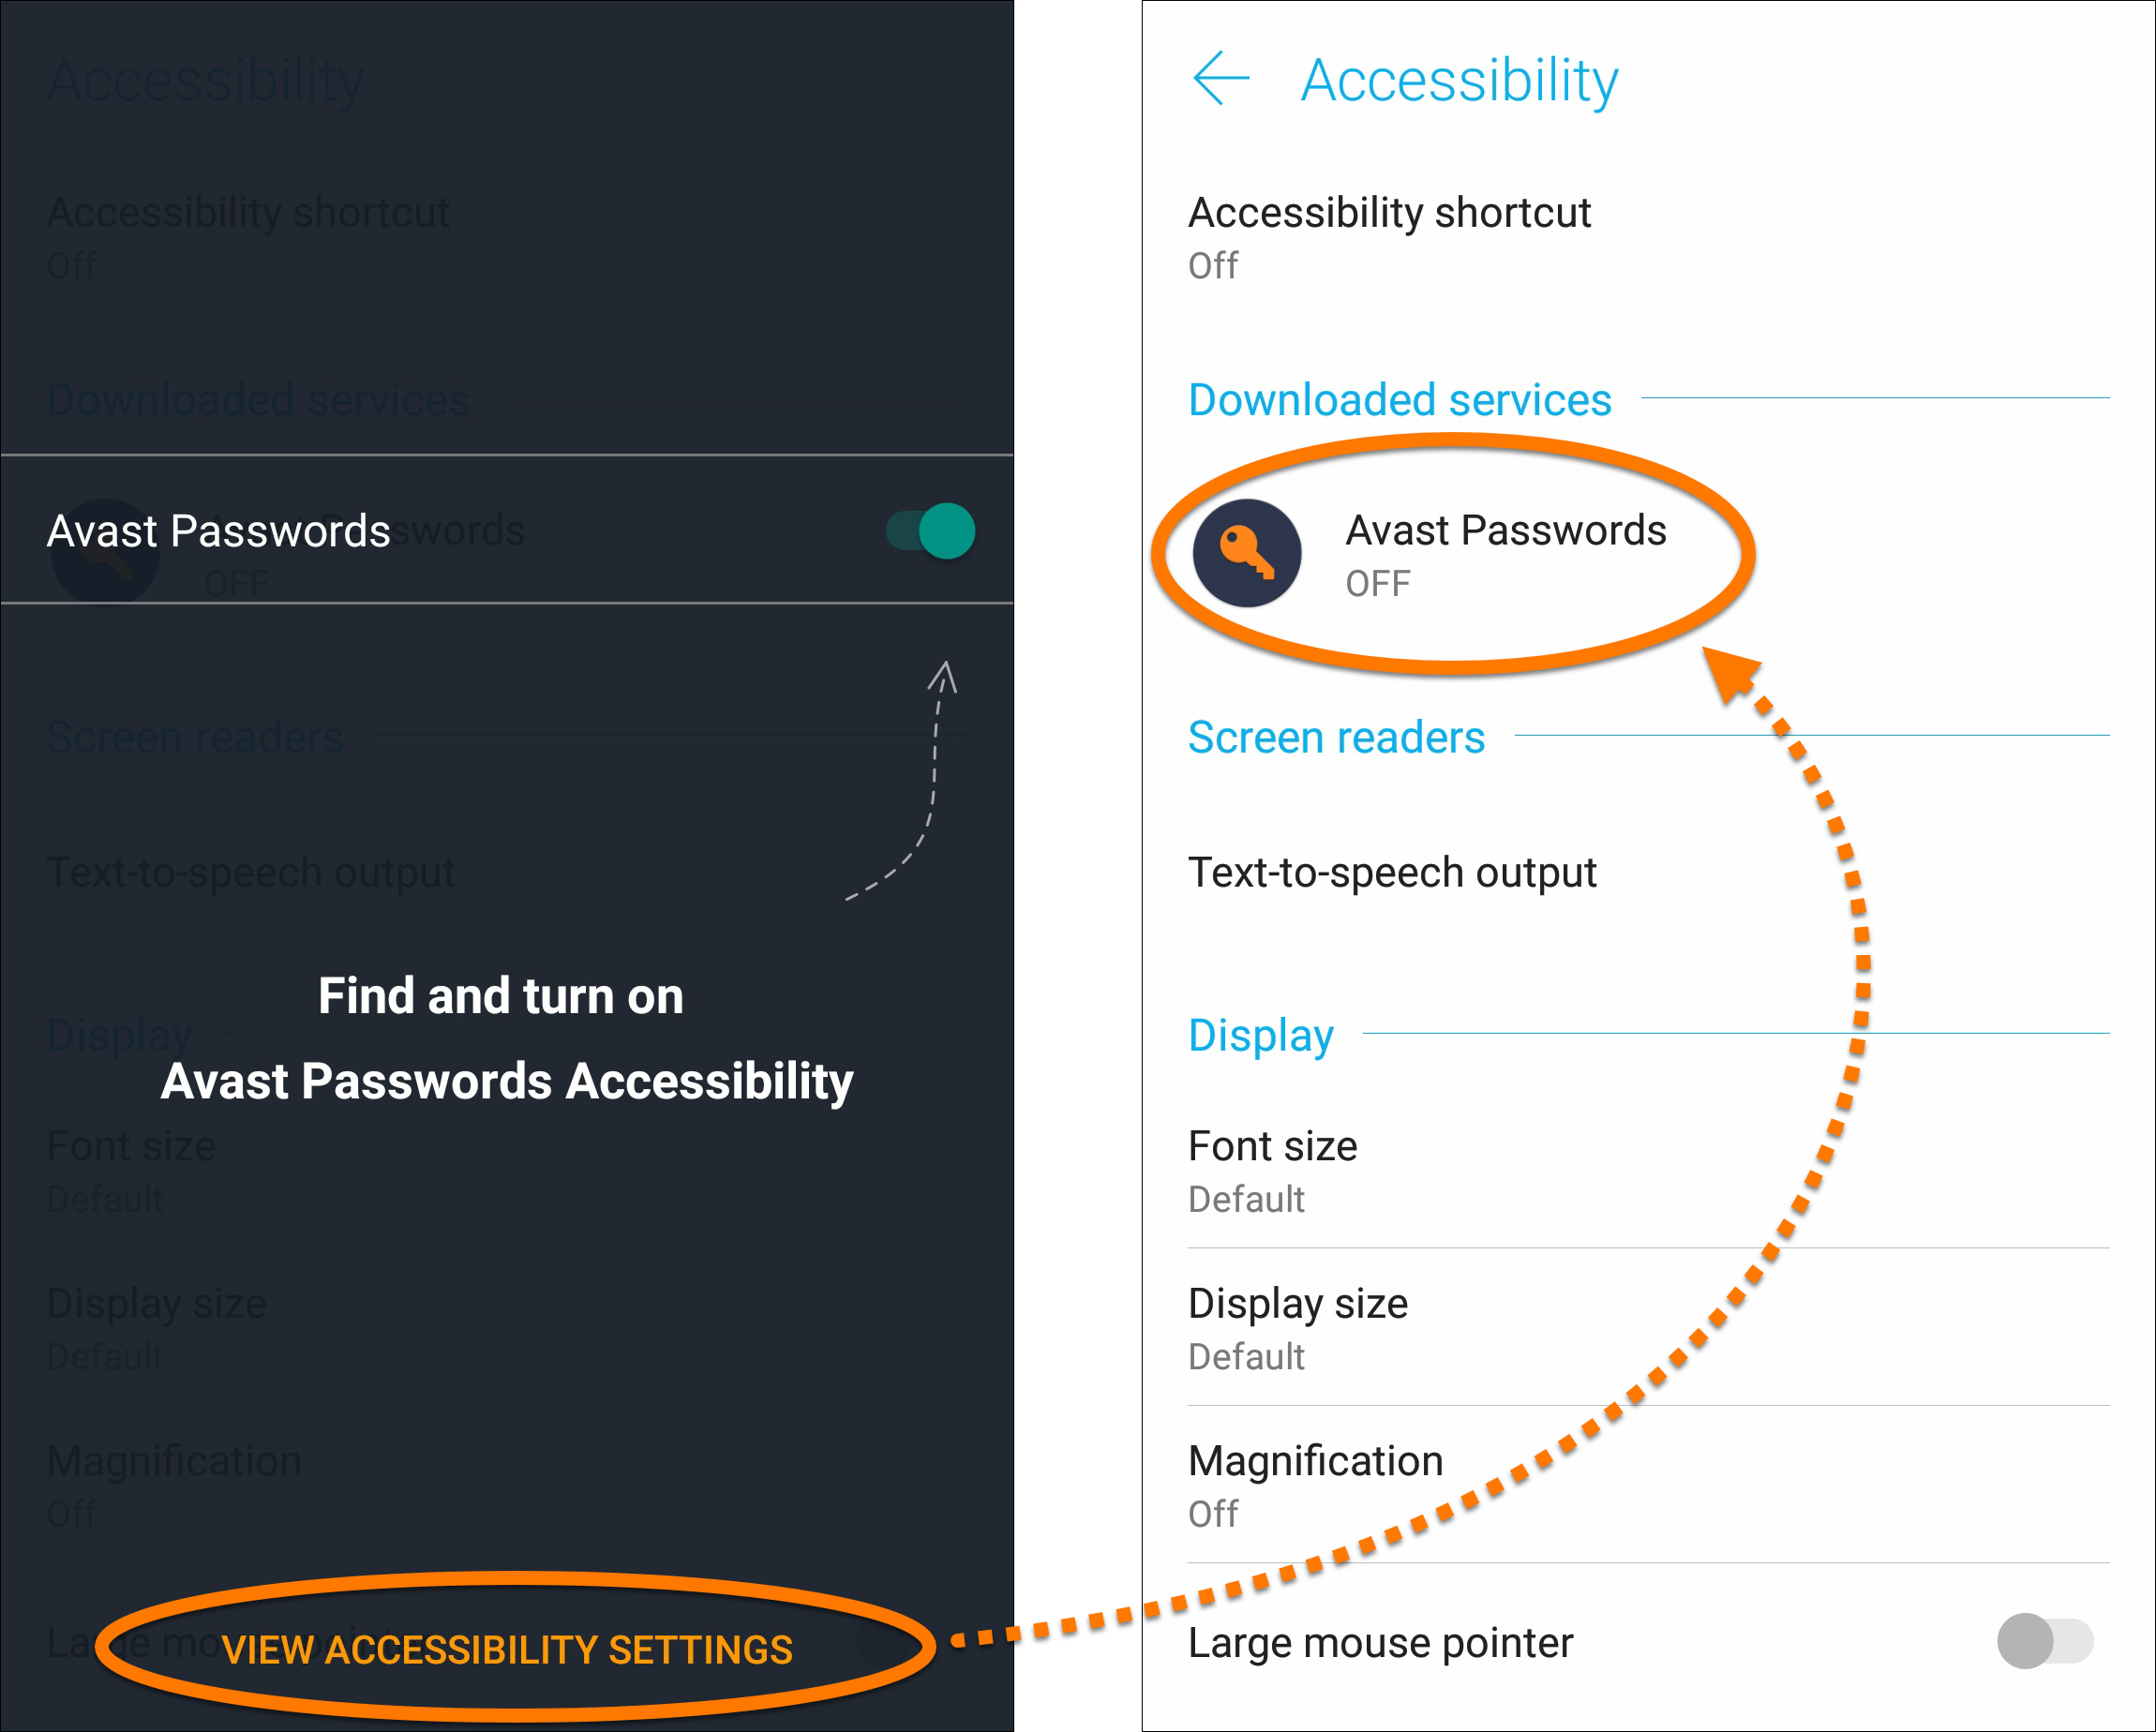
- Tap View Accessibility Settings, then tap Avast Passwords.
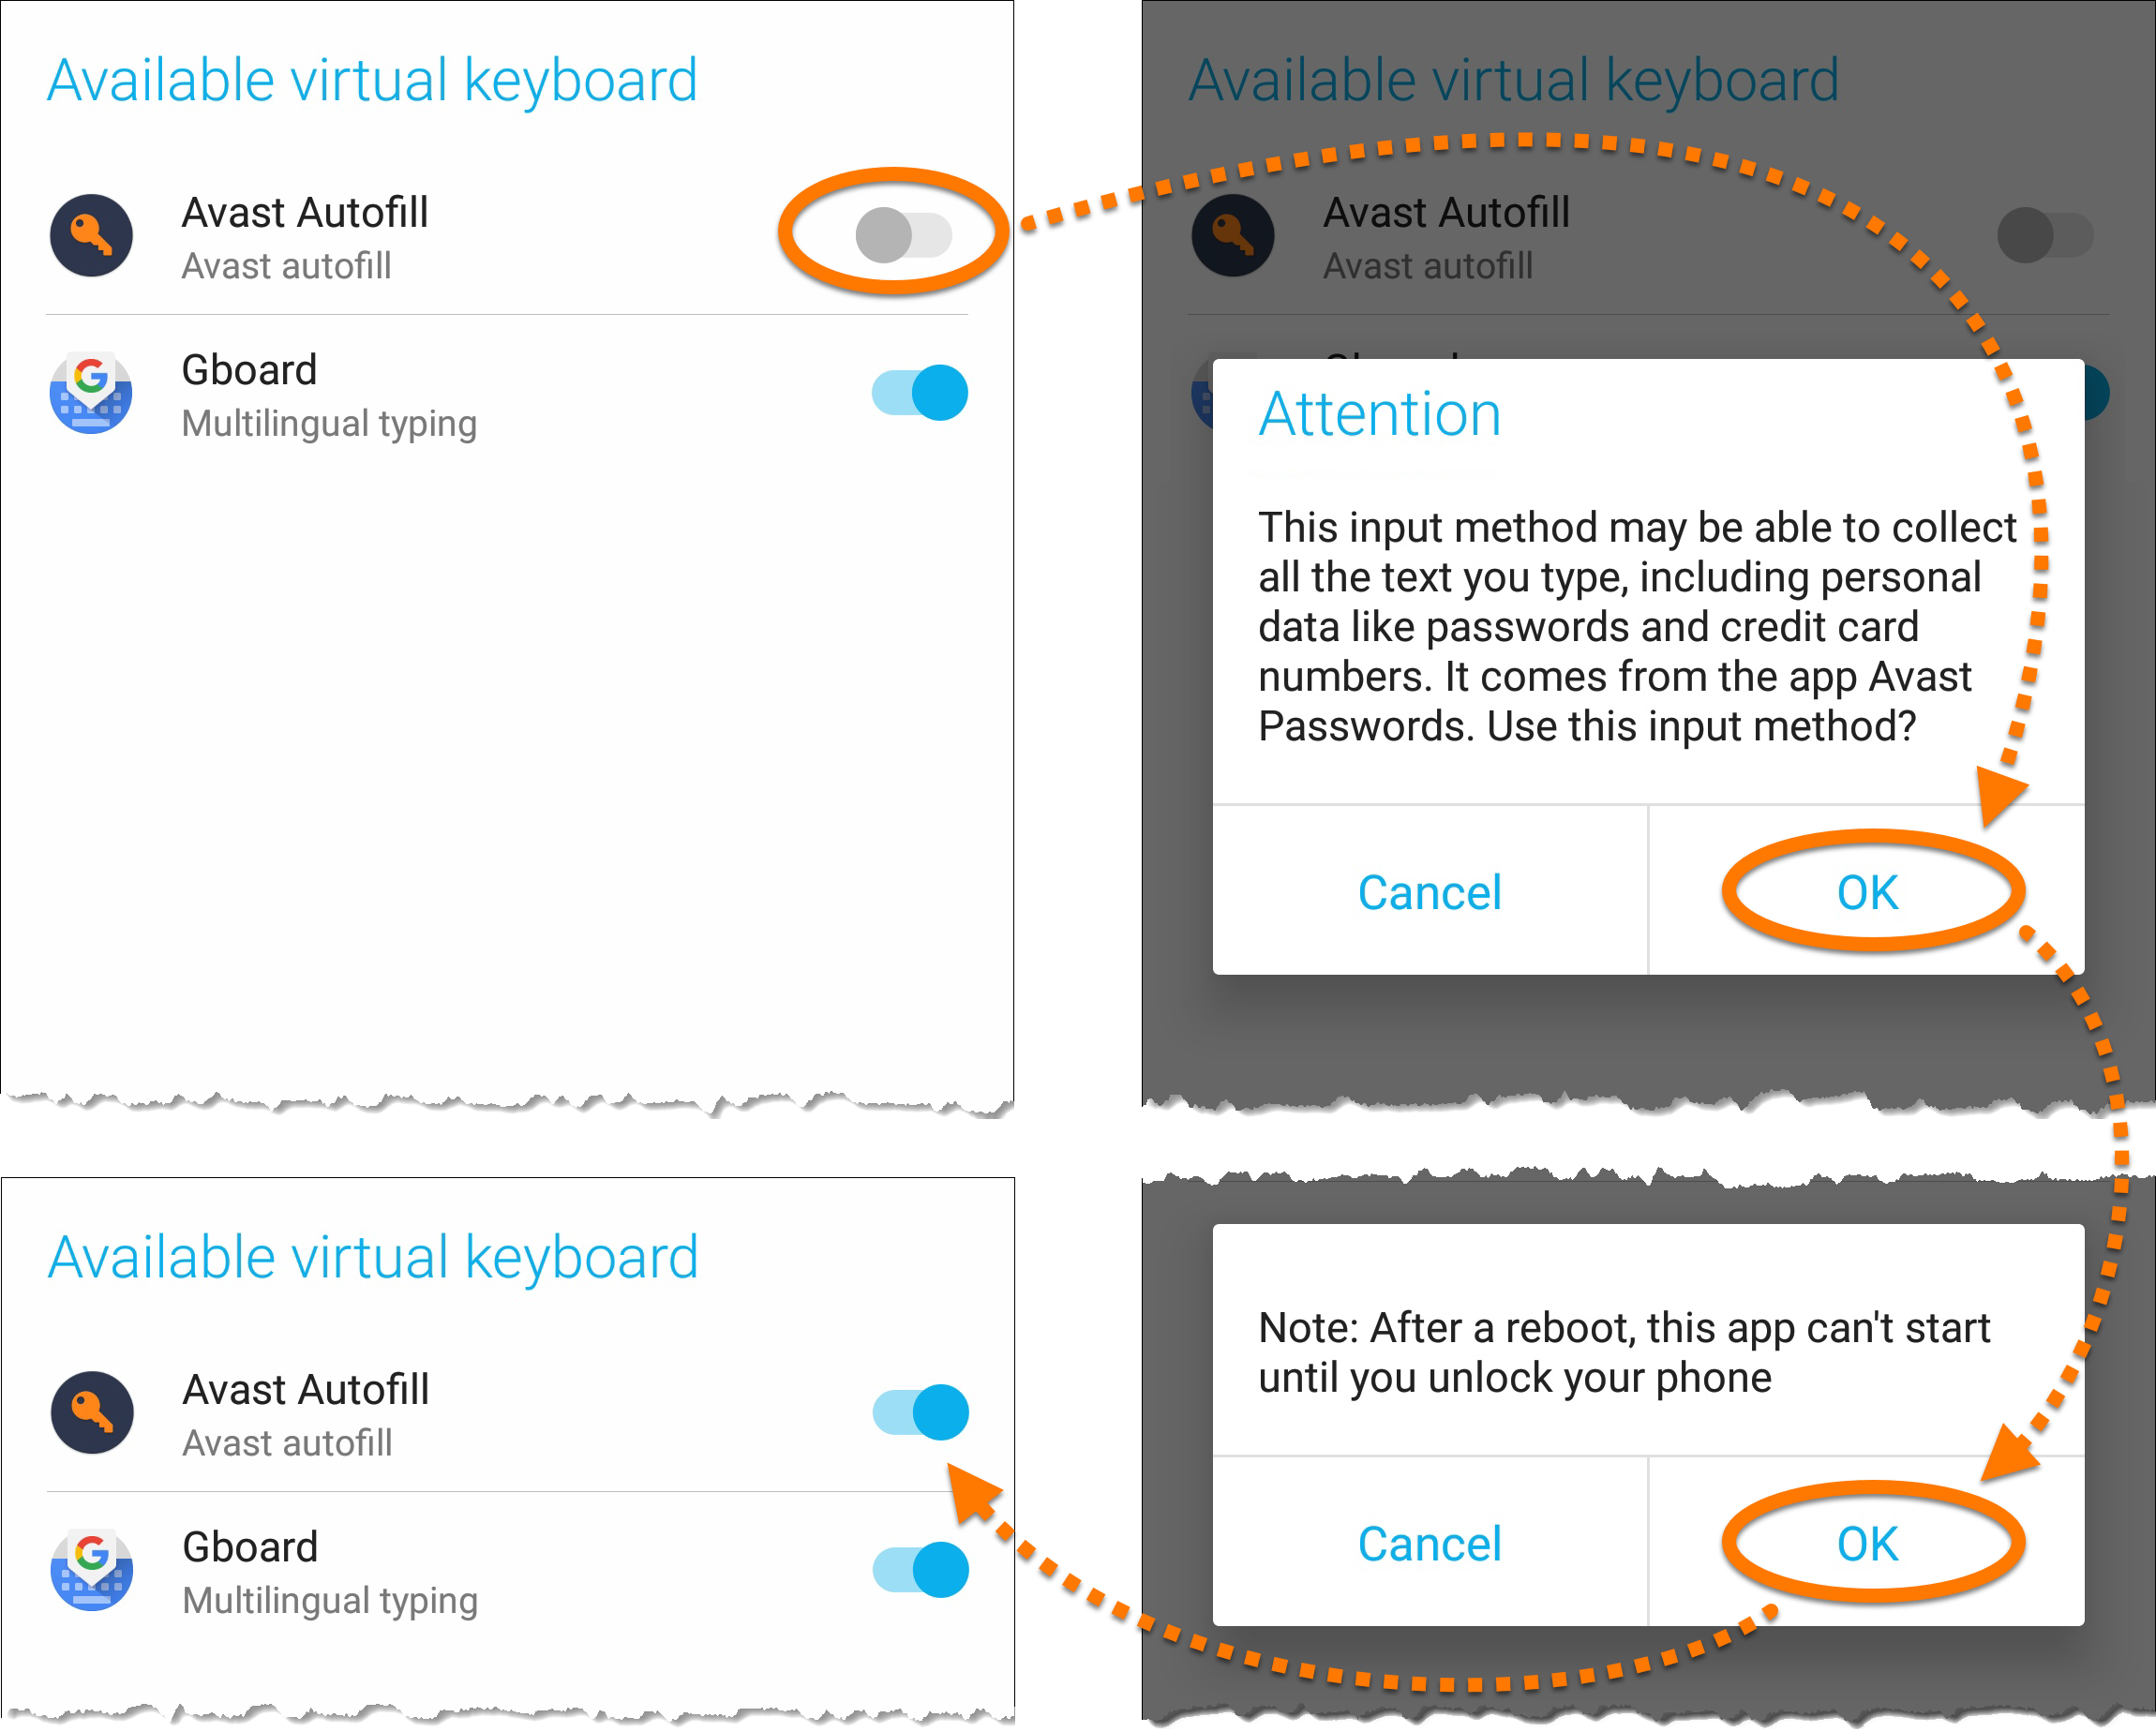
- Tap the slider to enable the permission, then tap OK to confirm.
These steps may differ slightly depending on your device mode, Android version, and vendor customizations.
- Tap the back arrow to return to Avast Passwords and tap Allow custom keyboard. On the next screen, tap Go to settings.
- Tap the slider to enable the permission, then tap OK to confirm.
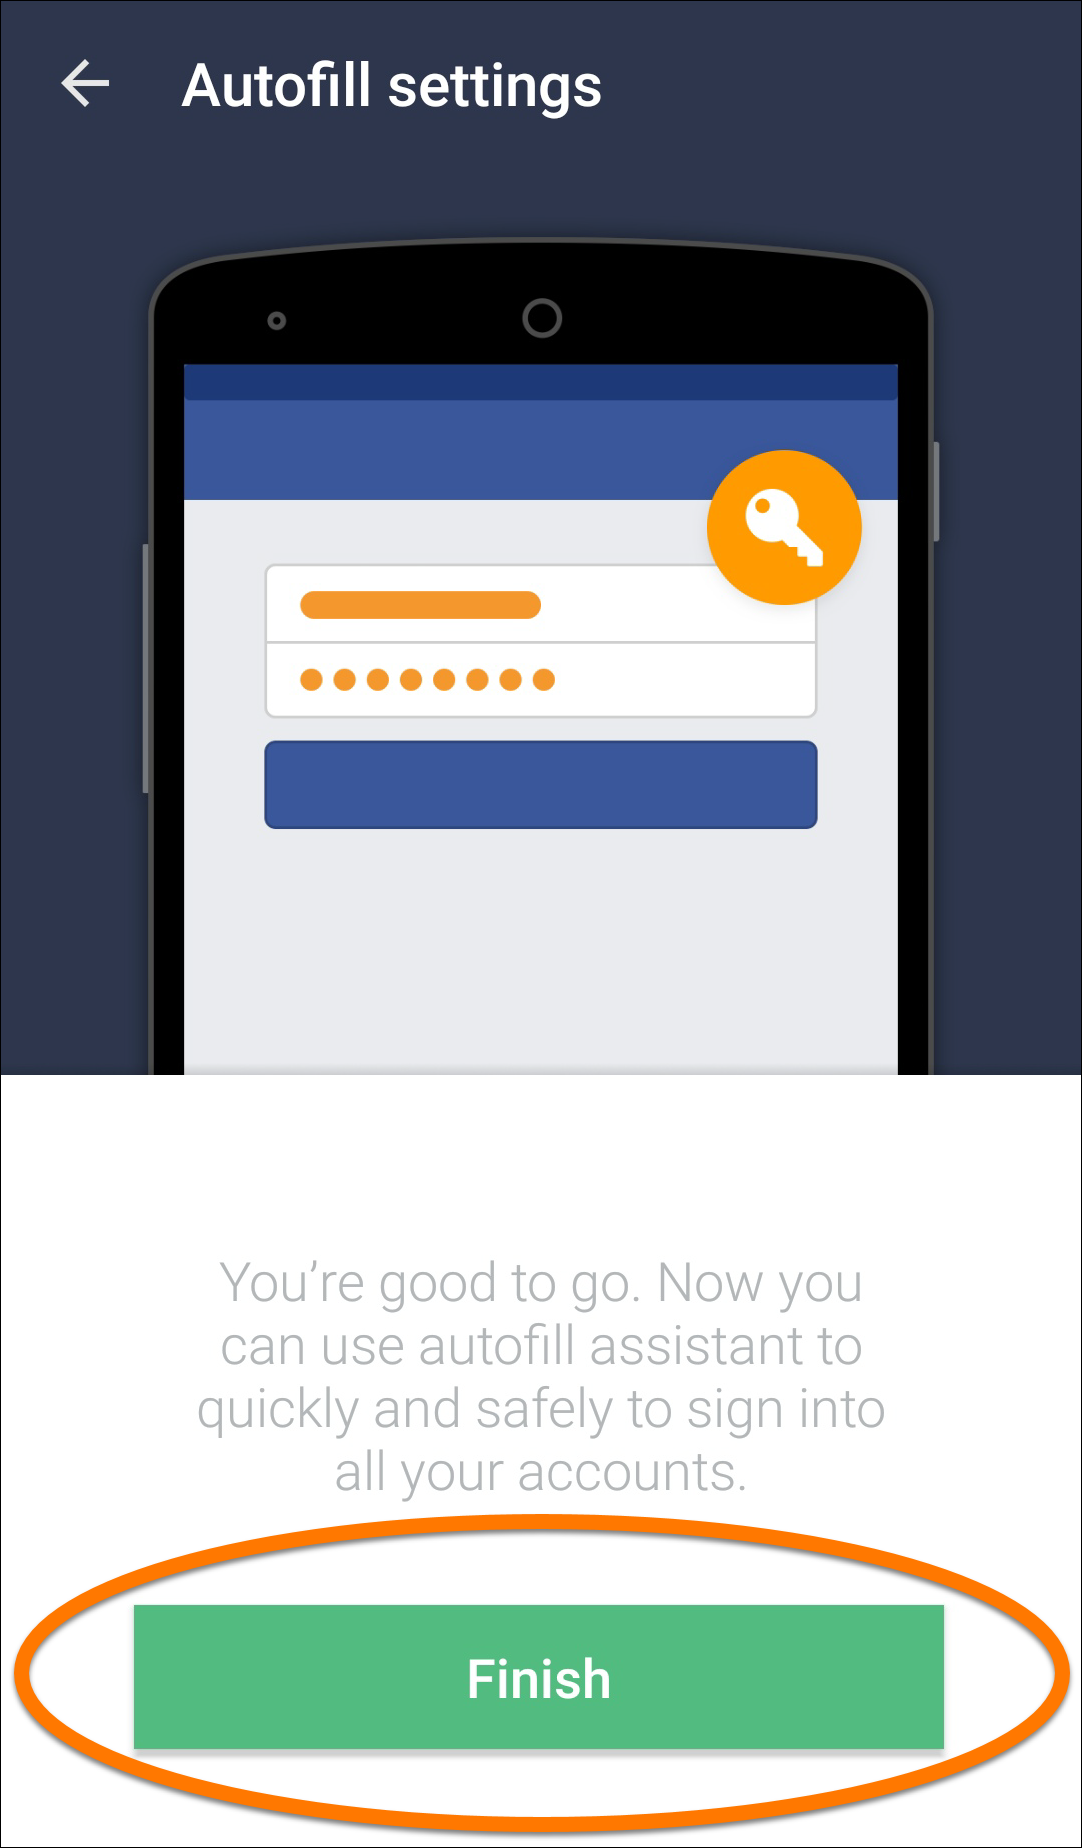
- Tap Finish to complete the configuration process.


- Tap the Avast Passwords icon to open the app, then read the intro or start configuration immediately by tapping Skip in the bottom-left corner.
- Tap Get started to start configuration.
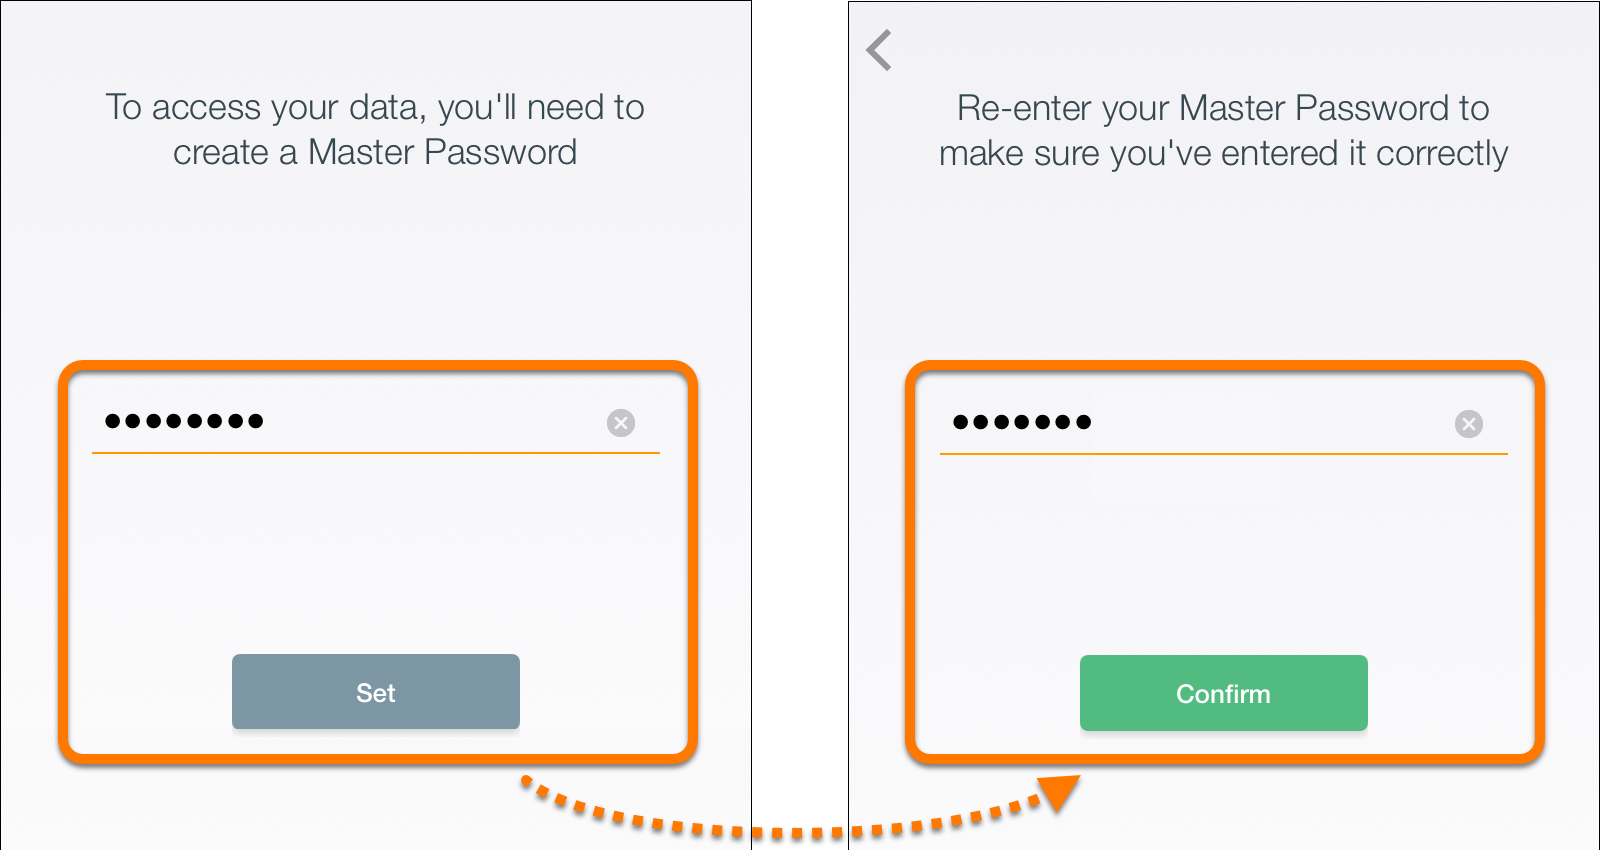
- Create a Master Password and tap Set. Enter your Master Password again on the next screen and tap Confirm.
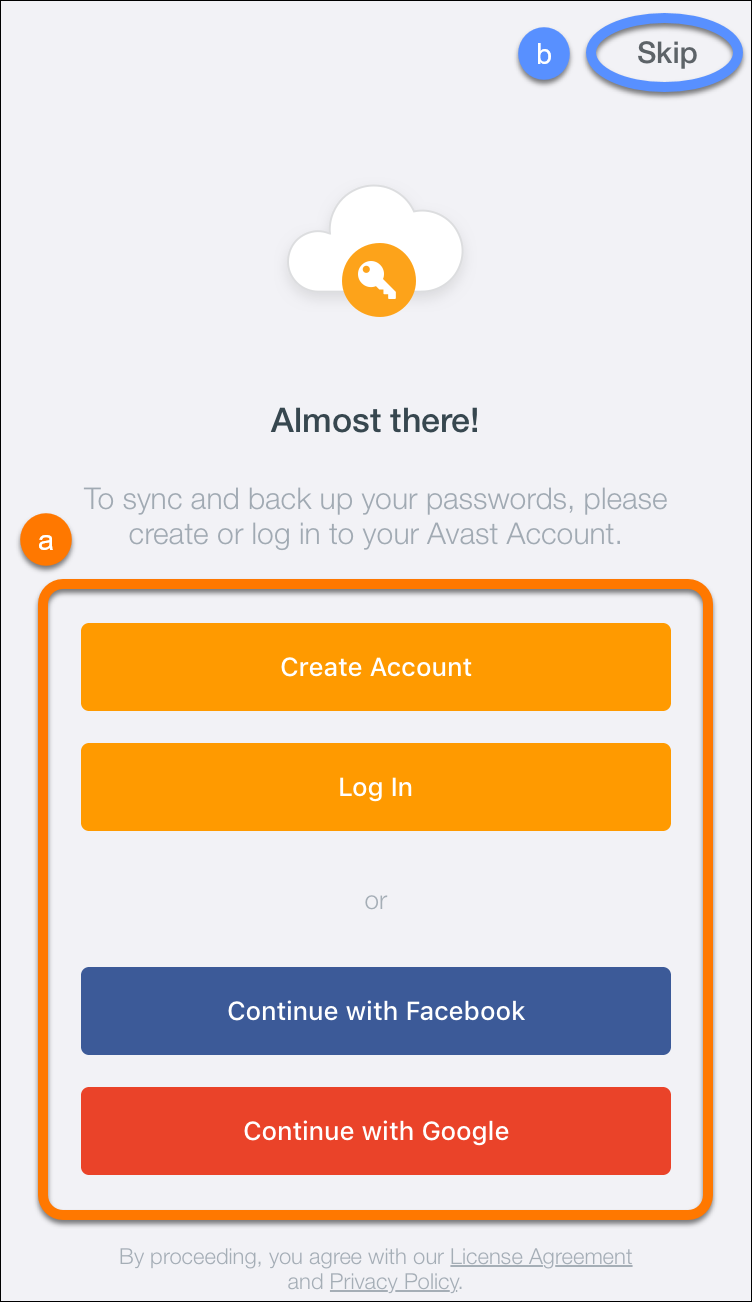
- Log into your Avast Account to set up synchronization and backup your data. Tap Skip if you don't want to synchronize passwords across your devices.
- If this is the first device you are synchronizing, an Avast Passwords synchronization group is created and a backup is sent to your email address. The password for this backup is the same as the Master Password for the device (the first device added to the group).
- If you are adding this device to an existing synchronization group for Avast Passwords, you must authorize it on a device which is already authorized. Confirm the authorization message which appears on your previously authorized Windows PC, Mac, Android or iOS device.
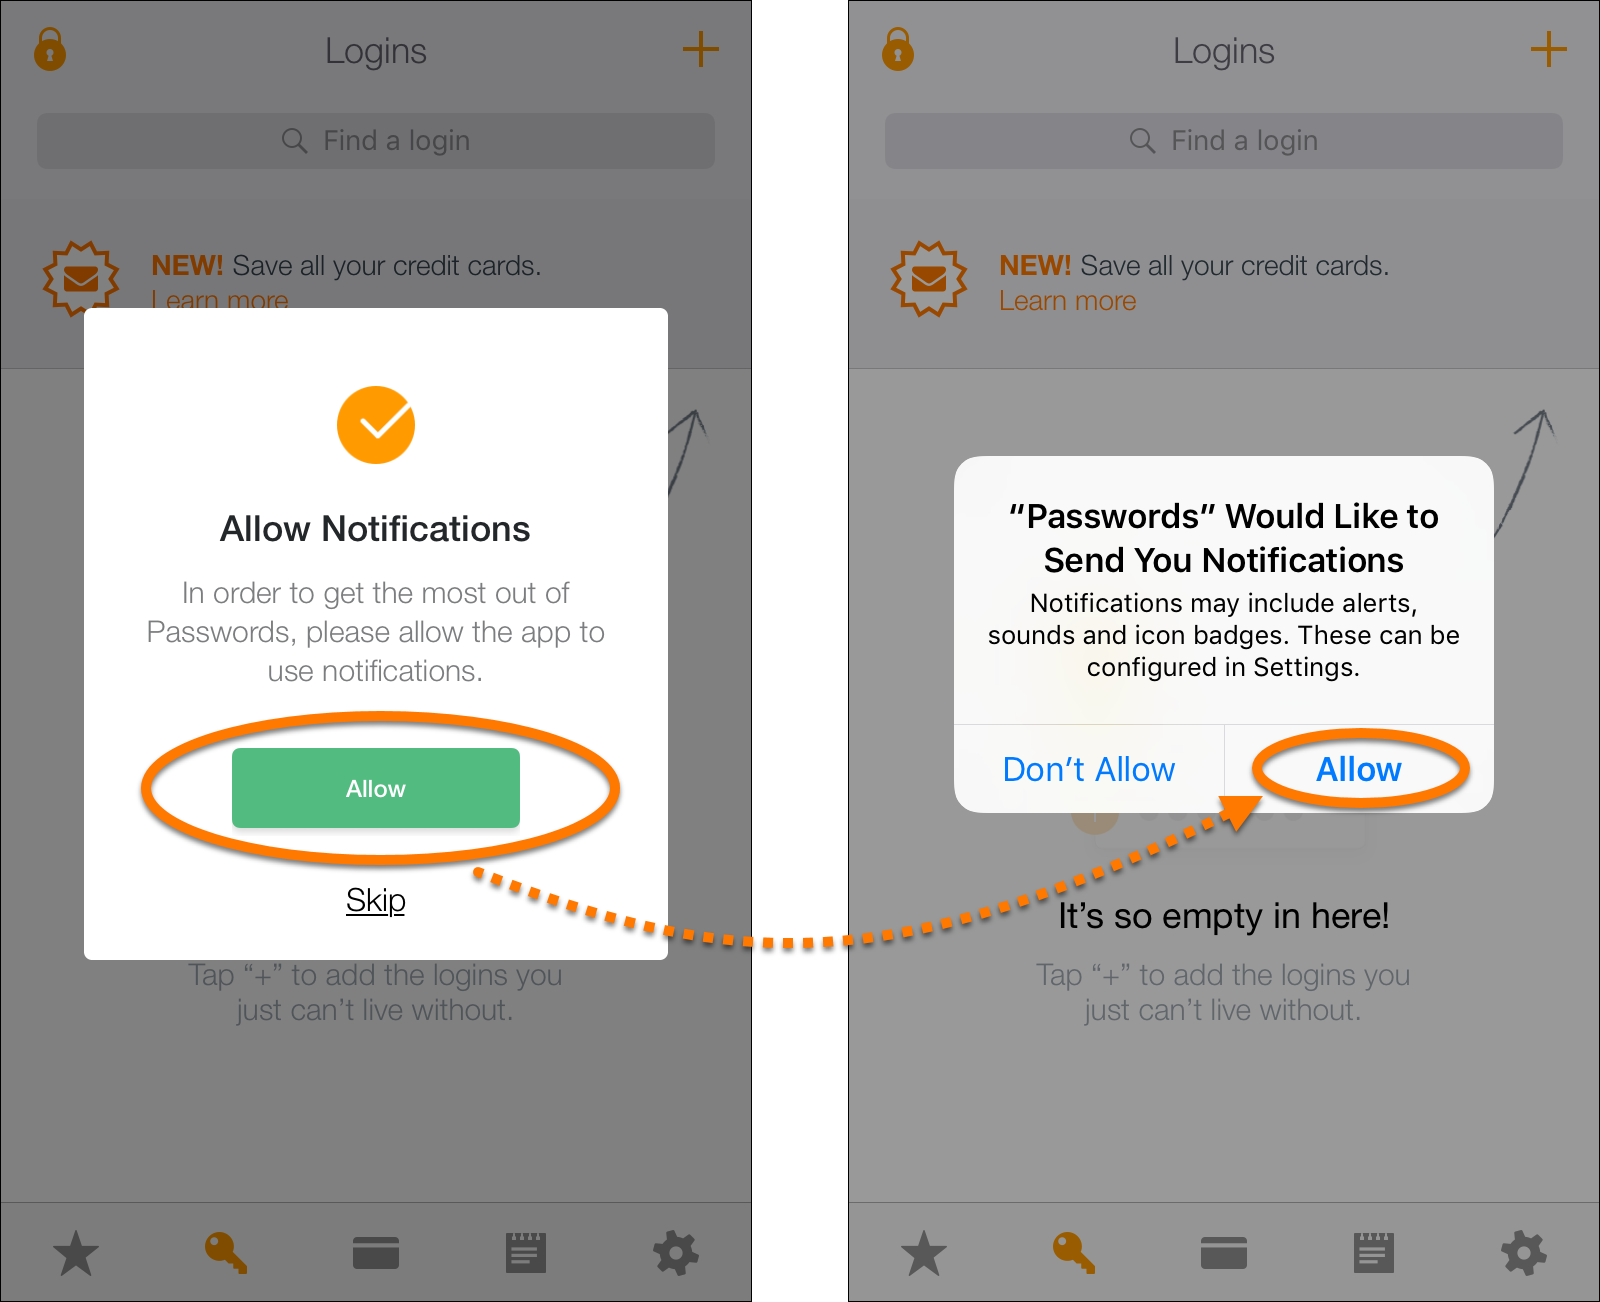
If you skip this authorization step, your passwords on this device are not synchronized with your other devices until you authorize this device. For more information, refer to the following article: - Tap Allow if you want to receive notifications. Confirm this setting by tapping Allow in the dialog box.
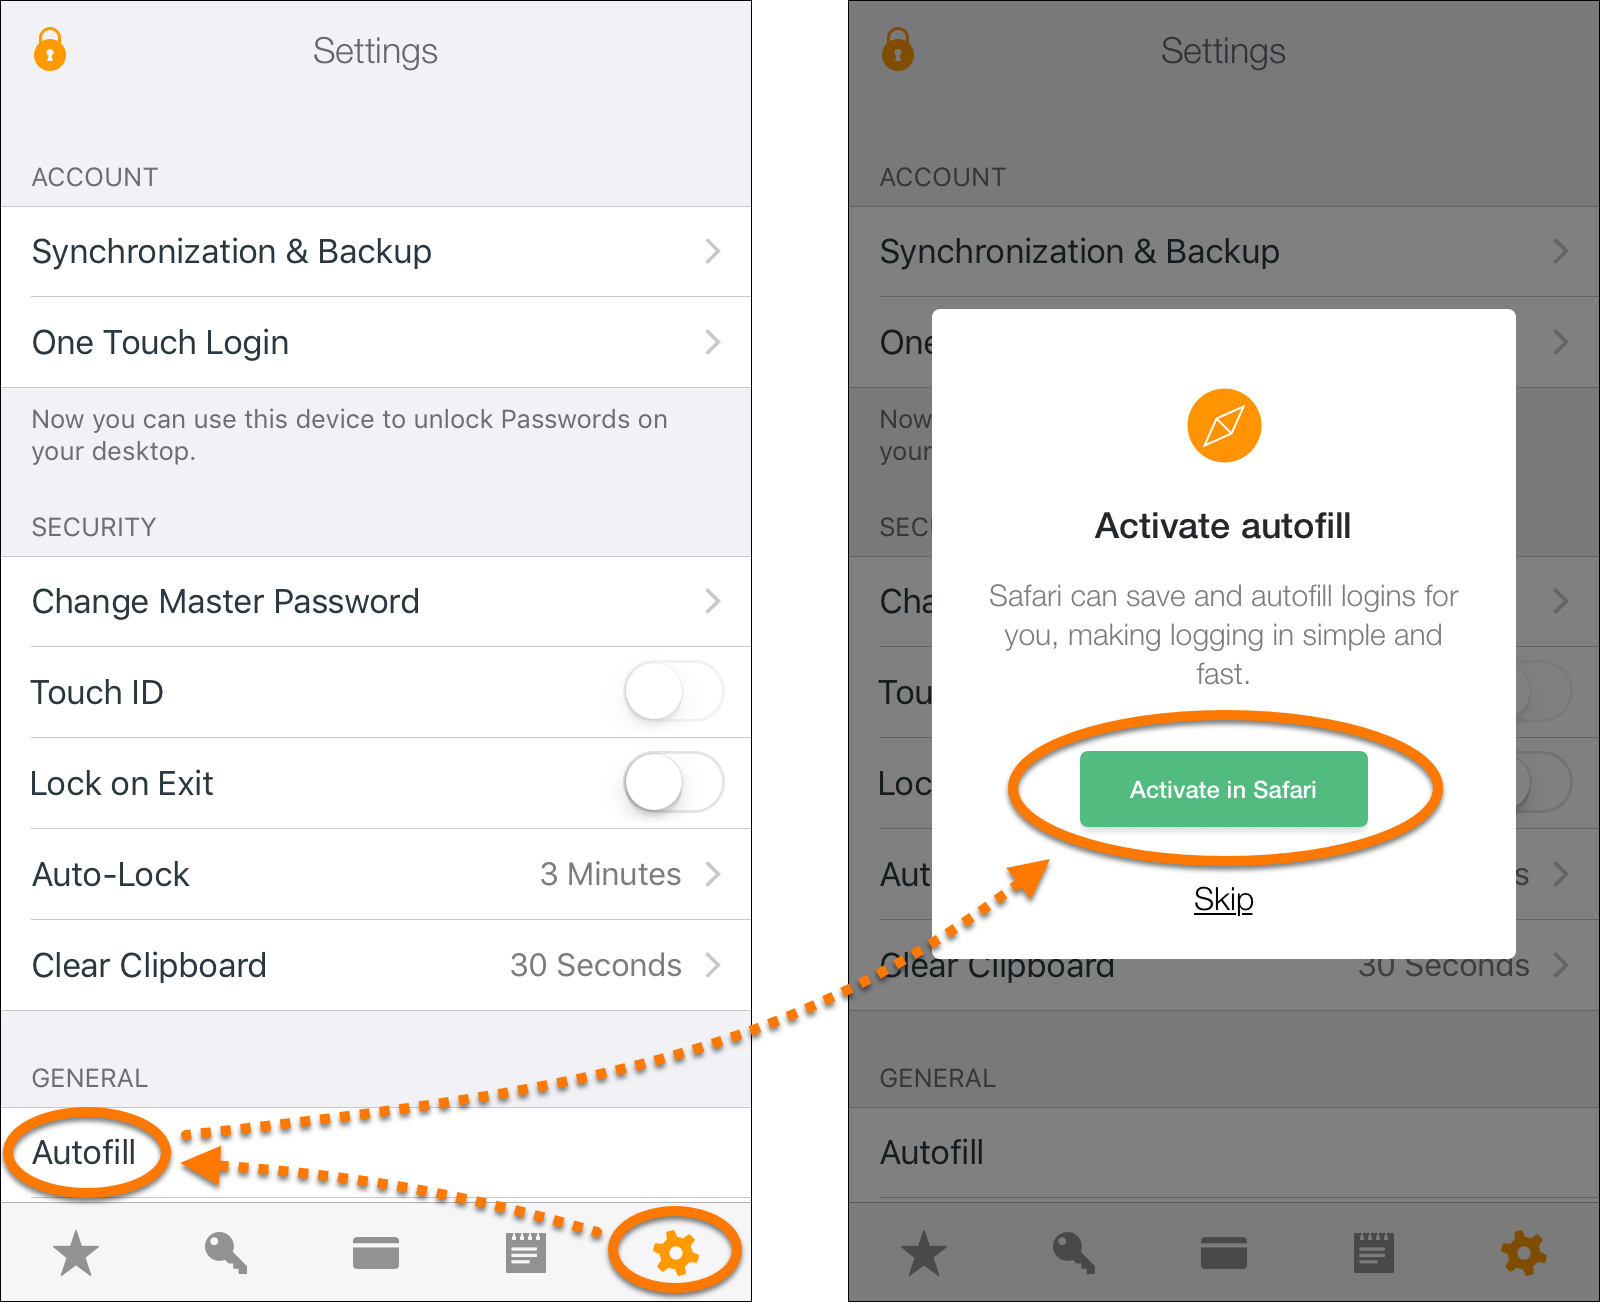
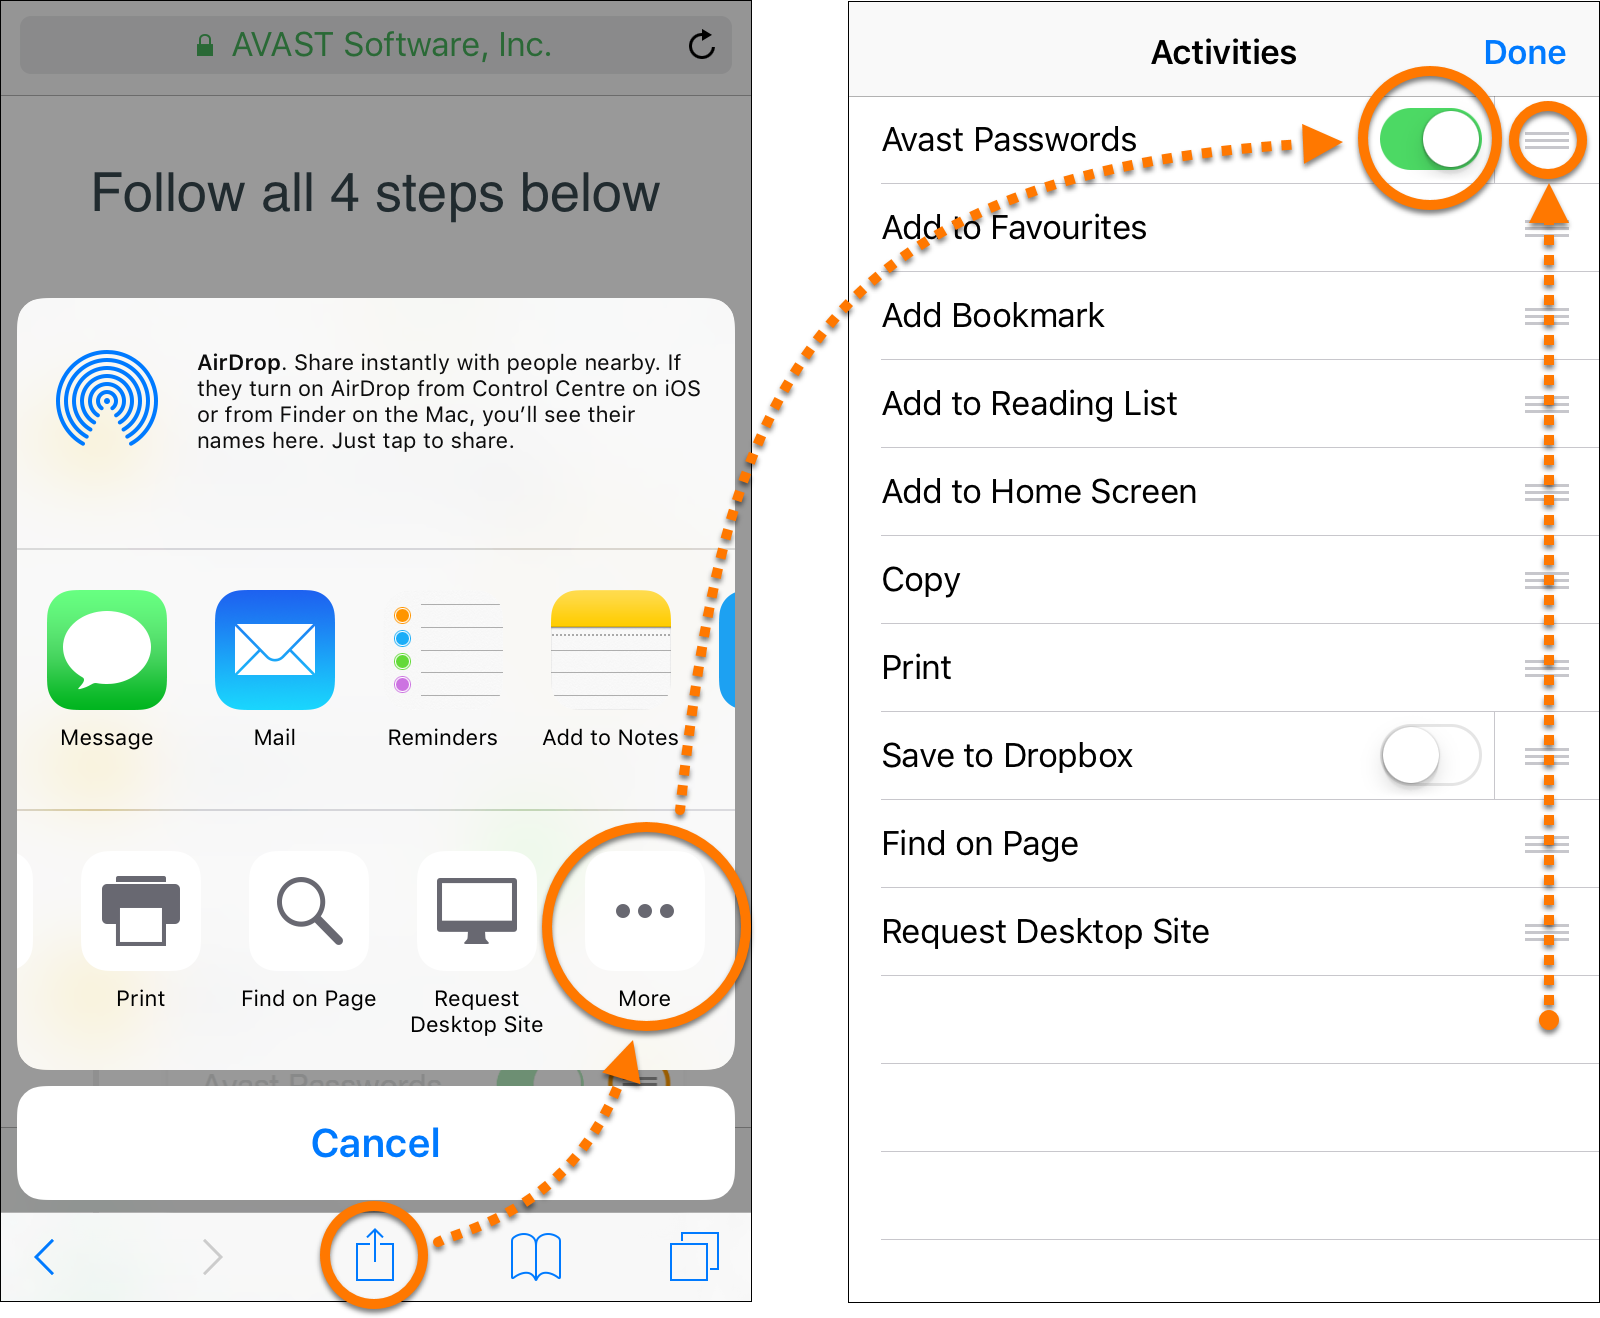
- Tap the Settings icon at the bottom of the main Avast Passwords screen. Select Autofill and tap Activate in Safari.
- Follow the on-screen instructions.
- Tap the Avast Passwords icon to open the app, then read the intro or start configuration immediately by tapping Skip in the bottom-left corner.
- Tap Get started to start configuration.
- Create a Master Password and tap Set. Enter your Master Password again on the next screen and tap Confirm.
- Log into your Avast Account to set up synchronization and backup your data. Tap Skip if you don't want to synchronize passwords across your devices.
- If this is the first device you are synchronizing, an Avast Passwords synchronization group is created and a backup is sent to your email address. The password for this backup is the same as the Master Password for the device (the first device added to the group).
- If you are adding this device to an existing synchronization group for Avast Passwords, you must authorize it on a device which is already authorized. Confirm the authorization message which appears on your previously authorized Windows PC, Mac, Android or iOS device.
If you skip this authorization step, your passwords on this device are not synchronized with your other devices until you authorize this device. For more information, refer to the following article: - Tap Allow if you want to receive notifications. Confirm this setting by tapping Allow in the dialog box.
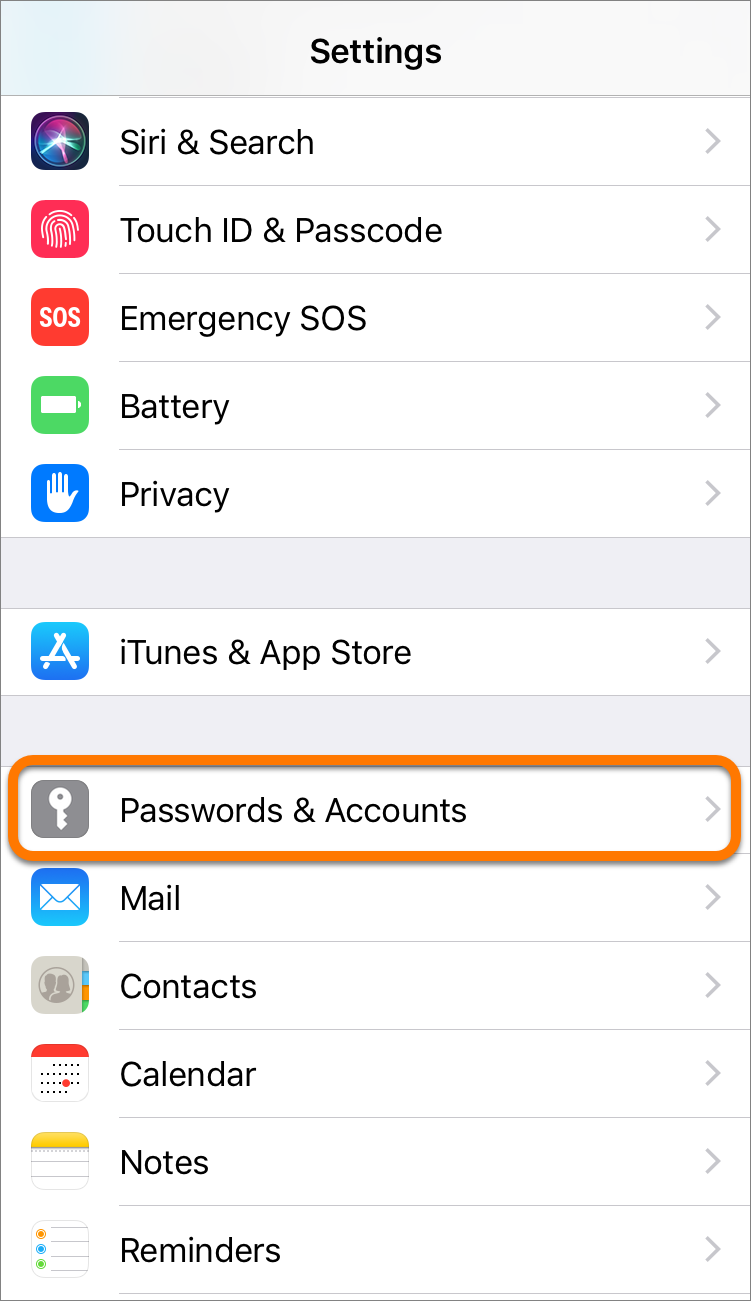
- Close the app and open your device settings to set up autofilling using Avast Passwords.
- Tap Passwords & Accounts.
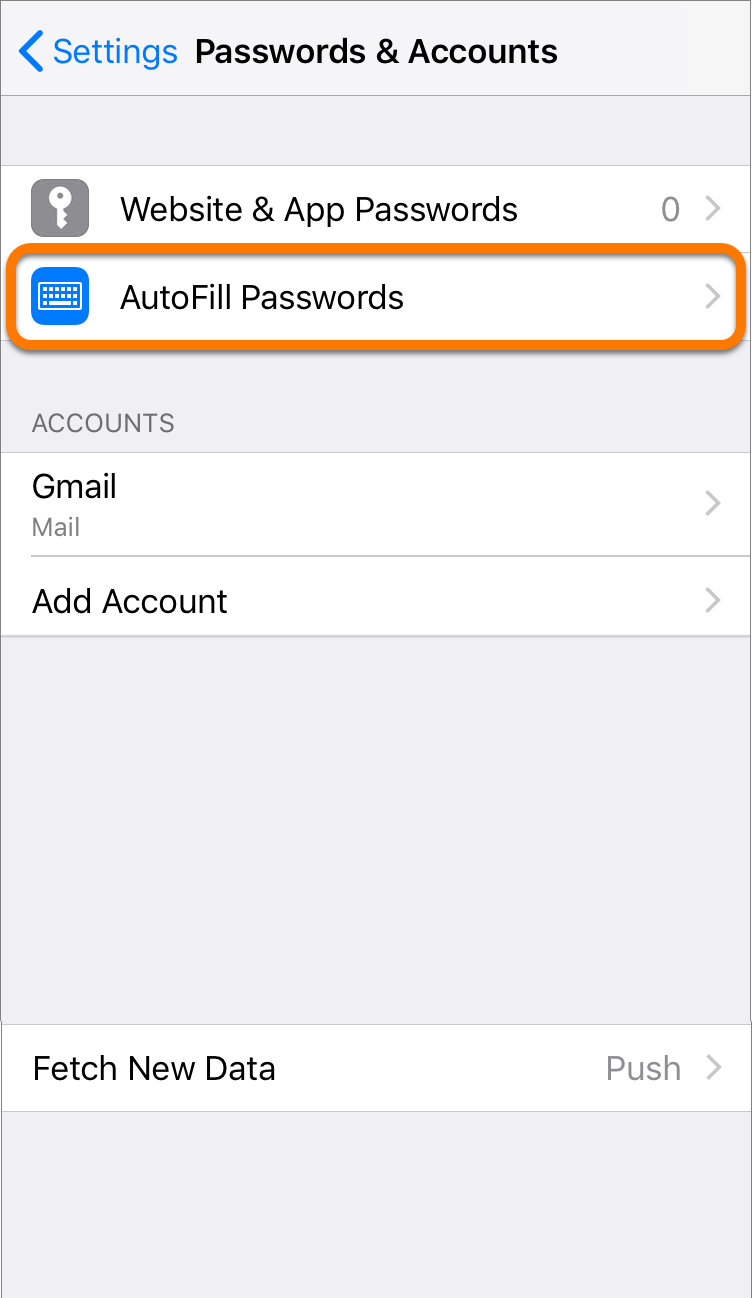
- Tap AutoFill Passwords.
- Tap the slider next to AutoFill Passwords so that it changes from white to green, then tap Passwords so that a blue tick appears.
- Return to Avast Passwords to manage your accounts, cards, or notes.

Manage accounts
When you log into an online account for the first time through an internet browser, the Avast Passwords extension recognizes the new login attempt and offers to save your account details to Avast Passwords. Alternatively, you can add the details of an account manually on the Avast Passwords screen by following these steps:
Add an account
- Tap the key icon on the main Avast Passwords screen, then tap the plus icon and select an account from the list. If the account you want to add is missing from the list, tap Add login.
- Enter the following details for your selected account:
- Name of website: the name of the website or a name that will allow you to easily find and recognize your account.
- Website address: the website address of the account, for example,
https://www.example.com. - Username: the username (often an email address) that you use to log into the account.
- Password: the password that you currently use to log into the account. Alternatively, tap Generate Password and move the slider to adjust the password strength according to your preferences. This is especially useful if you are setting up an account on the selected website for the first time, or re-setting your password.
- Note: optional information about the account.
- Tap the tick icon to confirm the data.
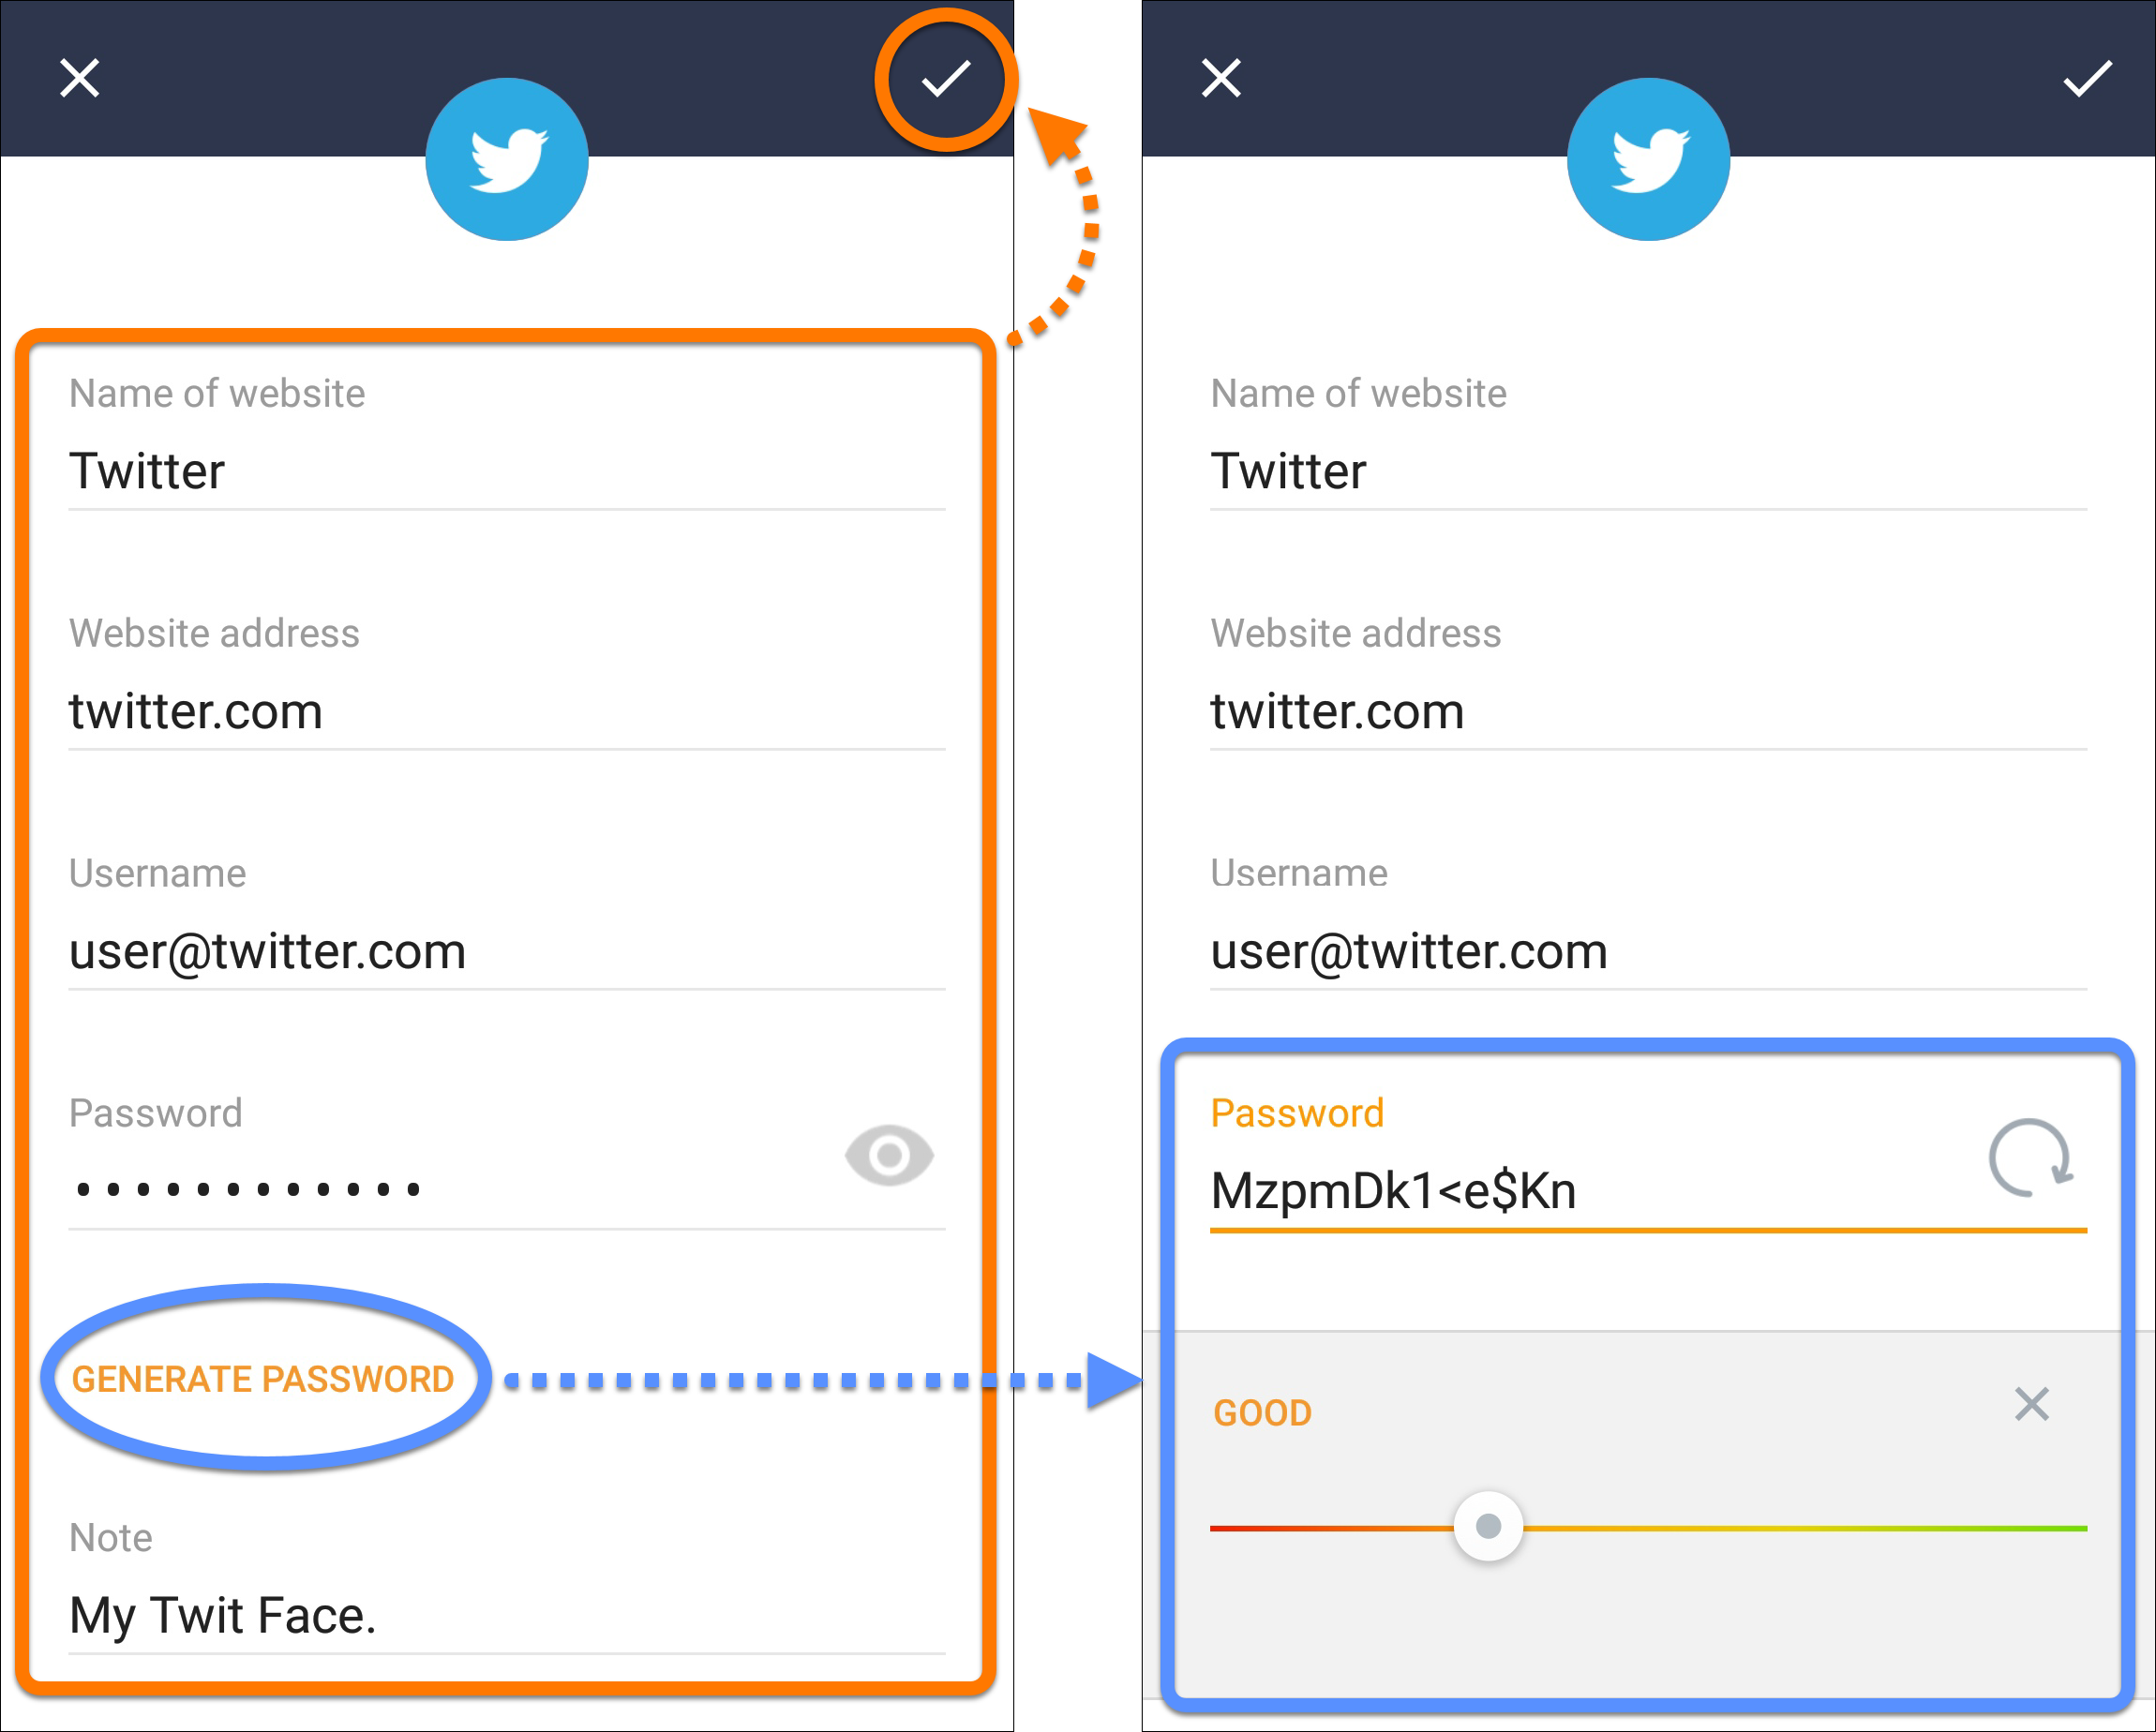
A tile representing your newly added account details appears on the Logins screen.
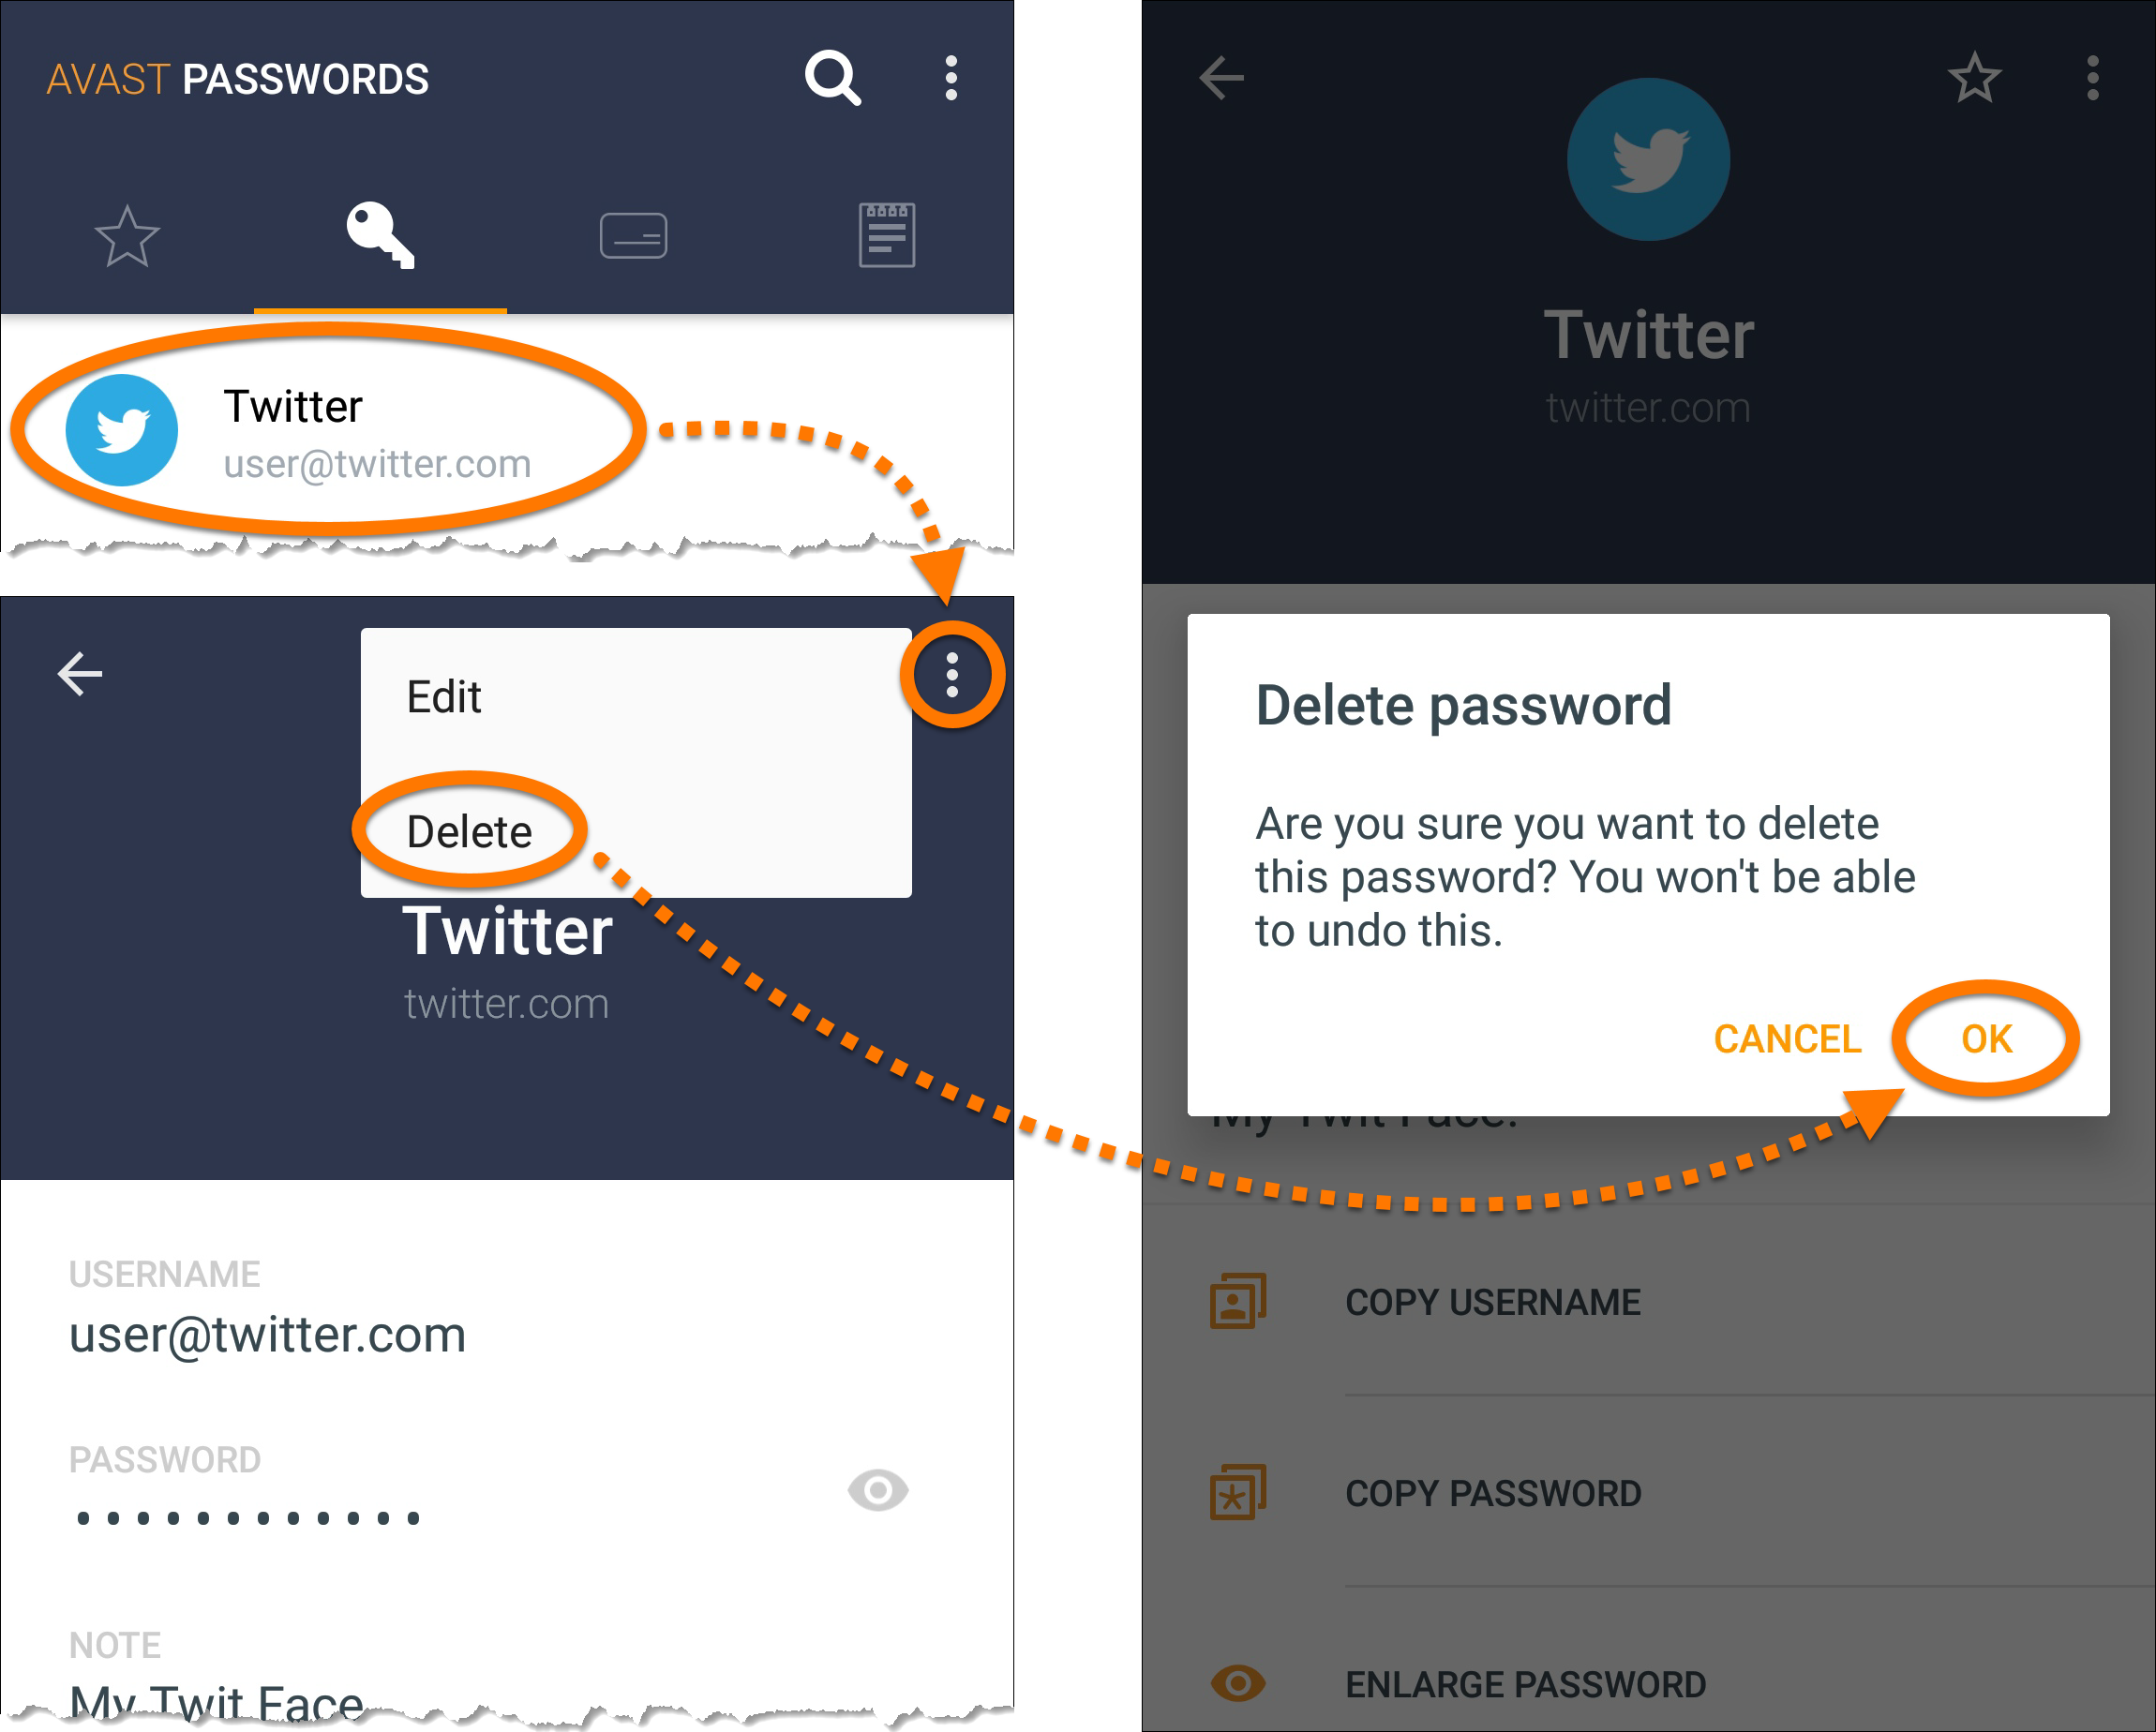
Edit or delete an account
- Tap an account tile to open the account contents.
- Select one of the following options:
- Edit an account: Tap the
⋮menu icon (three dots) and select Edit to edit the account details. Confirm your changes by tapping the tick icon. - Delete an account: Tap the
⋮menu icon (three dots) and select Delete to completely remove the account. Confirm removal of the account by tapping OK in the dialog box.
- Edit an account: Tap the

Add an account
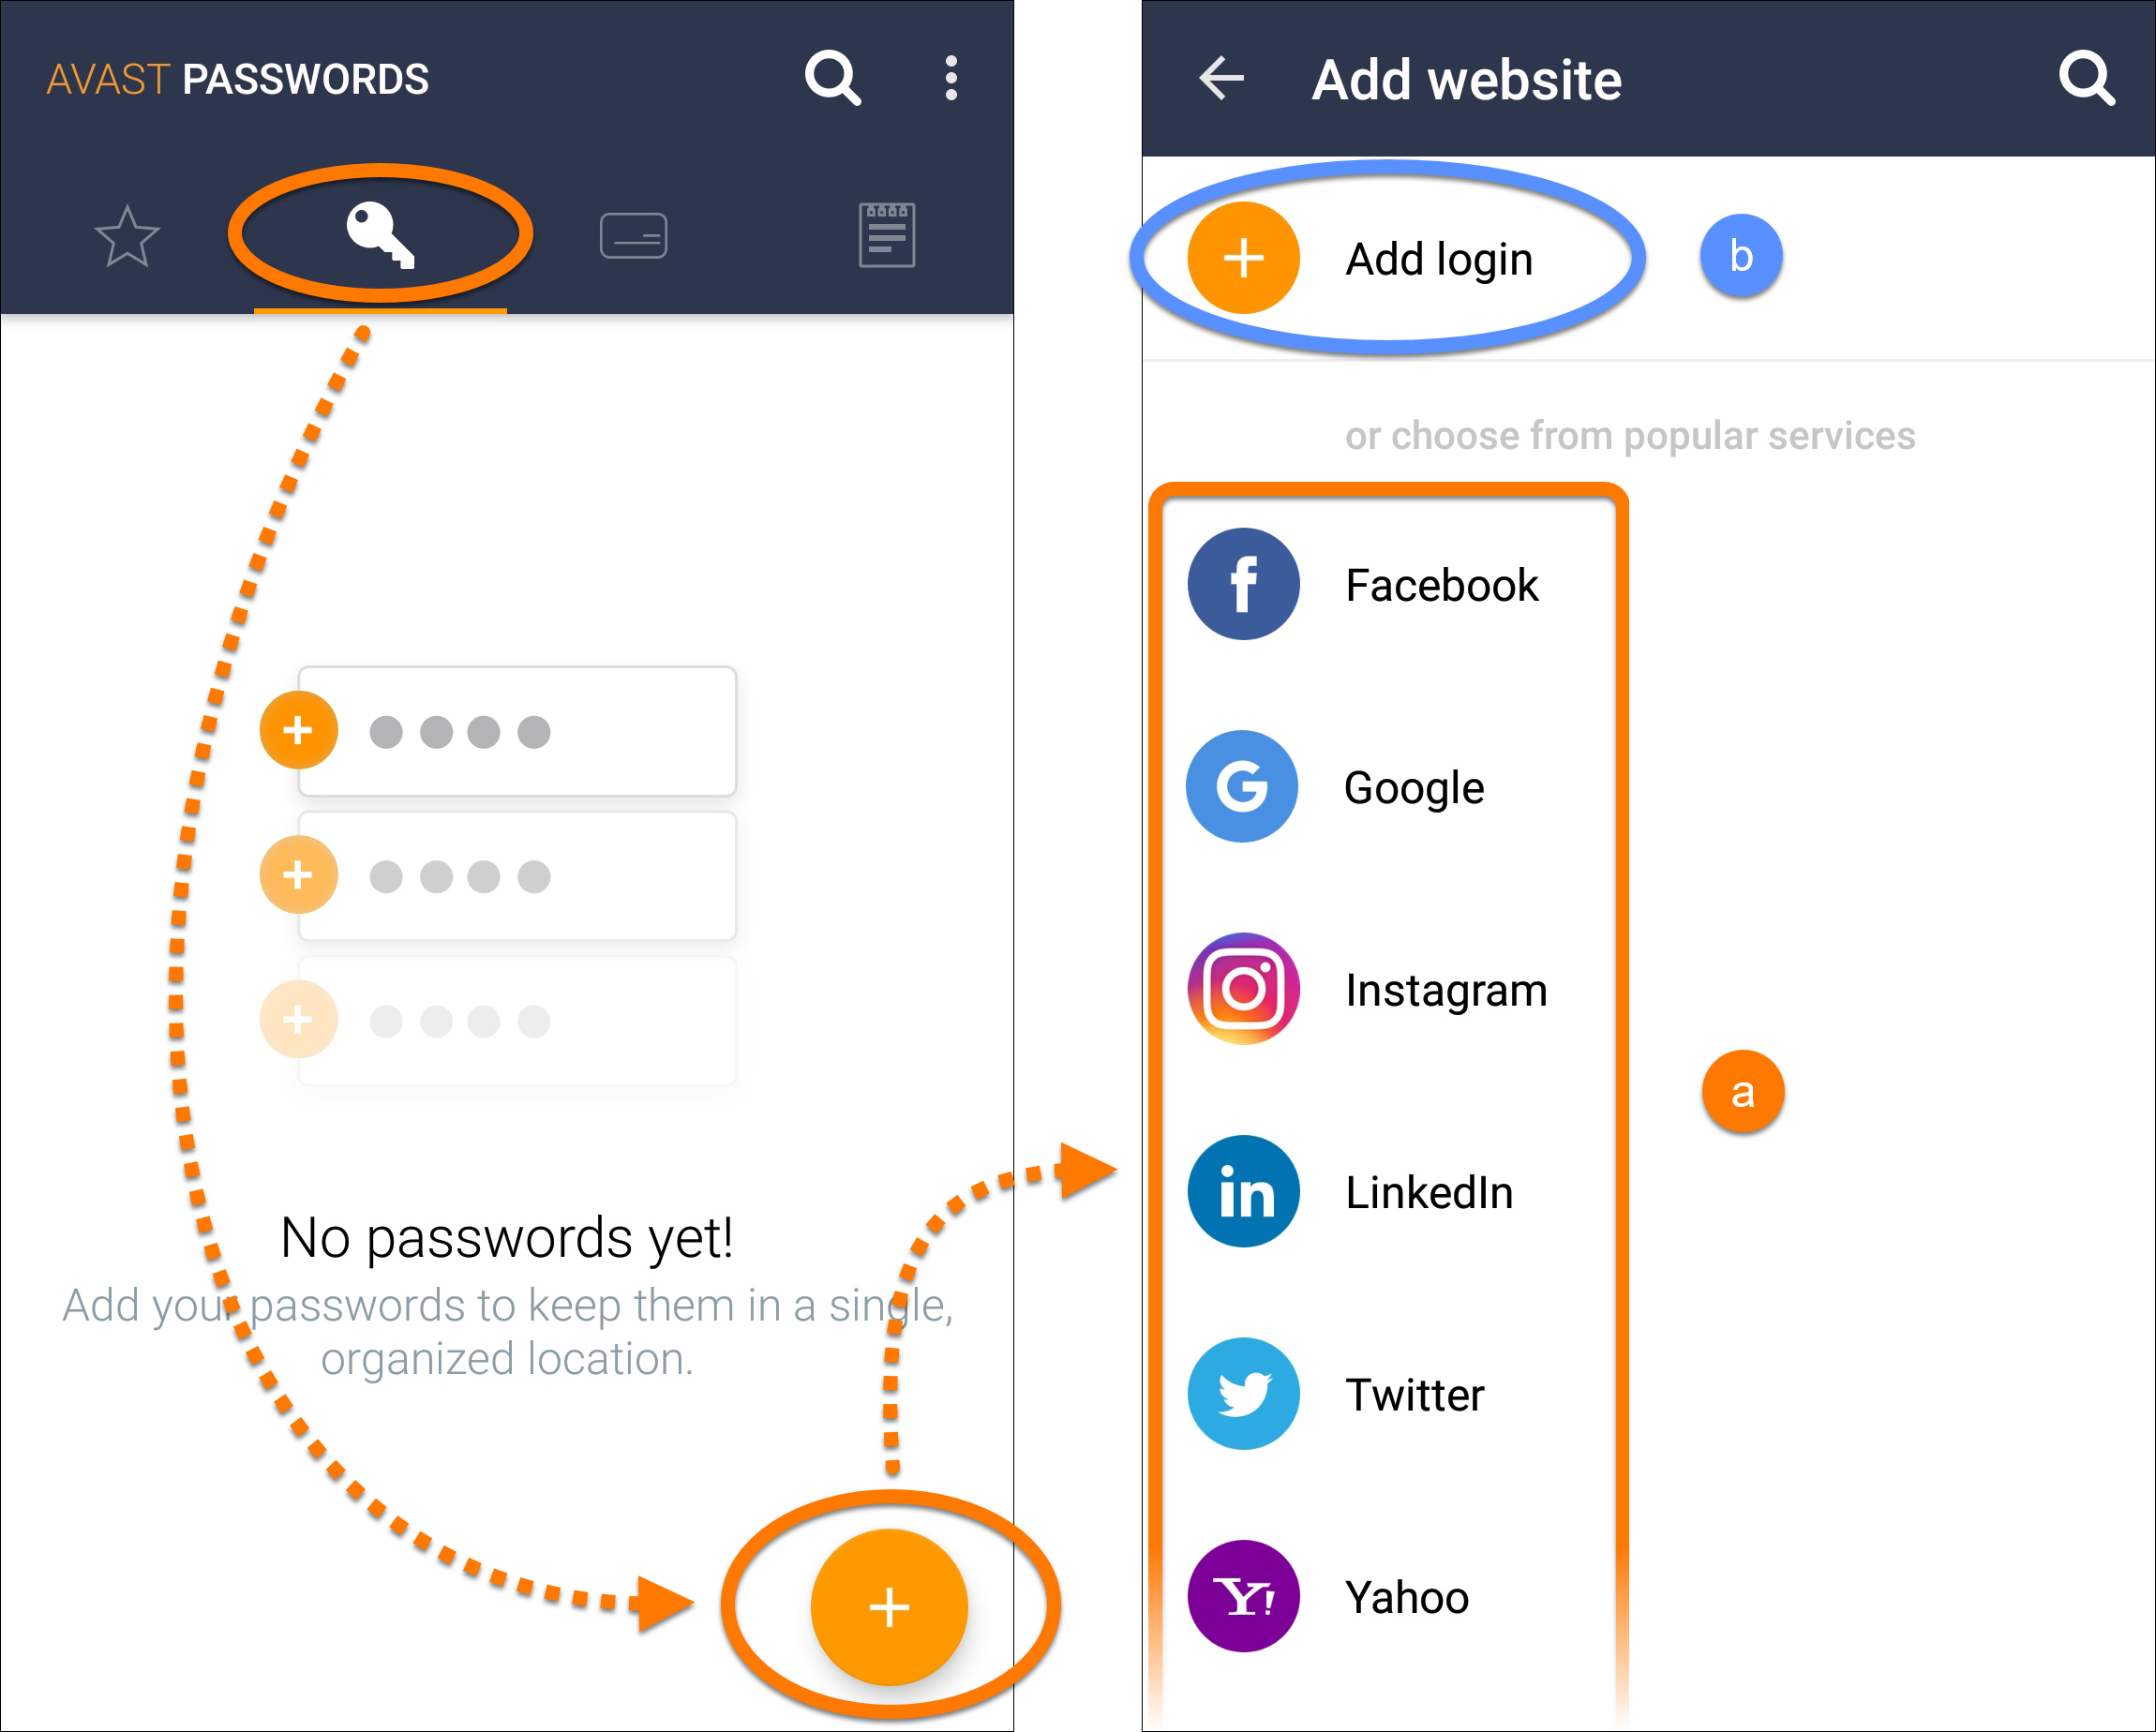
- Tap the key icon on the main Avast Passwords screen, then tap the plus icon. Select an account from the list. If the account you want to add is missing from the list, search for it or tap Custom to add it.
- Enter the following details for your selected account:
- Name of website: the name of the website or a name that will allow you to easily find and recognize your account.
- Website address: the website address of the account, for example,
https://www.example.com. - Username: the username (often an email address) that you use to log into the account.
- Password: the password that you currently use to log into the account. Alternatively, tap Generate Password and move the slider to adjust the password strength according to your preferences. This is especially useful if you are setting up an account on the selected website for the first time, or re-setting your password.
- Note: optional information about the account.
- Tap Save to confirm the data.
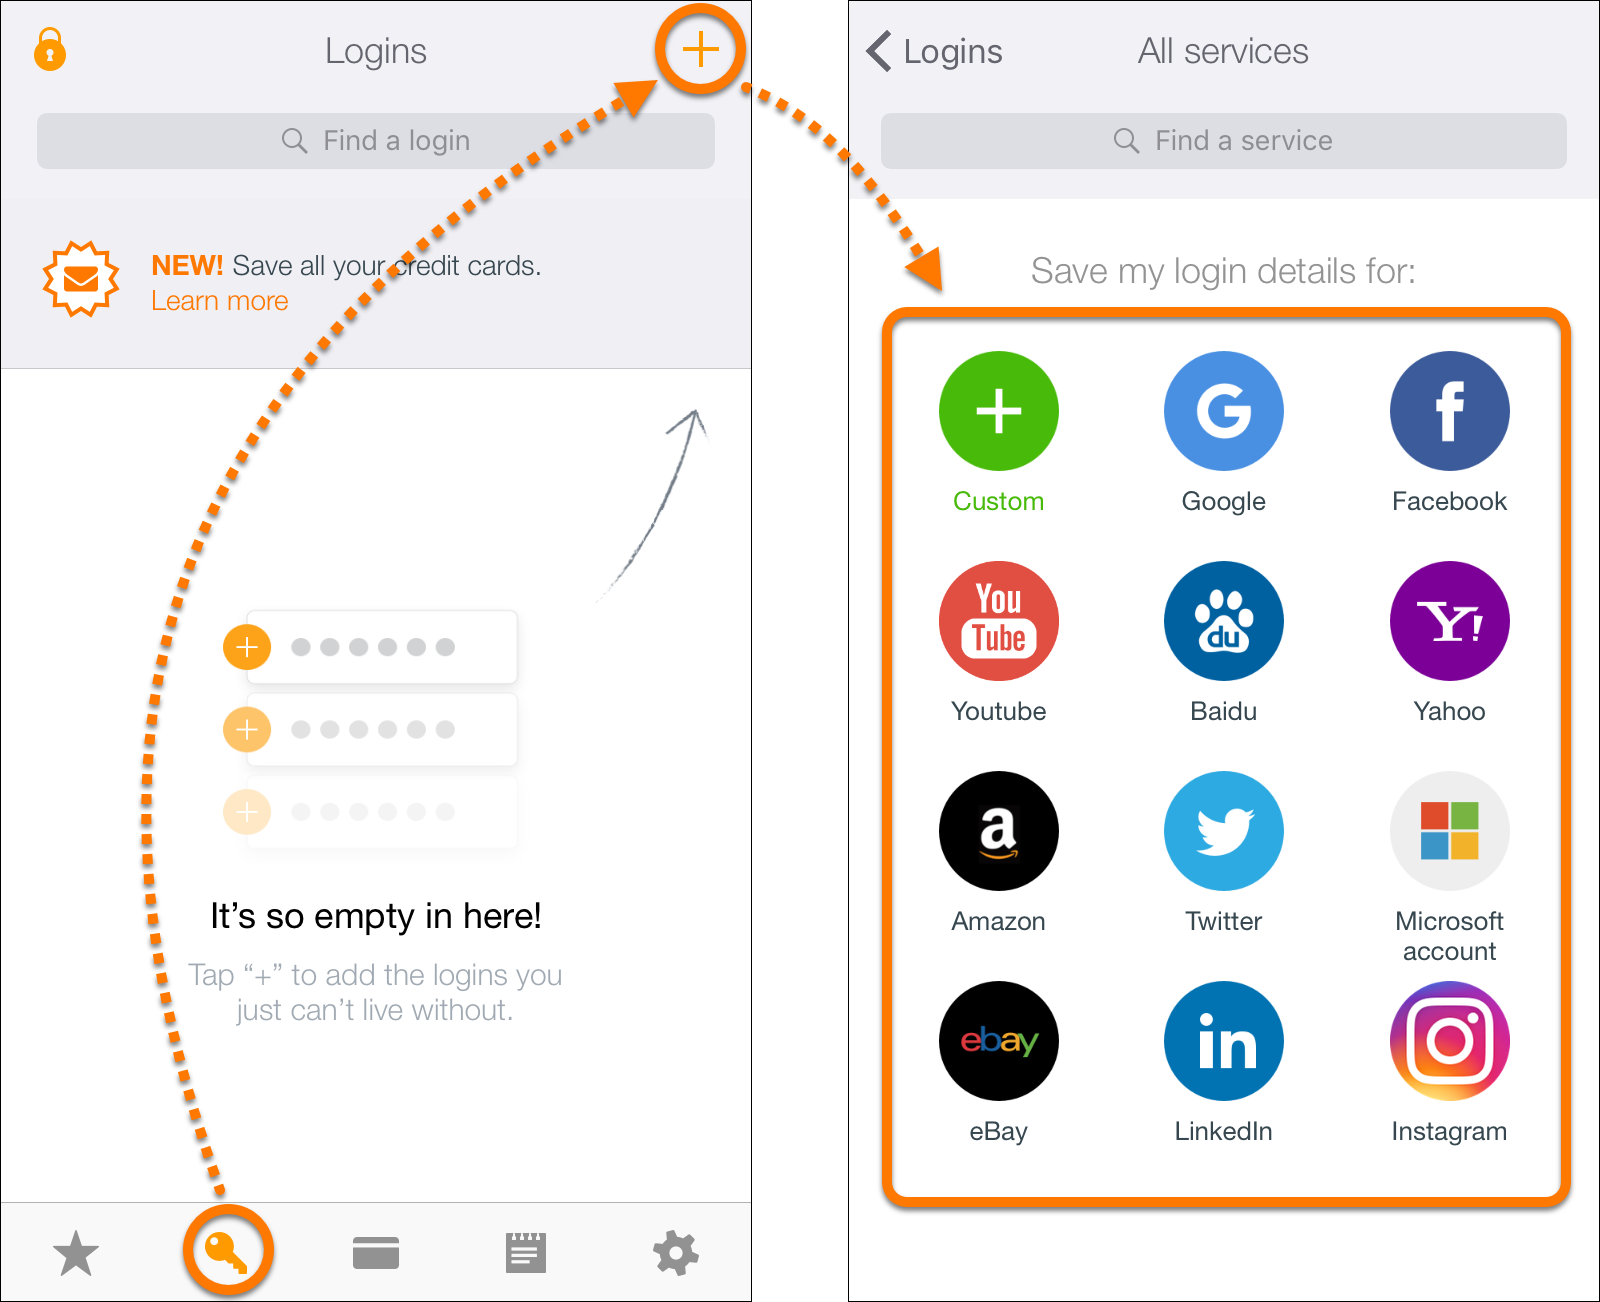

A tile representing your newly added account details appears on the Logins screen.
Edit or delete an account
- Tap an account tile to open the account contents.
- Select one of the following options:
- Edit an account: Tap Edit to edit the account details. Confirm your changes by tapping Save.
- Delete an account: Tap Edit then tap Delete to completely remove the account. Confirm removal by tapping Delete in the dialog box.
- Edit an account: Tap Edit to edit the account details. Confirm your changes by tapping Save.


Add an account
- Tap the key icon on the main Avast Passwords screen, then tap the plus icon. Select an account from the list. If the account you want to add is missing from the list, search for it or tap Custom to add it.
- Enter the following details for your selected account:
- Name of website: the name of the website or a name that will allow you to easily find and recognize your account.
- Website address: the website address of the account, for example,
https://www.example.com. - Username: the username (often an email address) that you use to log into the account.
- Password: the password that you currently use to log into the account. Alternatively, tap Generate Password and move the slider to adjust the password strength according to your preferences. This is especially useful if you are setting up an account on the selected website for the first time, or re-setting your password.
- Note: optional information about the account.
- Tap Save to confirm the data.
A tile representing your newly added account details appears on the Logins screen.
Edit or delete an account
- Tap an account tile to open the account contents.
- Select one of the following options:
- Edit an account: Tap Edit to edit the account details. Confirm your changes by tapping Save.
- Delete an account: Tap Edit then tap Delete to completely remove the account. Confirm removal by tapping Delete in the dialog box.
- Edit an account: Tap Edit to edit the account details. Confirm your changes by tapping Save.
Manage cards
Add your credit card details to Avast Passwords for faster online shopping by following these steps:
Add a card
- Tap the credit card icon on the main Avast Passwords screen.
- Tap the plus icon and provide the following details:
- Custom card name: a name that will help you recognize this card.
- Card number: your card number.
- Cardholder name: your name as it is printed on your card.
- Expiration: the expiration date of your card.
- Cvv: the 3 or 4 digit security number that is visible on the signature panel on the back of the card.
- PIN: the PIN code protecting the card.
- Note: additional details related to the card.
- Tap the tick icon to save the data.

A tile representing your newly added card appears on the Credit Cards screen.
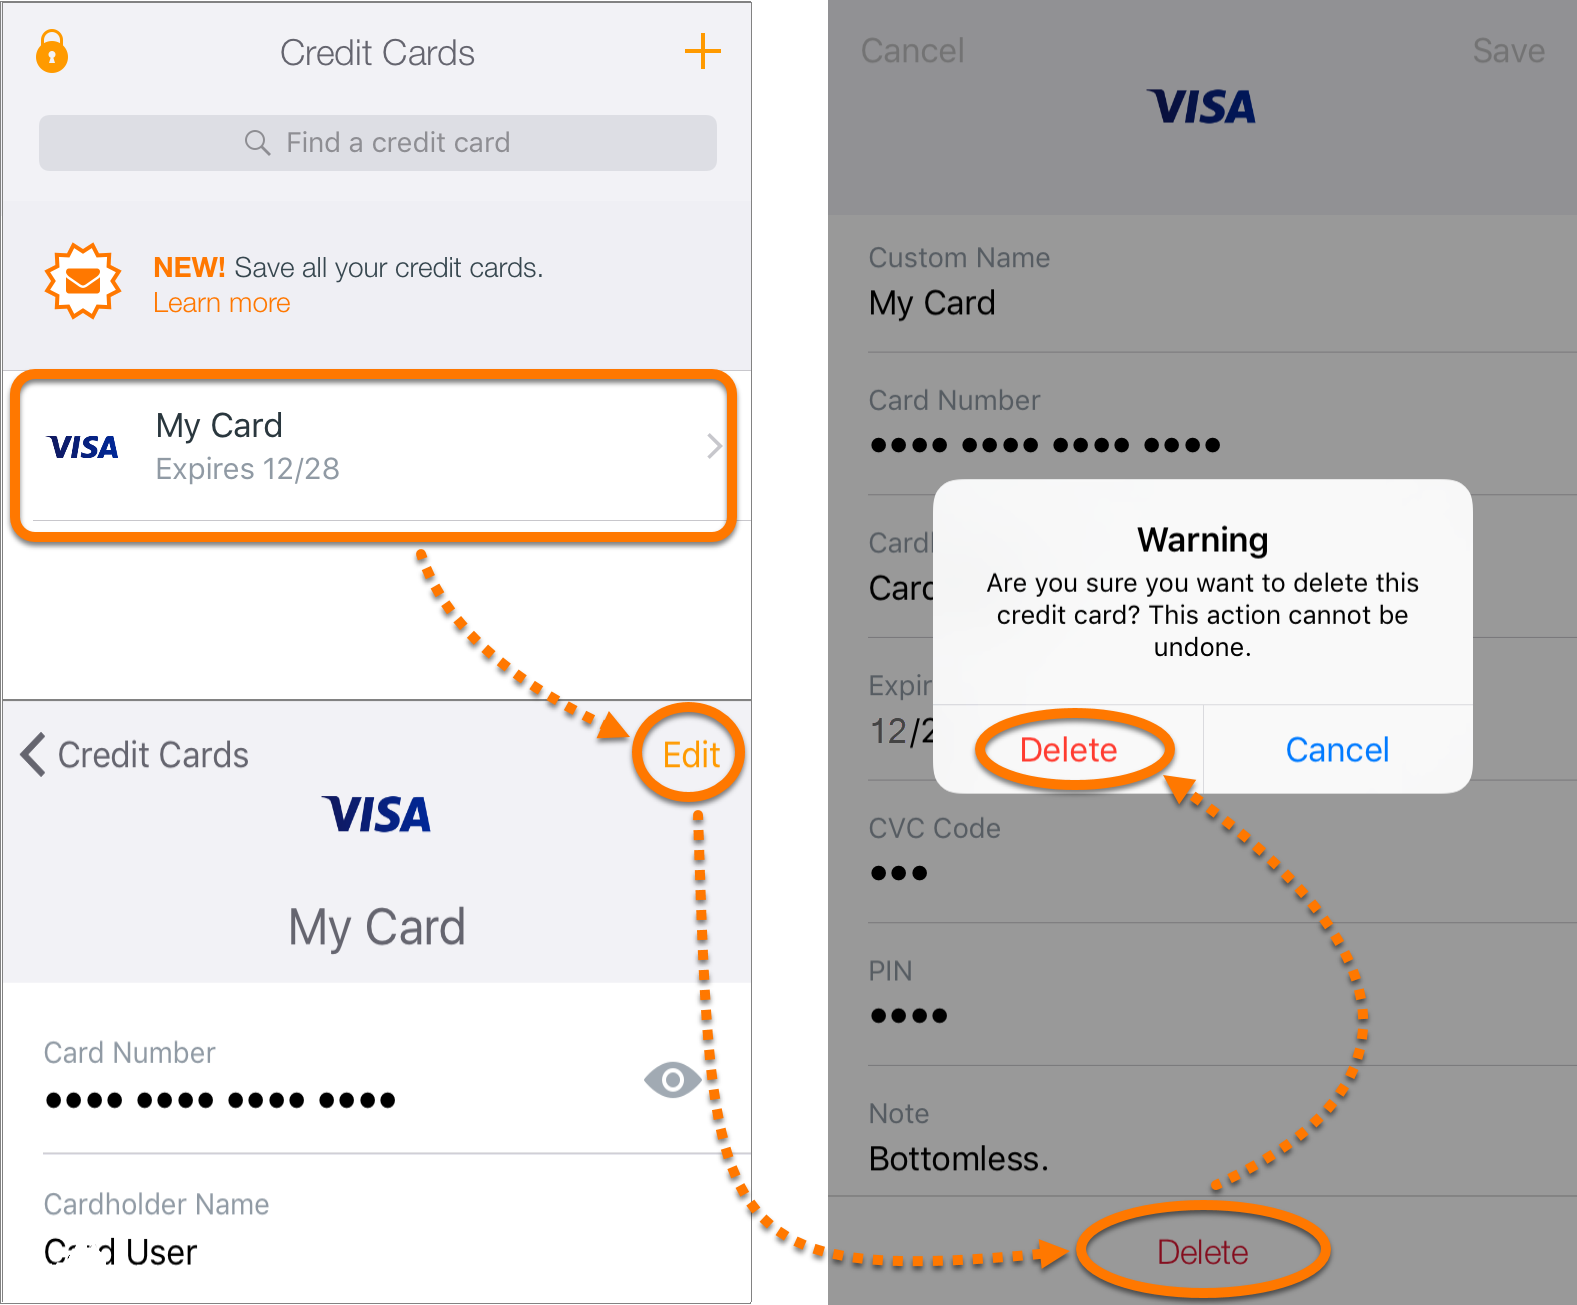
Edit or delete a card
- Tap a card tile to open the card details.
- Select one of the following options:
- Edit a card: Tap the
⋮menu icon (three dots) and select Edit to edit the card details. Confirm your changes by tapping the tick icon. - Delete a card: Tap the
⋮menu icon (three dots) and select Delete to completely remove the card. Confirm removal of the card by tapping OK in the dialog box.
- Edit a card: Tap the


Add a card
- Tap the credit card icon on the main Avast Passwords screen. Then tap the plus icon and provide the following details:
- Custom name: a name that will help you recognize this card.
- Card Number: your card number.
- Cardholder name: your name as it is printed on your card.
- Expiration: the expiration date of your card.
- CVC Code: a 3 or 4 digit security number that is visible on the signature panel on the back of the card.
- PIN: a PIN code protecting the card.
- Note: additional details related to the card.
- Tap Save to confirm the card details.

A tile representing your newly added card appears on the Credit Cards screen.
Edit or delete a card
- Tap a card tile to open the card details.
- Select one of the following options:
- Edit a card: Tap Edit to edit the card details. Confirm your changes by tapping Save.
- Delete a card: Tap Edit then tap Delete to completely remove the card. Confirm removal by tapping Delete in the dialog box.
- Edit a card: Tap Edit to edit the card details. Confirm your changes by tapping Save.

Add a card
- Tap the credit card icon on the main Avast Passwords screen. Then tap the plus icon and provide the following details:
- Custom name: a name that will help you recognize this card.
- Card Number: your card number.
- Cardholder name: your name as it is printed on your card.
- Expiration: the expiration date of your card.
- CVC Code: a 3 or 4 digit security number that is visible on the signature panel on the back of the card.
- PIN: a PIN code protecting the card.
- Note: additional details related to the card.
- Tap Save to confirm the card details.
A tile representing your newly added card appears on the Credit Cards screen.
Edit or delete a card
- Tap a card tile to open the card details.
- Select one of the following options:
- Edit a card: Tap Edit to edit the card details. Confirm your changes by tapping Save.
- Delete a card: Tap Edit then tap Delete to completely remove the card. Confirm removal by tapping Delete in the dialog box.
- Edit a card: Tap Edit to edit the card details. Confirm your changes by tapping Save.
Manage notes
The Secure Notes section is a place where you can safely store notes in Avast Passwords. All notes are encrypted and protected by your Master Password to ensure maximum security. This feature protects your confidential information from unauthorized access.
Add a note
- Tap the note icon on the main Avast Passwords screen.
- Tap the plus icon and provide the following details:
- Title: a title that will allow you to easily find and recognize your note.
- Note contents: any data that you want to keep secure, such as PIN codes and contact details.
- Tap the tick icon to confirm the data.
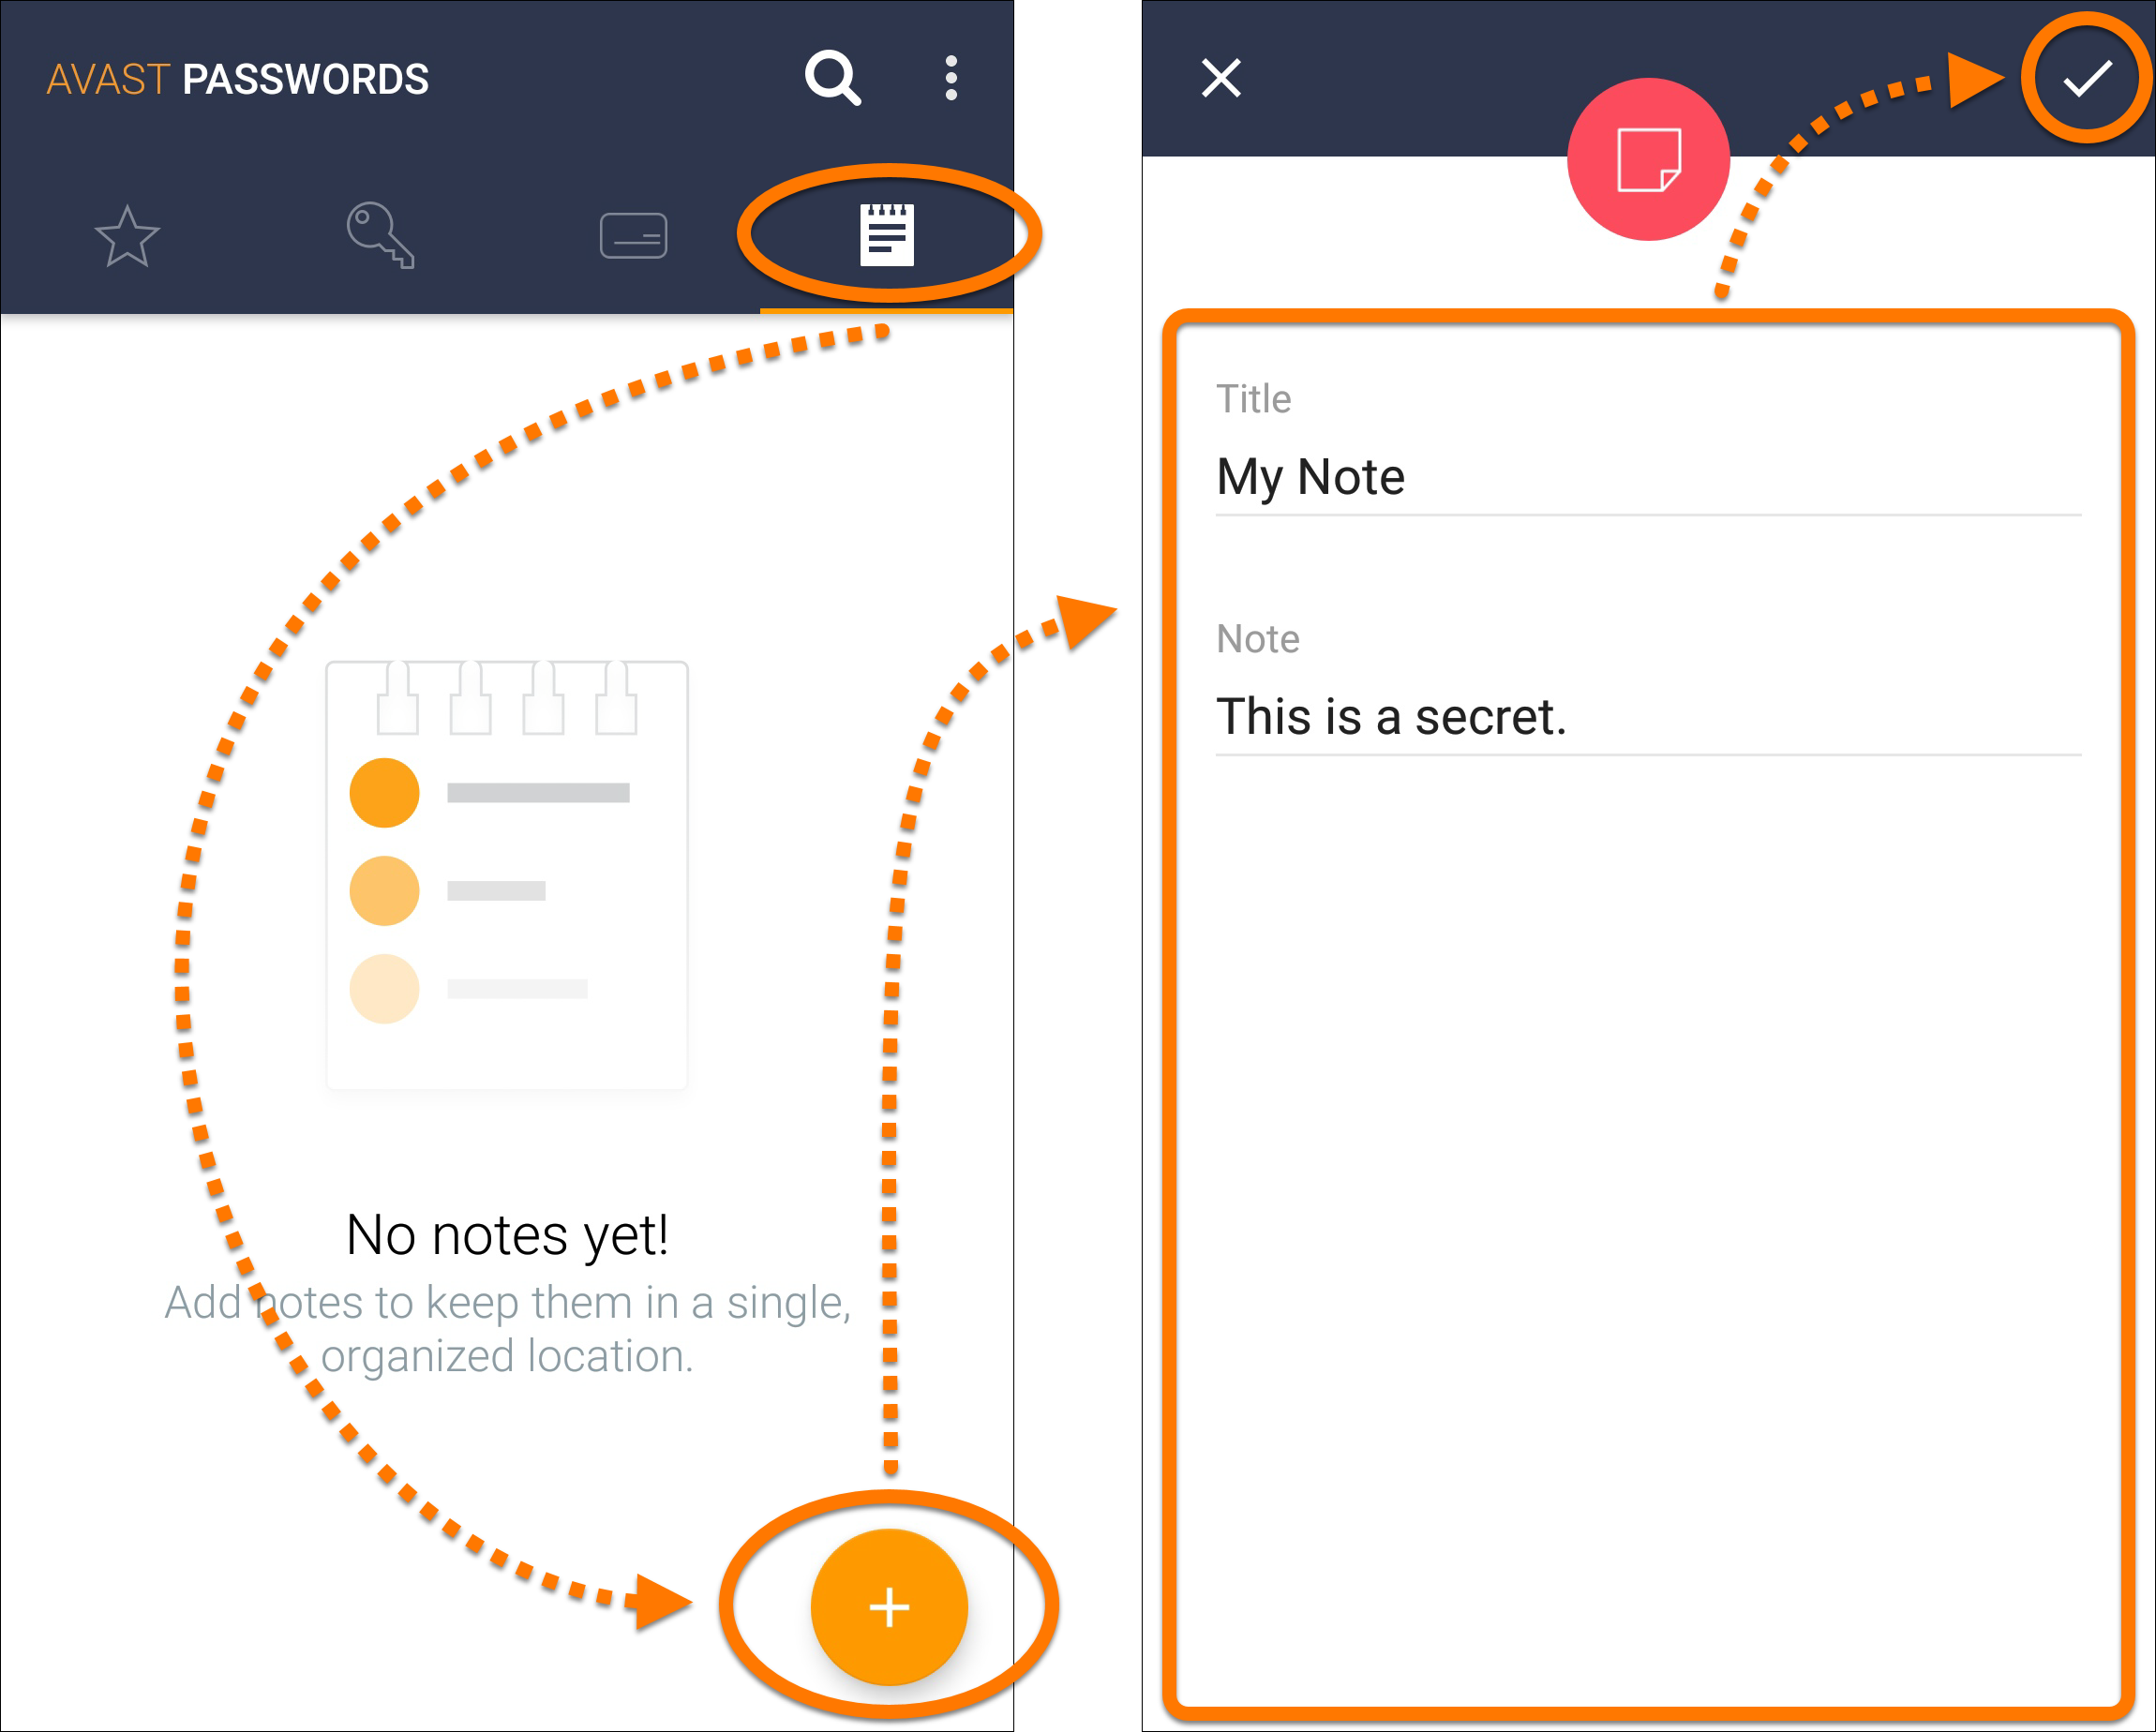
A tile representing your newly added note appears on the Notes screen.
Edit or delete a note
- Tap a note tile to open the note contents.
- Select one of the following options:
- Edit a note: Tap the
⋮menu icon (three dots) and select Edit to edit the note contents. Confirm your changes by tapping the tick icon. - Delete a note: Tap the
⋮menu icon (three dots) and select Delete to completely remove the note. Confirm removal of the note by tapping OK in the dialog box.
- Edit a note: Tap the


Add a note
- Tap the note icon on the main Avast Passwords screen.
- Tap the plus icon and provide the following details:
- Title: a title that will allow you to easily find and recognize your note.
- Note contents: any data that you want to keep secure, such as PIN codes and contact details.
- Tap Save to confirm the data.
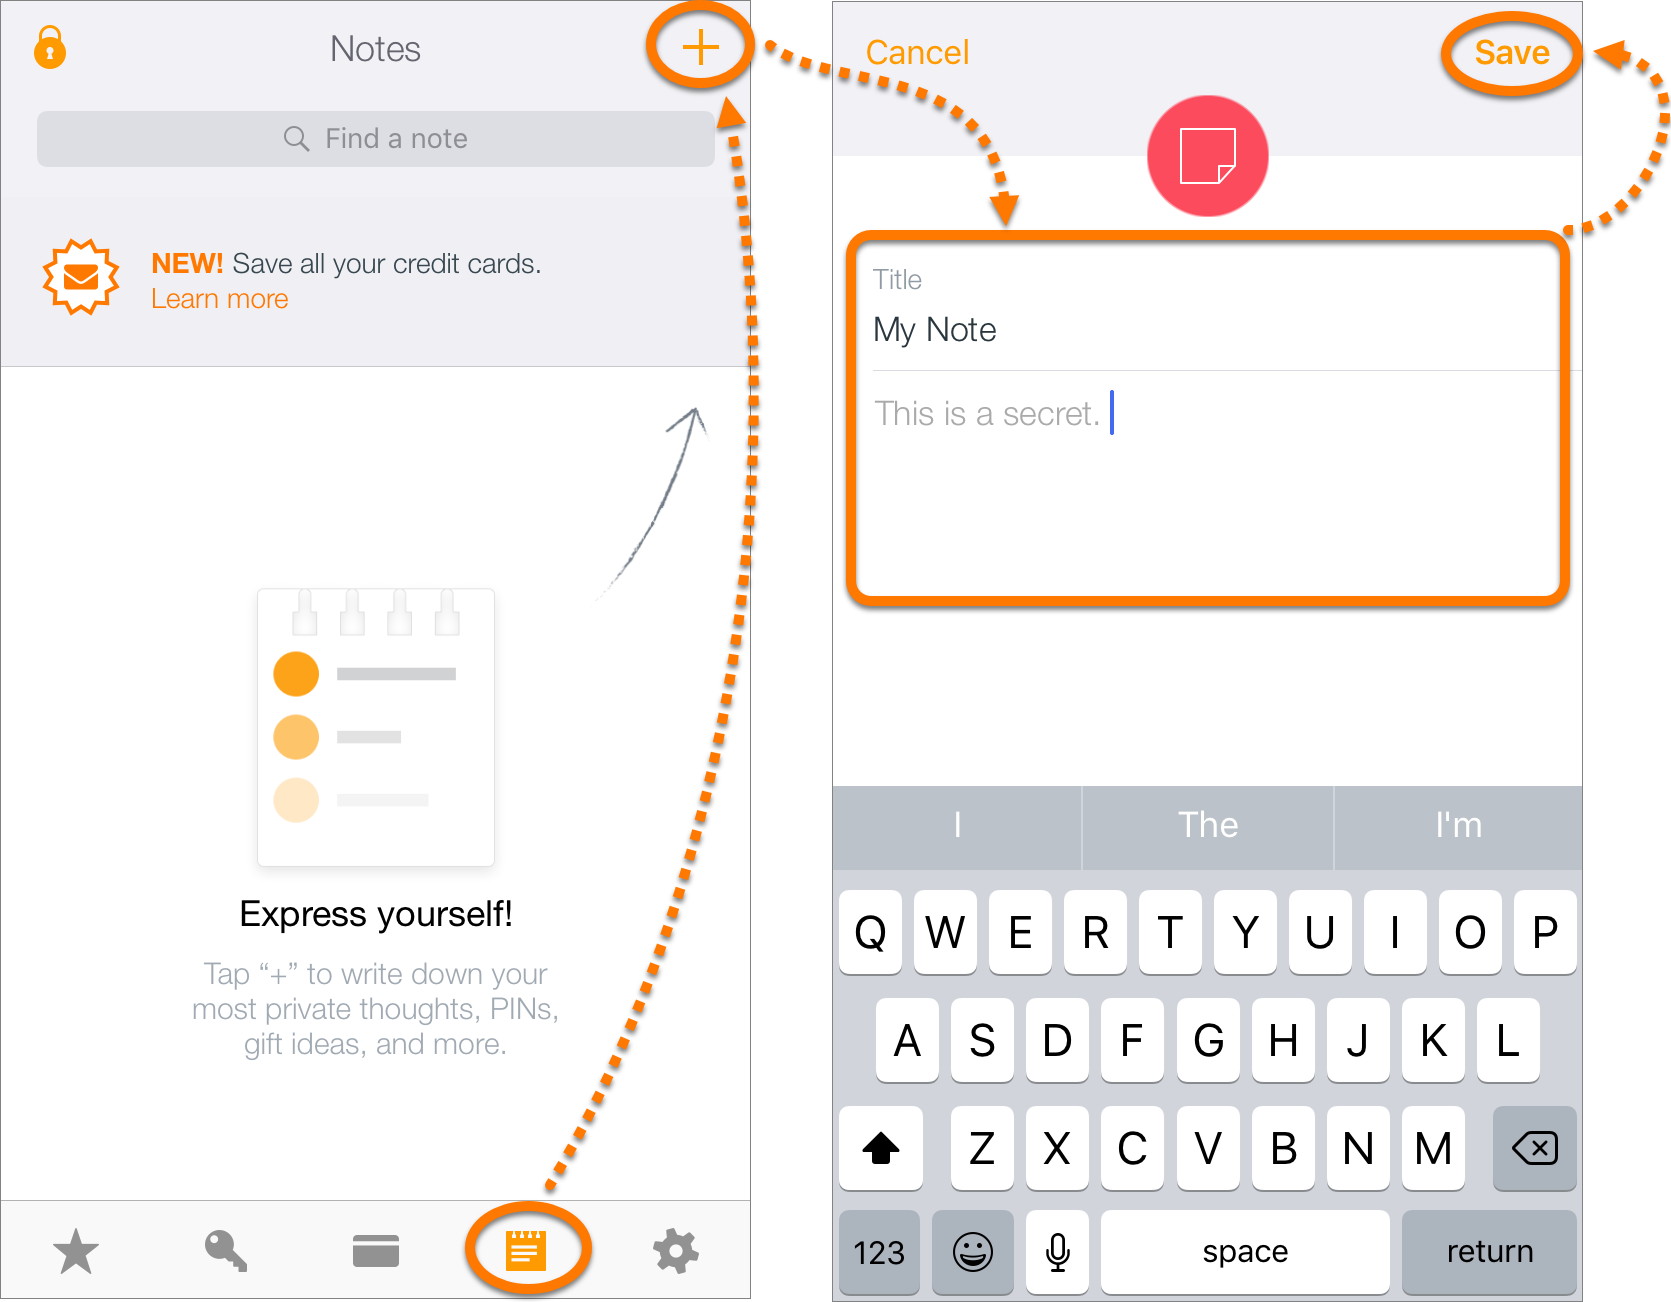
A tile representing your newly added note appears on the Notes screen.
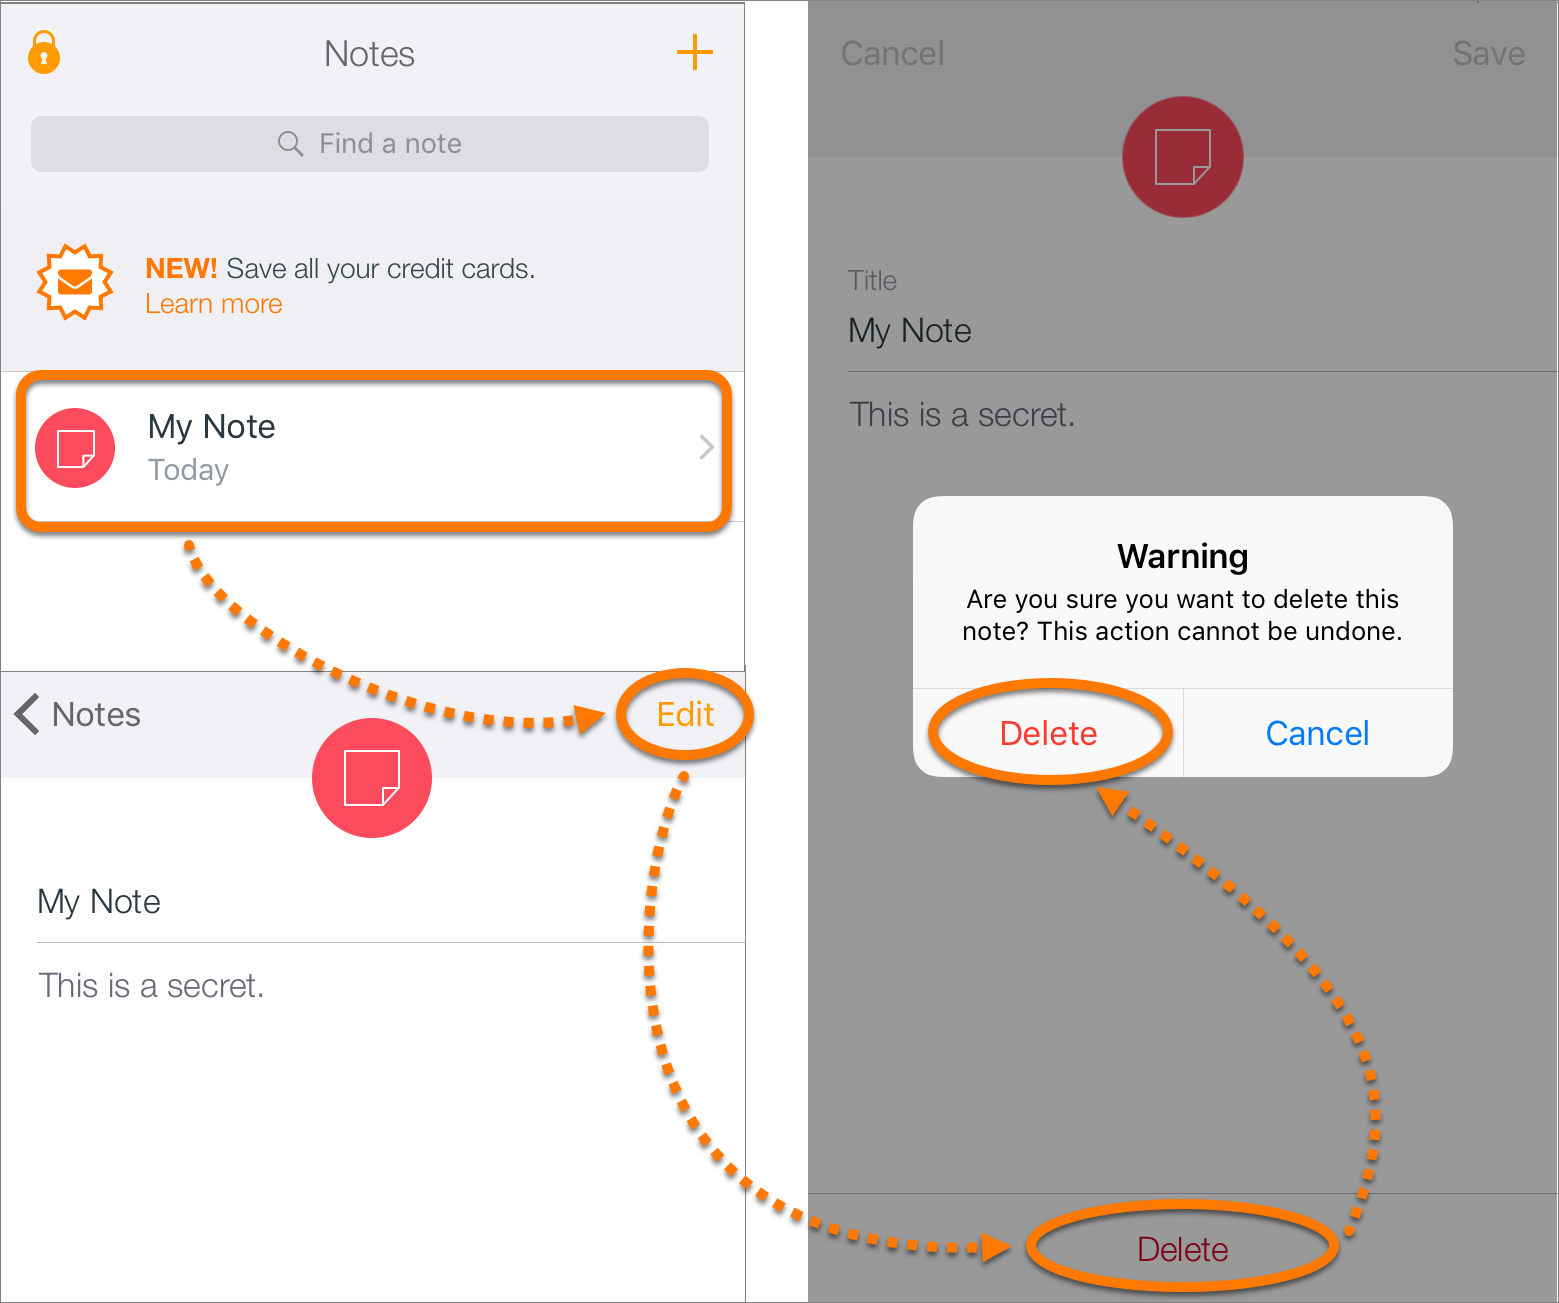
Edit or delete a note
- Tap a note tile to open the note contents.
- Select one of the following options:
- Edit a note: Tap Edit to edit the note contents. Confirm your changes by tapping Save.
- Delete a note: Tap Edit then tap Delete to completely remove the note. Confirm removal by tapping Delete in the dialog box.
- Edit a note: Tap Edit to edit the note contents. Confirm your changes by tapping Save.

Add a note
- Tap the note icon on the main Avast Passwords screen.
- Tap the plus icon and provide the following details:
- Title: a title that will allow you to easily find and recognize your note.
- Note contents: any data that you want to keep secure, such as PIN codes and contact details.
- Tap Save to confirm the data.
A tile representing your newly added note appears on the Notes screen.
Edit or delete a note
- Tap a note tile to open the note contents.
- Select one of the following options:
- Edit a note: Tap Edit to edit the note contents. Confirm your changes by tapping Save.
- Delete a note: Tap Edit then tap Delete to completely remove the note. Confirm removal by tapping Delete in the dialog box.
- Edit a note: Tap Edit to edit the note contents. Confirm your changes by tapping Save.
Log into a website or app with Avast Passwords
- Using either an internet browser or app, open the login page for the account you want to log into. Tap the key icon and enter your Master Password.
- If you have more than one account for the website, select the account you want to log in with. You can also tap the
⋮menu icon (three dots) to select other options.
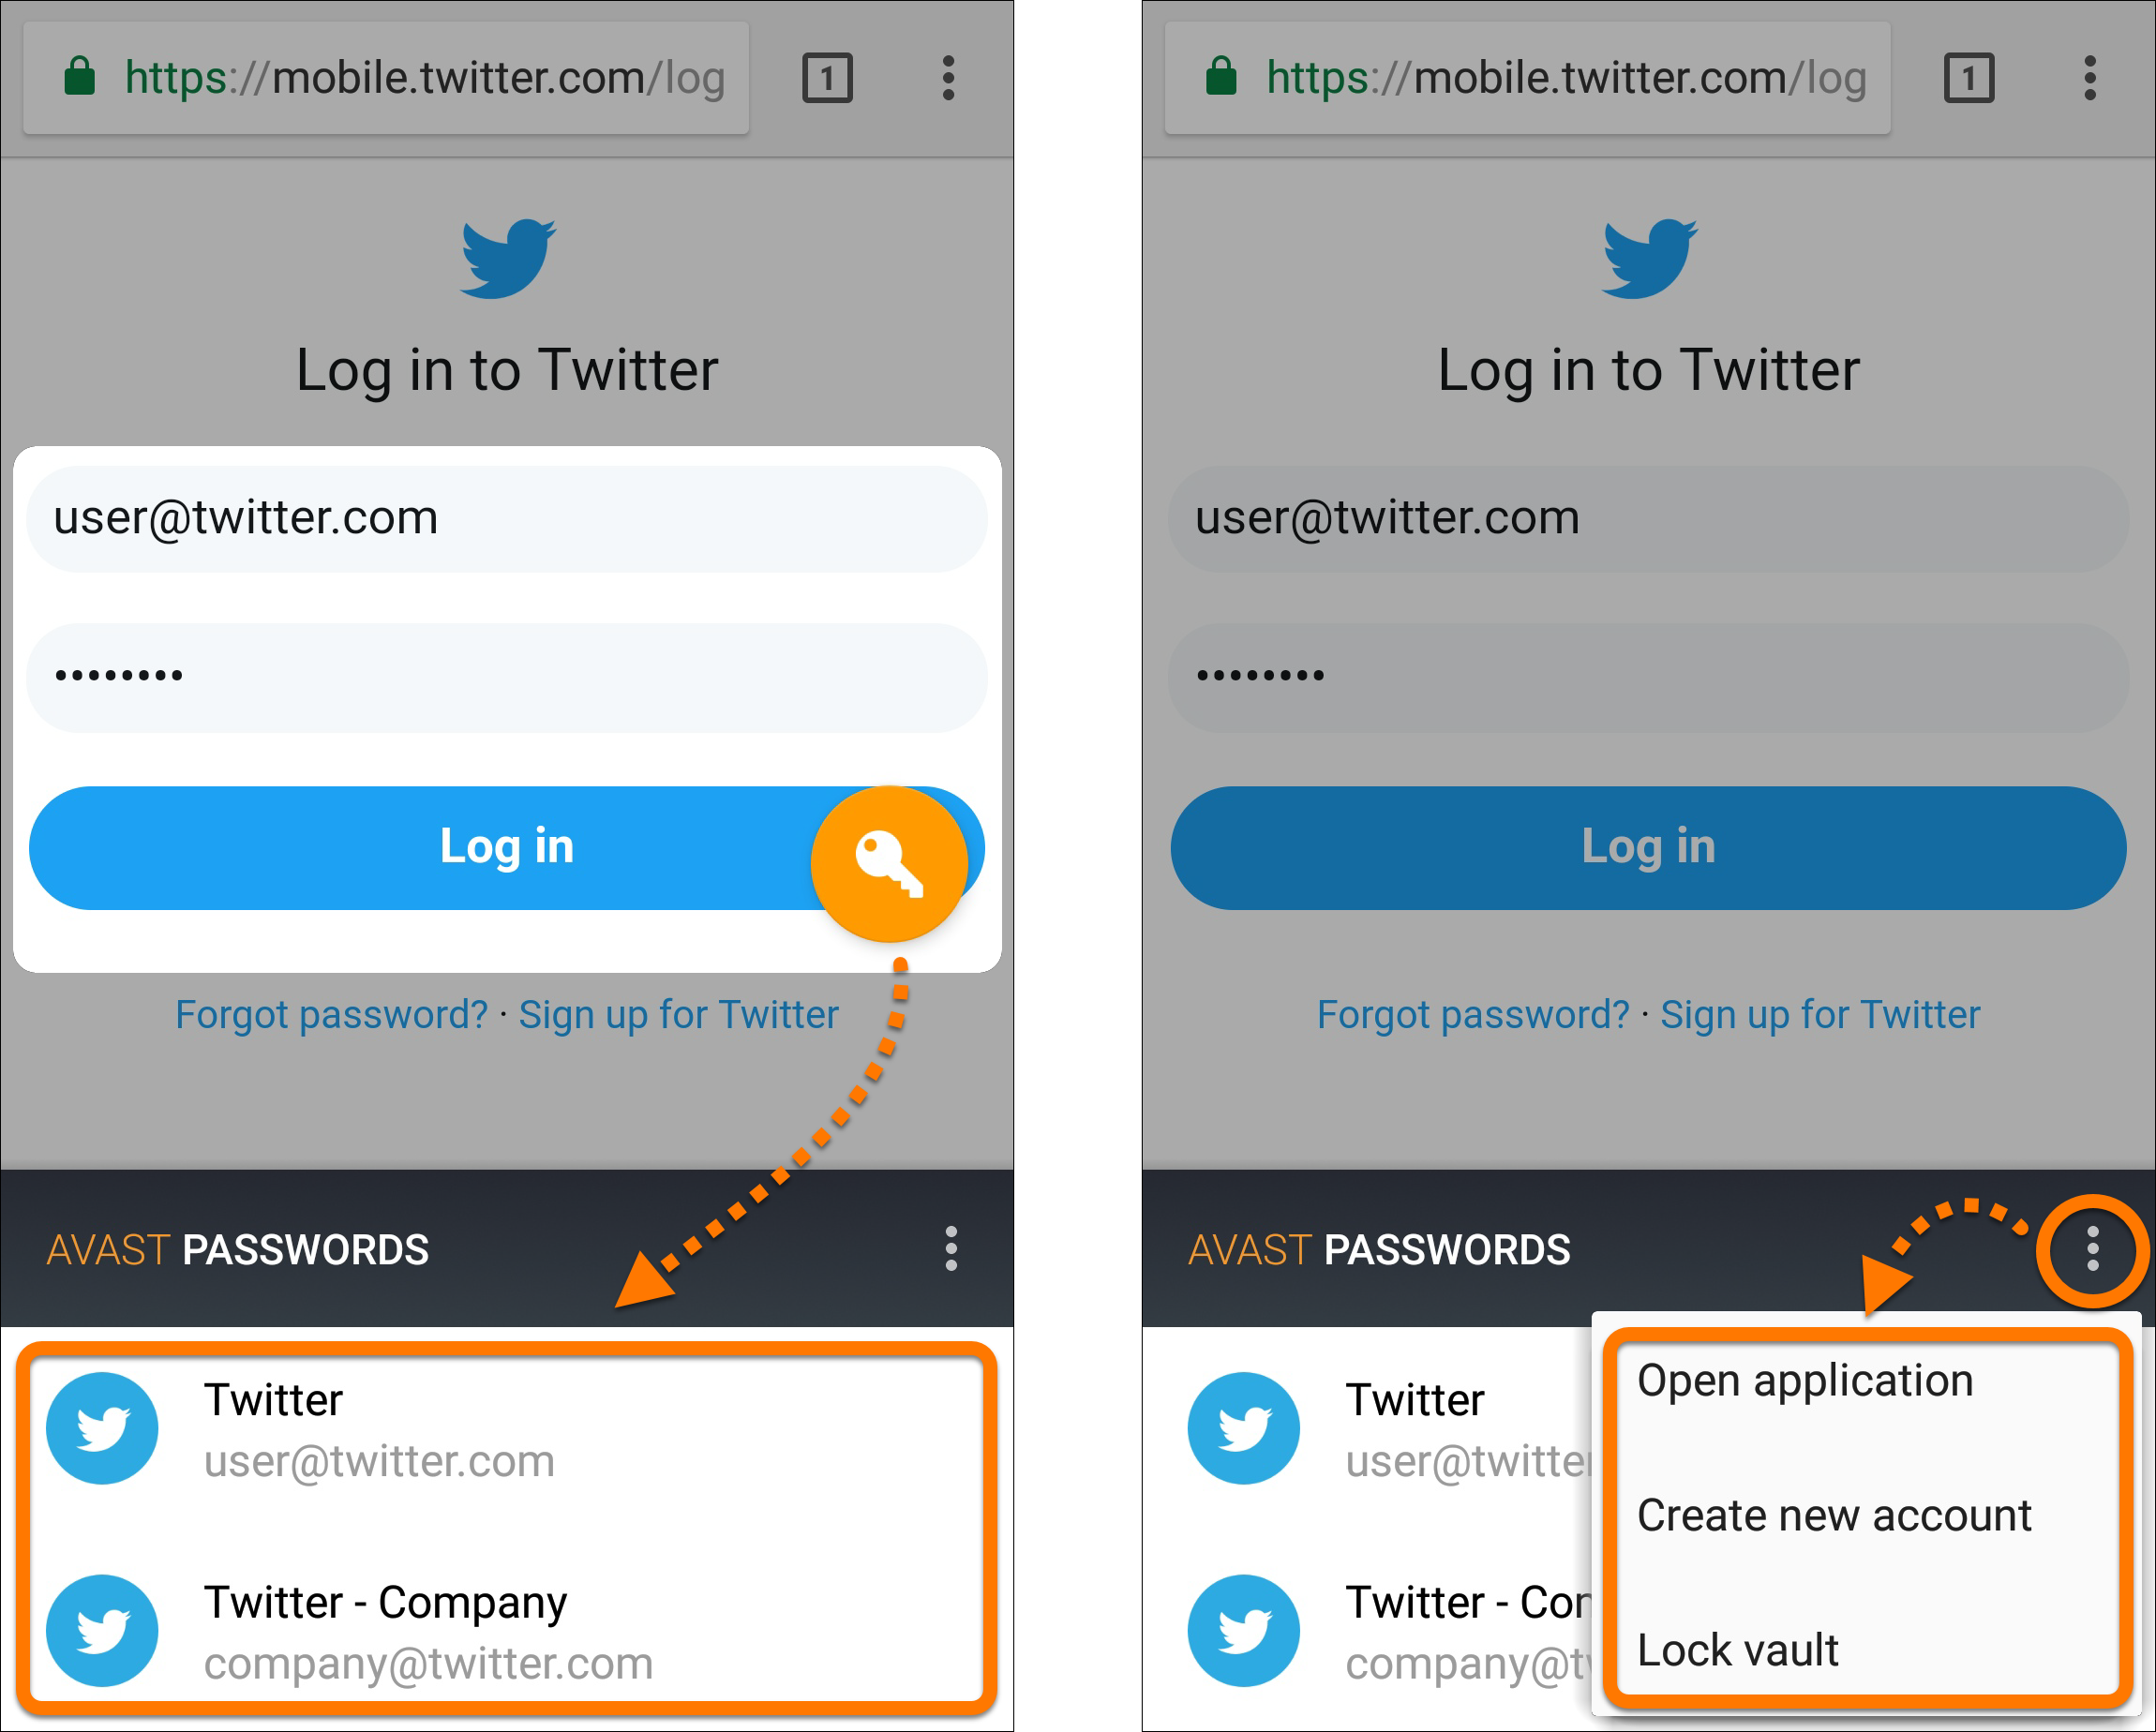
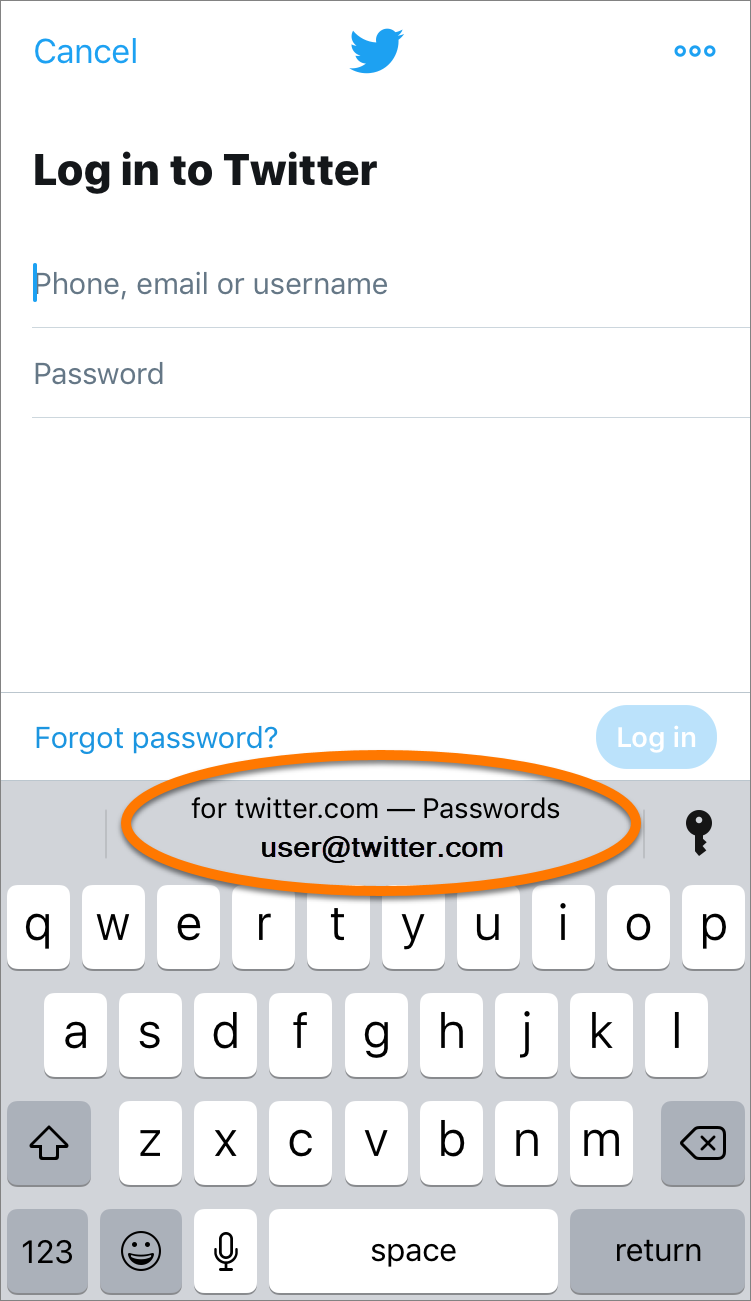
- Using either an internet browser or app, open the login page for the account you want to log into. Tap the share icon and select Avast Passwords.
- Use your Touch ID or enter your Master Password, and tap Unlock to authorize access.
- Tap the account. Your log in details are automatically entered by Avast Passwords. Tap Log in to finish the process.


- Using either an internet browser or app, open the login page for the account you want to log into. Tap your account details to autofill your username and password. Alternatively, if you have more than one account for the website, tap the key icon and select the account you want to log in with. You can also tap Passwords to go to the app and select an account to use or view all logins saved in Avast Passwords.
- Use your Touch ID or enter your Master Password, and tap Unlock to authorize access.
- Your account details are automatically entered by Avast Passwords. Tap Log in to finish the process.
 Alternatively, if you have more than one account for the website, tap the key icon and select the account you want to log in with.
 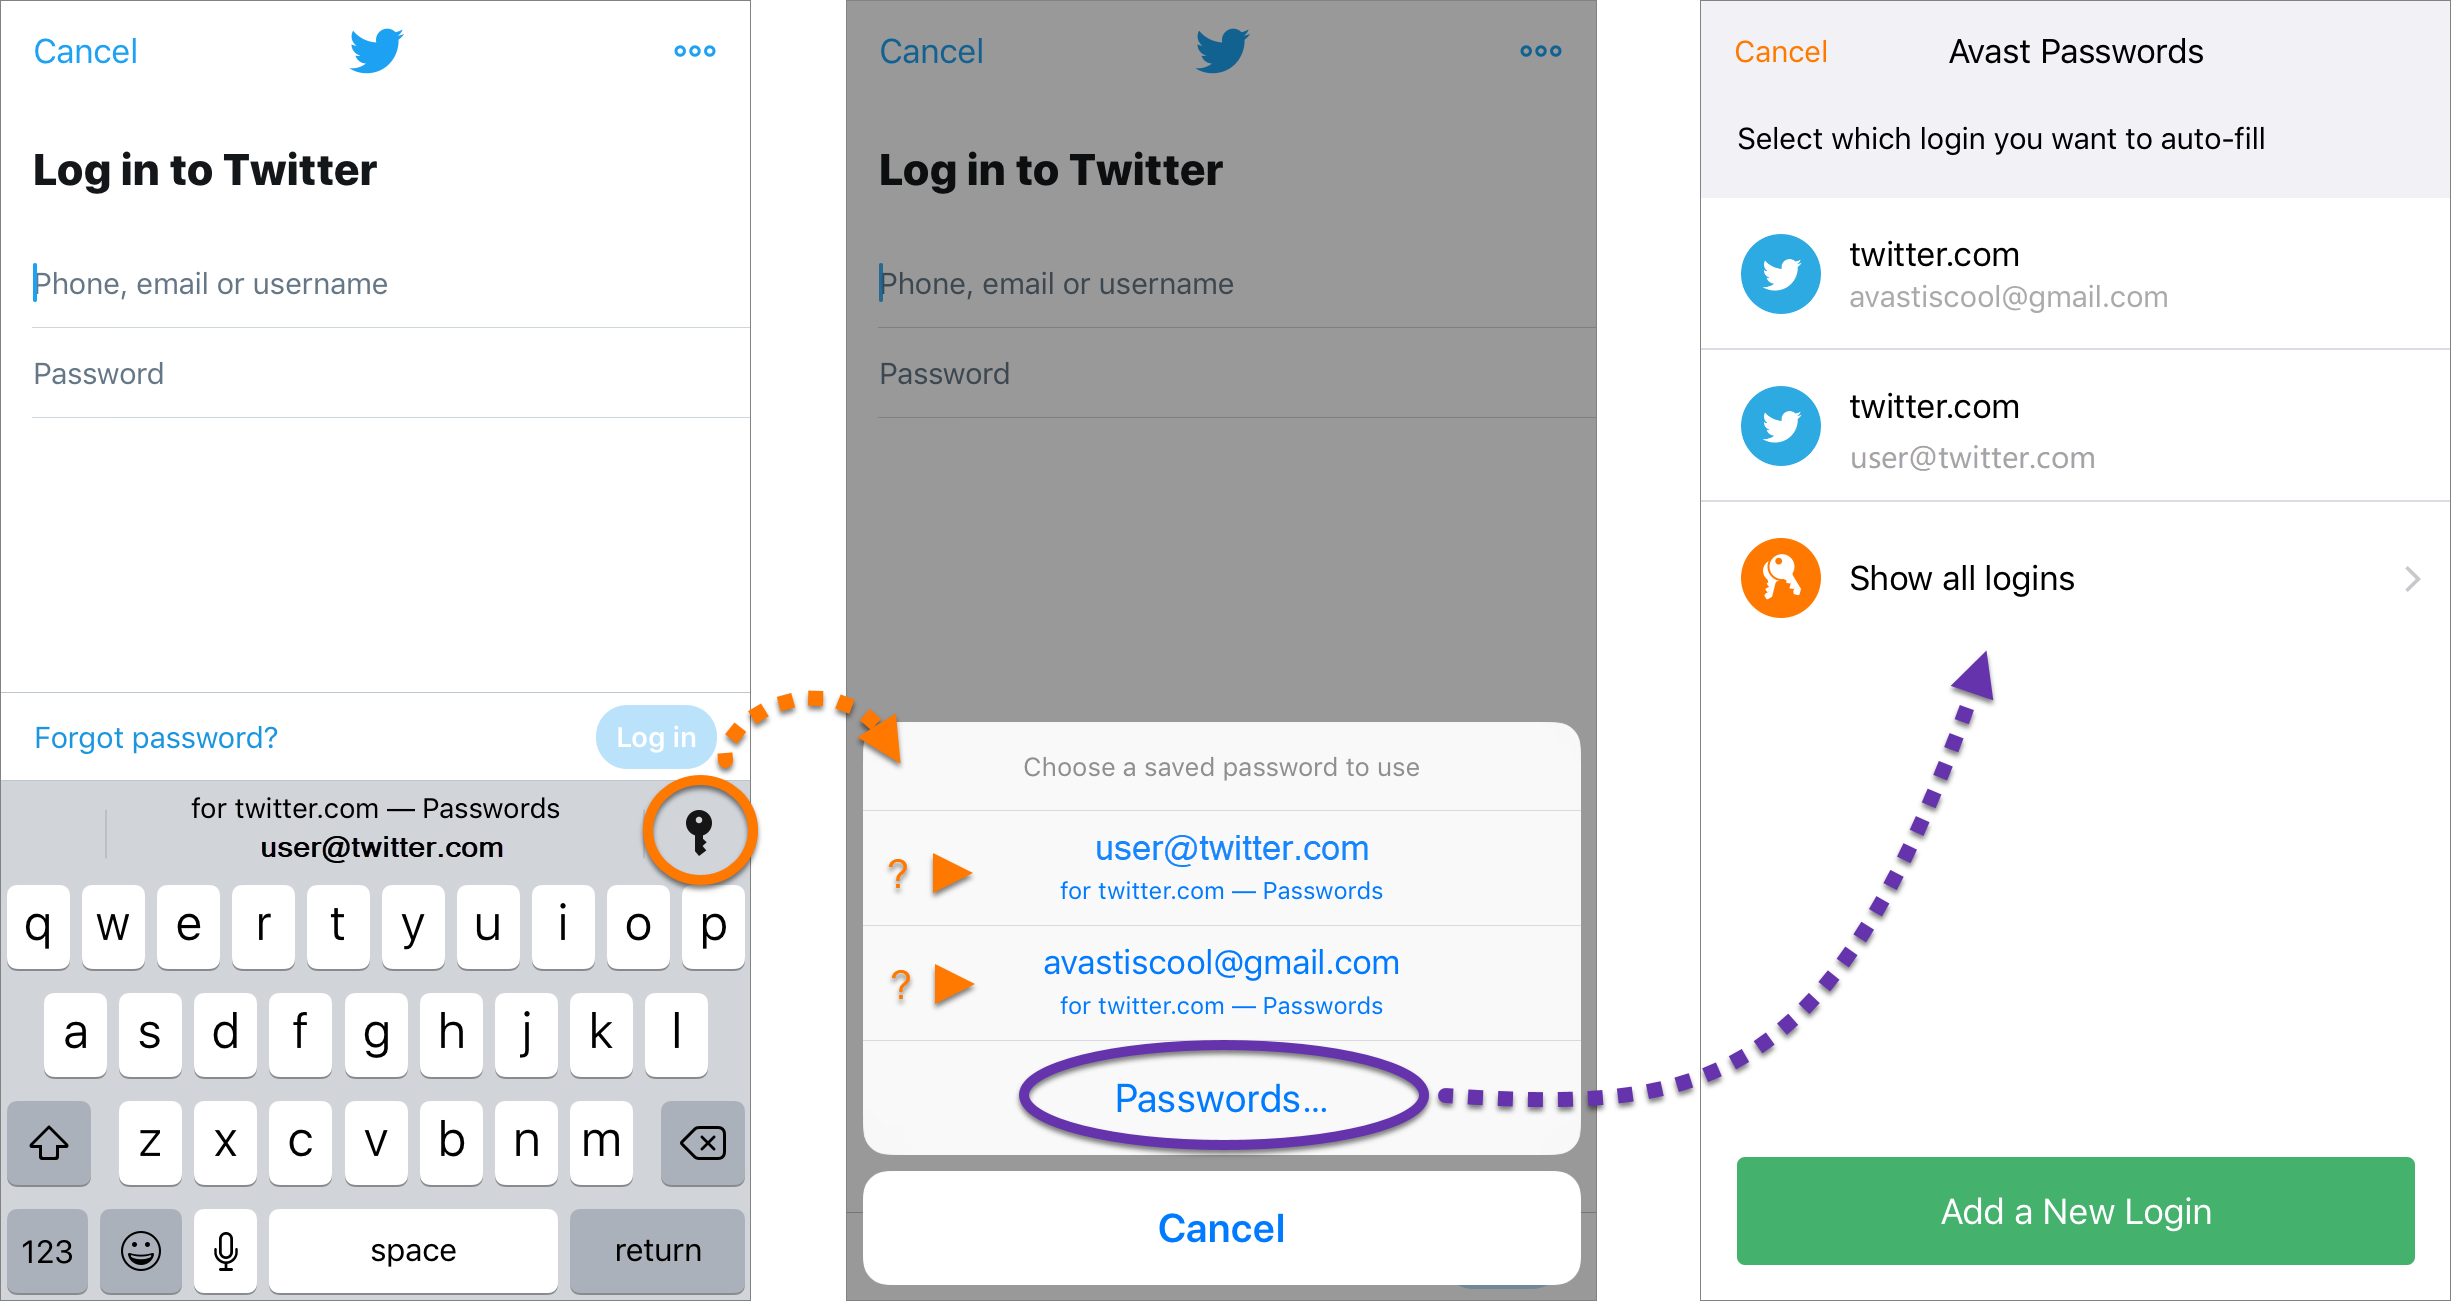 You can also tap Passwords to go to the app and select an account to use or view all logins saved in Avast Passwords.
Adjust Avast Passwords settings
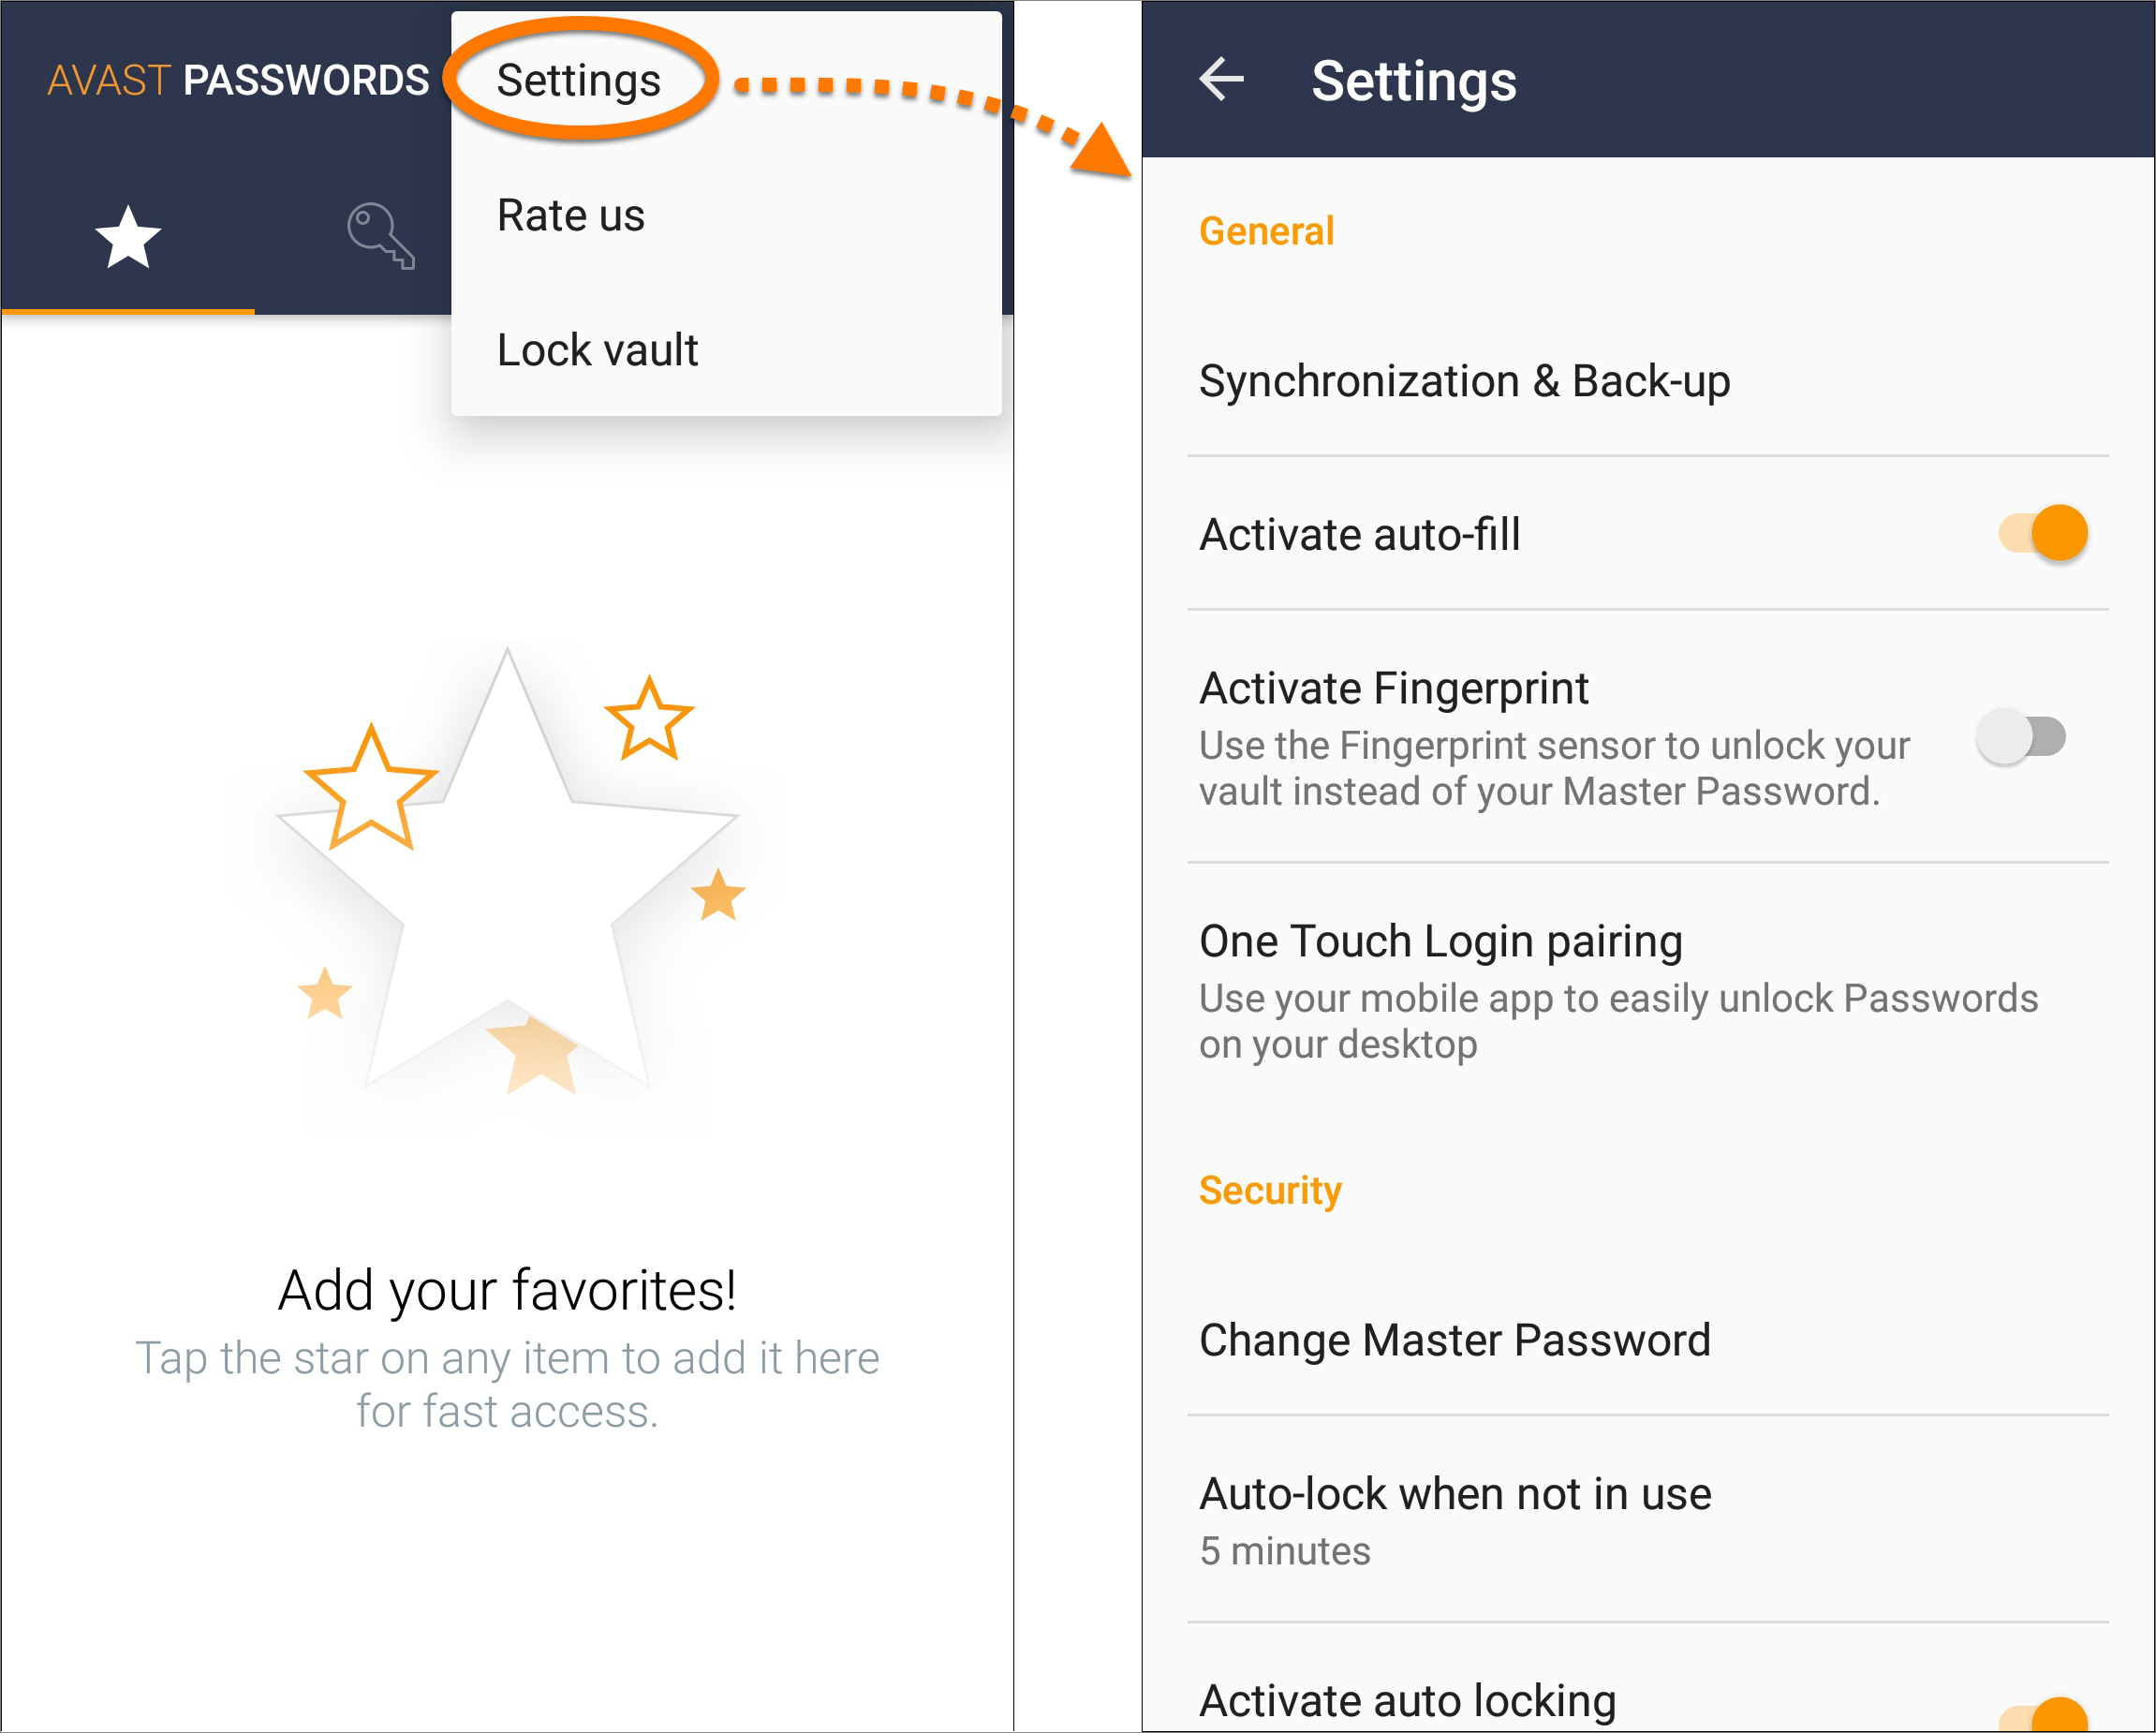
- Tap the
⋮menu icon (three dots) in the top-right corner and select Settings. - The following options are available:
- Synchronization & Back-up: sync your Avast Passwords with your Avast Account so that you can use Avast Passwords across all your devices. For more information about synchronization, refer to the following article:
- Activate auto-fill: enable Avast Passwords to fill out your login details automatically.
- Activate Fingerprint: use Fingerprint instead of Master Password when you log in.
- One Touch Login pairing (a paid feature in Avast Passwords Premium): use your mobile device to log into your online accounts on your PC. For more information, refer to the following article:
- Change Master Password: change your current Master Password.
- Auto-lock when not in use: specify the time period after which Avast Passwords is automatically locked (by default 5 minutes).
- Activate auto locking: lock Avast Passwords 5 seconds after the screen turns off.
- Enable screenshots: enable taking screenshots to send to Avast Support in case of any issues with the app.
- Enable shortcuts: access your account details records quickly by creating a shortcut from the apps screen on your device. When this feature is enabled, tap and hold the Avast Passwords icon on the apps screen of your device to view the last 4 account logins used on your device. Tap an account login to create a shortcut on your home screen to quickly access and edit your account details.
- Tap the Settings icon on the main Avast Passwords screen.
- The following options are available for Avast Passwords:
- Synchronization & Backup: sync your Avast Passwords with your Avast Account so that you can use Avast Passwords across all your devices. For more information about synchronization, refer to the following article:
- One Touch Login (paid feature in Avast Passwords Premium): use your mobile device to log into your online accounts on your PC. For more information refer to the following article:
- Change Master Password: change your current Master Password.
- Touch ID: use Touch ID instead of Master Password when you log in.
- Lock on Exit: lock Avast Passwords after you exit the app.
- Auto-Lock: specify the time period after which Avast Passwords is automatically locked (by default 3 minutes).
- Clear Clipboard: specify the time period after which your clipboard is cleared (by default 30 seconds)
- Autofill: enable Avast Passwords to fill out your login details automatically.

- Tap the Settings icon on the main Avast Passwords screen.
- The following options are available for Avast Passwords:
- Synchronization & Backup: sync your Avast Passwords with your Avast Account so that you can use Avast Passwords across all your devices. For more information about synchronization, refer to the following article:
- One Touch Login (paid feature in Avast Passwords Premium): use your mobile device to log into your online accounts on your PC. For more information refer to the following article:
- Change Master Password: change your current Master Password.
- Touch ID: use Touch ID instead of Master Password when you log in.
- Lock on Exit: lock Avast Passwords after you exit the app.
- Auto-Lock: specify the time period after which Avast Passwords is automatically locked (by default 3 minutes).
- Clear Clipboard: specify the time period after which your clipboard is cleared (by default 30 seconds)

- Avast Passwords 1.x for Android and iOS
- Google Android 5.0 (Lollipop, API 21) or later
- Apple iOS 10.3 or later
Updated on: 20/12/2024