Refer to the sections in this article for instructions on using Avast Passwords on Windows PCs with Avast Antivirus.
Avast Passwords is a password manager that securely stores your login and other sensitive data, making it easier for you to quickly log in to websites and fill in web forms. This article assumes that Avast Passwords is installed and activated on your computer. Refer to the sections below to learn how to use Avast Passwords for Windows.
If you want to configure Avast Passwords on a Mac or mobile device, refer to the following articles:
Set up Passwords
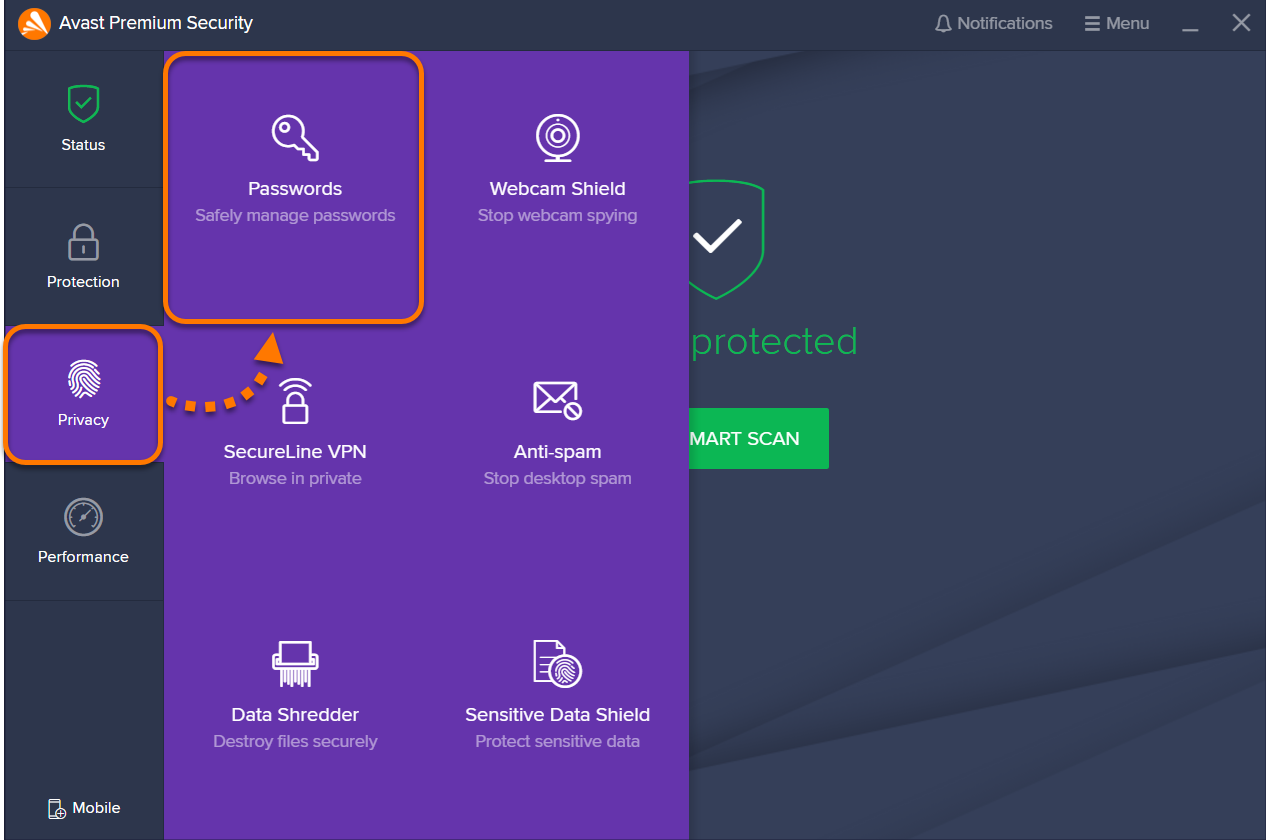
- Open the Avast Antivirus user interface and select Privacy ▸ Passwords.

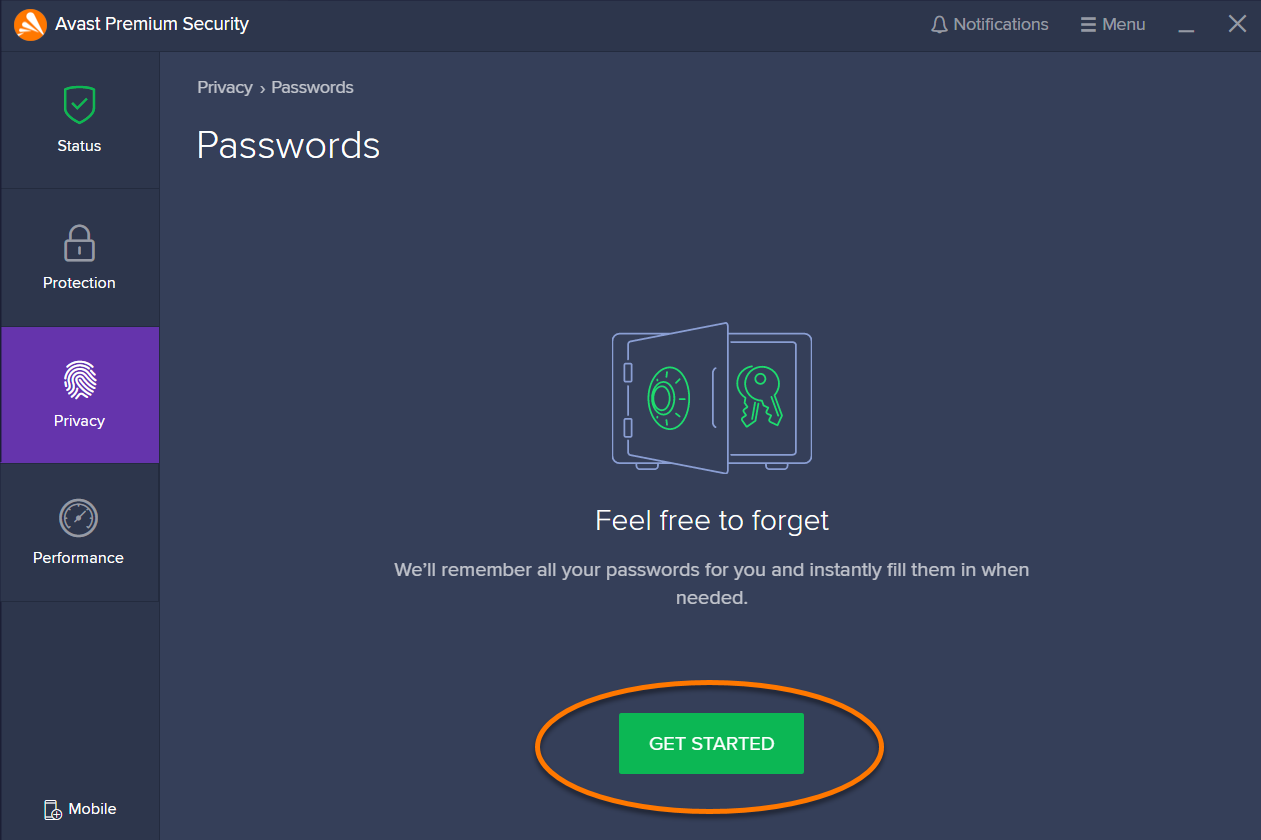
- Click Get Started.

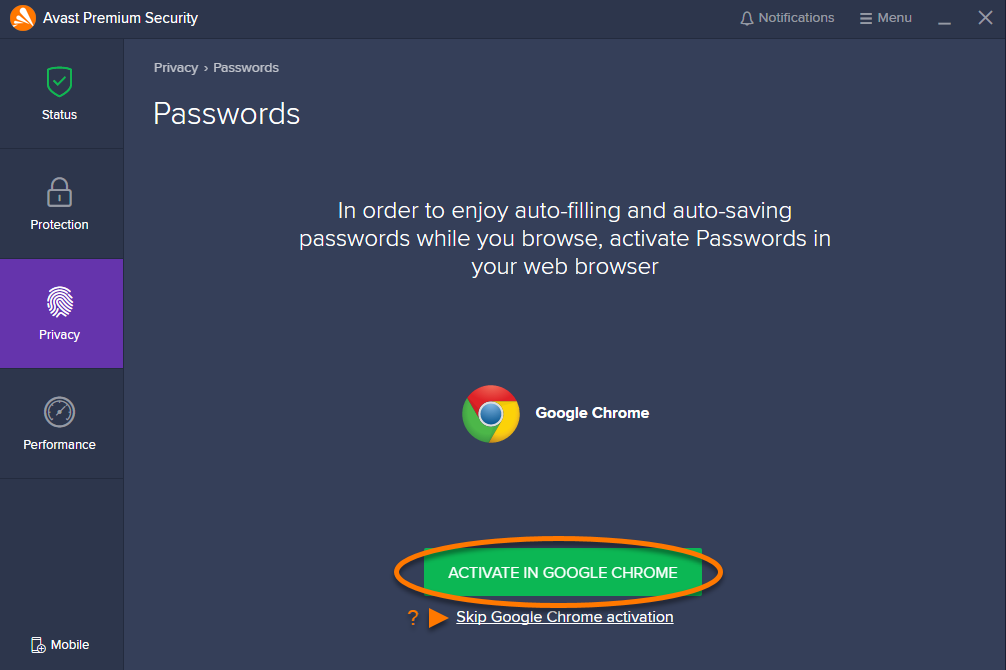
- Click Activate in Google Chrome (if you do not use Google Chrome, click Skip Google Chrome activation) then follow these steps in your browser:

- Click Install in your Google Chrome browser, then click Add extension in the dialog box that appears.

- Click Install in your Google Chrome browser, then click Add extension in the dialog box that appears.
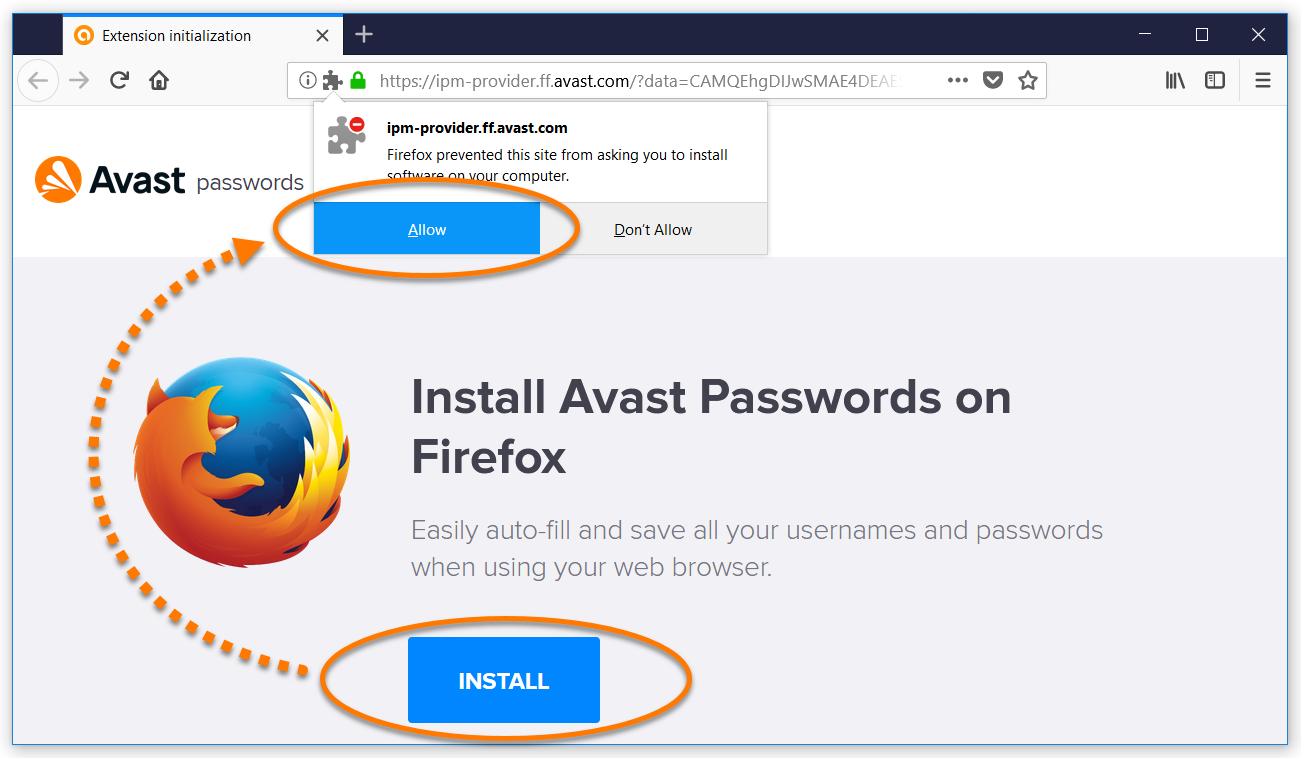
- Click Activate in Firefox (if you do not use Mozilla Firefox, click Skip Firefox activation) and follow these steps in your browser:

- Click Install, then click Allow in the dialog box that appears.

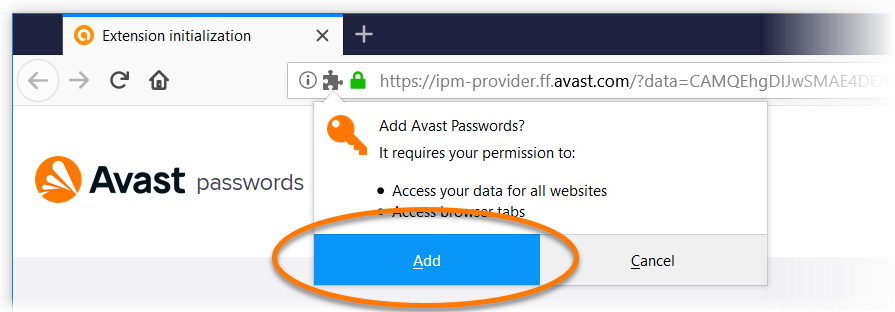
- Click Add.
 A confirmation screen indicates that the extension is Installed.
- Click Install, then click Allow in the dialog box that appears.
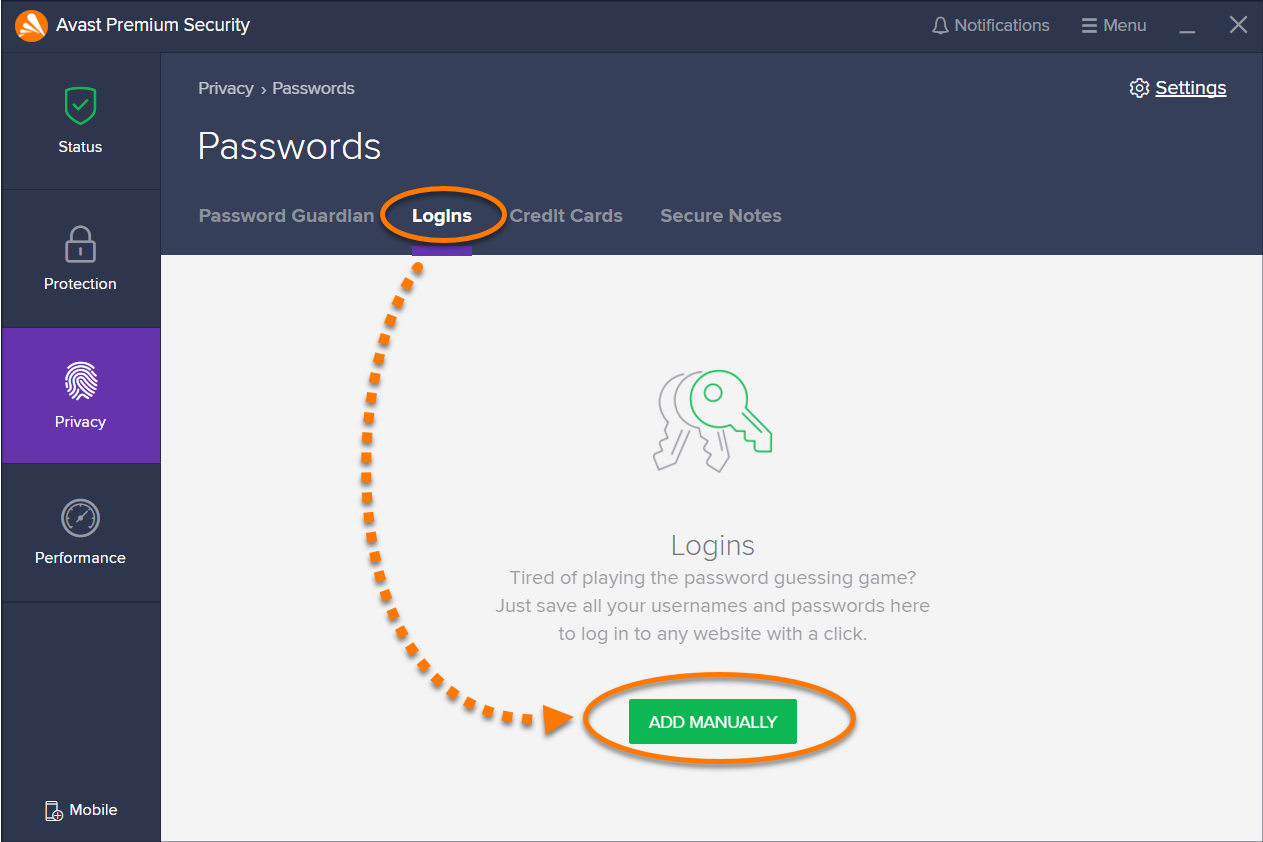
When you activate the Avast Passwords browser extension, the passwords saved in your internet browsers are automatically imported to Avast Passwords. If you do not have any passwords saved in your browsers, click Add Manually (or Add Account) and provide the login details for each of your online accounts.
Manage and add accounts
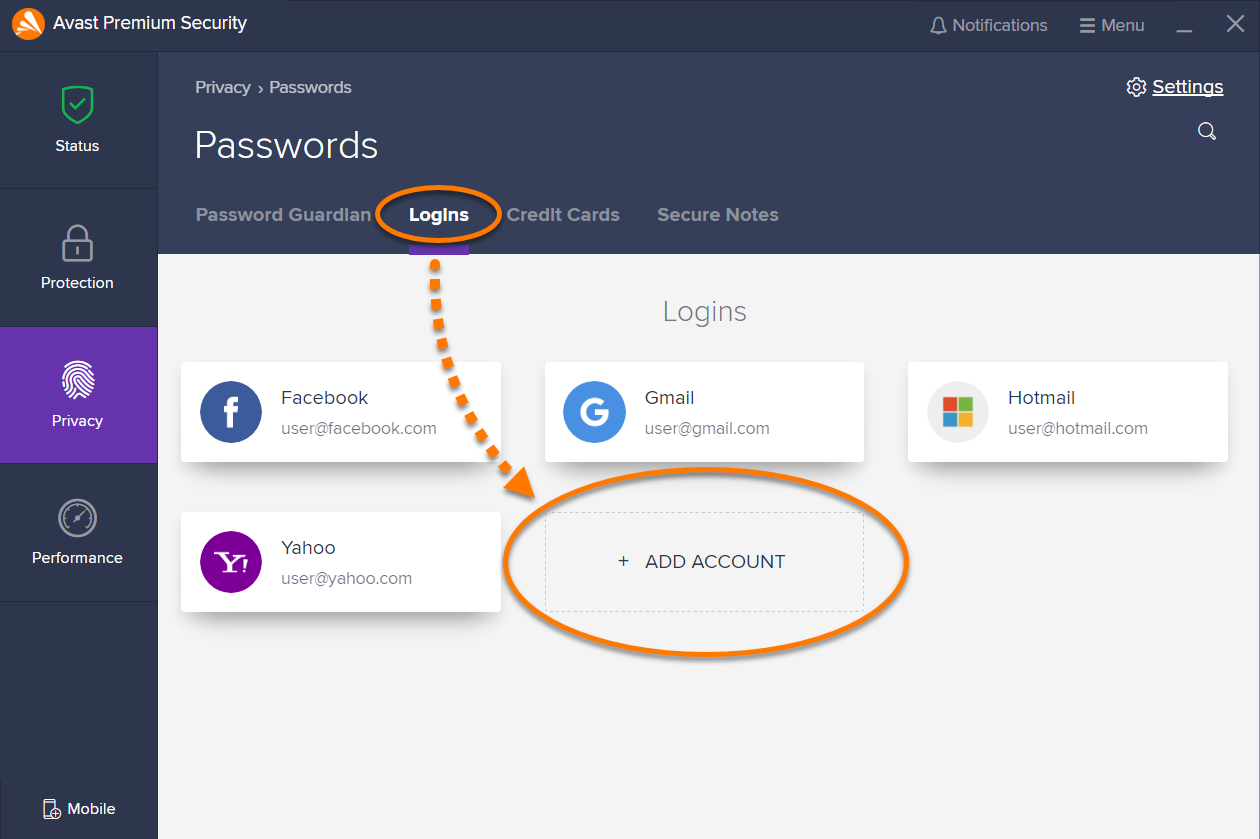
When you log into an online account in your internet browser for the first time, the Avast Passwords browser extension recognizes the new login attempt and offers to save the account details to Avast Passwords. You can view newly added accounts on the Logins tab.
To manually add an account to the Logins screen:
- Click the Logins tab on the Passwords screen.

- Click Add Account (or Add Manually).
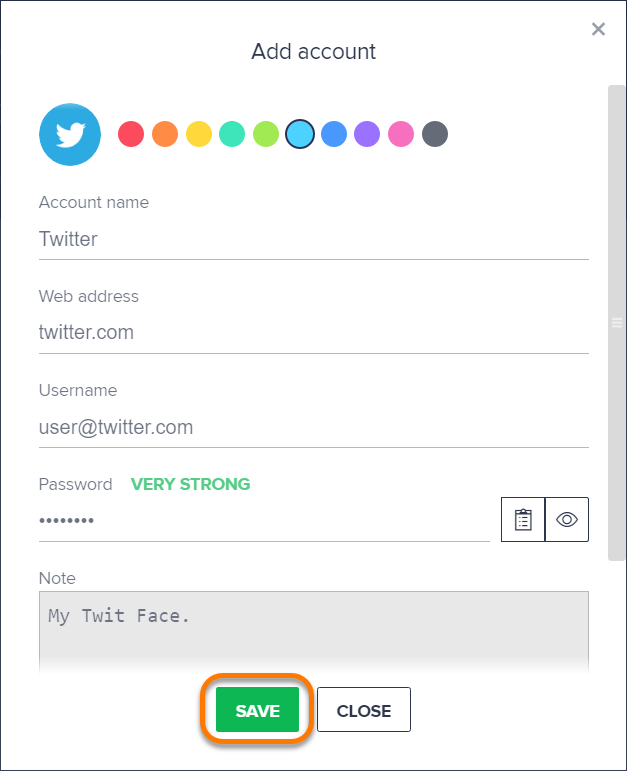
- Optionally select a color for the account (this color appears in the account icon), then provide the following details:
- Account name: a name to easily find and recognize your account on the Logins screen.
- Web address: the website address of the account, for example
https://www.example.com. - Username: the username (often an email address) that you use to log into the account.
- Password: the password that you currently use to log into the account.
- Note: optional information about the account.

- Click Save.
A tile representing your newly added account details appears on the Logins screen. To edit the account's details, click the relevant tile and click Edit. You can then modify the data and click Save, or click Delete to permanently remove the account's tile.
To quickly access an account, click the search icon below Settings and type the Account name to retrieve your account details.
Add and manage your credit card information
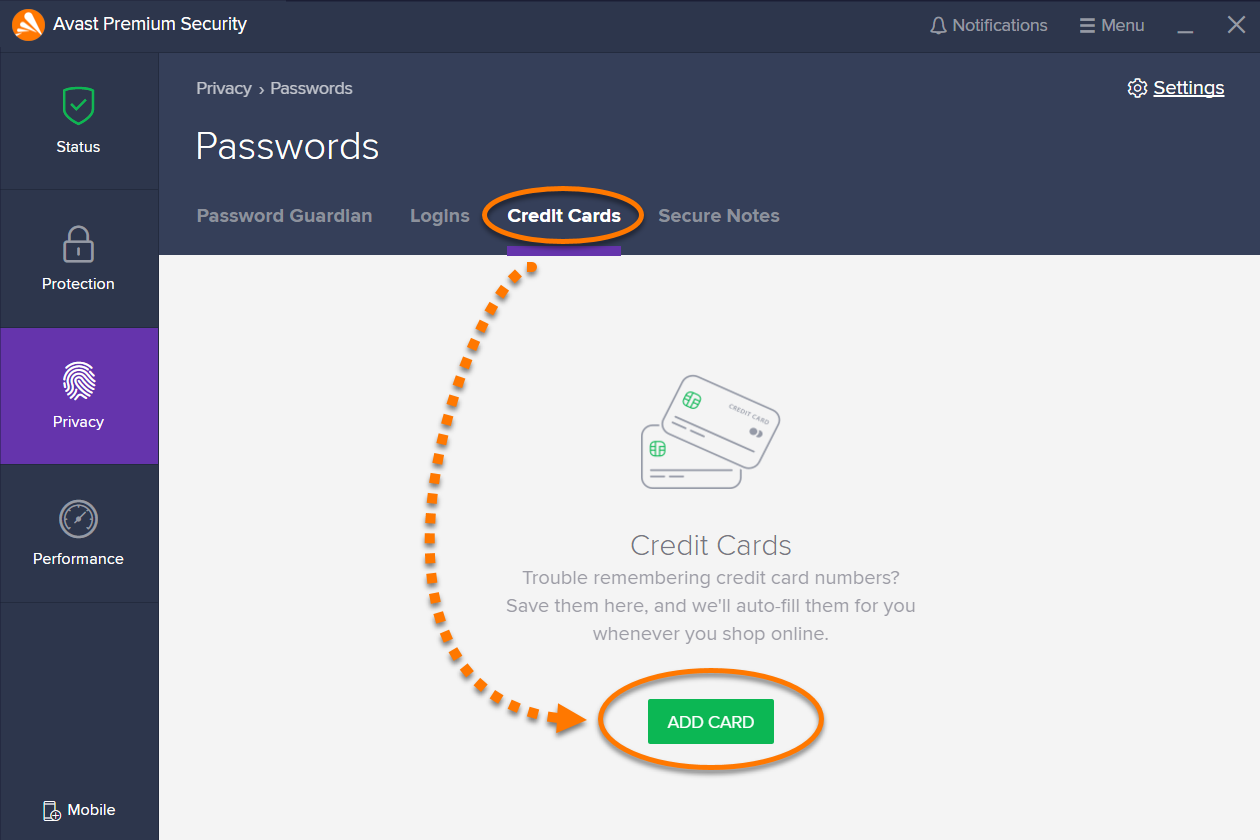
Avast Passwords allows you to add your credit card information so that you can quickly fill in web forms when you pay online. To add a credit card's details:
- Click the Credit Cards tab on the Passwords screen.

- Click Add card.
- Provide the following information:
- Card number: the number displayed on the credit card.
- Custom card name: a name to easily recognize the card, for example American Express.
- Cardholder name: the name displayed on the credit card.
- Expiration date: use the drop-down menus to select the month and year the card expires.
- CVC/CVV: the security code found on the back of your credit card.
- PIN: the personal identification number you use to protect your credit card.
- Note: additional details related to the card.

- Click Save.
A tile representing your newly added credit card appears on the Credit Cards screen. To edit the credit card's details, click the relevant tile and click Edit. You can then modify the data and click Save, or click Delete to permanently remove the credit card's tile.
To quickly access set of card details, click the search icon below Settings and type the Custom card name to retrieve your card details.
Add and manage notes
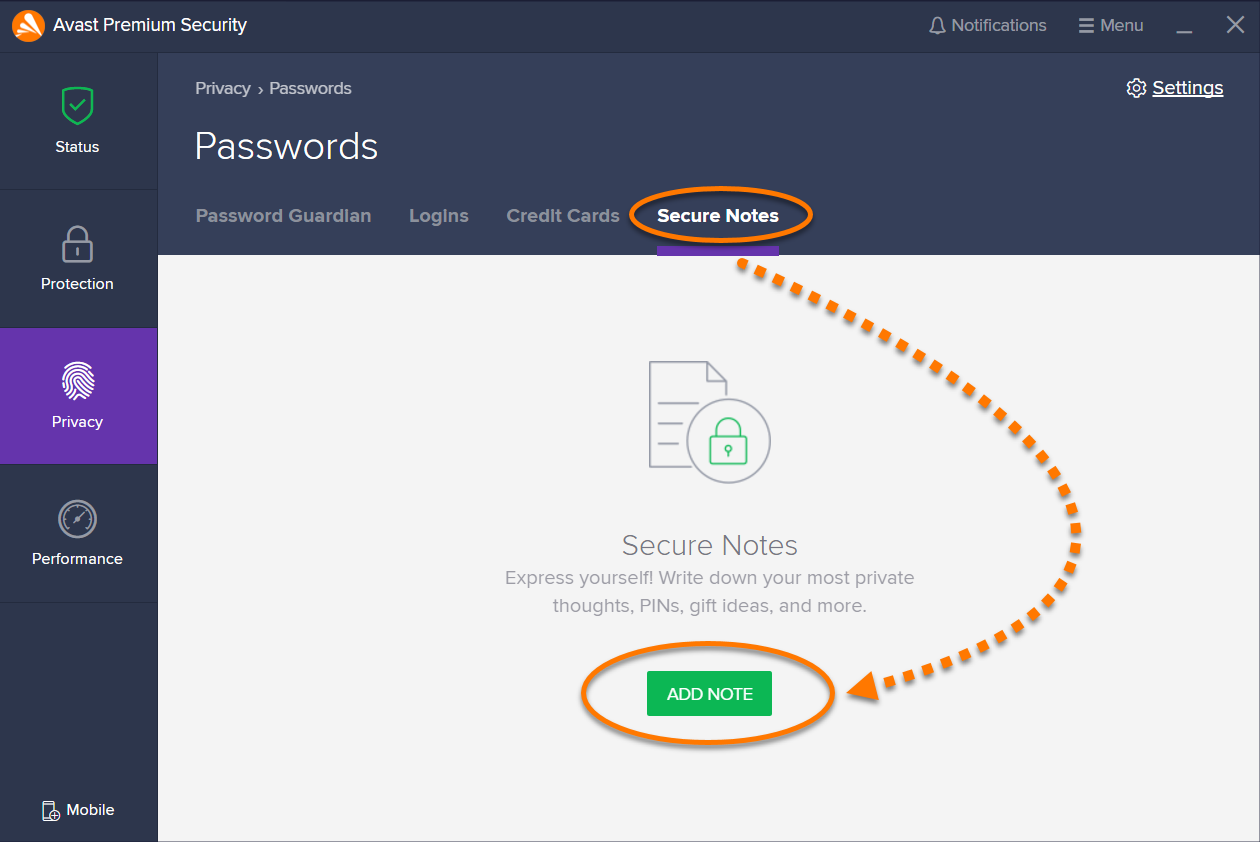
The Secure Notes screen allows you to safely store your sensitive notes in Passwords. This feature protects your confidential information from unauthorized access. To add a new note:
- Click the Secure Notes tab on the Passwords screen.

- Click Add Note.
- Optionally select a color for the note (this color appears on the note's tile), then provide the following details:
- Title: a title to easily find and recognize your note on the Secure Notes screen.
- Note: any content that you want to keep secure, such as PINs and contact details.

- Click Save.
A tile representing your newly added note appears on the Secure Notes screen. To edit the note's details, click the relevant tile and click Edit. You can then modify the data and click Save, or click Delete to permanently remove the note's tile.
To quickly access a note, click the search icon below Settings and type the Title to retrieve your note.
Use the Avast Passwords browser extension
Once you have installed the Passwords extension on your browser, a ![]() Passwords icon (key) is visible next to the search bar in the browser.
Passwords icon (key) is visible next to the search bar in the browser.
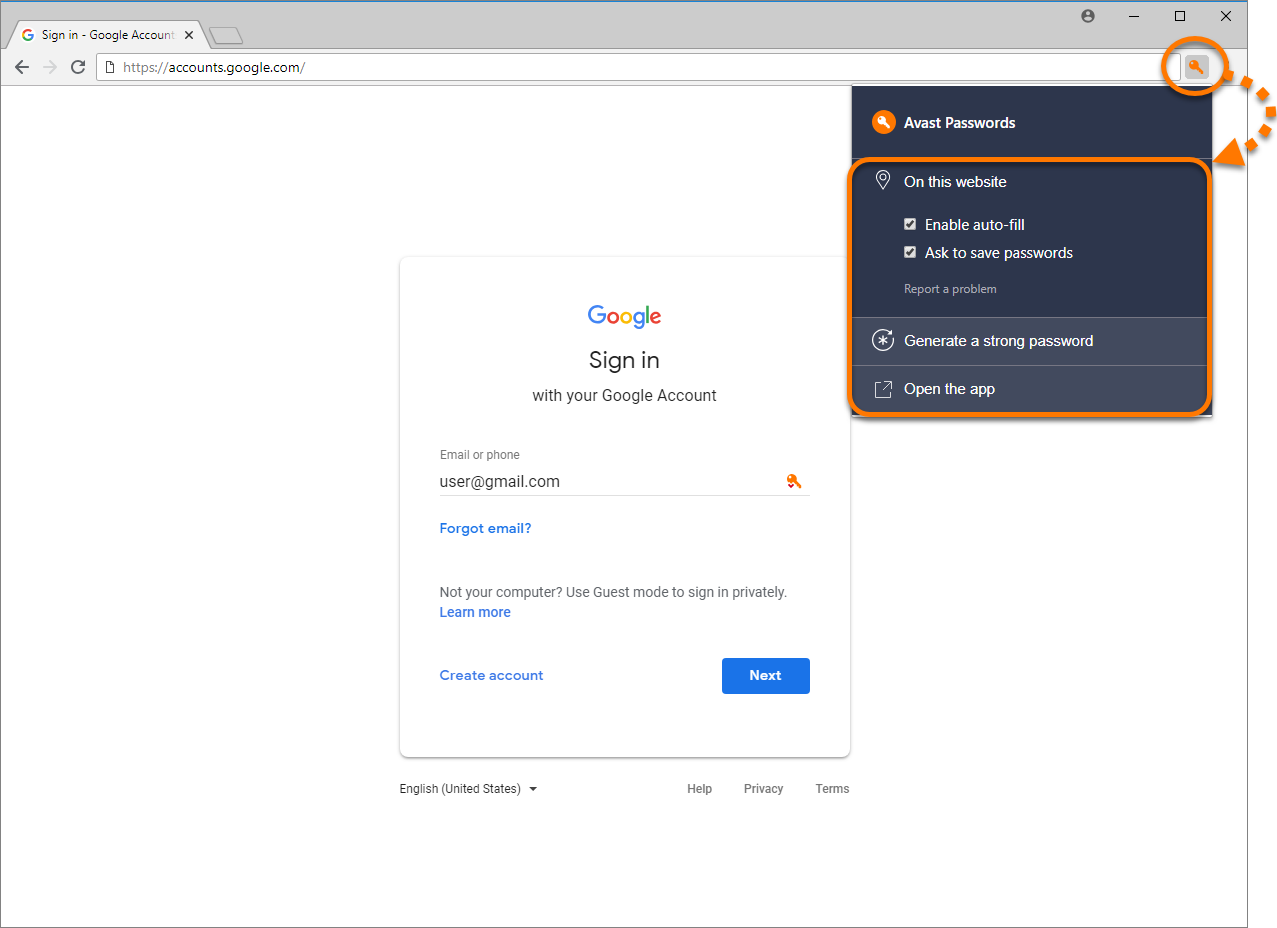
Click the ![]() Passwords icon (key) in your browser to access the following options:
Passwords icon (key) in your browser to access the following options:
- Enable auto-fill: tick to enable Passwords to automatically fill in your login credentials or credit cards information when you log into your online accounts or pay online.
- Ask to save passwords: tick to enable Passwords to offer to save your login credentials each time you access a new online account.
- Generate a strong password: automatically creates a strong password. Click the refresh icon to generate a new password.
- Open the app: click to open the passwords screen in Avast Antivirus.
When you log into an online account in your internet browser which is already stored in Avast Passwords, the ![]() Passwords icon (key) is visible next to your Username.
Passwords icon (key) is visible next to your Username.
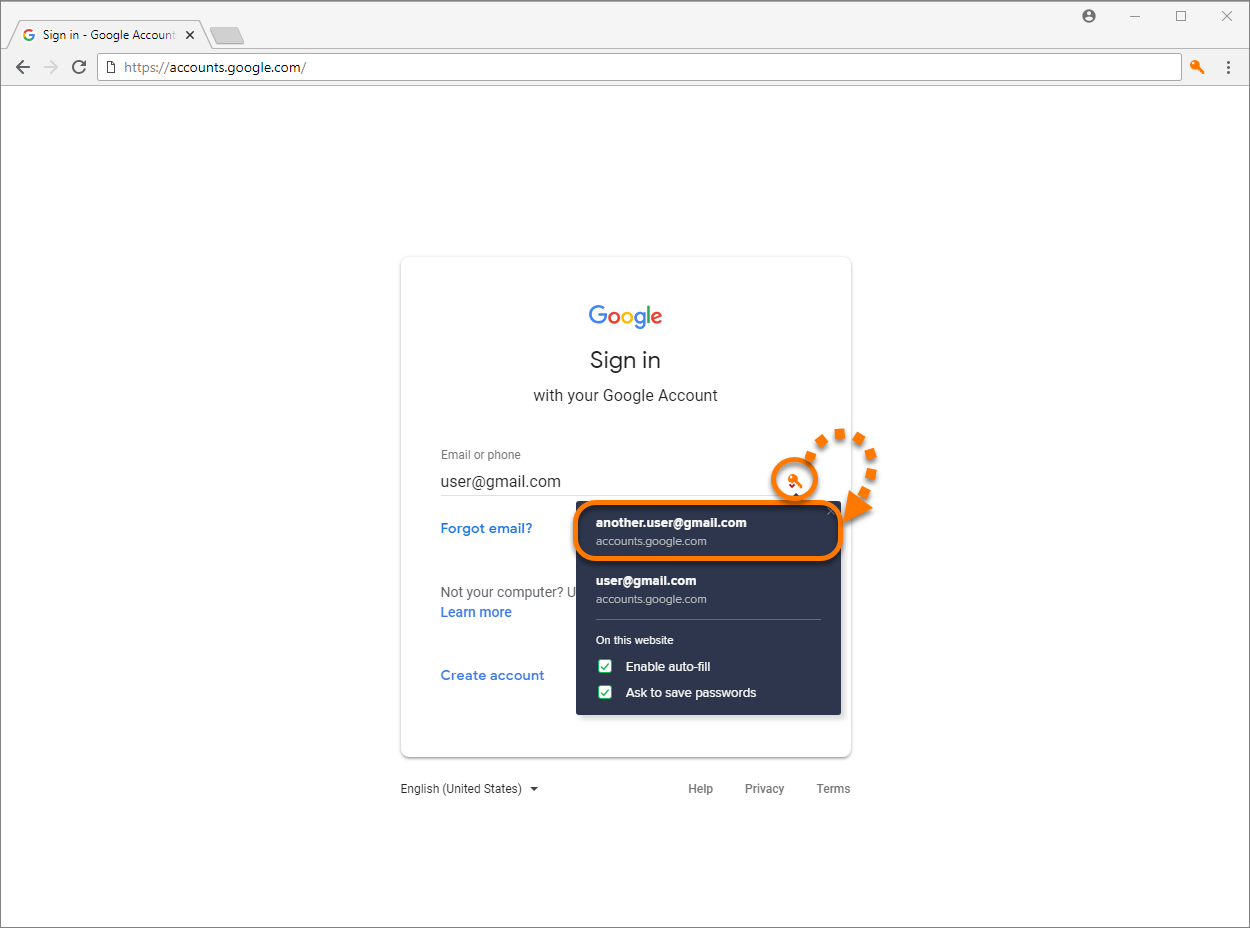
Click the ![]() Passwords icon (key) next to your Username to switch between accounts if you have more than one account linked to the same web address.
Passwords icon (key) next to your Username to switch between accounts if you have more than one account linked to the same web address.
Create a Master Password
You can create a Master Password to protect data you store in Passwords as well as to log into all of your accounts using a single password. To configure your Master Password:
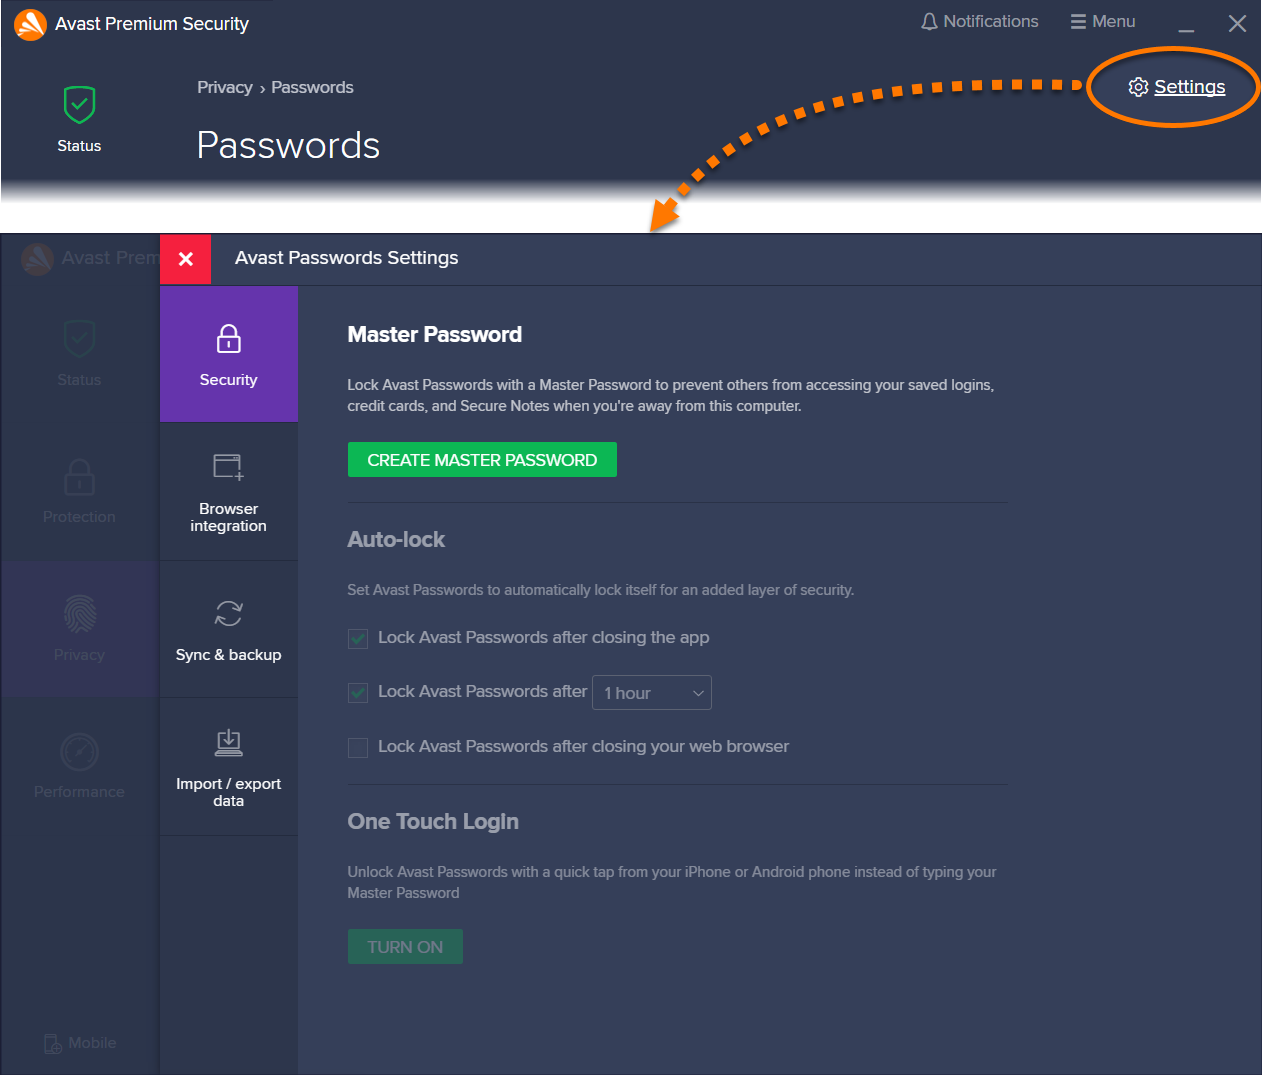
- Click Settings on the Passwords screen.

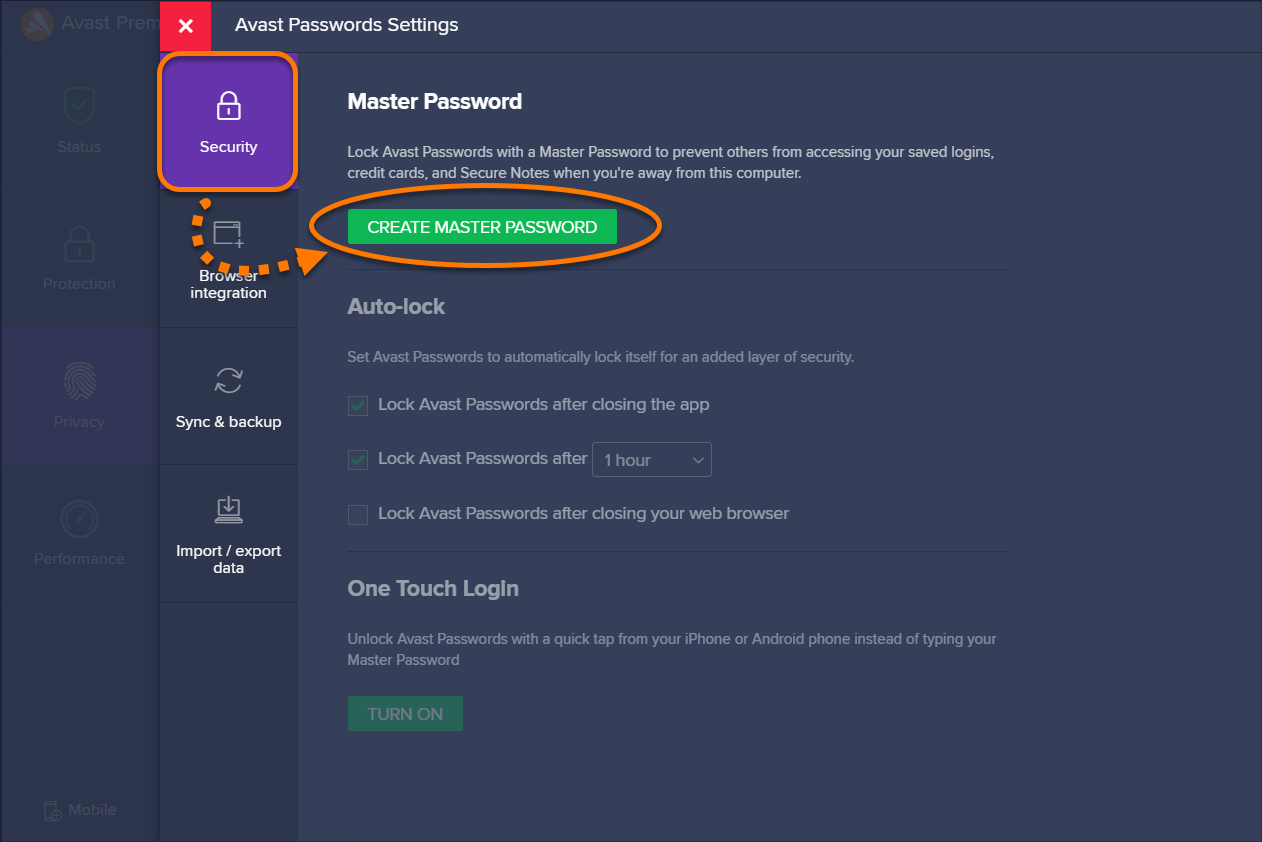
- Select the Security tab, then click Create Master Password.

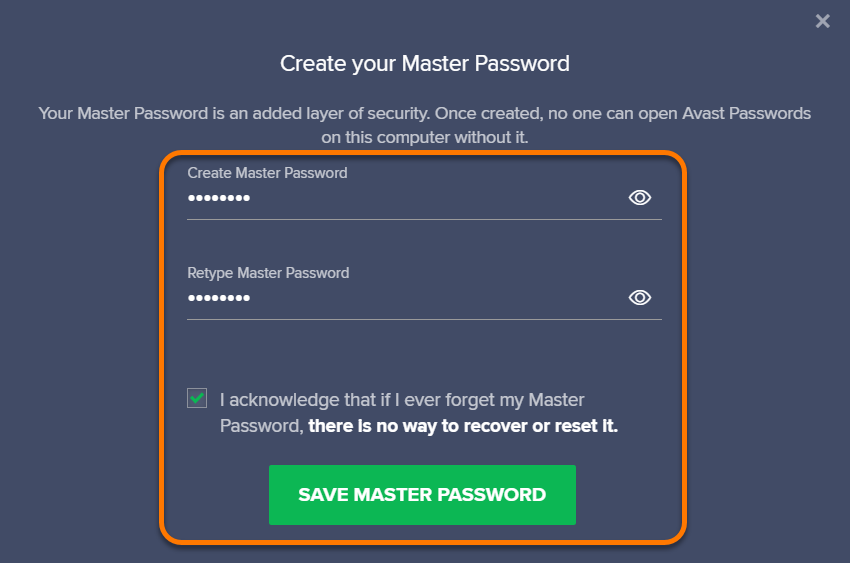
- Type and re-type the password you want to use as your Master Password into the text boxes.

- Tick the box next to the acknowledgement dialog, then click Save Master Password.
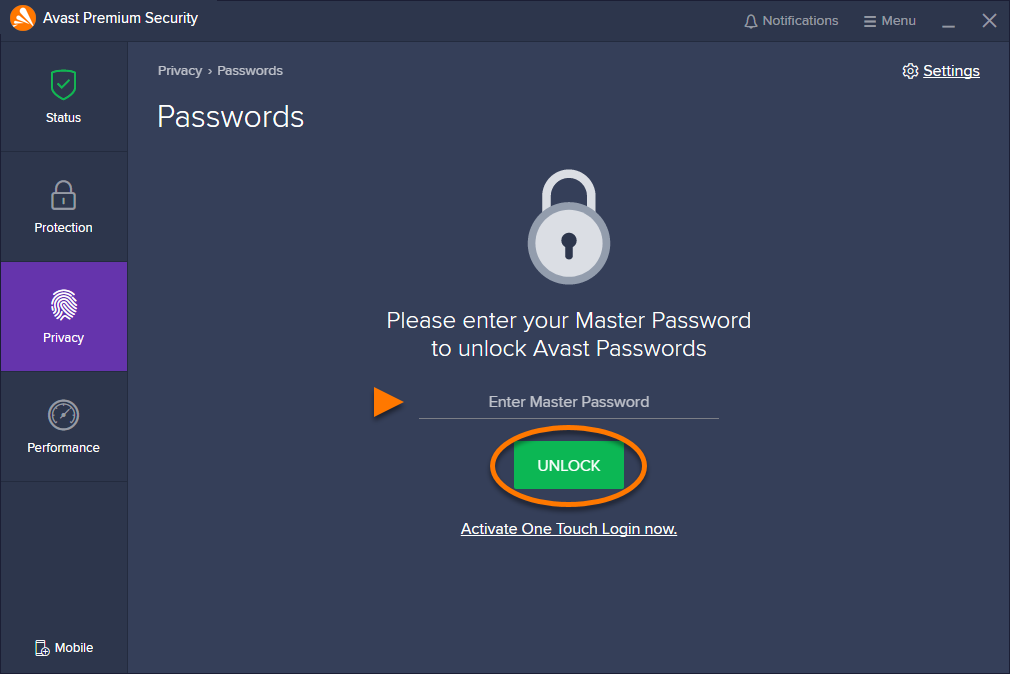
After creating a Master Password, Lock appears next to Settings in the top-right corner of the main Avast Passwords screen. Click Lock to immediately lock your account. To unlock your account from the lock screen, enter your Master Password and click Unlock.
- Resetting Avast Passwords to defaults (to delete all data stored in Avast Passwords and start over)
- Restoring your Avast Passwords data using a backup (to retrieve your Passwords data if you enabled synchronization)
Set up synchronization and backup
To make accessing your online accounts easier, synchronize the data stored in Avast Passwords across all of your devices using your Avast Account. For more information, refer to the following article:
Activate Avast Passwords premium features
Upgrade to Avast Ultimate or the paid version of Avast Passwords to unlock the following premium features:
- Password Guardian notifies you if any of the passwords you save to Avast Passwords become compromised.
- One Touch Login allows you to quickly access the data on your PC by tapping the screen of your mobile device when your PC and mobile device are within close proximity.
After you purchase Avast Ultimate or the paid version of Avast Passwords, you can activate your subscription in Avast Antivirus with the activation code included in your order confirmation email. For detailed information, refer to the following article:
Adjust Avast Passwords settings
- Click Settings on the Passwords screen.

- Click the relevant tab from the left-side panel to manage the following:
- Security: click Create Master Password to set a password that you enter each time you want to access any information stored in Passwords. After you create your Master Password, use the tick boxes to specify how and when you want to secure the Passwords feature. If you use Avast Passwords Premium or Avast Ultimate, click Turn On in the One Touch Login section to use your mobile device to log into your online accounts. For more information, refer to the following article:
- Browser integration: click Add Extension next to the internet browsers you want to use Passwords with.
- Sync & backup: sync your Passwords with your Avast Account so that you can use Passwords across all your devices. For more information about synchronization, refer to the following article:
- Import / export data: click Import to import passwords from your browser or Avast EasyPass (discontinued). Click Export to export passwords from Avast Passwords. For detailed information, click See how or refer to the following articles:
- Click the
Xicon to close the settings screen.
Use Password Guardian (premium feature)
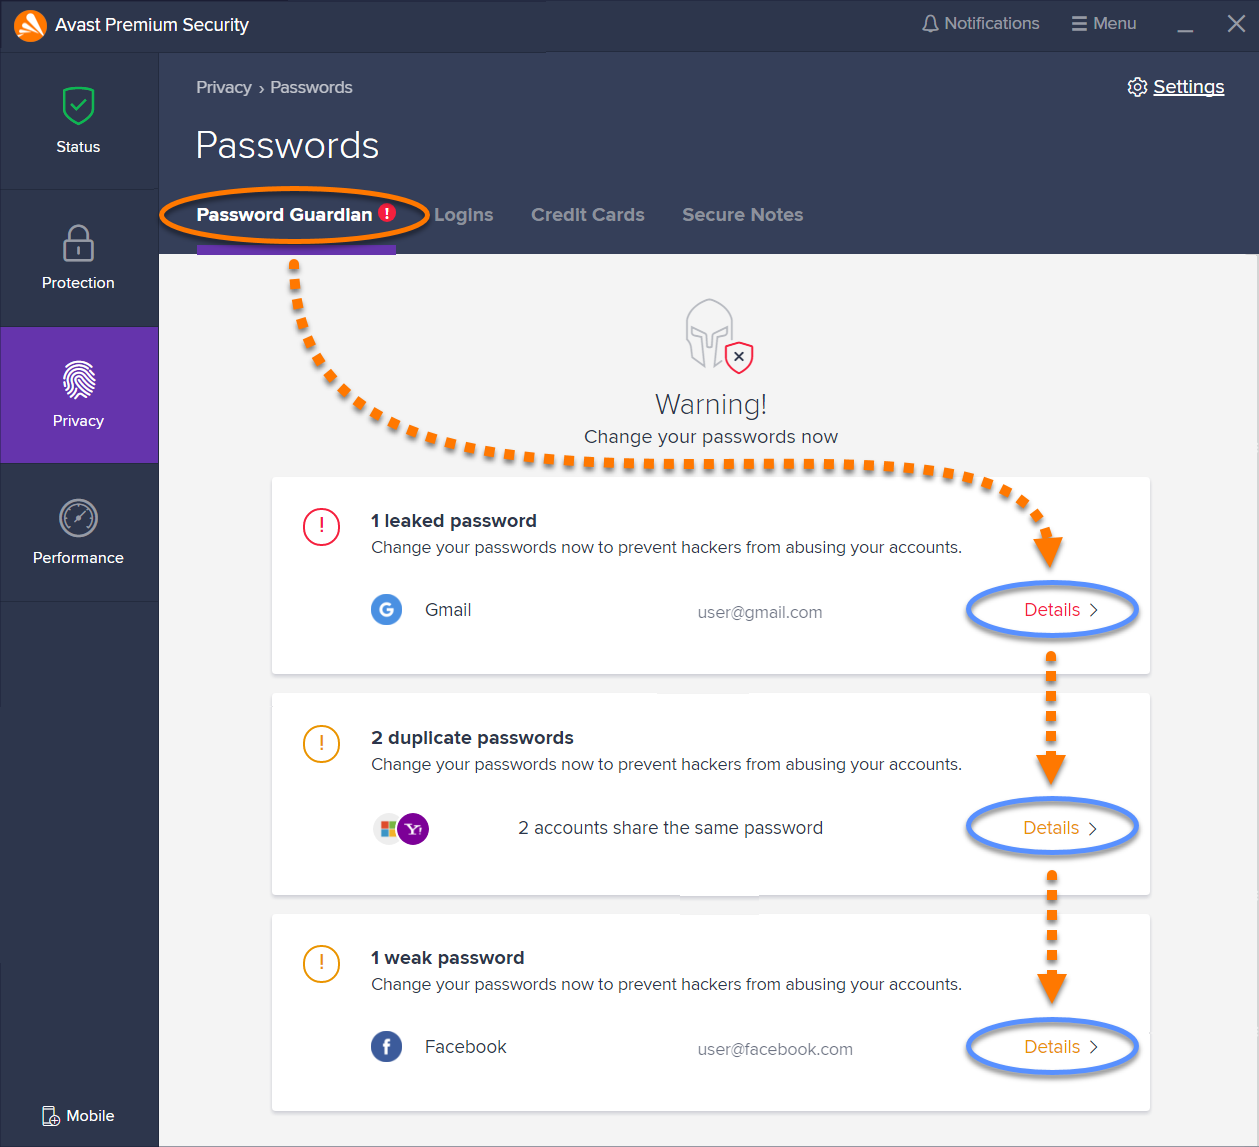
Password Guardian is a premium feature that notifies you if you have any weak, duplicated, or compromised passwords. Password Guardian is only available in Avast Ultimate or the paid version of Avast Passwords. To use Password Guardian:
- Click the Password Guardian tab on the Passwords screen.

- Click Details next to the account name you want to edit the password for.
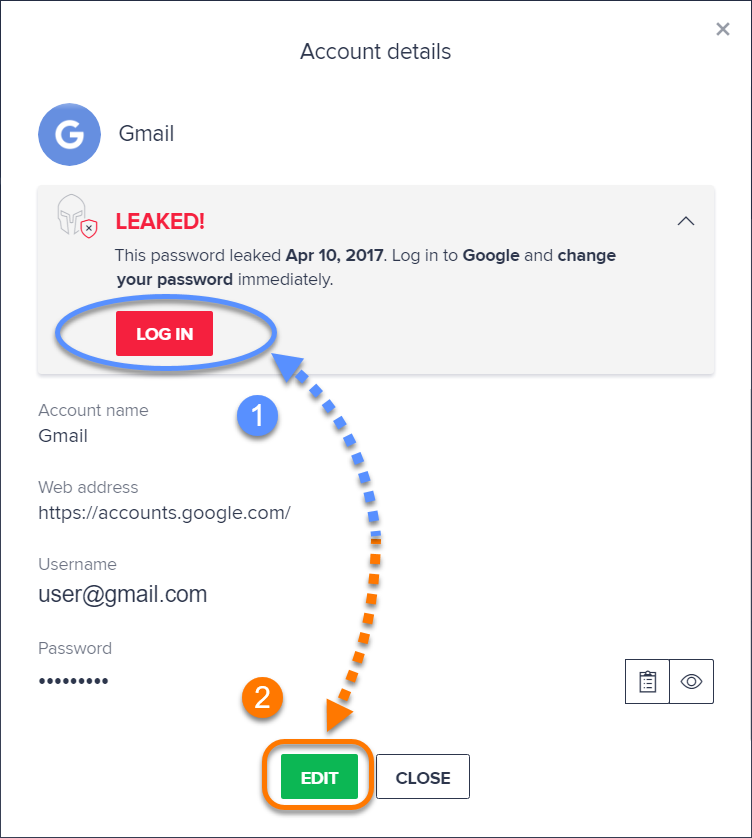
- Click Log in to change the password for the account directly on the website, then click Edit to update the password stored in Avast Passwords.

Enable One Touch Login (premium feature)
One Touch Login is a premium feature that allows you to use your Android or iOS mobile device to access Avast Passwords installed on your Windows PC. One Touch Login is only available in Avast Ultimate or the paid version of Avast Passwords. To set up and use One Touch Login, refer to the following article:
- Avast Passwords 21.x
- Avast Premium Security 21.x for Windows
- Avast Free Antivirus 21.x for Windows
- Microsoft Windows 10 Home / Pro / Enterprise / Education - 32 / 64-bit
- Microsoft Windows 8.1 / Pro / Enterprise - 32 / 64-bit
- Microsoft Windows 8 / Pro / Enterprise - 32 / 64-bit
- Microsoft Windows 7 Home Basic / Home Premium / Professional / Enterprise / Ultimate - Service Pack 1 with Convenient Rollup Update, 32 / 64-bit
Updated on: 20/12/2024


 A confirmation screen indicates that the extension is Installed.