This article explains how to resolve the issue if Network Inspector in Avast Antivirus shows the following alert:
- DNS hijack found
Description
If you see the alert above after running a Network Inspector scan:
We have found that a hacker has gained access to your router and modified your DNS settings, making you a victim of DNS hijacking. DNS hijacking is a type of malicious attack that attempts to redirect you from the website you want to visit to a fake one that may look just like it. Hackers utilize fake websites to steal your sensitive personal information, such as usernames, passwords, and credit card details.
If posssible, we strongly recommend ensuring that the Real Site feature in Avast Antivirus is enabled. This is because Real Site prevents you from being redirected to fake websites, even when your DNS settings have been hijacked. However, Real Site only protects the device where Avast Antivirus is installed. For this reason, it is also essential to secure the other devices on your network by resetting the DNS settings on your router.
Solution
Select your router brand for detailed instructions on how to reset your DNS settings:
ASUS
To configure an ASUS wireless router:
| 1. |
From the Network Inspector results screen, select Go to your router settings to open the administration page of your ASUS router. |
| 2. |
Enter your router username and password. If you do not know your login credentials, contact the party who provided the router. This is normally your Internet Service Provider (ISP). |
| 3. |
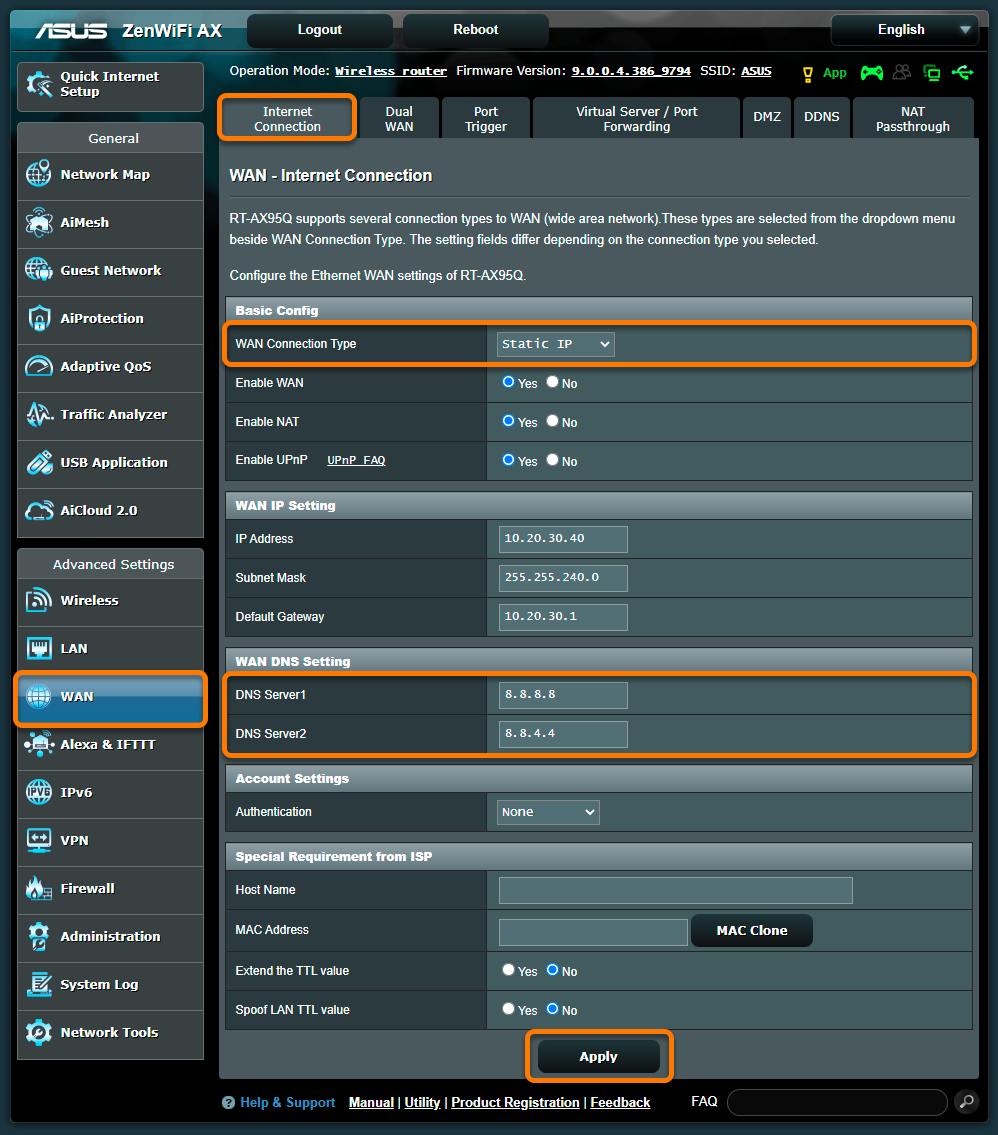
Follow the step below that matches your router settings: Go to Advanced Settings ▸ WAN ▸ Internet Connection. OR Go to IP Config ▸ WAN & LAN. OR Go to Advanced Setup ▸ WAN. Then, select your WAN Connection profile. If you see more than one connection profile in the list, follow step 4 below for each profile. |
| 4. |
Follow the relevant instructions below according to the option that is selected next to WAN Connection Type: If Static IP (or any other available option) is selected:Fill in the DNS Server 1 and DNS Server 2 fields with the IP addresses of reliable DNS servers, such as Google Public DNS, as shown below:
If Automatic IP / Dynamic IP is selected:Set Connect to DNS Server automatically to Yes under WAN DNS Setting. If this option is already enabled, follow the additional steps below:
|
| 5. |
Confirm your changes by selecting Apply or Save, and reboot your router if necessary. If Network Inspector continues to show the DNS hijack found alert after following all of the instructions above, we recommend contacting your ISP, as the DNS servers provided by your ISP may have been hijacked. |
If WAN Connection Type is set to Static IP (or any other available option):
If WAN Connection Type is set to Automatic IP / Dynamic IP:

Belkin
To configure a Belkin wireless router:
| 1. |
From the Network Inspector results screen, select Go to your router settings to open the administration page of your Belkin router. |
| 2. |
Enter your router username and password. If you do not know your login credentials, contact the party who provided the router. This is normally your Internet Service Provider (ISP). |
| 3. |
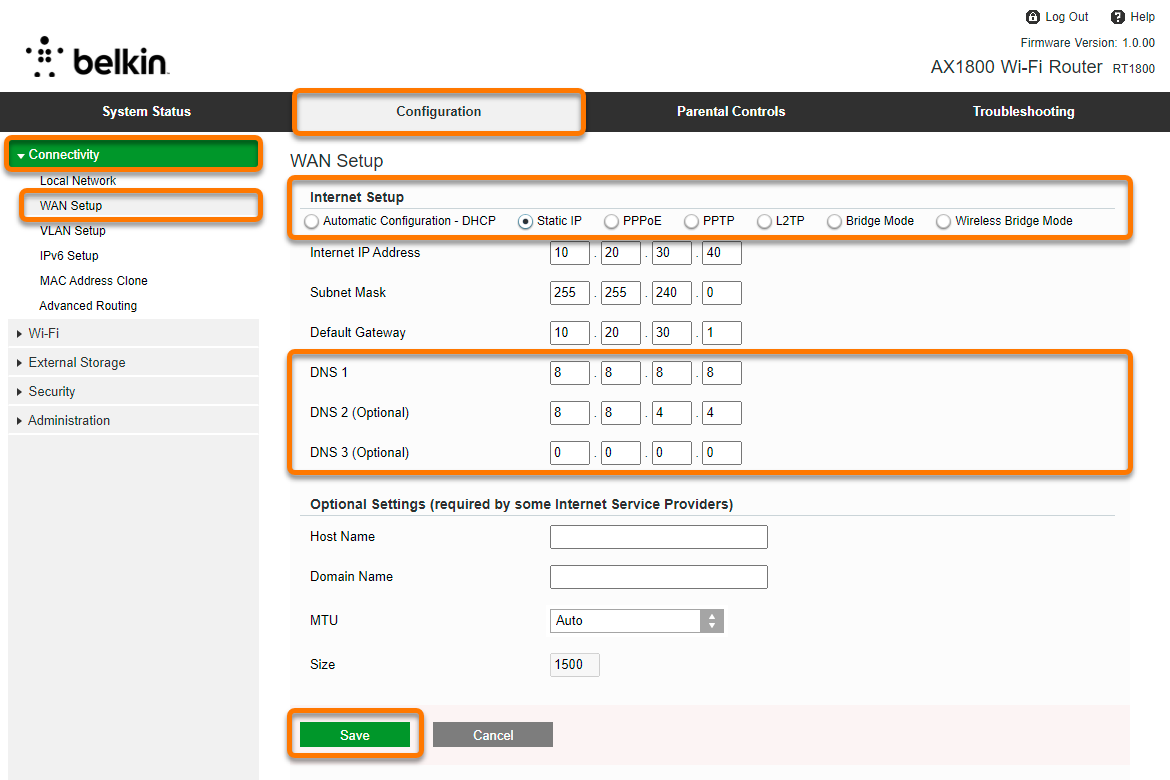
Go to Configuration ▸ Connectivity ▸ WAN Setup. |
| 4. |
Follow the relevant instructions below according to the option that is selected under WAN Setup: If Static IP (or any other available option) is selected:Fill in the DNS fields with the IP addresses of reliable DNS servers, such as Google Public DNS, as shown below:
If Automatic Configuration - DHCP is selected:
|
| 5. |
Confirm your changes by selecting Save, and reboot your router if necessary. If Network Inspector continues to show the DNS hijack found alert after following all of the instructions above, we recommend contacting your ISP, as the DNS servers provided by your ISP may have been hijacked. |
If WAN Setup is set to Static IP (or any other available option):
If WAN Setup is set to Automatic Configuration - DHCP:


Cisco
To configure a Cisco wireless router:
| 1. |
From the Network Inspector results screen, select Go to your router settings to open the administration page of your Cisco router. |
| 2. |
Enter your router username and password. If you do not know your login credentials, contact the party who provided the router. This is normally your Internet Service Provider (ISP). |
| 3. |
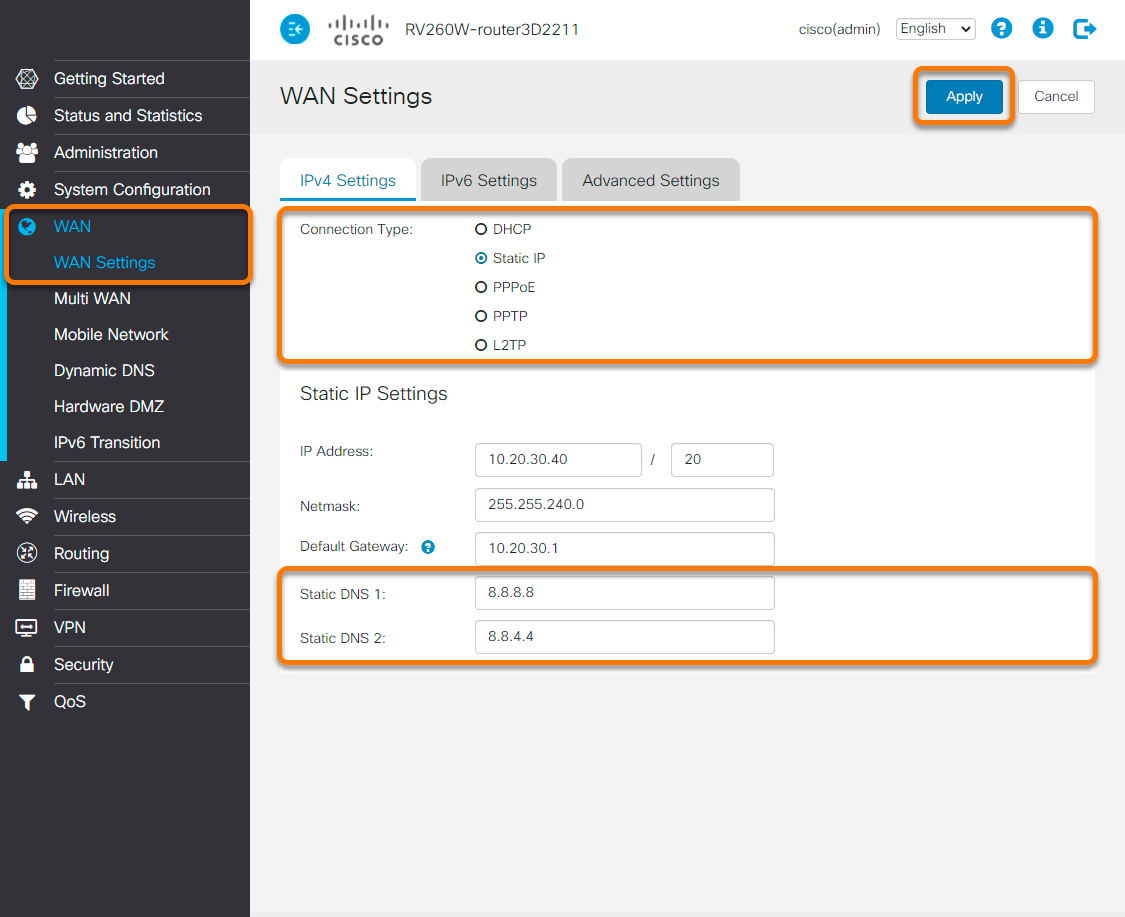
Go to WAN ▸ WAN Settings. |
| 4. |
Follow the relevant instructions below according to the option that is selected for Connection Type: If Static IP (or any other available option) is selected:Fill in the Static DNS 1 and Static DNS 2 fields with the IP addresses of reliable DNS servers, such as Google Public DNS, as shown below:
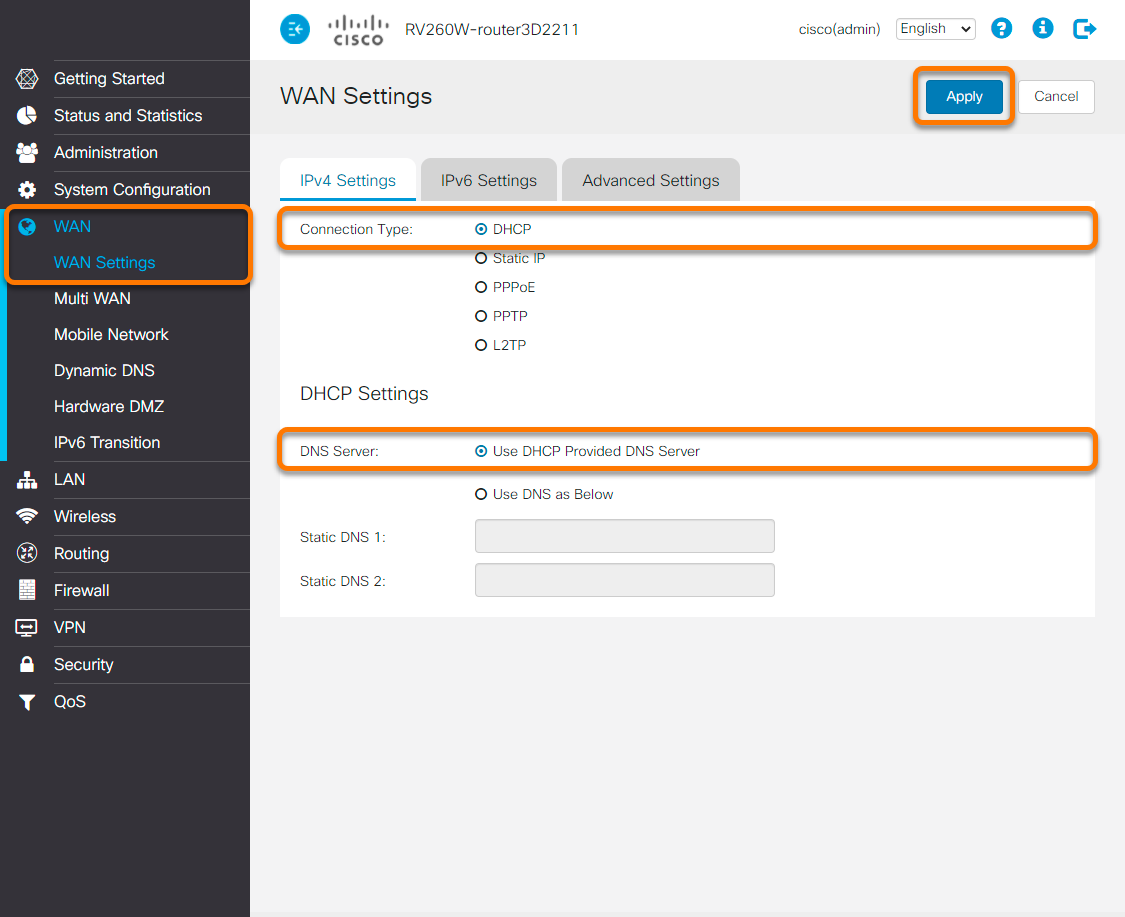
If DHCP is selected:Select Use DHCP Provided DNS Server under DHCP Settings. If this option is already enabled, follow the additional steps below:
|
| 5. |
Confirm your changes by selecting Apply, and reboot your router if necessary. If Network Inspector continues to show the DNS hijack found alert after following all of the instructions above, we recommend contacting your ISP, as the DNS servers provided by your ISP may have been hijacked. |
If Connection Type is set to Static IP (or any other available option):
If Connection Type is set to DHCP:
D-Link
To configure a D-Link wireless router:
| 1. |
From the Network Inspector results screen, select Go to your router settings to open the administration page of your D-Link router. |
| 2. |
Enter your router username and password. If you do not know your login credentials, contact the party who provided the router. This is normally your Internet Service Provider (ISP). |
| 3. |
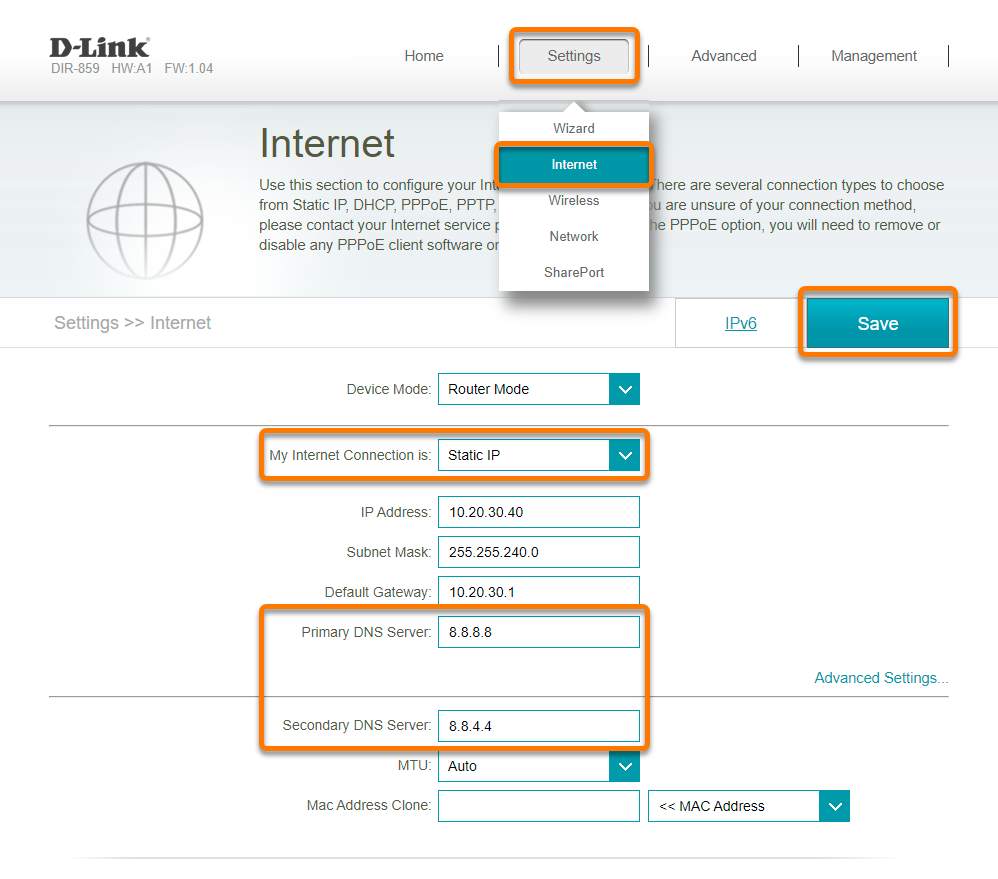
Follow the step below that matches your router settings: Go to Settings ▸ Internet. OR Go to Setup ▸ Internet. OR Go to Setup ▸ Internet Connection. |
| 4. |
Follow the relevant instructions below according to the option that is selected next to My Internet Connection is: If Static IP (or any other available option) is selected:Fill in the Primary DNS Server and Secondary DNS Server fields with the IP addresses of reliable DNS servers, such as Google Public DNS, as shown below:
If Dynamic IP (DHCP) is selected:
|
| 5. |
Confirm your changes by selecting Save or Save settings, and reboot your router if necessary. If Network Inspector continues to show the DNS hijack found alert after following all of the instructions above, we recommend contacting your ISP, as the DNS servers provided by your ISP may have been hijacked. |
If My Internet Connection is set to Static IP (or any other available option):
If My Internet Connection is set to Dynamic IP (DHCP):

Huawei
To configure a Huawei wireless router:
| 1. |
From the Network Inspector results screen, select Go to your router settings to open the administration page of your Huawei router. |
| 2. |
Enter your router username and password. If you do not know your login credentials, contact the party who provided the router. This is normally your Internet Service Provider (ISP). |
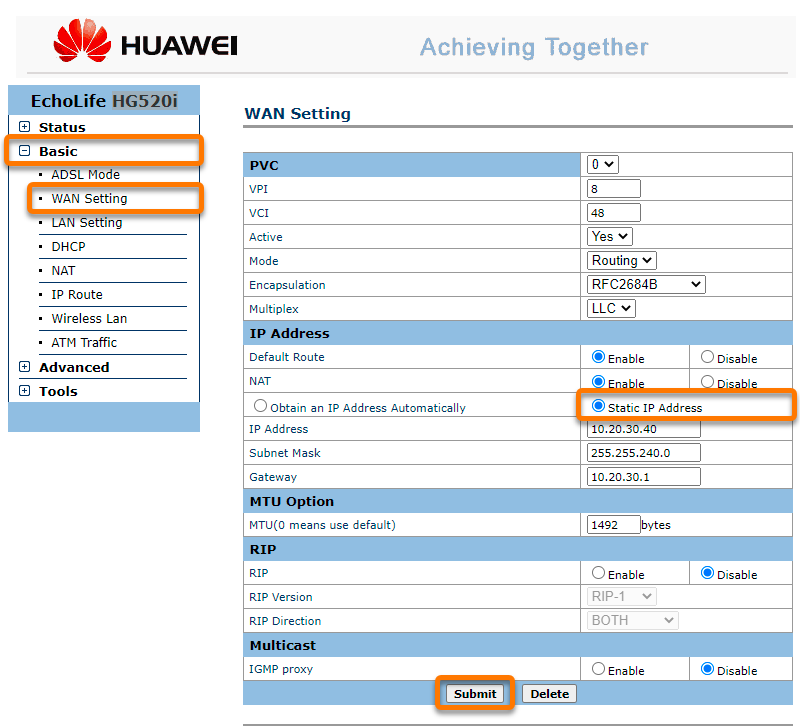
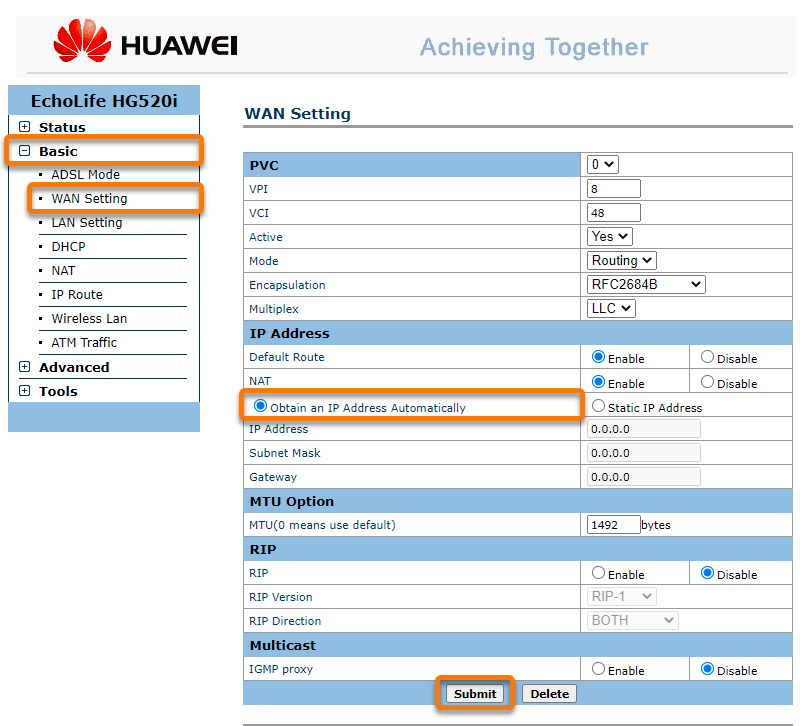
| 3. |
Follow the step below that matches your router settings: Select Basic and go to either WAN Setting or WAN. Then, select your PVC or WAN Connection profile. If you see more than one connection profile in the list, follow step 4 below for each profile. OR Go to Basic ▸ DHCP. |
| 4. |
Follow the relevant instructions below according to the option that is selected in the IP Address section: If Static IP (or any other available option) is selected:Go to Basic ▸ DHCP, and fill in the Primary DNS Server and Secondary DNS Server fields with the IP addresses of reliable DNS servers, such as Google Public DNS, as shown below:
If Obtain an IP Address Automatically is selected:
|
| 5. |
Confirm your changes by selecting Submit, and reboot your router if necessary. If Network Inspector continues to show the DNS hijack found alert after following all of the instructions above, we recommend contacting your ISP, as the DNS servers provided by your ISP may have been hijacked. |
If IP Address is set to Static IP (or any other available option):

If IP Address is set to Obtain an IP Address Automatically:

Linksys
To configure a Linksys wireless router:
| 1. |
From the Network Inspector results screen, select Go to your router settings to open the administration page of your Linksys router. |
| 2. |
Enter your router username and password. If you do not know your login credentials, contact the party who provided the router. This is normally your Internet Service Provider (ISP). |
| 3. |
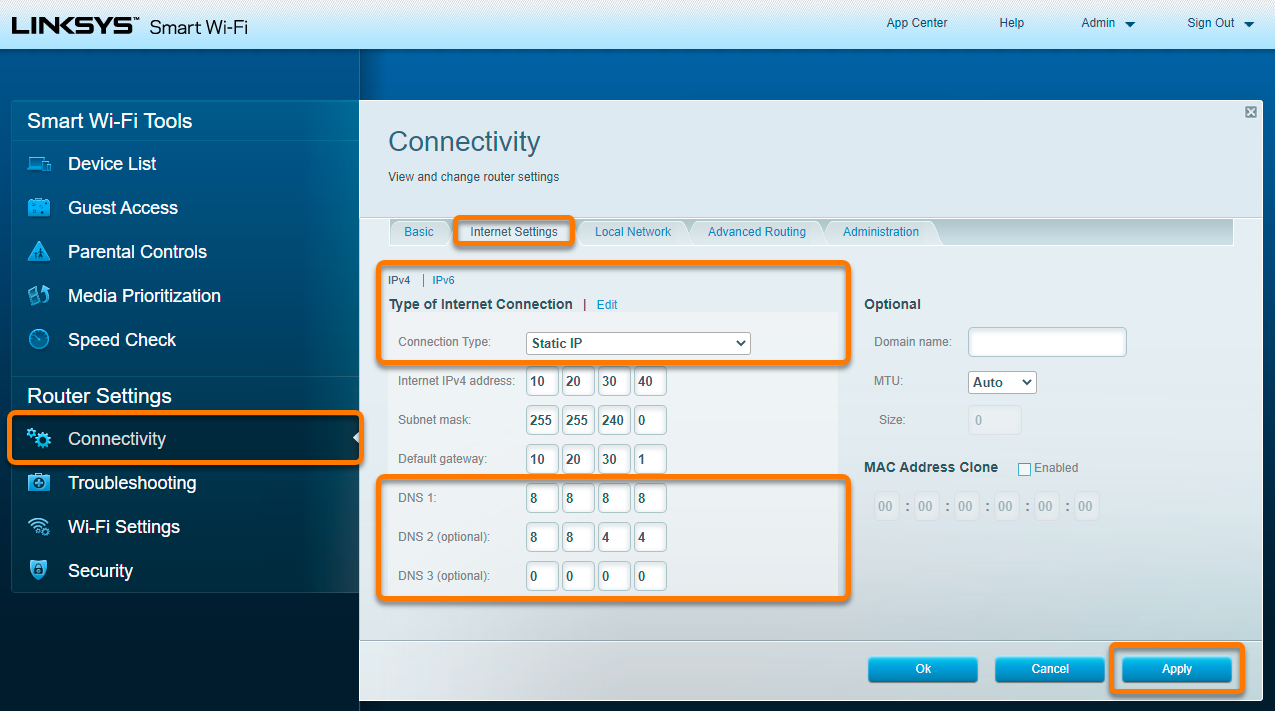
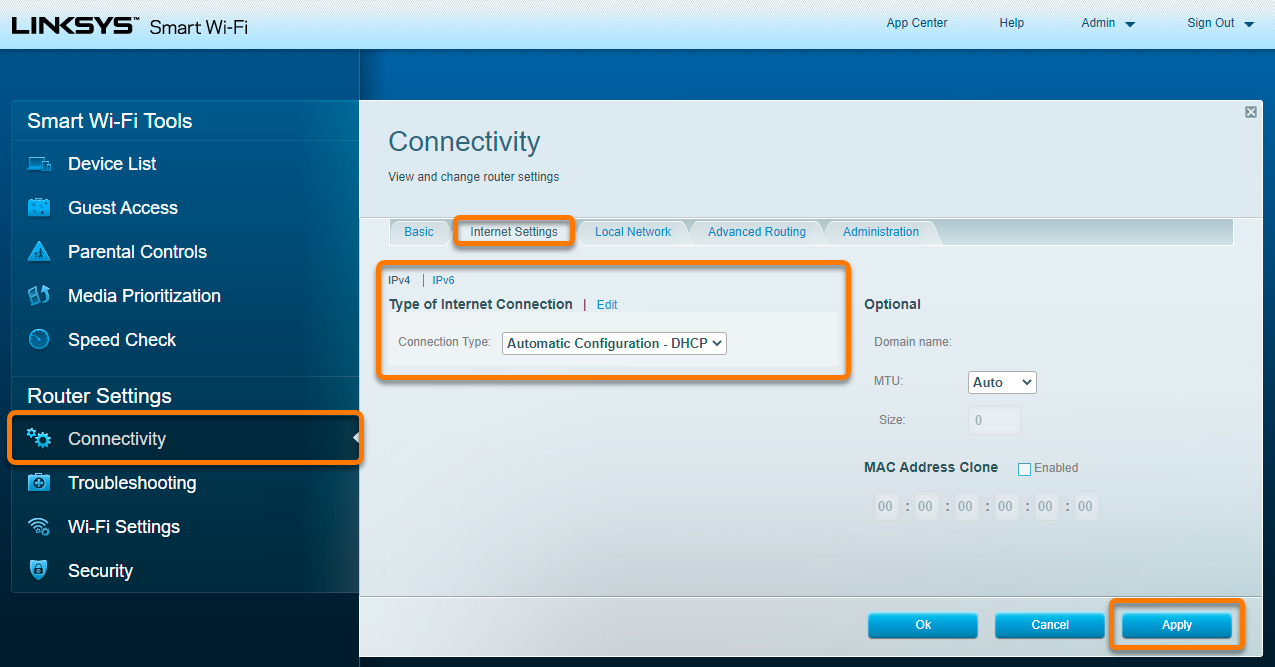
Follow the step below that matches your router settings: Go to Connectivity ▸ Internet Settings ▸ IPv4 ▸ Type of Internet Connection ▸ Edit. OR Go to Setup ▸ Basic Setup ▸ Internet Setup. |
| 4. |
Follow the relevant instructions below according to the option that is selected next to Connection Type: If Static IP (or any other available option) is selected:Fill in the DNS 1, DNS 2, and DNS 3 fields with the IP addresses of reliable DNS servers, such as Google Public DNS, as shown below:
If Automatic Configuration - DHCP is selected:
|
| 5. |
Confirm your changes by selecting Apply or Save settings, and reboot your router if necessary. If Network Inspector continues to show the DNS hijack found alert after following all of the instructions above, we recommend contacting your ISP, as the DNS servers provided by your ISP may have been hijacked. |
If Connection Type is set to Static IP (or any other available option):
If Connection Type is set to Automatic Configuration - DHCP:

NETGEAR
To configure a NETGEAR wireless router:
| 1. |
From the Network Inspector results screen, select Go to your router settings to open the administration page of your NETGEAR router. |
| 2. |
Enter your router username and password. If you do not know your login credentials, contact the party who provided the router. This is normally your Internet Service Provider (ISP). |
| 3. |
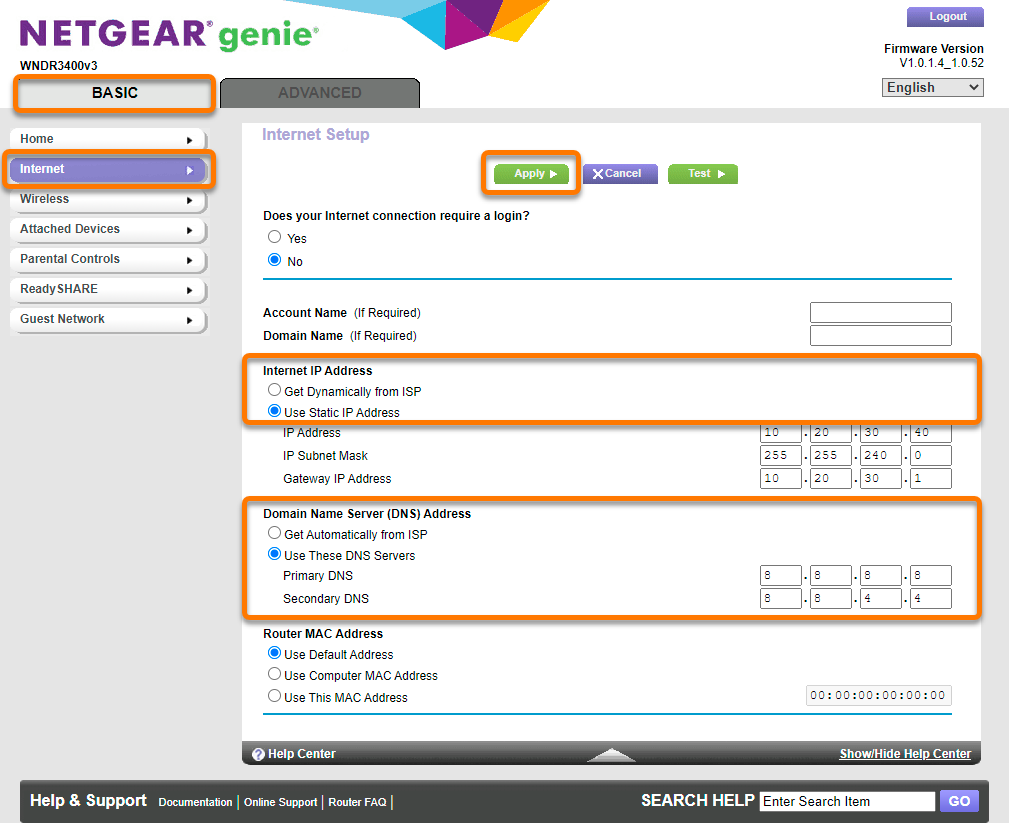
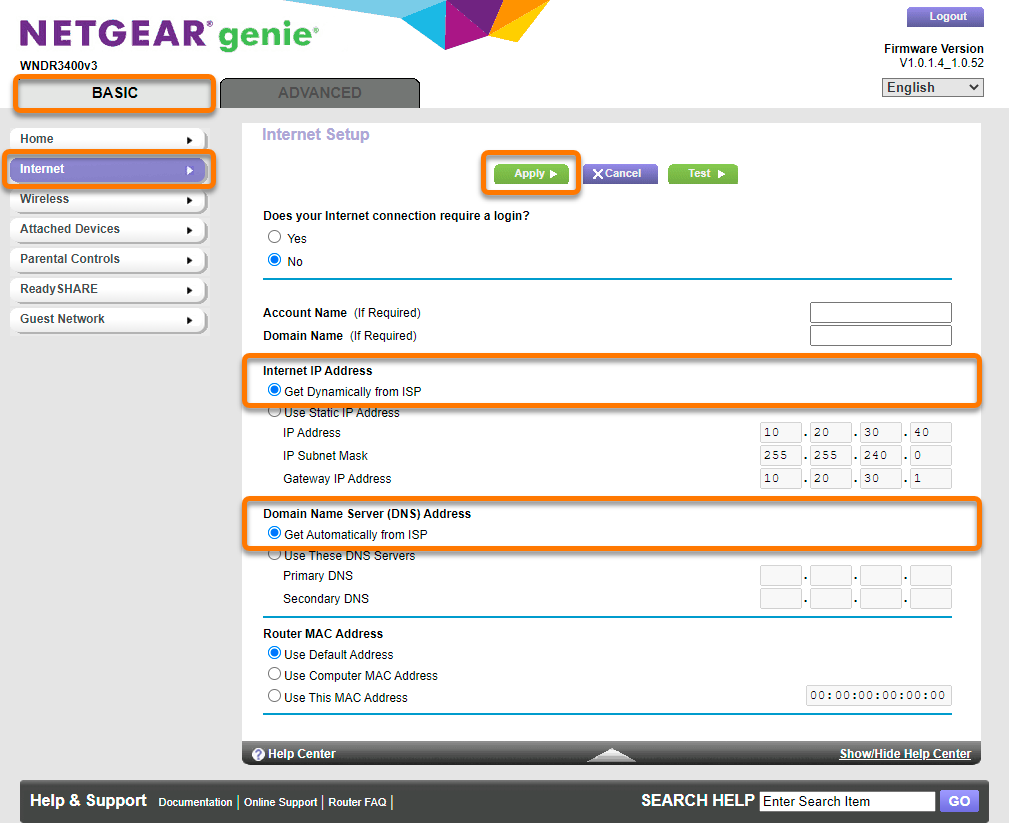
Follow the step below that matches your router settings: Go to Basic ▸ Internet. OR Go to Advanced ▸ Setup ▸ Internet Setup. OR Go to Setup ▸ Basic Settings. |
| 4. |
Follow the relevant instructions below according to the option that is selected under Internet IP Address: If Use Static IP Address (or any other available option) is selected:Under Domain Name Server (DNS) Address, fill in the Primary DNS and Secondary DNS fields with the IP addresses of reliable DNS servers, such as Google Public DNS, as shown below:
If Get Dynamically from ISP is selected:Under Domain Name Server (DNS) Address, select Get Automatically from ISP. If this option is already enabled, follow the additional steps below:
|
| 5. |
Confirm your changes by selecting Apply, and reboot your router if necessary. If Network Inspector continues to show the DNS hijack found alert after following all of the instructions above, we recommend contacting your ISP, as the DNS servers provided by your ISP may have been hijacked. |
If Internet IP Address is set to Use Static IP Address (or any other available option):
If Internet IP Address is set to Get Dynamically from ISP:
TP-Link
To configure a TP-Link wireless router:
| 1. |
From the Network Inspector results screen, select Go to your router settings to open the administration page of your TP-Link router. |
| 2. |
Enter your router username and password. If you do not know your login credentials, contact the party who provided the router. This is normally your Internet Service Provider (ISP). |
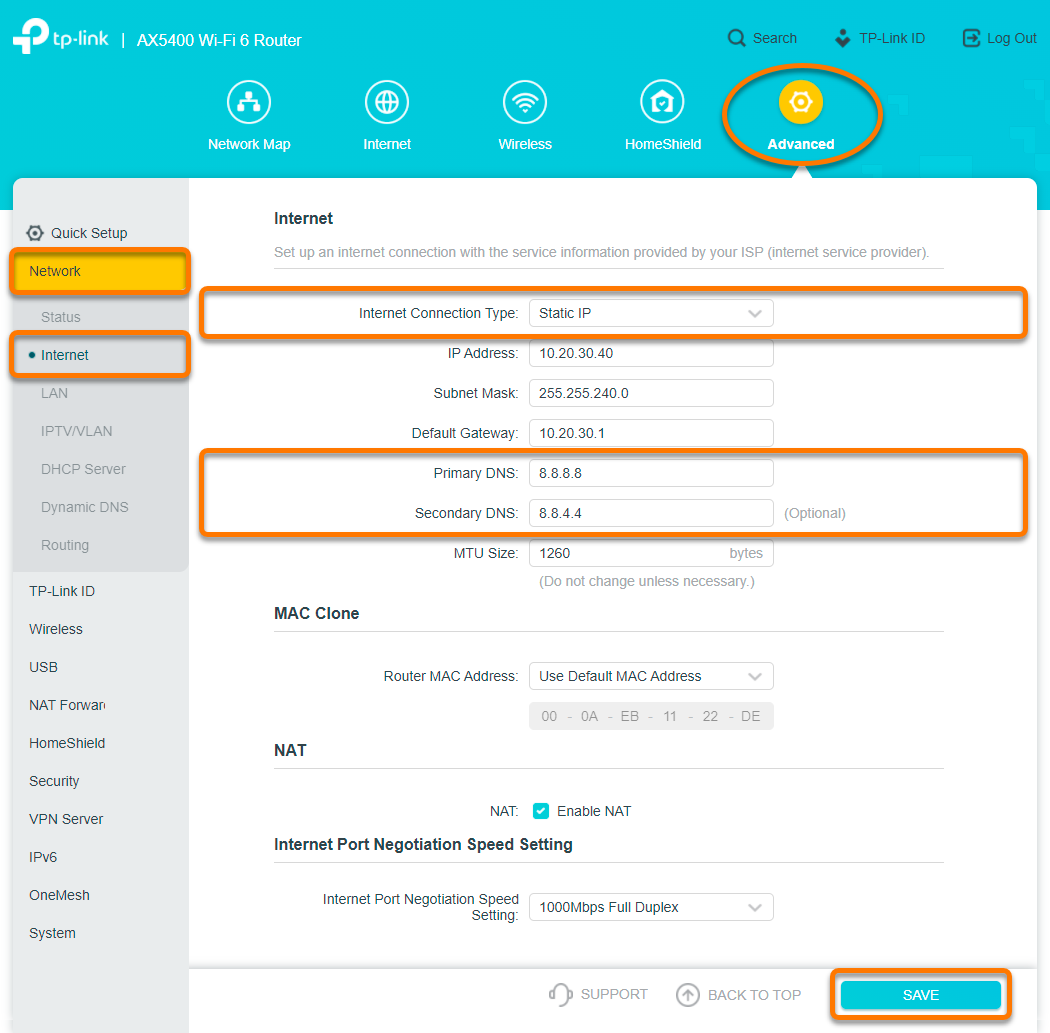
| 3. |
Go to Advanced ▸ Network ▸ Internet. |
| 4. |
Follow the relevant instructions below according to the option that is selected next to Internet Connection Type: If Static IP (or any other available option) is selected:Fill in the Primary DNS and Secondary DNS fields with the IP addresses of reliable DNS servers, such as Google Public DNS, as shown below:
If Dynamic IP is selected:Select the Advanced Settings panel, and select Get Dynamically from ISP next to DNS Address. If this option is already enabled, follow the additional steps below:
|
| 5. |
Confirm your changes by selecting Save, and reboot your router if necessary. If Network Inspector continues to show the DNS hijack found alert after following all of the instructions above, we recommend contacting your ISP, as the DNS servers provided by your ISP may have been hijacked. |
If Internet Connection Type is set to Static IP (or any other available option):
If Internet Connection Type is set to Dynamic IP:

TRENDnet
To configure a TRENDnet wireless router:
| 1. |
From the Network Inspector results screen, select Go to your router settings to open the administration page of your TRENDnet router. |
| 2. |
Enter your router username and password. If you do not know your login credentials, contact the party who provided the router. This is normally your Internet Service Provider (ISP). |
| 3. |
Go to Advanced ▸ Setup ▸ WAN Settings. |
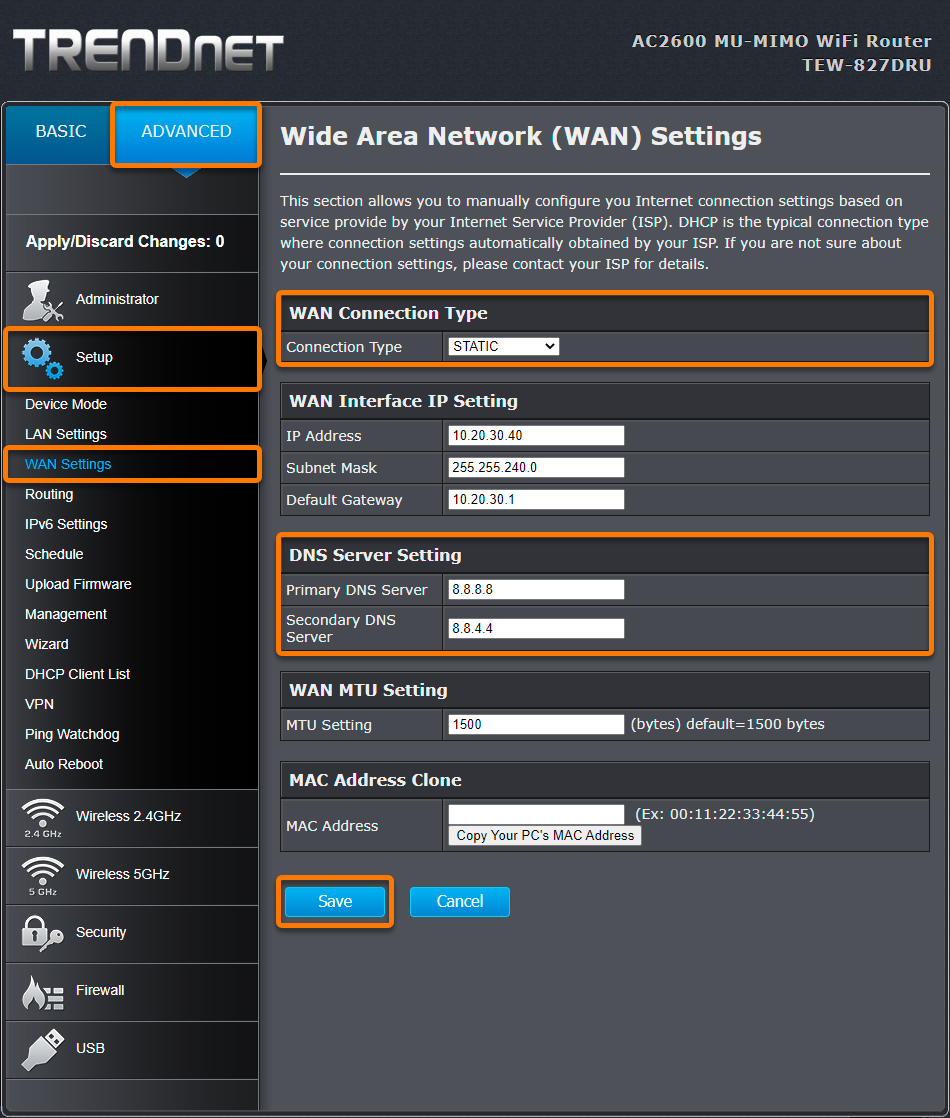
| 4. |
Follow the relevant instructions below according to the option that is selected under WAN Connection Type: If STATIC (or any other available option) is selected:Under DNS Server Setting, fill in the Primary DNS Server and Secondary DNS Server fields with the IP addresses of reliable DNS servers, such as Google Public DNS, as shown below:
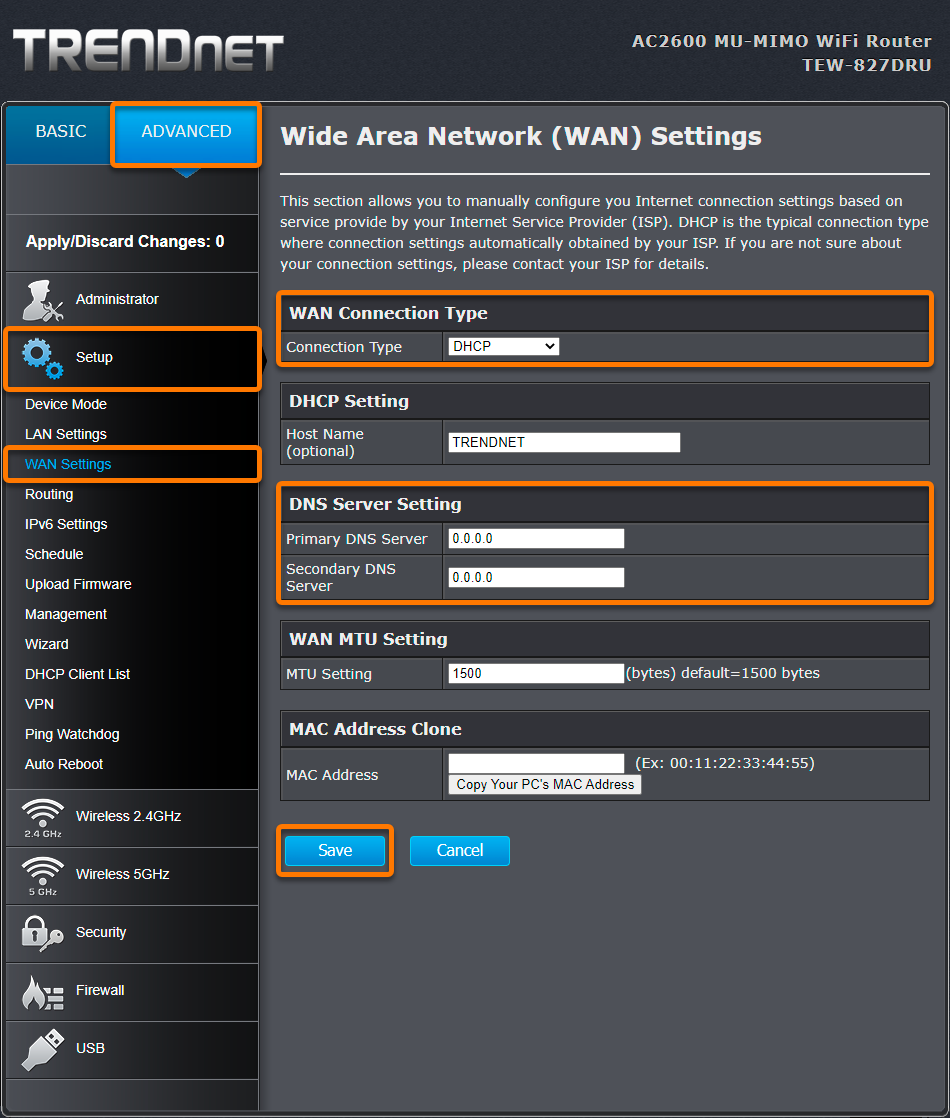
If DHCP is selected:
|
| 5. |
Confirm your changes by selecting Save, and reboot your router if necessary. If Network Inspector continues to show the DNS hijack found alert after following all of the instructions above, we recommend contacting your ISP, as the DNS servers provided by your ISP may have been hijacked. |
If WAN Connection Type is set to STATIC (or any other available option):
If WAN Connection Type is set to DHCP:
Other routers
Below are links to the support pages for other router brands:
Apple | AT&T | Dell | DrayTek | Eero | GL.iNET | Google | MicroTik | Motorola | NEC | Sagem/Sagemcom | Speedefy | Ubiquiti | UniFi | Vodafone | ZyXEL
To configure a wireless router:
| 1. |
From the Network Inspector results screen, select Go to your router settings to open the administration page of your router. |
| 2. |
Enter your router username and password. If you do not know your login credentials, contact the party who provided the router. This is normally your Internet Service Provider (ISP). |
| 3. |
Find the Internet settings section (may also be listed as WAN, Connection, Broadband, Basic settings/setup, or similar). OR Find the separate DNS configuration section. |
| 4. |
Follow the relevant instructions below according to the option that is selected next to Connection type (or WAN connection type):
Static IP (or any other available option)Fill in the DNS Server fields with the IP addresses of reliable DNS servers, such as Google Public DNS, as shown below:
Automatic Configuration (may also be called DHCP, Dynamic IP, or similar)If available, enable the additional option to set your DNS configuration to automatic. If this setting is available, it may be listed as Get dynamically / automatically from ISP, Connect to DNS server automatically, or similar. If this option is available but it is already enabled, follow the additional steps below:
If you do not see the option to set your DNS configuration to automatic, ensure that the DNS Server fields are blank or set to |
| 5. |
Confirm your changes (select Save settings, Update, OK, or similar), and reboot your router if necessary. If Network Inspector continues to show the DNS hijack found alert after following all of the instructions above, we recommend contacting your ISP, as the DNS servers provided by your ISP may have been hijacked. |
- Avast One 22.x for Windows
- Avast One 22.x for Mac
- Avast Premium Security 22.x for Windows
- Avast Free Antivirus 22.x for Windows
- Avast Premium Security 15.x for Mac
- Avast Security 15.x for Mac
- Microsoft Windows 11 Home / Pro / Enterprise / Education
- Microsoft Windows 10 Home / Pro / Enterprise / Education - 32 / 64-bit
- Microsoft Windows 8.x / Pro / Enterprise - 32 / 64-bit
- Microsoft Windows 8 / Pro / Enterprise - 32 / 64-bit
- Microsoft Windows 7 Home Basic / Home Premium / Professional / Enterprise / Ultimate - Service Pack 1 with Convenient Rollup Update, 32 / 64-bit
- Apple macOS 12.x (Monterey)
- Apple macOS 11.x (Big Sur)
- Apple macOS 10.15.x (Catalina)
- Apple macOS 10.14.x (Mojave)
- Apple macOS 10.13.x (High Sierra)
- Apple macOS 10.12.x (Sierra)
- Apple Mac OS X 10.11.x (El Capitan)
Updated on: 02/06/2022